Search the Community
Showing results for tags 'Trumpeter'.
-
 Sources: http://www.britmodeller.com/forums/index.php?/topic/234951965-trumpeter-new-tools-148-f-106-testshots/ http://www.arcforums.com/forums/air/index.php?showtopic=270956 Strange. Interesting images but no source... Just the topic title announcing a 1/48th Convair F-106 Delta Dart by Trumpeter. Prototype pics are from a F-106B. Looks like a Monogram kit revisited. Bad news for the similar (I mean the single seat F-106A) AvantGarde Model project. Wait and see. V.P.
 -
 Hello everyone. For those who have been following my build thread here: Build Thread Here are the final pics for the Trumpeter F-100C, all ready for inspection: Oops, just noticed the slats are at two different angles. Have to fix that! Like many a lady, she's not perfect, but she is very pretty. Kudos to Lt. Col George Laven, who thought of the color scheme first! Hope you enjoy, Ed
 -
Hi Guys, While working on my P-51´s I thought I need something different and I started to paint the superb Academy F-4 pilots. Looking thru my stash, my eyes spotted the nice looking T-38A from Trumpeter in 1/48. It took only a few seconds to check the fit of the two guys in the new cockpit. A new projekt was born! More pictures can be found here: http://petesmancave.blogspot.de/p/trumpeter-t-38a-talon.html Hope you like! Pete
-
 I built this one straight after doing a MiG-29S as part of a recent Mig-mania spree All the pros and cons of Trumpeter's Fulcrum kits are here. The pros: very good fit and exquisite surface detail. The cons: bad nose fit needs a lot of filling and sanding which will wipe out the detailing and require a delicate rescribe. It's annoying but not a deal breaker in my opinion. Trumpeter's narrow canopy issue is carried over to both the S and SMT kits despite having a chance to correct it since the upper fuselage is a completely different piece in each of its kits. Most glaring, however, is that only ONE Krypton missile is included despite the manual and box suggesting that two are in the kit. What was Trumpeter thinking?!? There are also only decals for one of them so something clearly got lost in the chain of command. This is really annoying as it forced me to use an asymmetric weapons load which I'm not sure the Russians do. Unrealistic? Probably. But at least I got to use this lovely monster missile. Decals were entirely from the kit, there's not that much variety anyway. Went down well with just one pass of Microsol after applying. Now, an issue with camo which hopefully will help any modellers having a go at the kit or the upcoming Zvezda version: the AKAN set is woefully inaccurate! I know, this is shocking, since AKAN is the gold standard for Russian colors. But I think they really messed up this one. There are two sets, one which depicts the older green splinter camo, and another which has the more recent grey splinter. The only difference in both sets is the presence of the classic Fulcrum grey/green vs the new dark grey. All other five colors are the same ones. The problem is that none of the other greys appear to match the real thing, they all have a beige-ish tint that is inappropriate. Which means the set is a complete waste of money since only the dark grey is useful (the other useful colors, the radome grey and the wheel green are in the basic Fulcrum set so if you have that, you're sorted). Since none of the greys matched the real thing, I used the following. For the light grey, I used Vallejo 36495. It looks the part although some SMT pics show it slightly darker. I guess you can't go wrong with any light neutral grey. For the medium grey I used the dark grey lightened up with the off white at about a 1:4 ratio. I was quite pleased with the mix. The dark camo is the dark grey which I do think is the only accurate color in the set. I am £17 or so poorer... but wiser. With knowledge of the camo colors, I want another go at the SMT so will probably do the Zvezda once it comes out next month. I especially like that it will come with a much greater variety of air-to-ground ordinance. Until then, enjoy the pics. Despite the issues, I am quite happy about how the kit came out!
- 13 replies
-
- 39
-

-
Hi everyone, Have not posted much lately but that has not stopped the modelling. I'm on a bit of a Fulcrum spree and here's a go at the 1/72 Trumpeter MiG-29S painted in Ukrainian markings. I was aiming to build one of the gorgeous blue/gray camo birds but could not find decals to make any of the units that I have photographic proof of their existence. The next best was to build a possibly fictitious Blue 02 based on the Blue 01 in one of the Hasegawa kits and with the decals coming from the wonderful (and huge!) Begemot set. Comments on the kit and the build: Build: I love Trumpeter's Fulcrum kit. It has fantastic fit although some accuracy issues, namely a non-existent "step" between wing and fuselage, as well as a canopy that tapers too much in the rear, although this is not too obvious if left open. I don't think these are kit killers, and I strongly recommend it otherwise. However, my main gripe is the fit of the nose, the one area that truly deserves attention. It inevitably requires filling and sanding which will annihilate the panel detail and require a delicate rescribe. Zvezda found a much more convenient way of engineering the nose that avoids this. Aside from that, most of everything falls in well. Camo: I have the AKAN kit for the standard MiG-29 which provides the camo gray as well as the radome gray. The question was how to make the lovely Ukrainian light blue. After mulling over mixes I realized that it looks a lot like USAF Air Superiority Blue. Unfortunately, only Lifecolor makes it in acrylic and it looks a bit dull vs the Ukrainian shade. I then saw that Gunze has it in its Mr Color range (sadly not in its Aqueous range). I'm not a fan of spraying anything other than acrylics but I had no choice this time. The result was great and it is certainly a brighter shade than Lifecolor and closer to the real thing. Decals: Markings come from the Begemot set from an unrelated unit. The stencils come from the kit. Trumpeter's decals were excellent: went down like a charm after a single coat of Microsol and no silvering either. They were also super thin. Unfortunately, I am not quite sure whether they are 100% accurate. For example, there are no nose stencils (aside from the radioactive warning) even though these appear in pics. Also the prominent semi-circular stencil on the starboard fin is not included. Most annoying was that there were no fuel tank decals. I borrowed them instead from a MiG-29SMT kit. Conclusion: It's a great kit with the only major issues being the nose fit and the inaccurate decals. In this sense, the Zvezda is the kit to beat for a truly accurate MiG-29S. Unfortunately, the Zvezda has no rivet detail and therefore looks a bit plain in comparison to the beautiful detailing on this one (I have the Zvezda but have not built it). It also annoys me that Zvezda has the upper air intakes molded closed. Yes, I know they are typically closed when on the tarmac but they look so much cooler open. That said, there are no air-to-ground weaponry on this kit, which the Zvezda does include to represent the MiG-29S's modest ground attack capability. I hope to do a Zvezda kit in the near future and compare side by side. In the meantime, enjoy:
-
Hiya. Here's my latest project. After few WWII vehicles. I wanted to go for something modern. Few years back I was in Berlin and found a hobby shop. I bought Trumpeter's Grizzly for a bargain price as box was a little damaged. This is an outcome of this. Trumpeter's Canadian AVGP Grizzly. I read few reviews indicating that model is full of mistakes. Maybe it is, but it's fun to build and - in my case - for painting colour modulation training. See for yourself. That's it. As I said, it was great fun to build. Hope you like this. Thanks for watching. Dawid
- 11 replies
-
- 10
-
-
- AVGP Grizzly
- 1/35
- (and 1 more)
-
Hi there, I'm going to be doing a trumpeter DH.100 Vampire, not sure which scheme yet, have to have a think about that. See you soon!
-
Hiya, folks. I finished my Willys, so it's time for something new. This time I decided to build something more modern. I found this Grizzly in my stash. I bought it once in Berlin for a bargain price due to the box damage. It's an easy to build (i hope) model with no interior. It has lotsa mistakes - too bad. I'll try co correct some of them. Here's what's inside the box: But first, the box itself... Rubber tires. Some PE parts. Clear parts. And the sprues. The Hull. I also started on lower hull and suspension. So far everything fits fine, no problems. Some more details added. Some close-ups. As lower hull is nearly done, I'm gonna go for upper one. First I'll fill these 3 holes in the center of the image. They are incorect, the hull should be flat. That is it for now. Cheers. DAwid
-
When you say 1/32nd and Tomcat together most people think "Tamiya" but this project involves the new kid on the block - Trumpeter. You may have heard or read positive or negative things about this kit and to be fair it has a few peculiarities which are somewhat of a Trumpeter trademark. So many areas are damn good and then you discover areas where the usual designer must have gone for break and some crazy guy adds a few parts which do not match the rest of the kit. So let's get started by taking a peek at this rather large pudycat. This is no ordinary box, it is also a piece of luggage and comes complete with it's own carry handle and strong securing points to stop the box from opening unless you really want it to. When you do reveal the inside it is packaged very well with separate boxes and containers to protect the contents. The upper and lower fuselage halves come together in their own plastic tray with a clear cover, this should mean that they stay stress free and do not become out of shape. This kit comes with three decal options, all light-gull grey over white schemes. VF-1 Wolfpack, VF-84 Jolly Rogers and VF-111 Sundowners. But enough of this hear you cry! This is supposed to be a WIP and not a review so let's start at the beginning which is the best place to start so I'm told. For those of you thinking that Trumpeter supply a nicely moulded set of throttle handles to go on the phallic gesture sticking up - you'd be wrong as that's it! Deep breaths now and put it down to that crazy guy having his fun whilst the real designer went to the loo. You'll see more of this later. The kit comes supplied with another cockpit tub and instrument panels for an F-14B, so I put aside the original "A" cockpit tub and went to town on the "B" version. Starting by sanding down all the side console detail as I intended to try something using the Eduard cockpit etch in a new and unusual way. I dislike working with photo etch parts so scanned the fret on the computer where I could correct and change certain bits and then print out what I needed on to matt photo paper. More on how this worked out later on. The F-14A should have two circuit breaker panels inside the pilot's foot well so some surgery was required.
-
Here's my 1/35 Trumpeter BTR 80A. It's a great kit but you must get the sit of the suspension right early doors - I didn't as you will see. I tried to sag the tyres with small screws but I was in great danger of wrecking the hubs and adjusting the screws when the wheels were on was tricky Painted with Vellejo acrylics which I still find tricky to get consistent results from but does give authentic looking colour I think. The KFOR script was done with some stencils I picked up which I was pleased with. Let me know what you think - plenty still to learn but getting there Cheers David
- 12 replies
-
- 19
-
-
Hi folk's sad but my aircraft mojo has gone on vacation I get a project out,stare at it and put it back so as I,m building the last subject in my other armour thread I thought as a companion to the Chieftain next up would be it's replacement. The kit comes in a sturdy box with lid. And the box is packed with sprue's. Must get a bigger table! Some beautifully molded parts,vinyl track's which actually bend with each link and a little fret of PE.There are a lot of extra parts in the box including a dozer blade and fitting's. Should get started soon.
-
Hello First thing I've posted in two years (or something like that), first thing I've finished in a long time and my first armour model since my early teen years So, this is Trumpeter's T-54B in 1/72, straight out of the box. I had great difficulties with the tracks, they really don't take regular modeling glue, or superglue, or anything.. I really have no idea what they're made of. Painted with Xtracrylics, LifeColor, Gunze and Citadel, with brush. No flat lacquer on it, sorry about that. -J
-
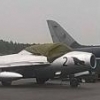
- The weather is quieter for a while so , the photos can be taken ib the openb at last -One of the main mistake of the Trumpeter kit is the bad shape of the rear fuselage. The first photo show the kit OOB This one is the real thing now the KZ About Begemot decals ,the Su 24 sheets are wonderful and I couldn't resist to the sharkmouth. The transfer is very large and so, difficult to settle around the nose gear well, door and nose both side probes. The instruction sheet says nothing about this . I've been obliged to resort on a hand painting job I cannot do better unforetunatly. notice the forgotten masking tape on the laser range finder and on landing lights; THe weathering is very heavy according to Begemot but Ididn't know to what extent I may have been heavy handed
- 17 replies
-
- 20
-
-
- TRUMPETER
- KOMPLEKT ZIP
- (and 1 more)
-
It seems that AS-90's are like busses. You don't see one for ages then two come long at once (ukmodllers on Sunday). Added extras include: a seriously fiddly photo etch set metal barrel and drooped recoil sleeve. Accurate armour GPMG (the kit one is horrendous) Accurate armour GPMG ammo boxes I also found some rather useful stick on glass studs in a craft shop which I used for the head lights, indicators and brake light lens I also added a few stowed items including the cam nets, cam poles and an air identification panel more to add a splash of colour, lets call it an Orange Forces gun sub somewhere on Salisbury Plain? It's a good kit which I have made before many years ago. I couldn't help a cheeky pic next to the Hobby Fan 155mm FH-70 just to show the old and the new. I'm a bit biased as I served on the FH-70 which was a dreadful beast to work, nowhere near as civilised as it's younger brother! Anyway hope you enjoy. https://www.dropbox.com/s/4cninwfs8buepbo/20170217_124255.jpg?dl=0 https://www.dropbox.com/s/k4moatd12k931ft/20170217_123538.jpg?dl=0 https://www.dropbox.com/s/puwwrh0n72iqs6x/20170217_123625.jpg?dl=0 https://www.dropbox.com/s/s889xiqdyy5w0ni/20170217_123656.jpg?dl=0 https://www.dropbox.com/s/zgoj1m3z52ebcdv/20170217_112220.jpg?dl=0 https://www.dropbox.com/s/hkl37eo05n2cjnn/20170217_123458.jpg?dl=0 https://www.dropbox.com/s/s889xiqdyy5w0ni/20170217_123656.jpg?dl=0 Please excuse the dropbox links but I can't get the photo's to up load to the site https://www.dropbox.com/sc/qv2djfgn2eir09v/AABJK8JD1nnvOXLXLffn_A3Aa
-
Sorry if this has already been posted/asked elsewhere but does anyone know if there are any aftermarket name & penant numbet sets for the 1/350 Trumpeter Type 23 frigate to enable it to be built as any of the other ships in the class? I'm thinking of getting the kit and would love to model it as HMS Sutherland (F81) as I have served on the real ship. Thanks in advance! Andrew
-
Along with the mine vehicle Trumpeter have also announced the S-300V on a tracked vehicle to go alongside the quad wheeled version.
-
Hi folks, long time no see, I mean, post... First of all, pardon me for the fictitious marking on the turret, It's totally incorrect, both historically and politically. The base also doubles as storage. Critics and suggestions are welcome, Cheers!
-
First of the year and a change from winged things. Regards J A
-
Hey everybody, Does anyone know if there is a difference in shapes between the two noses provided in Trumpeter's MiG-29 kits? I have a very bad eye for shapes, and as far as I can tell, the only difference is that one has the diverter strips molded on, and the other does not.
-
Hello All, This is Trumpeter's 1/72 M113 'ACAV' with Black Dog resin stowage accessories and ammo crates. The rolled up fencing on the front is wire forming mesh w/ masking tape straps, and the antennas are stretched sprue. The finish is Model Master Olive Drab, weathering completed using pastels, drybrushing, Tamiya weathering pigments. The base is made from a section of pre-made model railroad groundwork on a picture frame. Thank for looking! Cheers, Albert
-
The Puma is a family of Italian light wheeled armoured fighting vehicle family, consisting of the Puma 6x6 and the Puma 4x4. The vehicles were developed and are produced by the Consorzio Iveco Fiat - Oto Melara for the Italian Army. First prototypes completed in 1988, with a total of five testbed vehicles being completed by 1990. The 4x4 variant carries 3 troop members plus the driver, the 6x6 variant carries 6 troops plus driver.[1] I'm doing the 4x4 version by Trumpeter. For such a small vehicle there is an awful lot of plastic and PE Construction is pretty straight forward with excellent fit if parts and nice clean moulding. Some quite complex structures. This has 18 plastic and PE parts and I don't even know what it is 😀 But the fit was excellent Some really tiny parts too. I bought a "sticky pencil" from RB Productions at our recent nationals and it came in very handy Very useful tool for only €2 Some tiny and complex PE also. This little piece requires 30 desperate folds Didn't go quite according to plan But I'll hide it with a tarp or something The side stowage bins went better I just need to mask the vision blocks and lights and ready for priming going to try do the white UN version but painting all white may be a challenge. At least this time I have an airbrush
-
Trumpeter is to re-issue its 1/72nd Chengdu J-20 Mighty Dragon (ref.01663 - J-20 Mighty Dragon http://www.hyperscale.com/2012/reviews/kits/trumpeter01663reviewpp_1.htm) as J-20 Mighty Dragon Prototype N°2011 - ref.01665 Source: http://www.modelforum.cz/viewtopic.php?f=1&t=68170&start=5475 V.P.
-
This is the 1/72 Trumpeter J-10S, with the addition of DreamModel etched cockpit details and exhaust nozzle. I’m sure that it is humanly possible to make the DreamModel etched exhaust work ... but I couldn’t manage it! I just used the afterburner ring and put one part of the etched detail inside the kit nozzle for what I think is a pleasing effect; the cockpit set on the other hand worked fine. Markings are one of the kit decal options. The Trumpeter kit goes together easily and, although I can’t vouch for the accuracy of the form in every regard, I think it looks good.
-
Got this from a secret santa thing at work, great kit, nice and easy. Built and painted over a weekend with various painting shortcuts I've picked lately. Thanks for looking, Owen
-
Indian T-90 “Bhishma” Trumpeter 1:35 History The T-90S is the latest development in the T-series of Russian tanks and represents an increase in firepower, mobility and protection. It is manufactured by Uralvagonzavod in Nizhnyi Tagil, Russia. The T-90S entered service with the Russian Army in 1992. In February 2001, the Indian Army signed a contract for 310 T-90S tanks: 124 were completed in Russia and the rest are being delivered in "knocked down" form for final assembly in India. The first of these was delivered in January 2004. The locally assembled tanks are christened 'Bhishma'. The tanks are fitted with the Shtora self-protection system and Catherine thermal imagers from Thales of France and Peleng of Belarus. The first ten Bhishma tanks were inducted into the Indian Army in August 2009. India plans to induce 1,640 T-90 tanks by 2020. In January 2005, it was announced that a further 91 T-90S tanks would be procured for the Russian Army, although this number was later reduced. By November 2007, it has been estimated that the Russian Army has around 200 T-90 tanks. In August 2007, Thales was awarded a contract to supply 100 of these with the Catherine FC thermal imager. In March 2006, Algeria signed a contract for the supply of 180 T-90S tanks from Uralvagonzavod, to be delivered by 2011. Of the total, 102 tanks were in service with the Algerian Army by 2008. In November 2006, India ordered a further 330 T-90 tanks, to be licence-built by heavy vehicle factory (HVF), Avadi, Tamil Nadu. The Model The kit comes in the standard style of box used by Trumpeter these days, although in this instance it appears to be slightly deeper. The boxart shows a vehicle on the road during a parade in the standard Indian colour scheme for this type. Inside there are fourteen sprues of light grey styrene, separate lower hull and turret, eight of brown styrene, one of clear, two sprues of a rubbery material, a bit like Dragons DS, three sheets of etched brass, sixteen poly caps, plus lengths of copper wire, brass wire and vinyl tubing. All the parts are beautifully moulded with great detail and surface texture. There is no sign of flash or other imperfections, but there are a lot of moulding pips that need to be removed and will add to the cleaning up required. Construction begins with the assembly of the two sprocket wheels, each from three parts plus the poly cap, the two idler wheels, each of two parts and the poly cap, the idler axle mounts, each from four parts, (ensure you use the correct parts as they are handed), and the twelve road wheels, again each from two parts plus the poly cap. With these done the lower hull section is fitted out with the idler wheel axles, the sprocket axle casings, the return rollers, track slides and the three additional shock absorber mounts for the first, second and sixth road wheels. The lower glacis plate is also attached, and fitted with two towing eye fixtures and centrally mounted hook, whilst on the hull sides, two turret ring panels are fitted, and completed with the addition of fifteen PE bolt heads. The torsion arms and additional suspension arms are attached, whilst the mine trawl KMT-6 connection hardpoint/attachment plate is fitted on the underside of the hull. All the wheels are now fitted and the complete lower hull assembly put to one side to set properly. Before fitting any parts to the upper hull several holes need to be opened up from the inside, followed by the fitting of the drivers clear vision block. The armoured plate that sits between the drivers hatch and the turret ring is attached, followed by two long rods plus end fittings on the upper glacis plate, drivers vision block shield and the six shtora sensors each made up from two parts. The glacis plate ERA block comes in one piece and is fitted with the block end plates, mid mounted breakwater, and tow hooks, before being fitted to the upper hull. Each of the main headlight assemblies are made up from the protective cage, headlight, with separate clear lens, indicators and reflectors before being attached to the sides of the upper glacis. There is a further plate fitted in front of the drivers position, whilst the drivers hatch is made up from inner and outer plates and fitted into position. The front upper hull section is then attached to the lower hull, followed by the engine hatch, complete with additional hinge details, and the radiator hatch, which is fitted with hinges, clasps, four etched grilles and two intake covers. The rear bulkhead plate is fitted out with spare track links, unditching log straps, unditching log, (DS type material) and the fuel drum supports, before being fitted to the rear hull. Each individual track link is connected to the sprue in two places, in addition to the two moulding pips per link, it will be a rather labourious job cleaning up the 166 links required per side, not to mention the individual track horns, although these are very nicely moulded. Whilst the links have to glued together as there are no location pins provided, Trumpeter have provided a guide to build up the links into the various lengths required. With the tracks completed and fitted its back to the more interesting stuff with the assembly of the four part exhaust, with optional top plate, and the two four piece fuel drums. The two track guards are assembled, with the support arms and inside front plate attached. The right hand guard is fitted with a full length top piece representing the various stowage boxes the rear one fitted with a blanking plate, whilst the left hand unit is fitted with a smaller stowage box plate, exhaust unit and separate rear stowage box. Each of the stowage plates are then fitted with the various PE straps and hinges before the side skirts are attached. Each side skirt is then fitted with three additional armour plates and their associated fittings to the front of each side. The previously assembled fuel drums, additional engine cover plate and the track guards are then attached to the hull. The fuel drums are then plumbed, using the vinyl tubing provided. Each of the front rubber sections of mudguards are fitted with a PE part which will need some careful bending to fit correctly. The tow cable is then made up from a length of brass wire and the two tow eyes; this is then wrapped around the clamps to the rear of the hull. The turret is probably the most complicated section of the build, well, perhaps after the tracks that is. There are quite a few parts which I cannot identify even through searching the interweb, so forgive me if I get some parts wrong, or am a bit vague. Before the turret ring is attached to the turret itself, the three piece commanders’ sight is assembled and fitted inside, just in front of the commanders’ hatch. The only other part that needs to be fitted from the inside is the barrel of the co-axial machine gun. The mantlet cover is made of the DS type material and once fiotted to the turret is finished off with a PE connector ring. The infra-red sight housing is fitted with a PE window frame, and side panel, whilkst on the right hand side of the lower front, there is a small angled ERA box, made up from four parts, fitted. Each of the large cheek mounted ERA boxes is made up of four parts, which once assembled is glued into place. There is another small ERA box fitted to the right of the main gun and is assembled using five parts before being glued into position. There are an additional nineteen individual ERA boxes mounted on the roof of the turret. In front of the fixed sight there is a PE hood, made up from four parts attached to the turret roof, along with a rotating sight further aft which is made up from three parts. The spent cartridge port door is then fitted, as is the gunners hatche and aerial base. On each side of the turret there are six smoke dischargers. The tubes of which are individual parts fitted to a back plate. A small searchlight mounted on a pintle and including a clear leans is fitted to the left front of the turret. On the right side of the turret, adjacent to the commander cupola, a large storage box, made from nine parts is attached, along with the five parts that go to make up a spare ammunition box for the 14.5mm machine gun. There is another aerial type structure which looks to be part of the defensive suite and made up of seven parts before being fitted to the to the rear of the turret. The commanders’ cupola is quite a complex affair with the cupola being fitted with the vision blocks and computer sight, followed by the cupola ring. To this the hatch is attached after being fitted with the inner and outer plates, two grab handles inside and two vision blocks and their covers on the outside. The two part hinge is then fitted, followed by the clear plate and frame at the nominal front. The 14.5mm machine gun is assembled from five parts, then fitted with the three part spent cartridge bag, before being fitted to the cupola via the six piece mount. The completed cupola is then fitted with an elevation support, whilst the machine gun is fitted with its four piece ammunition box. Two more storage boxes are then assembled the smaller one, made from six parts is fitted to the left rear of the turret, just behind the smoke dischargers, whilst the larger one, made up of eight parts and fitted with the six piece snorkel, is attached to the rear of the turret. The main gun barrel is provided in two halves, which, with the strap detail, may be rather awkward to get rid of the seam without losing the detail, os it may be an idea to buy one of the turned aftermarket barrels that are available for this kit. The barrel and commanders’ cupola are glued into position and the completed turret attached to the hull completing the build. There is only one colour option, that of sandy brown overall, with a number of wood brown splotches over the base coat. There are no markings provided with the kit, and from what I’ve seen, none on the real tank. Conclusion Ok, so it’s another version of the T-90 from Trumpeter, but this one at least is a little different and will look great in its camouflage scheme. Without the glaring anti missile “eyes” on the front of the turret it looks very much like its forbears the T-72/T-80, but if you like the T-90 it will certainly stand out from the crowd in your collection. Very highly recommended. Review sample courtesy of UK Distributors for
- 4 replies
-
- 2
-
-
- Pocketbond
- T-90
- (and 2 more)