Search the Community
Showing results for tags 'Thunderbolt'.
-
 Eduard is to rebox with add ons the Hasegawa's 1/32nd Republic P-47D Thunderbolt kit in 2017?- ref. Source: http://pwm.org.pl/viewtopic.php?f=14&t=78501&sid=2fed11272508b70cc053fe34bdf286c4&start=645 Box art by Romain Hugault. V.P
 -
Hello All, I got back from my trip on Friday with acute modelling withdrawal symptoms, and I wanted to do a quick build. So I chose this: From the wonderful Ace Hardware in Berkley. I bought it in their moving sale earlier this year, so I actually paid around two dollars for it. The cockpit was a "seat on pegs" affair so I constructed a new one out of plastic card: The engine is a bit anaemic, so I added some valve gear to the ends of the cylinders that you can see. I cut away the moulded turbocharger intake scoop and made my own out of bent plastic card and some rod: Cockpit installed: And painted in bronze green, instruments simply scratched into the paint: The instruments may look a bit crude in a close up, but they look fine seen through the canopy. I have seen on other builds that there is a big gap between wings and fuselage. This is not a new feature: I cured it with a piece of sprue cut to length to push the fuselage sides out a bit: I made some cheap and cheerful wheel wheel wells out of plastic card and strip. I'm also going to replace the undercarriage doors with something a little more refined: And I've added some detail to the propeller: My symptoms have subsided! Thanks for looking, Adrian
- 38 replies
-
- 20
-

-
Does anyone remember the Matchbox P-47 Thunderbolt kit? Here are my two builds of this lovely old kit displaying both of the kits decal options. The bare metal P-47 was built earlier this year as part of the P-47 stgb, while the o/d version was built some time further back. While not the best Thunderbolt available these days it is still a nice kit to build and looks good on the shelf. Sadly the Matchbox Group Build looks like it will miss the boat again this year, but if there is anyone out there that fancies giving a Matchbox kit a go then a few extra votes might just tip the balance.
- 15 replies
-
- 15
-
-
- Thunderbolt
- P-47
- (and 1 more)
-
 These are in 1/72. The Bubbletop being a Brazilian machine with aftermarket decals, the Razorback one of the 325th Checkertail Clan using kit decals. For their age, the kits are decent, although lacking in cockpit detail. The Tamiya kit is superior, but the Hasegawa can often be found and swap meets for 5 bucks, in fact that's what dad paid for it about 15 years ago when he bought it for me. It was a 2 in 1 special edition.
- 7 replies
-
- 20
-
-
- P-47
- Thunderbolt
- (and 1 more)
-
Old school photos are mine; More modern photos from Graham James
-
Hello again. After a while I've managed to complete this magnificent aircraft. The kit itself is a charm. Easy to build, nice fit and no problems whatsoever. Painting it was a bit of fun but nothing hard. Unfortunately I can't make a build without some problems. This time problems with silvering of decals. Weird, because on glossy surface it was absolutely fine, but after putting matt coat half of the decals were silvering:( I've read some forums, tip and advices and followed the one with needle and pucturing the silvered decals and another coat of Sol and Set. Helped a lot, but still I'm not happy to be honest. Some decals basically unfixable.. Build is OOB + Eduard masks. Anyway, pictures: I hope you like it. Thanks and see you soon!
- 10 replies
-
- 22
-
-
- tamiya
- thunderbolt
- (and 4 more)
-
All done!
- 11 replies
-
- 15
-
-
This is the 1/48th scale Tamiya P47-D Thunderbolt Razorback. The model was painted with Aeromaster acrylics with the exception of the canopy frame, which was painted with Xtracolor enamel. Artist gouache was used for weathering and to highlight the panel lines. The seat belts are from Eduard. The decals are Eagle Strike set number 48054. American Jabos. The markings are for Yankee Tarheel. Flown by Lt. H. I. Price. 510 F.S. 405 F.G. Thanks for looking, Joe
- 67 replies
-
- 65
-
-
- Ready for inspection
- Tamiya
- (and 3 more)
-
Saab AJ-37 Viggen 1:48 Special Hobby The Viggen was Sweden's Cold War fighter, which began service in the early 1970s with the AJ variant, which was primarily a ground attack aircraft that could also perform the fighter role if necessary. It was a tad shorter than the later JA, with a slightly different cockpit arrangement and a less powerful engine. Over a hundred were built, with roughly half of them converted to AJS standard at the end of the 90s with improved avionics and software. The last of these upgraded AJs were taken out of service in 2005. The Kit The initial Tarangus release of the JA-37 was a collaboration with MPM the parent company of Special Hobby, which has resulted in a split of the variants between MPM and Tarangus. I forget who is doing what at the moment, but can't wait for the two seaters! The initial release was well received for the most part, but like all model kits, some issues have been pointed out with varying degrees of hysteria, and as this is ostensibly the same moulding, many of those issues will apply to this kit. It is still a modern and mainly accurate tooling of an important and (IMHO) attractive aircraft, and should give any modeller plenty of enjoyment during the build, and it will of course look great in your cabinet. Inside the box it is almost the same plastic as the Tarangus edition, with only the gun-pack sprue missing, which also included the extension tube for the JA and the cockpit for that version. There are six sprues of mid-grey styrene, plus one of clear parts, a small Photo-Etch (PE) fret that is also pre-painted, and a decal sheet. The A4 instruction booklet is printed on thin glossy paper in full colour, which is rather helpful during construction, and the large size of the construction steps is welcome to this modeller and his failing eyesight. As construction is almost identical to that of the JA, which you can follow here I won't go over it all again, as aside from the lack of extension ring and the different cockpit tub and panel, it's near identical. I will however remind you that the detail in the main areas of interest is very good for injection moulded styrene, and the engine rear is superb. The cockpit is the recipient of the majority of the additional PE, which is decked out with a pre-painted instrument panel, side consoles and seatbelts, plus additional detail on the side of the seat, a pair of replacement rudder pedals and additional sidewall details. A trio of rear-view mirrors are also provided for the canopy when it is fitted later in the build. The gear bays are all well detailed, and as the inner main bay doors are usually closed when on the ground, no additional detail would be seen without the aid of a torch and the risk of a sore neck. The only items available in the box that you can hang from any of the pylons are a choice of centreline tank with either three or four fins, which fit to a stubby pylon just aft of a centreline intake fairing. It would have been nice to have some additional weapons included, but as the Viggen was often seen with just tankage, it's not a major thing. You might want to visit the inside rear of the instruction booklet before you go any further, as CMK (another MPM company) are bringing out a host of new updates to further improve on this already nicely appointed kit, as follows: 4310 M70 Rocket Pod x2 Q48219 Ejection Seat (Raketstol fpl37) Q48222 Thrust reverser petals Q48220 Air Brake Set Q48221 Wheels Maestro Models also do a substantial number of sets for the Viggen, but check that you're getting the ones tailored for the new kit before you pounce, or you might end up with parts for the old ESCI/Airfix kit. Markings The AJ was primarily seen wearing either bare metal finishes that was standard at the beginning of its career, or in the later disruptive splinter pattern we all know and love (and fear). There are some superb pictures of the variation in tone of the bare metal finish, and you'd go through extensive colours and masking tape doing it justice, but the finish would be well worth the effort. As to the splinter pattern, there are brave people that will tackle it themselves, and there has been a set of masks available for some years now from the US, but I'm sure some enterprising soul will produce a new set tailored to the new kit and more easily available in the near future. From the box you can build one of the following: 37062 "Gustav 62", F7 Wing, Satyenas, 1990s. Splinter scheme with red 62 on the tail. 37022 "Gustav 22", F7 Wing, Satenas 1973 – bare metal with squadron on fuselage and tail for an airshow in Germany. 37051 F15 Wing, Soderhamn 1978 – Splinter scheme with unpainted starboard intake in bare metal. The decals are well printed, with good register, colour density and sharpness, although there were a few tiny artefacts on my review copy, but these only really show up under magnification. There are extensive stencils on the sheet, all of which are legible, although I don't speak Swedish, so can't vouch for them being verbatim. Conclusion Another welcome kit of this superb Cold War Warrior, and with the addition of some PE to detail up the cockpit coupled with a reduction in price, it deserves to sell well. For the detail and accuracy minded, check the forums for information about the corrections needed to improve the kit further. Very highly recommended. Review sample courtesy of
-
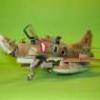
REPUBLIC P-47D THUNDERBOLT Hello! This is my 1/48 Tamiya P-47D Thunderbolt finished in the markings of 1st Lt. Raymond Knight, 346th FS/350th FG,USAAF. This airframe was based in Pisa, Italy in 1945. You can see the WIP posts and more pics of the finished build on my blog: http://thescalemodelhangar.blogspot.co.uk Happy Modelling! Darren.
- 23 replies
-
- 24
-
-
- P-47D
- Thunderbolt
- (and 3 more)
-
 As I mentioned in my twin Academy build thread, this is another P-47, the Revell one. The box says one thing (if you ignore the Texta overwriting) and the instructions and kit bits say quite another! Yep, the good old 'rebox it for the mug' trick. The kit in the box has 2 options, one USAAF the other French, and I'm thinking I'll do the French one. I'm pretty sure that someone else has the same kit in the running, so I'll be able to follow along and learn as I go. Comparing it to the Academy kit, it's both good and bad. Shapewise, the Revell is horrendously fat. Must be all the MacDonald's it's eaten. Details though, are excellent - the main gear wells go all the way to the top of the wing, there's a retraction strut on the tail wheel doors and the engine cooling gills are commendably thin and moulded open. Plus other stuff as well, but these are the standouts for me. It'll be interesting building both kits alongside each other. The eagle-eyed will notice that the kit's been started - that was me, this evening, banging on without thinking. I got the wings and engine together, then thought " 'ang on, Oi've missed summat, 'aven't I?" Yeah, you have, haven't you. A bit of thought, and it hit me - PHOTOS! Ah well, I'm finding that I get stupider with every passing day. This will (hopefully) be rolling along with the Academy 'Beetle' builds, to take advantage of open paint bottles and all that, so updates will be forthcoming! More anon.
- 16 replies
-
- 1
-
-
- Revell
- Thunderbolt
- (and 2 more)
-
Kit manufacturer: Hobbyboss Scale: 1/48 Type: A-10 Thunderbolt II Extras used: Eduard canopy masks, Aftermarket decals, scratch built FOD covers Paints and colours used: Tamiya and Mr Hobby Finished today. Very much enjoyed this build, Finished in arctic aggressor camo, couldn't get the exact decals so its finished as a bit of a what if scheme. Slightly overdone the pre/post shading and the pva glue on the bomb lenses hadn't dried when i took the pictures. Anyway, here's the pics and thanks for looking
- 49 replies
-
- 61
-
-
 Hi, here's my 1/72 Tamyia Thunderbolt built from the box. WZ-P was fflown by Lt.Col. Benjamin Mayo with 84th FS/78th FG, Duxford/England, 1944. Painted with Alclad II Metallics and Gunze Acrylics. Thanks for your interest. Best wishes from Vienna, Roman
- 10 replies
-
- 29
-
-
Hi all,I thought it would be nice to equal last year,s four plane build for the opening GB of the year and with really enjoying the previous two Revell kits It was logical to pick up another (that and the 40% off at my LMS) Here,s another outing for the box top should get a start at the end of the week as the Hurricane,s nearly finished for that GB.
-
 Here is my GB entry...... Box art and all the bits! So nearly ready for the build. Haven't built a Thunderbolt in ages. Still to decide on the markings but have decided not to do the one on the front of the box due to that scary checkerboard nose.
- 65 replies
-
- 5
-
-
- academy
- thunderbolt
- (and 1 more)
-
 Ok as host of this GB I guess I had better build something! Well I had it all planned before I went on holidays and I had hoped to buy stuff while I was away but couldn't find what I wanted so just ordered online. My cunning plan fell to pieces once I got home and started looking at the references I had, I wanted to build a Latin American P-47D. The decals I got were for D-30s and higher, where as the model I was building was a D-25. I then though about modifying the model I had to suit (not a really hard mod to do) until I found the perfect decal set! So now I’m building Brazilian P-47D-25 of 1°GAvCA used in Italy from October 1944. The decals are from a super rare AeroMaster Thunderbolts Galore set. Plus I will be throwing in a bit of AM stuff as well. I only have the model at the moment, the AM stuff is stock photos. no need for sprue shots for this one... Aires Wheel Wells…I know the Tamiya ones are nice but these are resin…….. Eduard detail set (plus canopy masking set too) Master gun barrel set… I blame Arnold for this…. AeroMaster decal…rare as hens teeth…..hope I don’t stuff them up! And this is what I’ll be building….have already found an issue with the decals, the a/c serial number is wrong for the aircraft ID number! Will sort that out when I get to it. I won’t get a chance to start this now until next week, go back to work on Wednesday, plus the AM bits haven’t arrived yet. In the mean time I’m working on “Gold Member”.
- 107 replies
-
- 7
-
-
- P-47D
- Thunderbolt
- (and 4 more)
-
Hi folk's this is number four in the P-47 STGB,my take on Revell,s "M" in the marking,s of Capt. John C Fahringer's aircraft of the 63RD F.S at the end of the war.Revell have shown her in the late scheme with the fin fillet added,red outlines to the codes and the lower wing buzz code added,while being flown by Maj. George E Bostwick on March 25th 1945 she downed an Me 262 and damaged another(I,m two kill markings shy on the finished model).Thanks for looking. And all four take a final bow.
-
Hi folk,s I did,nt intend to take part in this one not that I don't love the P47 mind,I was in my LMS and as he still has 40% off Revell I thought why not so decided on two in a nice small scale,Not decided on both scheme's I got a bottle of Vallejo's new metal effect paint to try on the Siskin on the made in Britain GB if all end,s well I may do one in NMF,one will be a French machine.
- 153 replies
-
- 10
-
-
- Revell
- Thunderbolt
- (and 1 more)
-
Hi all, These are some pictures of my new OOB (or not so OOB) project: Thanks for coming by :-)
- 17 replies
-
- 8
-
-
- P-47D
- thunderbolt
- (and 5 more)
-
Hello all. This will be my contribution to this group build. Republic P-47D-15-RA Thunderbolt of 58FG, 69FS serial 42-23224 - "A23" in 1944, flown by Lt. Herbert B. Emrich The kit: The subject: I'm planning to do it OOB at this point. Cheers Jimmy
- 57 replies
-
- 5
-
-
- P-47D
- Thunderbolt
- (and 1 more)
-
Republic P-47D Thunderbolt Kinetic 1:24 The Republic P-47 Thunderbolt is one of the largest and heaviest fighter aircraft in history to be powered by a single piston engine. It was built from 1941–1945, and was heavily armed with eight .50-caliber machine guns, four per wing. When fully loaded, the P-47 weighed up to eight tons, and in the fighter-bomber ground-attack roles could carry five-inch rockets or a significant bomb load of 2,500 pounds; it could carry more than half the payload of the B-17 bomber on long-range missions (although the B-17 had a far greater range). The P-47 was designed around the powerful Pratt & Whitney R-2800 Double Wasp engine—the same engine used by two very successful U.S. Navy fighters, the Grumman F6F Hellcat and Vought F4U Corsair, the latter of which was the first to fly with Double Wasp power in late May 1940—and was to be very effective as a short-to-medium range escort fighter in high-altitude air-to-air combat. When deployed as a fighter-bomber with its usual "double quartet" of heavy-calibre M2 Browning machine guns, it proved especially adept at ground attack in both the World War II European and Pacific Theatres. The P-47 was one of the main United States Army Air Forces (USAAF) fighters of World War II, and served with other Allied air forces, notably those of France, Britain, and Russia. Mexican and Brazilian squadrons fighting alongside the U.S. were equipped with the P-47. The armoured cockpit was roomy inside, comfortable for the pilot, and offered good visibility. A modern-day U.S. ground-attack aircraft, the Fairchild Republic A-10 Thunderbolt II, takes its name from the P-47. Throughout its career the Thunderbolt was almost continually updated and refined, leading to the P-47D, (the subject of this review), which was the most produced version with 12,602 built. The "D" model actually consisted of a series of evolving production blocks, the last of which were visibly different from the first. The first P-47Ds were actually the same as P-47Cs. Republic could not produce Thunderbolts fast enough at its Farmingdale plant on Long Island, so a new plant was built at Evansville, Indiana. The Evansville plant built a total of 110 P-47Ds, which were completely identical to P-47C-2s. Farmingdale aircraft were identified by the "-RE" suffix after the block number, while Evansville aircraft were given the "-RA" suffix. The P-47D-1 through P-47D-6, the P-47D-10, and the P-47D-11 successively incorporated changes such as the addition of more engine cooling flaps around the back of the cowl to reduce the engine overheating problems that had been seen in the field. Engines and engine subsystems saw refinement, as did the fuel, oil and hydraulic systems. Additional armour protection was also added for the pilot. The P-47D-15 was produced in response to requests by combat units for increased range. Underwing "wet" (equipped with fuel plumbing) bomb racks were introduced to allow a jettisonable drop tank pressurized by vented exhaust air to be carried under each wing, in addition to the belly tank. Seven different auxiliary tanks were fitted to the Thunderbolt during its career. The tanks made of plastic-impregnated (laminated) paper could not store fuel for an extended period of time, but they worked quite well for the time it took to fly a single mission. These tanks were cheaper, lighter, and were useless to the enemy if recovered after being dropped—not only did they break apart, but they did not provide the enemy with any reusable materials that could be scavenged for their own war effort. With the increased fuel capacity, the P-47 was now able to perform escort missions deep into enemy territory. A drawback to their use was that fighters could not land with the tanks in place because of the hazard of rupture and explosion. Fighters recalled from a mission or that did not jettison their paper tanks for some reason were required to drop them into a designated "dump" area at their respective fields, resulting in substantial losses of aviation fuel. The P-47D-16, D-20, D-22 and D-23 were similar to the P-47D-15 with minor improvements in the fuel system, engine subsystems, a jettisonable canopy, and a bulletproof windshield. Beginning with the block 22 aircraft, the original narrow-chorded Curtiss propeller was replaced by propellers with larger blades, the Evansville plant switching to a new Curtiss propeller with a diameter of 13 ft. (3.96 m) and the Long Island plant using a Hamilton Standard propeller with a diameter of 13 ft. 2 in (4.01 m). With the bigger propellers having barely 6 in (152 mm) of ground clearance, Thunderbolt pilots had to learn to be careful on take-offs to keep the tail down until they obtained adequate ground clearance, and on landings to flare the aircraft properly. Failure to do so damaged both the propeller and the runway. A modification to the main gear legs was installed to extend the legs via an electric motor (un-extending before retraction) to accommodate the larger propeller diameter. The Model Kinetics new kit of the P-47D is an update of their 2014 release, with the razorback fuselage replacing the cut down, bubble canopied example, which in turn was originally released by Vintage Fighter Series. The kit comes in a pretty standard sized box, only, very, very deep. The boxart shows a P-47 just leaving the runway on a mission, inside the box is pretty much packed full to the gunwhales with styrene. In total there are twenty four sprues of mid grey styrene, with the wings and fuselage halves separate, there are two sprues of clear styrene, two rubber tyres and a large decal sheet. The parts are beautifully moulded, with no sign of flash or other major imperfections, although there are some flow marks on the wings, which will easily be covered by primer and paint. Whilst the main parts are large, the detail is well reproduced with recessed and raised detail where appropriate. The kit doesn’t look particularly complicated, although the instructions parts placement indications could be better, and whilst it is well detailed it does appear to have some scope for the modeller to add even more, particularly on the engine and in the cockpit. Talking of the cockpit, that’s exactly where the build begins, nothing out of the ordinary there I here you say. The cockpit consists of the floor, front bulkhead, rear bulkhead, three piece seat, joystick, beautifully detailed sidewalls, with separate throttle quadrant, and instrument panel, which is fitted with separate rudder pedals and gunsight. The engine is built up form two banks of cylinders, each moulded as one piece. Each bank is fitted with their respective push rods, whilst the front bank is fitted with the cowl mounting ring. The exhaust manifold is assembled, with each of the exhaust pipes being separate parts and fitted to the engine bulkhead. The gearbox cover comes in three parts and is detailed with separate magnetos before being fitted to the front cylinder bank. The firewall is then detailed with the five piece oil cooler section to the front and the two piece channel to the rear. The engine is then fitted to the bulkhead along with the two oil cooler ducts. The area between the engine bulkhead and the firewall is filled with pipework, oil tanks the turbo-supercharger, and engine mounting stays to which the engine assembly is attached. The cockpit assembly, wing spars and turbo-supercharger outlet are glued to one half of the fuselage before it can be closed up. The engine assembly, with cowling front now attached is then fitted to the front of the fuselage. The rest of the cowling can then be attached, of left off as per the modellers wishes. If attached, the clear cowling sides can be left unpainted if desired. The horizontal tailplanes are now glued into place, followed by the two gills on the mid fuselage sides, either in the open or closed positions. The tail wheel is made up from eight parts and fitted to the rear fuselage, along with the tail wheel bay doors. The fuselage mounted, five piece flattened drop tank is fitted into position, as are the inner main wheel bay doors and supercharger outlet duct. Each wing consist of upper and lower halves, with separate ailerons, flaps and navigation lights. Before gluing the wing halves together, the quad 50 cal gun bays are assembled from seventeen and fitted to the lower wing and any holes required, to be opened up. Each gun bay comes with a separate cover which can be left off if required. Only the port side gun bays is further enhanced with the ammunition belt bay, also with separate, poseable covers. Each of the completed wings are then glued to the fuselage. The underwing stores options include:- • 108 U.S. gallon (409 l) drop tank • 110 U.S. gallon drop tank • 500lb GP Bomb • Triple Bazooka tube launchers Each with their respective pylons and fittings. Each of the main undercarriage assemblies are built up from seven parts, with separate scissor link, inner hub, and outer bay doors. The relevant stores and undercarriage are glued to their respective positions. The flaps can be posed retracted or extended, with the relevant parts required to show off the fully extended flaps. The kit is finished off with the fitting of the two leading edge gun panels, pitot probe and a choice of four different propellers depending on the type you are building. Decals The decal sheet is suitably large, as it should be given the scale, yet there are only two schemes provided, both in olive drab over neutral grey, although one has an off white tailplane. The decals are well printed and really quite vibrant, given the subjects provided. The carrier fill is quite thin, so care should be taken when manoeuvring the decals into position. Conclusion Another one of my favourite aircraft, mainly as it’s one heck of a brute and goes against grain of the dainty fighters of the period. This kit will build into one large model, yet, whilst the size will be quite impressive the parts count isn’t that great. This means that even a fairly novice modeller could have a huge P-47 in their collection. That said, it is quite expensive for what you get, (yes, I know the moulds will be large and the company will need to get their money back on the investment), but it just seems to lack that je ne sais quoi detail one would expect. It’s still a great looking kit and I can quite happily recommend it, as it will give hours of fun, especially with the detail painting, although, if you don’t own an airbrush, you may need a large brush for the exterior paint job. Review sample courtesy of
- 7 replies
-
- 4
-
-
- Lucky Model
- P-47D
- (and 2 more)
-
Afternoon All, A bit late for this particular party, but I've decided to weigh in with these two from Tamiya in 1/72. I hummed and hawed about joining in with this STGB as I've a number of other things on the go at the mo and had wanted to concentrate on getting some of them finished, but I've decided a quick hassle free project is just the tonic for an ailing mojo! A quick delve into the stash came up with these two from Tamiya that will be finished as a couple of aircraft from 73 OTU in Fayid, Egypt. This will be finished as a Mk.I in ANA equivalent paints using Freightdog decals. And this one will be finished as a Mk.II, however I'll decide a bit closer to the finish which one I'll be doing. A couple of mask sets to save time as well as some resin and metal details to build upon the rather nice plastic Tamiya have provided. I'll be starting shortly, but since I'm on nights this weekend it probably won't be before Mon/Tues. Regards, Mark.
-
 Good day, gentlemen. This is my next model and last in this year.
 -
 Hi All, I'm in with a Tamiya 1/48 scale build of the Republic P-47D-27-RE Thunderbolt 42-27234. Outside the box Inside the box Cheers, Daniel.
 -
Hello! The latest model today This model was made in May 2015. The range of excellent quality. Details connected perfectly. Perhaps, the best model, what I saw. Additional sets not used. They are not needed. The model was painted Tamiya paint. For weathering I used salt dots. Decals Print Scale.