Search the Community
Showing results for tags 'TAMIYA'.
-
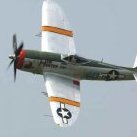
 Hi all, Another rollout for me and this time I have returned to an area of interest that I exploited a while back with my F-80, T-33s, F-86Fs, TB-26B and others. That is Latin America. This time I have returned to a machine that caught my eye a number of years ago as she was unusual to me and reasonably colourful. The model – the first of a two-part RFI – shows F-51D “FAB-511” of the Fuerza Aerea Boliviana around the time of her delivery to South American. The photos I have (below) – and they are easily sourced on the web – are stated to be of her upon delivery. I question that given the USAF C-54 and a Herc that sit in the background of at least one image. I therefore prefer to think that she was pre-delivery. I could be wrong! Having said that, there is at least one available image of her in these colours while in service. I built her before using an Airfix kit. this time I've gone for the Tamiya. I know it lacks the dropped flaps and has an incorrect spar but many Mustangs sat with flaps up and you cant see the spar ;). The plus side is the finish of the Tamiya kit, whch is superior in many ways. This was my first effort a few years ago and when I had just got back to modelling: She is ex-45-11453 and prior to going to Bolivia she was, post US military, registered as N5479V and was ultimately sold by Sanford Aviation to the FAB. She was delivered to Bolivia on 10th June 1966. Her Bolivian career ended in December 1977 when she was returned to North America as C-GXUP. Thereafter she became a racer and was finally trashed – poor her – on 12th February 1996 at Palm City, FL after being starved of fuel ☹. I’ll describe more of that in the next RFI – Part 2! In building her I have chosen to vary the panels a little to give a break from a sea of same-tone NMF. It seems that by this time the putties and painted upper side of the wings was a thing of the past. Being a Tamiya kit, and as I said earlier, she did not have the dropped flaps and sadly (and wrongly) my impatience got the better of me and so I chose not to cut them and drop as I should have. Next time! 😊. So, what did I use? Well, here goes …. And it’s not a lot!: Kit – Tamiya F-51D Mustang 1/72 (54) Decals – Blue Rider “Chaco War”, home printed serial, and the kit stencils etc. The rudder was painted. Paints – Humbrol Interior Green (226), Insignia Red (155), Insignia Yellow (153), Gloss Green (??), Metalcote 27002 and 27003 mixes, Humbrol washes. Colourcoats Olive Drab, Matt black, and Humbrol Clearcote varnishes. Washes – Flory dirt plus some swipes of Tamiya Weathering powders A simple build. Here she is: I hope you like her. Now I need to finish my Sabre and get on with the next two Mustangs Martin
- 21 replies
-
- 45
-

-
Started this kit back in February and all was going great until I had to paint the window rubbers and start the decals. I made a right mare off it and decided to soak the body in Dettol to remove the paint and decals, this worked great and then I dropped it, breaking the pillars, so I packed the chassis up which was completed and left it for a few months. So last month I purchased the kit again, as well as a Fine Tip Sharpie and some fine paint brushes and started again, this time all went well. There are a couple of things Im not happy with but I enjoyed it in the end, and the decals were not as bad as I expected.
- 6 replies
-
- 9
-
-
- toyota celica
- rally car
- (and 1 more)
-
My last finish is this Tamiya 1/48 He219A-7. Only AM set used is the excellent Fug 220 radar antenna from Master Models. Cheers! Nanond
- 31 replies
-
- 81
-
-

-
A bonus day off after the bank holiday so I decided to grab something out of the deep stash and make a start. This is the Jagdpanzer IV/70(V) Lang (Sd.Kfz.162/1) by Tamiya, and here's today's progress so far: JAGDPANZER IV/70(V) LANG (Tamiya 1/35) by Jon Gwinnett, on Flickr JAGDPANZER IV/70(V) LANG (Tamiya 1/35) by Jon Gwinnett, on Flickr JAGDPANZER IV/70(V) LANG (Tamiya 1/35) by Jon Gwinnett, on Flickr JAGDPANZER IV/70(V) LANG (Tamiya 1/35) by Jon Gwinnett, on Flickr JAGDPANZER IV/70(V) LANG (Tamiya 1/35) by Jon Gwinnett, on Flickr JAGDPANZER IV/70(V) LANG (Tamiya 1/35) by Jon Gwinnett, on Flickr JAGDPANZER IV/70(V) LANG (Tamiya 1/35) by Jon Gwinnett, on Flickr JAGDPANZER IV/70(V) LANG (Tamiya 1/35) by Jon Gwinnett, on Flickr JAGDPANZER IV/70(V) LANG (Tamiya 1/35) by Jon Gwinnett, on Flickr
-
This was the legendary 2 strokes monster driven to victory by Mick Doohan. A pretty hard kit but a rewarding one.
-
Hi folks - hope you’re all enjoying the weekend - I’ve just started work on this little thing: She’s been in the stash for ages - I bought this just after completing the razorback version so it was only right and proper that this would sneak into the build queue. I loved the Razorback - both the build and the finished model - but the nmf that I intend on doing kinda scared me off. Since then I’ve dabbled with metallics on different projects - trying to work out what paints work best and how to apply them - I’ve discovered the wonders of Alclad which I’ll be using on this wee girl - but this will be the first time attempting a proper full metal finish - I have a heap of kits that are crying out for the shiny treatment- so hopefully this will be the first of many - time to pop the cherry 🍒 I got some after market: Some masks for the canopy- a compulsory item for me these days because life is too short. Some photo etch goodness for the cockpit and some replacement gun barrels- as the kit ones don’t really cut the mustard- I used brass barrels on the razorback but these required some surgery to the wing to make them fit - I’m hoping these will be easier to install. The scheme... well I bought this decal sheet a while back: I thought this bird looked pretty good. Love the pin up and that blue... However when I broke them out when starting this build I realized something. They’re for a P-47 N... not a D like I have. I thought about using artistic license and using them anyways... but just couldn’t get my head around it. One of the things I love about the hobby is depicting real aircraft- however badly, and learning about them - it adds to the richness of the finished piece. Knowing that this scheme was on the wrong type wasn’t going to work for me... So a quick look around on the inter web resulted in me ordering some new decals - they’re 2 weeks away but I can still keep working until they arrive... the 2 schemes in the kit are fine but I wanted something blue - you’ll have to wait abit longer to see the what i ordered... Started on the pit - broke some bits off a sprue: and sprayed them with tamiya xf 5 flat green followed by some highlights in a lighter shade: Then painted In the details- with some dry brushed silver and tamiya panel line washes... I put the eduard instrument panel together- sanded down the kit version and glued it in place... Looks okay I think - I used some other pe around the cockpit sides but discarded most of it - the kit has a decent amount of detail already. The seat got some seatbelts: Again these are quite nice. After supergluing them-in place, they got some panel line wash to dirty them up a little. The completed office. No trouble from the kit as you’d expect from tamiya. The razorback was a nice easy build so I’m sure this will be no different. Thats it for now... thanks for checking in 😀 Cheers John
- 28 replies
-
- 16
-
-
From Tamiya Blog https://tamiyablog.com/2019/08/video-preview-of-new-tamiya-kits-including-the-1-48-p-38-lightning-and-1-16-remote-controlled-m551-sheridan/ Regards Robert
-
on the ground so to speak
-
Hallo, this is a kit that I bought many years ago and had no courage to start. Originally it should be build as MoviStar machine, but I managed to spoil the decal, so it will be Repsol's bike. Aftermarket decal is from Shunko Models and it is absolute trash. Avoid it! On the positive side is Zeropaints set - absolute joy to work with ))) VG K.
-
Best I can do with my phone camera for the pictures my friends but here she is in flight mode. What a dream of a kit to build. If you can see it the cowling is black alclad gloss primer mixed with a tint of tamiya blue. I will post on ground shots tomorrow. Thanks for the hints and tips. Joel
- 10 replies
-
- 18
-
-
Hi guys, I am a newb in AFV that wants to build some tanks. One of my favs being Matilda, in my searches, I found the Red Army Matilda by Tamiya more or less 15 bucks more expensive than the original Matilda. Can somebody tell me why is that? Searched for it but couldn't find something. TIA
-
Hello My intention to build the Corsair of Tamiya in 1/32, I delayed a very long time. The reason was that I have a BIGSIN from Eduard. My experience in installing such Brasin components is almost entirely negative to this day. Take the cockpit as an example. Nobody could tell me that it fits or not. A modeler has written a book about it, where the secrets for some money may be explained. The manufacturer has made no test of fit accuracy of Brasin components in the Tamiya kit. This is what the Eduard Helpdesk has told me. After you could even read in this forum, my funny experiences with Brasin Eduard (weapons), I am curious if I can finish the kit then or if I have to throw it away. In the WWW, I have found no one, except the author of the said mysterious book. That is the starting position. · Kit: F4U-1 Tamiya · Eduard 63302 BIGSIN cockpit, engine, wheels · Eduard F4U-1 exterior · SAC Gear · Barracuda Cals cockpit stencils and placards · HGW wet transfrers · Montex Maxi Masks mm32146 Well, if anybody can give me a hint concerning the Brasin items, please let me know. Happy modelling
-
Here's the 2003 Honda RC211V which Rossi led to victory. The kit is awesome with some additional details like the clutch, gas cables and some other minor things from top studio.
-
Tamiya's still superb wee Universal Carrier: Built pretty much from the box with just some 'tarps' and an Italeri 'Boys' rifle from the stash. Markings are from Star-Decal (35-C-1148) - which are a quite thick in my opinion - for a vehicle from the 19th Bt. 2nd NZ Divn' in late '41 / early '42. Not too much else to say, the 'Caunter' colours are 'home brewed' using so many other folks builds as reference and the always (un)reliable Mk.1 eyeball method. Not too shabby for a 43 year old kit... as ever all outrage, questions and comments welcomed. Best from NZ Ian.
- 20 replies
-
- 33
-
-
Hi folks There's been a couple of these posted recently I think, but as this is only my third completed build this year I've decided to put it out there anyway. Regards J.A.
- 12 replies
-
- 32
-
-
 Hi there guys, Beginning of this month I decided to start an out of box-build to allow myself to some modelling without thinking too much, setting the Delage 15-S-8 scratchbuild project on hold for a bit. I'll certainly resume that later, so no worries there. Introduction The Honda RA273 was a Formula 1 car from the '60s... not really successfull but it looked beautiful and sounded impressive. I chose Youtube vlogs as a medium to present the build to my colleague modellers. As my daughter participates and she doesn't speak English, the spoken language is Dutch but as long as there is interest I'll put into English subtitles featuring 1) a translation of the written tips and tricks throughout the videos; and 2) a summary of what's happening. These subtitles start from the ninth video! The first eight videos Note: there are no subtitles for the first eight videos but I'll describe them so you know what's in there. In the first vlog I describe the character of the build (out of box insofar a part won't turn out to be ugly... in those cases we'll try to improve on the kit). This first vlog also offers a look into the box and the instructions. In the second video I discuss given reactions, briefly explain how an injected moulded kit is produced and why the parts had best be cleaned before starting the build. The cleaning process is shown. My daughter Karmijn participates. The third vlog discusses viewers reactions as well as a big problem, occurring even before the build commences! The kit is not complete by far. But a solution is found. Karmijn tells a joke and shares her opinion on the kit model. In the fourth vlog I tell Karmijn she's going to get an important role in the build. Selected parts are cut from the sprues and cleaned (sanded). In the fifth vlog the engine block is glued using liquid poly. We see how it's important that the instructions are studied and understood before the glueing starts. Also, a dryfit is always a good idea. The sixt vlog treats, among other things, cleaning and glueing of the rims. In the seventh vlog the parts to be painted white are cut off and cleaned. Some building tips are given (but they are not written down yet). In the brief eighth vlog I explain that the next videos are going to be more brief and to the point. The vlogs thus far were 13-17 minutes each and I think that didn't provide an optimal viewer experience, although it is nice to see Karmijn work diligently. The ninth video In the ninth video all the parts that will need to be painted white are glued insofar possible. The video is much more compact than the previous ones. It's the first one I have subtitled. All conversations have been translated, leading to a lot of work... next videos I'll only add subtitles to summarise the build and to translate all on-screen tips provided throughout the video. What can you do? If you like this project, for example because you enjoy the father-daughter build progress, to see Karmijn improve her skills along the way, or perhaps you enjoy the tips given throughout the videos, then you can help by liking the video on Youtube, write a reaction on the forum or on Youtube, and/or subscribe to our Youtube channel (see text below). Karmijn and I would much appreciate all of this, especially if you choose to subscribe, and it would keep me motivated to keep adding translations to the videos. Plus, you'll get a non-disturbing notification whenever there's a new video. Hopefully you'll enjoy and we'll be able to build a nice almost-OOB racing car! In due time I'll get back to the Delage and/or Honda MP4/6 builds.
 -
Mk.IV Tamiya 1/35. Straight from the box Un saludo.
-
This is the Tamiya Messerschmitt Bf109 G-6 in 1/72nd scale. Apart from the EZ-line antenna wire, the model was built straight out box. Vallejo Model Air paints were used for the main colours. Thanks for looking. Joe.
- 12 replies
-
- 34
-
-
- Tamiya
- 1/72nd scale
- (and 1 more)
-
Greetings this is my A6M3 Zero Tamiya 1/48 straight from the box.
- 16 replies
-
- 37
-
-
I spent most of late 2014 and 2015 building and painting for the IPMS Scale Model World Battle of Britain, display, so much so that to paraphrase Sir Steve Redgrave, 'if I even start using Dark Green/Dark Earth/Sky, shoot me'. Three things changed that, the upcoming 2020 Anniversary display, buying and reading the Battle of Britain Archive series from Red Kite and the fabulous Fundekkals sheet for the early Spitfire. Realising my stash was BoB free, I bought an Airfix Spitfire Ia and a Tamiya one at a knockdown price. I planned to build both in parallel but the real world go the way as it tends to do. Compared to the Airfix kit it is up to £15.00 more expensive here in the UK ( though I picked mine up for a mere £4 more) I wondered if it was worth it. In the end, I will now speak heresy, it a nice kit, not perfect and a little quirky. I expect to get hammered for this view. let me explain. The fit is fabulous, I used absolutely no filler anywhere, it is probably the nicest kit I have ever built in that respect. The way the undercarriage is moulded and the covering panels mean the undercarriage legs with be at the right angle and a lot stronger than the fiddly way Airfix did theirs. On the downside there is no back or head armour provided, both essential for the BoB markings provided. It is also a shame that no two bladed propeller is offered, the rest of the options to make a mid production Mk I are there but not a two blader for the very early machines. The flying surfaces unmodified are not able to be posed in anything other than straight, unlike the Airfix one where they can be easily animated with no modification. Also, the way the cockpit inserts (which fit beautifully) mean that the canopy can only be pose fully open or fully closed. By moulding the radio aerial with a lump of the fuselage, you cannot add this vulnerable sticking out piece of plastic without having to remove and lengthening it, not very modeller friendly. Finally the way the front armour is a separate piece from the windscreen is trial to fit and in my case my hamfisted modelling allowed paint to seep under it. I much prefer the Airfix way of providing two different windscreens. I feel like I am damning it with faint praise and using it as an excuse for my shortcomings, I really enjoyed building it but for the price in the UK........ Here she is with the Airfix one I built a month or so ago. The Fundekkels markings are brilliant and the instruction PDF is a goldmine of information. There are still half a dozen more never been seen in decal form Mk Ia s I want to build on the sheet, The choice of which kit to buy is still the balance. Thanks for looking
- 1 reply
-
- 12
-
-
- 1/48th
- 64 Squadron
- (and 1 more)
-
thanks for the helpful response. I got photo uploaded using imgur
-
 Greetings this my first post in this forum Juan C.
 -
We now have the full range of Tamiya's Lacquer paints in stock and ready to ship! They come in a 10ml bottle and are suitable to paint plastic model kits and come in three finishes, gloss, flat and translucent. The Tamiya Lacquer Paint range can be brushed straight from the tub over small areas, or thinned to be used in an airbrush. Tamiya's lacquer paints feature a quick drying time, robust finish and can be over painted with either acrylic or enamel paints once dry. These paints also do not require the use of a primer and even the gloss colors can be applied directly to the plastic parts. Due to the nature of lacquer paint they should only be used outdoors or in a well ventilated area. Eye protection, gloves and a vapor mask should be worn at all times when using lacquer paints. See the full range here; https://www.wonderlandmodels.com/model-paints/paints-glues/tamiya/lacquer/
-
So as you can probably guess from my user name - my usual modelling territory is in the Aircraft section. However, I decided that I wanted to have a go at something a bit different and having been inspired by all the fantastic military vehicle builds on the BM forum I decided to give one a go. So whilst having a nosy around the Monk Bar Model Shop in York on a recent weekend away - I decided to pick up this kit: There's just something about the Kubelwagen that I like - probably it's simplicity and functional aesthetic. As this was a Tamiya kit, I knew I'd be in safe hands building this as my very first military vehicle. As you'd expect the kit went together with hardly any effort whatsoever and was one of the most enjoyable builds I've done for a while - I think sometimes it does you good to get away from your comfort zone. The kit also comes with a figure which you can have perched half in and half out of the drivers door which I decided to use so I could add a bit of interest to the model. I decided to go with the German Grey scheme (24th Panzer Division - Eastern Front 1943-44) rather than the other 2 schemes (both camouflage schemes like the box art). I liked the idea of completing the kit in the German Grey as I think nothing says WW2 German vehicle more than seeing one in this colour. So enough waffling from me - here's some pics of the model. As always please feel free to offer any feedback or comments - especially as this is my first vehicle and all advice is good advice. Thanks Kris
- 15 replies
-
- 28
-
-
Hi all, Just finished this for the Lockheed GB, have been working on it for the last 3 months or so. Wanted to do something different with the F-117a, so not only did I do the two-tone Grey Dragon (trust me, there are two shades of grey on the model!) but I also found this pic: so I decided to try to recreate the black lines/panels as well. Of course, I shouldn't be showing you this pic, as you can then just compare it to the model and see everything I did wrong! Anyhow, it's a Tamiya kit, so an enjoyable build! Used some Eduard PE for the cockpit/canopy and TwoBob decals for the Grey Dragon scheme. Also made a little 'Ladder Guard' that I saw in a couple of pics. Hope you like it, but please do send any constructive criticism my way, it's the best way to learn. And sorry for posting so many pics. Thanks! Kit: Tamiya F-117a Nighthawk Scale: 1:48 Paint & Weathering: Airbrushed with Mr. Paint, Weathered with Pastels. Extras: Eduard PE, TwoBobs Decals, little bits of scratch building Build Log: Here
- 22 replies
-
- 43
-