Search the Community
Showing results for tags 'TAMIYA'.
-
At approximately 1230 hrs on 12th June 1942 a single Beaufighter Ic, crewed by Flt Lt. Ken Gatward at the controls and guided there by his navigator Sgt. Gilbert Fern, roared along the Champs-Elysees at rooftop height to drop a French flag over the Arc de Triomphe and then flew to the Place de la Concorde where they strafed the Kreigsmarine headquarters with 20mm cannon fire and dropped a second French flag over it. This event, the express purpose of which was to raise morale of the French people and remind them they had not been forgotten, was Operation Squabble. Ever since I read about the event I've wanted to model the 236 Sqn. Bristol Beaufighter Ic that took part. Although it is known to be coded ND-C there is some speculation if it carried the serial T4800 as shown in a photograph of a Beaufighter carrying the code letters taken a month or so later. Since nobody can confirm with any certainty whether or not this was the case or otherwise let's go with it as best guess for the purposes of this project. Tamiya's 48th scale kit provides a decent basis to backdate from the Mk. VI and was the only option in 48th when I started this one a few years ago. The wings have been assembled and some minor corrections to the panel lines done then a bit of detail added inside the fuselage, still more to do there, the crew figures are the kit parts slightly modified but with hindsight they still need oxygen masks fitted across their faces. The stalling point had been at the engines so I've returned there and got the cowlings cleaned up. One of standard kit parts in the background with the two modified parts for comparison. Removed the small bulges, tidied up the mold lines, and removed the intakes from the front of each exhaust pipe. A section of plastic strip to cover the inside of that exhaust molding finishes the cowl for now. Engines next and trying to recreate to individual exhaust pipes from each cylinder.
- 76 replies
-
- 29
-

-
- Beaufighter
- Tamiya
- (and 1 more)
-
I would have swore I started a post on this but could not find it to save my life. This is Tamiya's 1/48th P-47 I'm planning to use Cutting Edge decal sheet. I've been wanting to do a P-47 marked as Eileen since seeing the Academy box art years and years ago on the store shelves. Doing the checkered nose had been giving me anxiety so in a rush of inspiration, I paused another build to tackle them back in June 2022. The Cutting Edge sheet provided the checkers but so did Tamiya and I felt I was going to have better luck with Tami's decals. They were in three parts compared to CE's 2 piece. I started out painting the cowl gloss white as a base. Then came the moment of truth.... There's some wrinkles but I got them mostly out with a healthy dose of Solvaset. Not too shabby, and I like that some of the black squares "chipped" as I'm sure they wouldn't have stayed perfect with use. From there, I started in the normal spot, the cockpit. Paints are Model Master, the green is Euro Green which I like as a match for "P-47 cockpit green". The black is just MM black. I did lay down a base of Alclad aluminum before the green for the chipping effects. I used the kit decals for the instruments and I'm very happy with the way it looks. They conform really well considering Tamiya's decals reputation for being thick, same with the cowl checks. There's some wrinkles but they're really only visible in this photo. I also added some aftermarket cockpit stencils which aren't really visible in these shots. I used a resin seat with molded belts from a company whose name escapes me, but I didn't manage to get a shot of it. 🫤 That's all for now, more to come.
-
Hi folks, another Tamiya Me 262 for the WW2 Twins GB- this one being Galland's 262 with JV 44. Kit is Tamiya with KitsWorld decals and sprayed with Vallejo acrylics as usual. Thanks for looking in!
-
After many hours of reading in this quite busy GB I figured I might have to give it a go myself. Looking through the shelves at my local store I found a Tamiya Beaufighter that I’ve been wanting to build in the past. Ever since getting back into the hobby during the pandemic though, I have had massive issues with actually finishing my builds. Usually I have a good flow until the first error, and then it just dies out. So, my main goal with this one is just to have a finished model built straight out of the box. No fancy detailing or complicated schemes. Just a “simple” gray/green. I apologize in advance for any inaccuracies. The added social pressure of all you knowing what I have started should hopefully help me keep the focus on this one and not be tempted by all the other shiny boxes in the stash. Bags will probably remain unbroken until my local groups build night this coming Tuesday. Thanks for stopping by. Hopefully I'll have an update soon.
- 14 replies
-
- 11
-
-
Hi everyone. I’ve been lurking over in the figures section for a while, building up the where-with-all to get seriously stuck into my scratchbuilt Italian tank crew, but as a(nother) diversion I cracked on with a quick Tamiya old-school build. Sherman aficionado’s please look away – it’s OOB and uses the parts I liked the look of best from the selection provided rather than those that might be most correct. I drilled out the MG barrels, replaced a few handles with wire and filled up the rather obvious sponson voids, but other than that, it’s pretty much as Tamiya intended back in the 80’s/90’s. The destructions indicated that “Hurricane” should have sand shields fitted and be painted OD plus a rather dark red-brown. Looking at some images online though, convinced me that the shields should go and that the brown should be a lighter mid-earth tone, so that’s what I went with. In a flight of fancy, I imagined that the crew would have been commanded to add the brown in the field, and would have been unlikely to have spraying equipment, or a budding Michaelangelo among their number, so I replicated crude, brush applied brown paint using a scale 6 inch brush, badly applied. VERY tricky for a true artiste like myself to replicate of course, but sacrifices have to be made…. I supplemented the kit stowage with a couple of tissue paper/PVA tarps and a bit of embroidery thread. I decided to go a bit thicker than usual with the mud, so applied a mix of tile grout, finely crushed cat litter, tea leaves, “earth” pastel powder, a little static grass and diluted PVA. I then went round with my more usual pastel dust and white spirit thin mud on top. Another quick (although pretty glacial by Maddoxx standards) and thoroughly enjoyable old-school Tamiya build. Right… where’s the FIMO? I really must get on with those Italians…..
-
Hi all, recently finished this Tamiya Bf109E-4- the second build from the Aims JG 54 decal sheet I have. By far the most challenging scheme I've attempted with the sawtooth mottle and Balkan campaign RLM04 markings- I'm glad I gave it a go though as I think this is the best finished product I've done! Painted with Vallejo acrylics, with the yellow being Ammo RLM04. JG 54 Fw190 in the works now, thanks for looking in!
-
While waiting for a replacement windscreen from Zvezda for my 1/72nd C-130, I built the Tamiya 1/48th P-47D Razorback. I've had this kit in the stash for many years but something else always pulled me away from building it. Since I am not sure how long it will take for Zvezda to get the part to me to continue the C-130 build, I wanted something that would be "quick". This one was fairly quick, for me, but painting took quite a while, even with the relatively simple color scheme. I painted on the stripes and tried a new metal finish (for me). I also had an Eduard color PE set for this one. Overall, I am happy with the result. Of course there are some things I think I could do better with. I used an aftermarket seat with molded on belts, Quickboost I think. Paint is the Vallejo Metal Color Aluminum with a few panels in a mix of Aluminum and "Silver". The paint set had 4 colors included, but the other 3 were quite a bit darker than the aluminum. The darker panels are a 60/40 mix of aluminum and silver. The white stripes are the undercoat of Tamiya spray can Fine White Primer. The black stripes are Testors flat back, and the forward antiglare panel is Model Master Olive Drab. Decals are a mix of kit stencils, Eagle Strike, and Superscale. I painted the cockpit in my version of Dull Dark Green, an ancient tin of Humbrol 88 (pushing 25+ years old and still working well.) However last week, on Hyperscale, a discussion erupted concerning P-47 cockpit colors. I don't think there was any confirmation on colors for various P-47 models (C, D, G, M, N). Interesting food for thought... Background on this one: While researching the 23rd Fighter Squadron, 36th Fighter Group, in WW2, I always thought that they started D-Day carrying bombs for close air support or battlefield interdiction. Most, if not all, USAAF fighter wings were tasked with air superiority for the first missions of the day. The 36th was no exception. In reading pilot accounts, most flew 3 or even 4 sorties on June 6, 1944. The first 2 sorties were air superiority, and following tasking was for air to ground. I wanted to show this aircraft ready for it's first mission that morning. I choose tail number 42-26043, a P-47D-22-RE. This ship was lost to flak near Mortain, France on 7 Aug 44. Pilot James "Mose" Cole was KIA. I wasn't sure of the in-squadron letter so I chose "J" because I had a J on the decal sheets and my wife's name starts with "J". It wasn't until after the 36th moved to the continent that colorful engine cowling and tailplanes appeared. Even though it's just silver, black, and white, mostly, it still has some color pops here and there. I kept weathering to a minimum since the aircraft were fairly new, having only been in operation for a few weeks before the invasion, and the stripes had been painted only hours before the first sorties on D-Day.
-
Very straightforward build, I used Value Gears' kit-specific stowage plus other 'stuff' scrounged from the spares box. Tamiya lacquer paints mixed & lightened by eye. One of my fave WWII vehicles and a huge step-up from the old Academy kit (which did sacrifice some bits & pieces to make this one). Please feel free to make any comments, ask any questions or criticisms. Belated HNY all from the other side of the planet. Cheers from a very sunny and warm New Plymouth. Ian.
-
Here is my 1/24 Tamiya Porsche 934, built to represent a car from the Max Moritz Racing Team in 1976. In addition to the kit decals, I also added some decals from Decalpool for the Shell and Dunlop logos. I also added seatbelts from Studio27. The body was painted with Splash Paints Jägermeister orange and clear coated with Gravity 2K. This was meant to be a quick and easy build, but some setbacks along the way made it take several months to complete. It's not my best work, but I'm just happy it's finally done! Questions, comments, and especially critiques are most welcome. - Justin
-
 ok here we go..... This is the version i'm going to do - as now restored at Duxford. No 3rd Party Items just things i had knocking around at home ... like the odd bit of wire Later found out that the IFF? tranmitter should not be there? oh well its there now! First time using photo eched parts ...interesting Just taped in place.... the fit is just great on this kit! Another day another few bits of primer... Mr Surfacer 1500 naturally Same bits detail painted Cut the tail elevators to droop a little. All orifices filled - ready for a coat of Tamiya Surfacer. The undercarriage covering panels are just blue tacked in place ... i thought better than having two undercarrige stalks poking out in the way. Never used Tamiya Surface Primer before .... lets see! Seems Ok... Its bought out some details i had not even seen before Thats it for now.....
- 10 replies
-
- 14
-
-
After a longer quarter scale vehicle abstinence, it´s time for my dad to start a new one. DSC_0008 by grimreaper110, auf Flickr didn´t have enough AK RC SCC15 left, so used AK RC Forrest Green instead, it´s more or less the same green tone. DSC_0009 by grimreaper110, auf Flickr DSC_0010 by grimreaper110, auf Flickr
-
 My second entry from my three-build challenge is going to be a very well-known Tamiya kit that I plan to do as a Yugoslavian aircraft. Here is what I have: Not huge amount of aftermarket bits. However that box of resin is really full of goodies - I'll show its content later in this thread. Decal provides markings for a very non-standard Yugoslavian camouflage scheme of grey aircraft with dark green spots. I do not really like it to be honest. My intention is to make a natural metal bird with red arctic tail and tanks - I have references to at least two such aircraft with Yugoslavian serials 10600 and 10620 which had the same large size roundels (normally F-84G at that period had smaller sized roundels). I'll need to source serials and large nose numbers which I do not think should be a problem because at early stage of F-84G career with RV i PVO they were of typical USAF font. Eduard masks hopefully will save me an hour or so for masking the canopy.
- 54 replies
-
- 5
-
-
- F-84G
- Jugoslovensko Ratno Vazduhoplovstvo
- (and 1 more)
-
 My record in group builds is frankly appalling but I'm hoping I can find the enthusiasm and most importantly the time to make a 2nd contribution to this GB. I couldn't not do a French jet, as my in-progress Streak is an Adl'A jet and my 'Streak for the GB is a Belgian jet, I decided I'd do a plank wing F-84G as a French jet, marcher la planche = walk the plank. When Modelzone were in trouble they were selling a lot of stock off cheaply, I came away with half a dozen Academy F-84E/Gs at £4.99 a pop! This is one of those kits, I'll be doing it in the markings of ER2/33, a reconnaissance unit based at Cognac, deep in the Charente department of France in 1955, the decals are courtesy of Model Art. The wingtip fuel tanks feature a stylised seagull, the historical markings of SAL6, the unit continues as a reconnaissance unit to this day, equipped with the MQ-9 Reaper. The subject aircraft can be seen here, if you look closely, you can see a camera fairing on the belly of the aircraft beneath the cockpit, hopefully, somebody can help out with the details of this (Patrice @TEMPESTMK5 what do you know)? Here'e the box... ...the contents... ...and the decals. I like the Academy kit, it's not a shake and bake kit, it needs some effort especially around the inserts on the fuselage where the panels depicting an E/very early G (no auxiliary intakes), or standard G (auxiliary intakes), also, it does have some sink marks (notably on the wing upper surfaces above the wheel well walls), but I'm happier dealing with that than I am mucking up a Tamiya kit at several times the cost (I can already hear you asking "Who can muck up a Tamiya kit", "Well!!!..." I reply and passing my drink to somebody to hold while I demonstrate that I am that man). I just hope I haven't bitten off more than I can chew time wise!
 -
Here's my first completion for 2024. Fantastic kit from Tamiya, brilliant engineering & very accurate. I didn't ever consider the F-35A to be a great looking aircraft & was mostly put off doing one as most kits representing the RAM strips were grossly overscale, but finally here's a kit that looks a bit more sensible than the others. That's my opinion & I'm sticking with it. I hope Tamiya engineer an F-35B & C to this same standard in the One True Scale! Only then will I consider building any other versions. 😉 So I've used the new generation AK acrylic Have Glass Grey which I found to be too light in tone, so a very small amount of black was added to darken it. Then AK FS36270 was used for all the lighter grey panel strips. There are decals for all the RAM strips but they were masked & painted instead. I just thought the grey decals for the panels was too contrasty for the HGG. All the lighter grey panels were then over sprayed with with the HGG. Decals are both from the kit & the Furball sheet "F-35 Anthology JSF Pt.4" This is the flagship airframe for the resurrected 495th FS "Valkyries" at Lakenheath. 19-5495 "Freyja" Only addition is some wire to represent the main wheel brake lines. Just wish that the canopy could have been posed either open or closed but in this scale that would have been a tricky job. Still undecided wether to change it to closed. Next to come is the black tail F-15C of the 493rd 86-0172.
- 18 replies
-
- 41
-
-

-
- Tamiya 1/72 F-35A
- 1/72
- (and 1 more)
-
My first GB of the year, looking for a nice easy build. My entry is Tamiya’s 1/72 F-84G, plan is to finish it in the scheme shown on the box art.
-
 Hi All, This is my second post on Britmodeller, it is a Me262 A-1a from Tamiya upgraded with Aires aftermarket for cockpit, wheel bays and engines. Hope you like it! Happy modelling, Alex
- 16 replies
-
- 60
-
-
-
Hi all, another Tamiya 262 from me here for my 2nd build of the GB. Using Kitsworld decals again to build Adolf Galland's Me 262 from JV 44. I also have Montex masks for the canopy which will make life easier. Standard 76/81/82 scheme here with some mottling, should be a nice challenge. Made a start last night assembling the interior components, once they're sprayed and fitted the kit really does just fall together in no time. Thanks for looking in!
- 24 replies
-
- 10
-
-
Hi all, built for the ongoing Twin WW2 GB. Kit by Tamiya, with Quinta Studios cockpit decals and KitsWorld decals to create this 262 flown by Karl-Heinz Becker of 10./NJG 11. Thanks for looking in, check out the GB there's some cracking builds on the go.
-
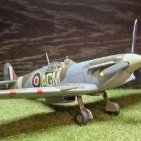
 Hello gang, first of all, best wishes for the new year and lotsa completed builds in 2024. Here is my take on a Malta Spitfire, I'm not pretending I have all the answers about that subject, just my interpretation. This is the the Tamiya 1/48 kit, painted with AK real colors and Gunze acryls. Plane is from the RAF 229 Squadron , in Ta-Kali, Malta, 1942. I worked from well known, B&W picture and tried to render what I saw on picture. Base camo scheme is DarkEarth/Middstone over Azure blue (from the AK real color range) while Middstone was over painted with extradark sea grey (Gunze range). I hope you'll like her, feel free to comment Best, Stef (#6)
 -
Its 2024 - my return after 18 months of RL fun will be a Tamiya 1/72 Mosquito Mk II Nightfighter -- I need to find if I can make all black look interesting 157 Squadron spent a few months at RAF Bradwell Bay so the kit fits with my - 'In Essex theme' for WW2 aircraft.
-
Placeholder for the first of my builds for this Groupbuild. A 1/72 Tamiya Mosquito VI.
-
My first build for the GB will be Tamiya's venerable Mosquito FB,VI in 1/48 scale, this will be my second build of this kit as I did one in 418 Sqn RCAF several years ago, I also built an older Airfix 1/48 one for the last "Less Than A Tenner GB" which was actually a nice build. Here's a picture of this time's box and contents; I have worked for Rolls Royce for more years than I care to remember and before some idiot decided to close it I was on their Ansty site just outside Coventry which was used by Standard Motors during the war to produce around 500 FB,VI's so when I build an FB.VI I like to build one that was built on that site, which means building one from either the HP, HR, RF or TE range. Now Warwickshire (my home county) also has a Royal Auxiliary Air Force Squadron and during the later stages of WWII it flew Moqsuitos on intruder missions and bomber support missions as part of 100 Group and after a couple of months on F.II's it was equipped with FB.VI's and I have found some of their serial numbers that include aircraft built by Standard Motors at Ansty so the build would have two local connections. I have found serials as I say but as of yet no photographs and if I can't find any I will need to either just build one in it's known codes and serial in the squadron's standard camo or build another Standard Motors built aircraft that I do have both the markings for and photographic evidence. I have several options in the decal stash to choose from and also have an Eduard Brassin Look set that I picked up at Telford somewhere, I shall post pics of this and any final choice of airframe later. Off topic but important to me is the fact that this will be my first build without my modelling buddy for the last 13 years, Mabel my black lab who we had to say goodbye to on Wednesday. I tend to do a lot of my modelling in our front room sitting on the floor and she would come and lie next to me, or actually sit on me which is about as comfortable as you imagine, to keep me company. It has been difficult losing her and sitting on the floor to build something will be very strange without her, so this will be for her, Mabel's Mossie if you will. This is her towards the end; Sorry for going off topic but thanks for looking in and any help, comments or criticisms will be gratefully received. Craig.
- 129 replies
-
- 37
-
-

-
Good day, With additional time off from the job along with a rather simple kit, I was able to squeeze in another completed project for the calendar year. Here are the highlights of the Tamiya Ki-61………….. 1. Colors used : A. Airframe base : Alclad Aluminum B. Tail : MRP Traffic Red C. Cockpit, landing gear bays, and doors : Tamiya Desert Yellow XF-59, Tamiya Brown X-9 D. Propeller : Polly Scale IJA Brown, Model Master Earth Red E. Landing Gear : Tamiya flat black XF-1 F. Ailerons & wheels : Tamiya Titanium Sliver G. Anti glare panel : Tamiya Flat Black XF-1 2. Washes : Vallejo Desert Dust ( airframe panels ), black, light rust, AK Oil Stains, Tamiya black & brown 3. Pastels : Brown, black, dark gray 4. Uschi bobbin thread antenna I built this one straight out of the box including using the colors as outlined by the instruction sheet. To try something different, I used Tamiya camouflage pattern decals for the unique green pattern on the upper surfaces. The entire set of decals are excellent!!!!! While I normally paint the yellow ID bands, I went thrifty and used the kit decal. I cannot say enough good things about the quality of this kit. Fit, detail, ease of construction are all outstanding. My only minor quibble is that the windscreen only comes in one piece. I would recommend this lovely kit from Tamiya for all skill levels. Thank you in advance, Mike
- 17 replies
-
- 50
-
-
-
 Hey all, This is Tamiya's Bradley. The kit was originally released in 1985, but this updated version was first released in 2003. I initially got hold of this kit to build it as an example used in Operation Iraqi Freedom, but seeing some of the other schemes, I had a change of heart to do it in European markings for a unit based in Germany at the time. The kit was built out of the box, but this time I took the oppurtunity to drill out the muzzle of the vehicle. I painted the vehicle using Tamiya Acrylics, and Humbrol Enamels. I weathered the vehicle with oil paints, and Acrylic mud effects by Mig. I also used all of the stowage handily included in the kit, which was painted with acrylics and oils. As a finishing touch I added Mantis Miniatures branches. They look fantastic, and are easy to use. However, they are quite expensive, and looking at them, you could probably achieve the same with a large tub of mixed herbs and some roots pillaged from the garden. I have seen techniques where you use PVA to dab the areas where you want the 'leaves' to stick and then sprinkle mixed herbs or similar over them to create some convincing albeit fragrant tree branches. Many thanks for looking! Sam
 -
Having become bored with my more elaborate builds, I thought it might recharge my modeling mojo to take on a simple Japanese destroyer – and perhaps actually finish it! Tamiya’s of the 1/350 scale IJN Kagero seems like a perfect choice. If it lives up to the Tamiya reputation of great fitting parts, assembly should be a snap. Just to keep things interesting I picked up the Infini brass upgrade set for it too. I’m hoping to complete this one fairly quickly with a minimum of the scratchbuilding which tends to bog down my projects. We’ll see, but this should be a fun, straightforward build! True to form, Tamiya’s Kagero hull parts fit beautifully and the hull went together quickly. My only quibble here is the split hull design. While the waterline/full hull option here is nice, molding the lower hull separately builds in a bit of extra effort to integrate the lower and upper portions. I definitely prefer the simpler single hull approach of their earlier USS Fletcher kit. That said, the join was pretty good and only a little Mr. Surfacer 1200 was needed to blend things.