Search the Community
Showing results for tags 'TAMIYA'.
-
 Hi all, Here is my Tamiya 1/72 Thunderbolt Razorback, a kit that requires little introduction I guess: great fit, with lovely detail all around. I just added a few details (PE seat belts in the cockpit, brake lines on the main landing gear, vacform canopy, brass gun barrels and DF loop antenna on the spine). The drop tank is from a Pavla armament set. The model represents an aircraft from the 1st ACG, that provided close air support and resupply operations to British troops (the so-called "Chindits") that were dropped behind Japanese front lines in Burma. For this "Operation Thursday" aircraft, I used the DP Casper decal sheet. The sheet provides fuselage stripes and theater bands in both dark blue and black. Reading through Squadron's "Thunderbolt in the Pacific Theater", the fuselage stripes are described as dark blue and the bands on wings and tail surfaces in black, so I settled for this combination. First time I used DP Casper's decals: these are very thin and break easily, so care is needed in handling them but they give a nice result. For the NMF I used a few Alclad shades, other paints are mostly Tamiya acrylics. Weathering was done with oils and pigments. Here is a Wikemedia picture of the real thing: United States Army Air Forces, Public domain, via Wikimedia Commons Credits background picture: freepik, https://www.freepik.com/free-photo/beautiful-scenery-green-tree-forest-cloudy-sky_9185373.htm Hope you enjoy the pictures, thanks for looking! Best regards, Patrick
- 15 replies
-
- 51
-

-

-
#9/2024 After a longer pause, my dad finished another race car. Tamiya kit, first released in 1978, this is the 2010 edition with Cartograf decals. Sadly they didn´t perform as used to, so painted all the gold on the main body with Gunze H9 Gold. For the blue my dad used Mr Paint Sea Blue. Didn´t add much detail, only some lead wire for tubing and wiring in the engine area. Well, the kit shows its age regarding engineering, molding and fit and my dad didn´t finish it glitch-free. Build thread here https://www.britmodeller.com/forums/index.php?/topic/235136624-fast-canis-lupus120-wolf-wr-1-1977/ Walter Wolf Racing, a British-Canadian team with roots in the Williams team, active from 1976 to 1979, lead by Austrian-Canadian businessman Walter Wolf Japan GP 1977 (therefore the Tamiya add on the engine cover), piloted by South African Jody Scheckter DSC_0001 by grimreaper110, auf Flickr DSC_0002 by grimreaper110, auf Flickr DSC_0003 by grimreaper110, auf Flickr DSC_0004 by grimreaper110, auf Flickr DSC_0005 by grimreaper110, auf Flickr DSC_0006 by grimreaper110, auf Flickr DSC_0007 by grimreaper110, auf Flickr DSC_0008 by grimreaper110, auf Flickr DSC_0009 by grimreaper110, auf Flickr DSC_0010 by grimreaper110, auf Flickr DSC_0012 by grimreaper110, auf Flickr DSC_0013 by grimreaper110, auf Flickr DSC_0014 by grimreaper110, auf Flickr
-
 This is the Tamiya 1/48 P-51D Mustang, marked as John C. Meyer's "Petie 2nd". Typical of Tamiya, easy assembly and a nice fit. The only weak points are the wheel well not going back to the spar, and a prop that is too wide and tapered at the cuff (easy to correct). I used an Ultracast seat, and the sliding canopy is a spare from an Airfix kit (suitably reshaped). Wheel well was opened to the aft spar, brake lines added, and the radio, battery and drop tanks wired, and plumbed. Decals are the kits (works well with VERY hot water), and the paints are all Tamiya acrylic. Thanks for looking, Colin
 -
Hi all I've just started to build the Tamiya 1:48 Vought F4U-1a Corsair #61070. Among the list of suggested Tamiya paints are: AS-8 Navy Blue (US Navy); AS-19 Intermediate Blue (US Navy); and AS-20 Insignia White (US Navy). As I don't use spray cans for painting, I'm trying to find the equivalent paints as either acrylic or enamel. So far, I've come up with Tamiya XF-17 (Sea Blue), Tamiya XF-18 (Medium Blue) and Tamiya XF-2 (Flat White) respectively. AK do an Insignia White, AK1101(FS37875) -(a comparison chart gives Tamiya XF-2 as a 'suitable' alternative to this). Is there an actual comparison chart anywhere of Tamiya AS Paints to Acrylic/Enamel (for future use), or has anyone done their own comparison chart or can give me alternatives to AS-8 and AS-19? Thanks in advance.
-

Lockheed Martin F 16 C . 22nd FS USAFE Spangdahlem
wellzy posted a topic in NATO 75th Anniversary GB
Hi Guys here we go. This is why Im building the F16 RIAT July 2017. Happy days Wellzy -
This Tamiya 109 is my latest build, and I have to say one of the nicest kits I have ever built; the fit is perfect and no modifications or putty were needed. This was also my first time doing mottling, I had to redo it at least 3 times but, I am pleased with the result. I used Ak real colors acrylics. The only aftermarket items used were Eduard Photo-etched in the cockpit, a master pitot tube and cannons, and Decals from Aeromaster, Eduard and Italeri. The sand filter, which wasn't included in the kit was taken from an Eduard 109. I used Abteilung 502 oils to wash the model and Tamiya weathering powders for the exhausts. Happy modelling! Anna
-
Hi, I would like to start and share my new build of a De Havilland Mosquito 1:48 scale. The kit is the old, but still very nice Tamiya of the FB Mk VI. I believe that neither a presentation of this aircraft nor of the kit is necessary. Since long, I wanted to build a model of this aircraft because of its fame and because of its remarkable design. For me, this is the first mosquito build as a grown up modeller if I exclude the ancient Revell 1/32 kit that I built when I was a kid. To start my build, I followed to the letter the Tamiya instructions which called the engine nacelles as a first step: I just thickened the frames for added 3-D effect and added few interior details. The white panel shown on the inside of the walls is an artistic license of mine having used a piece of thin styrene to hide annoying ejection pin marks which I didn't want to fill and sand. In the following, the nacelles are shown completed: Finally, they are test fitted with the wings and the main undercarriage struts to check that no interferences with the new parts are present: That is all for this first instalment, I hope you will enjoy following it. Best regards, Dan
-
This is my build of Tamiya’s very nice Mazda MX-5 ND RF kit (#24353). This kit has the larger option wheels and has been painted Tamiya TS-49 Bright Red to match my NA to ND series. The model was enjoyable to build and nicely completes my collection. Grant. With its “standard” convertible sibling The collection of MX-5s
-
Hello, Finally, I managed to finish Wildcat from Tamiya in marking from Guadalcanal. It was quite ok build, Tamiya kit has some years but still good in details. I used Gunze H and AK RC colours and Tamiya varnishes. I struggled with signs and numbers decals on fuselage and I rather used homemade masks. Weathering is done by Abteilung 502 oil paints and chalks. I hope you’ll like it. Petr
-
 Hey all, This is Tamiya's P-47D 'Razorback', an instant classic from the early 2000s. Like many others, I've had a strong affinity towards this aircraft for a long time. Somehow, the brutal look of the aircraft is met with some amazing lines, to create what in my eyes is a true thoroughbred aircraft. I've always had an interest in the Eighth Air Force during the Second World War as I live in East Anglia and have a number of former airbases right on my doorstep. Additionally, with my job I'm constantly all over the six traditional counties that make up the East of England. To be able to step out of my door and be right in the history has always driven an obsession interest with the 'Mighty Eighth'. The aircraft I've depicted is from the 355th Fighter Group, based at RAF Steeple Morden, which is just on the outskirts of Royston, sort of close to the borders of Hertfordshire and Bedfordshire but in fact in Cambridgeshire. The air base was originally a satellite for RAF Bassingbourne before being handed over the the USAAC in mid-1943. The kit fell together, as do Tamiya kits, so no need to cover already well documented ground. The only thing i did add was an Eduard LooK set which includes a drop in resin instrument panel and seatbelts, the only two additions really needed IMO. I painted the aircraft with Mr. Colour Acrylics, and weathered with oils. The decals are from Furball Aero-design, of which their 'Colors and Markings of P-47s Part 1' includes 20 different schemes for the P-47 in the ETO and MTO, and though the stencils are included, I used the kits stencils and national insignia. This means I can use the decals again for later projects! Thanks for looking, Sam
 -
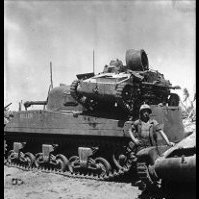
After a few months of it dusting away in my spray booth, finally got around to finishing it up. Did end up being a lot simpler compared to my previous T-72m1 also from tamiya, but still fairly happy with the results Everything aside from the tracks came with the kit itself out of the box with the tracks themselves being the ones from MENG
-
#4/2024 After some pause, time for a 1/48 vehicle between all the aircraft. Tamiya kit oob, thanks to the quality it was an easy and straight forward build. Painted with AC RC Forrest Green Build thread here https://www.britmodeller.com/forums/index.php?/topic/235135794-medic148-austin-k2y-ambulance/ DSC_0001 by grimreaper110, auf Flickr DSC_0010 by grimreaper110, auf Flickr DSC_0003 by grimreaper110, auf Flickr DSC_0004 by grimreaper110, auf Flickr DSC_0005 by grimreaper110, auf Flickr DSC_0006 by grimreaper110, auf Flickr DSC_0007 by grimreaper110, auf Flickr DSC_0008 by grimreaper110, auf Flickr DSC_0009 by grimreaper110, auf Flickr DSC_0012 by grimreaper110, auf Flickr DSC_0013 by grimreaper110, auf Flickr
-
 Lets see how this goes........ The kit does not have the side camera window... i am wondering if i'm brave enough to drill a hole and give it a go ..... Anyway started ... with a few other things... lights under the wing. painted silver apart from the centre. Filled that with ""Looks like Glass" ..seems to look like a bulb a drop of "Looks like Glass" on the front. Part II soon......
- 25 replies
-
- 17
-
-
- De Havilland Mosquito
- Tamiya
- (and 1 more)
-
Hi Guy`s here`s No two . other decal sheet only half used , P51B ,363FS 357FG .RAF Leiston 1944 Well that`s my second U.S.8th A.f. Build .Cheers Wellzy.
-
This Kit has been such a pleasure to make .... 5th model now... think i'm getting the idea. 🤓 BUILD DIARY
-
HI everyone!🙂 this is my TAMIYA 1/24 FIAT 500 A very cute little car... the kit is aged,however,I think it's a good kit I did some modification and detail up hope you guys like it!
- 16 replies
-
- 34
-
-
I’m guessing this is the Italeri kit with new decals based on the price but will be happy to be proven wrong. https://www.hlj.com/1-48-scale-f-a-18f-super-hornet-us-navy-special-paint-tam38104
-
Good day, Finally I am able to post something for this year. A previous failed project consumed the first month and half of the new year so here is my first submission for 2024. This is the Tamiya F-16C displayed from the 57th Fighter Weapons Squadron at Nellis AFB, Nevada. The highlights are as follows………… 1. Paints used : A. Airframe : Vallejo Pale Brown, USAF Tan, US Forest Green, USAF Medium Gray B. Exhaust : Exterior - AK Extreme Pale Burnt Metal ( Tamiya Black Panel Line wash ), Steel. Interior - AK Buff with Tamiya Black & Brown panel line wash C. Misc : Tamiya Flat Black, Flat White, Gun Metal, Metallic Gray, Lifecolor Dark Gull Gray, Polly Scale Lt Ghost Gray ( FS36375 ), AK Deep Blue 2. Wolf Pack AN/ALQ-188 ECM pod ( centerline station ) and dual chin pods ( all three resin ), Italeri ACMI pod ( port wing rail ) 3. Twobobs decals ( Fighting Fulcrums #72-002 ) 4. Master metal pitot tube & AOA tubes 5. Washes : Vallejo black, dark gray, light gray. Tamiya black, brown Tamiya continues it`s reputation of excellence with this kit. There were no issues with the parts fitting together without major or even minor surgery. I used putty in just a couple of small sections of the kit. I decided to include the pilot figure. I used my customary plumber`s putty and small lead fishing sinkers for ballast in order to have the Viper sit right. I inserted the putty and sinkers inside the nose and just aft of the cockpit. Despite the age of the decals, ( I cannot believe just how long I had these decals for ), they adhered and settled well with solution. I chose the early release from Tamiya of the F-16C for this particular subject as it did not require anything under the wings ( although I could have as some Aggressor Vipers tote external fuel tanks and four missile launch rails ). I enjoyed this kit very much and recommend it for all skill levels. Thank you in advance. Respectfully submitted, Mike
-
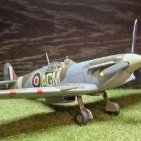
 Supermarine Spitfire Mk.Vb, EP829 T-N, 249 Squadron, Qrendi, Malta, April to May 1943. Sqn Ldr John J Lynch. Malta's 1000th victory Subject; Supermarine Spitfire Mk.Vb, non-tropicalised, clipped wings, x2 Hispano Suiza 20mm cannons and x4 Browning .303's Manufacturer; Tamiya Scale; 1/48 Kit number; 61033 Aftermarket; Eduard Zoom P.E set. Eduard decals. Paints; Exterior upper, AK Real Colour RAF Middle Stone and Dark Earth overpainted with custom mix of RAF Extra Dark Sea Grey and XF8 Flat Blue. Lower, mix of XF23 Light Blue, XF19 Sky Grey and XF2 Flat White for the AM Sky. Interior; AK Real Colour RAF Interior Grey Green and Xtreme Metal Matt Aluminium. X7 for the wing tips. Various Tamiya X, XF and LP and Posca pens for detailing. Primer; Mr Surfacer 1200 Varnish; AK Gauzy Shine Agent and Tamiya X35 Semi-Gloss. Weathering; Flory Dark Dirt and Grime wash, Abteilung oils, Ammo North Africa pigment and Tamiya weathering palettes. Extras; Prym Knitting Elastic for the antenna wires.
 -
 My first plane model in 40 years (usually it's tanks), I was inspired by the description in AK Real Colours for Night being a mix of a blue and black. Went for the Tamiya P-47M 1/48 - it's from 2005 (61096) - excellent model, any fault with the construction was mine and not due to the model! As I paint with rattle cans I got a custom filled rattle can and settled on RAL 5004 ie a very, very dark blue. I did try it out on various undercoats as testers and found it was too blue, when used on black undercoat. So finally went for a pale grey, as the final colour looked more black The weathering and inspiration for the model came from AK 56th fighter group in WW2 - the colour and weathering for the drop tanks, undercarriage doors, wheels, I lifted straight from the cover. Overall learnt an awful lot that I will carry over to my next plane, as I have the aviation bug now, including: - Pencils are harder to use than oils and scratch the base paint (I used only pencils on this) and the colour changes to a whiter look with the clear coat - The decals in the 56th FG book were awful and totally the wrong colour( great book, terrible decals), the decals in the box were (old?) difficult to get to sit on the model, even with a gloss layer for them to sit on, so I will go with spraying markings next time (as I do on tanks) -I'm sure most of you know this already, I didn't but the the Tamiya model was a masterclass in what a model should be for the way it all fitted together - I will actually be drawn to Tamiya planes first after this I have started a Loire 130 and looking to see what other aircraft I will do next.
- 15 replies
-
- 38
-
-
-
After some pause, my dad started another F1 car. this time a Wolf WR1 from the British-Canadian team, owned by the Austrian-Canadian Walter Wolf. It´s the 2010 kit edition, including decals by Cartograf, PE and metal parts. DSC_0008 by grimreaper110, auf Flickr engine block painted with Tamiya XF-16 Flat Aluminium DSC_0009 by grimreaper110, auf Flickr DSC_0010 by grimreaper110, auf Flickr DSC_0011 by grimreaper110, auf Flickr DSC_0012 by grimreaper110, auf Flickr
-
This is my model of Tamiya’s Mazda MX-5 ND / Mk IV (kit #24342). The model is an homage to a real car formerly owned by a former member of our local MX-5 club. Wheels are Aoshima 19” AVS Model T6 (#045527), exhaust tips are Hobby Design (actual car had two dual-tip outlets, though perhaps not this big!) and paint is Tamiya TS-95 Pure Metallic Red over grey primer. Grant. With “stock” sibling
- 10 replies
-
- 26
-
-
- Mazda MX-5
- Tamiya
- (and 1 more)
-
 Hello all, Here is my entry for this GB - Tamiya's 1/48 A-1H Skyraider marked as BuNo 139768 of VA-25 'Fist of the Fleet', flying off the USS Midway during the Vietnam war in 1965. Delivered to the Navy in 1956, this Skyraider served with VA-42 and VA-122 prior to being transferred to VA-25 in July 1964. On the 20th June 1965, this aircraft was piloted by Lt Clint Johnson and was credited with downing a North Vietnamese MIG-17 along with Lt Charlie Hartman. 139768 was passed to VA-115 in 1966 and forced to ditch in the Gulf of Tonkin due to battle damage in March 1967. Kit: Extras: I'll be adding a Quinta cockpit set, Quickboost resin cockpit piece, New Ware masks and Aeromaster decals. I've seen a few images of Spads carrying MK.81 250lb bombs, so I retrieved a few old Hasegawa examples from the spares and will add these to some the kit supplied ordnance (of which there is a lot!) Reference: Been wanting to do this one for a while so looking forward to getting started (need to get that Catalina under way first though!). Dave
- 75 replies
-
- 17
-
-
 Hi all, With the hope of getting a more simple and swifter build under my belt before tackling a SH F-84F I have embarked on another Tamiya Mustang! Many of you have built them and so I wont labour it with repetitive posts but I will post things that are particular to this build. My subject is a post-WW2 machine that served with the Nevada ANG while detached to Iceland in 1952-53. It is the second in this row - '474482' seemingly called "Nancy". So far the build has been pretty much standard fare for a Tamiya Mustang kit, particularly the flaps. This time around, though, I am using a set of Armycast resin items. Other aftermarket will be the canopy (Falcon), although if it ends up looking wrong, as I am no good at vac form stuff, I will revert to the kit parts. Also I will use resin exhausts, PE seat belts and a Yahu IP. The cockpit needs a bit of modification to accomodate what I believe to be an ARC-3 radio set up behind the cockpit. However, while my drawings show these as fitted horizontally these seem to be vertical. My efforts are a bit of guesswork but I think it will look okay 🤞. You can see this a little better in the following image: Today I am at the fuselage half mating stage. The following are some build shots: The internal parts painted Dry fitting I'm feeling better already! Martin
- 46 replies
-
- 22
-
-
At approximately 1230 hrs on 12th June 1942 a single Beaufighter Ic, crewed by Flt Lt. Ken Gatward at the controls and guided there by his navigator Sgt. Gilbert Fern, roared along the Champs-Elysees at rooftop height to drop a French flag over the Arc de Triomphe and then flew to the Place de la Concorde where they strafed the Kreigsmarine headquarters with 20mm cannon fire and dropped a second French flag over it. This event, the express purpose of which was to raise morale of the French people and remind them they had not been forgotten, was Operation Squabble. Ever since I read about the event I've wanted to model the 236 Sqn. Bristol Beaufighter Ic that took part. Although it is known to be coded ND-C there is some speculation if it carried the serial T4800 as shown in a photograph of a Beaufighter carrying the code letters taken a month or so later. Since nobody can confirm with any certainty whether or not this was the case or otherwise let's go with it as best guess for the purposes of this project. Tamiya's 48th scale kit provides a decent basis to backdate from the Mk. VI and was the only option in 48th when I started this one a few years ago. The wings have been assembled and some minor corrections to the panel lines done then a bit of detail added inside the fuselage, still more to do there, the crew figures are the kit parts slightly modified but with hindsight they still need oxygen masks fitted across their faces. The stalling point had been at the engines so I've returned there and got the cowlings cleaned up. One of standard kit parts in the background with the two modified parts for comparison. Removed the small bulges, tidied up the mold lines, and removed the intakes from the front of each exhaust pipe. A section of plastic strip to cover the inside of that exhaust molding finishes the cowl for now. Engines next and trying to recreate to individual exhaust pipes from each cylinder.
- 76 replies
-
- 29
-
-
- Beaufighter
- Tamiya
- (and 1 more)