
Search the Community
Showing results for tags 'TAMIYA 1/35'.
-
Hi all This is Tamiya's 1/35 Horch 1a 'Heavy Off Road Passenger Car' - an old kit, but still a nice build with no particular issues. Finished as a Luftwaffe vehicle, so probably used for airfield/transportation duties, rather than actual combat. Or that's my excuse for the 'mild' weathering anyway..
-
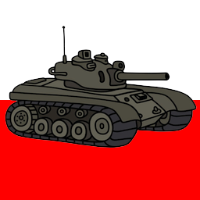
Hi, This is a 1:35 model of the Churchill Mk. VII, British Infantry tank. This is Tamiya KIT no. 35210. I made it as a movable model. The only additional parts are the AFV plastic tracks and couple small accessories like bucket, swags, chest, the rest is OOB. Constructive criticism is encouraged. I MADE SOME CHANGES I THE MODEL, CAN YOU SEE THE DIFFERENCE ? Below I show how does it ride Models finished in 2021/2022 - "Sturmgeschutz III ausf G (1:35 vintage Tamiya)", "Matilda MK II (1:35 vintage Tamiya)" I invite you to see the rest of works on my site "about me"
- 26 replies
-
- 46
-

-

-
- Tamiya 1/35
- Churchill
- (and 1 more)
-
Going to dip my toes into the armour section again and this time with a WIP. It will be a slow burner as harvest is upon us and time at the bench will be limited, will post spruce shots later but will be looking for plenty of advice, really looking forward to this as the plastic looks fantastic!!
-
Charioteer FV4101 Medium Gun Tank As WW2 ended and the Cold war began it soon became apparent that a more powerful gun would be needed to counter the threat of the heavier Soviet tanks such as the T-44 and so the Ordinance QF 20pdr gun was introduced in 1948. It had been developed for use in the Centurion Mk.3 however Centurion production was slow and there was a surplus of the 20pdr's. Cromwell tanks had been retained in service but it's 75mm armament lacked the punch to deal with the newer Soviet tanks so as an interim measure it was decided to up-gun the Cromwell. To do this a new two man turret was developed to accommodate the gun. The resulting vehicle was originally named FV4101 Cromwell Heavy AT Gun but renamed 'Charioteer' before entering service. This is the Accurate Armour conversion kit designed for the Tamiya Cromwell but the Airfix kit could probably be used as well. The model was painted with MRP-349 SCC No.15 Olive Drab and weathered with pigments. The pigments were a little warmer than I had planed and give a bit of a sandy appearance. This was my reference photo. I'm not sure who was operating this particular vehicle. The only visible markings are the 214 on the turret. I made a stencil for them and presumed they are white. I must admit that I struggled with getting this one finished, some of the casting on the resin parts wasn't great and trying to build it alongside a Centaur and Cromwell probably wasn't a good idea. Looking at the photos I can see that using gloss varnish on the vision blocks hasn't worked, they are quite large so I could probably cut a small piece of glass to go in them. If you are looking to build a Charioteer in 1/35 then I believe that the Accurate Armour conversion is the only option and with a little extra effort does build into a nice looing model. If you are interested I did do a Work in Progress. Wayne
-
HI Guys can anyone help me with information on the colours of the interior of the M 10 llc Achilles in northern Europe area lale 1944 and 1945 Cheers wellzy
-
 This is another vehicle destined for a forthcoming diorama, but which I thought deserved an outing all of its own. Here's a very old and tired Austin 10HP Utility Vehicle, the Tilly, by Tamiya and me. I had an Austin Cambridge in the 1070s and I can assure you, the rusty arches that you see here are based on my fond memories of that amazingly comfortable behemoth with its sumptuously padded bench seats. It slept four! It started life brown, or was it green, and then faded to green, or is that brown. Pieces have fallen off... But someone still fondly polishes the windscreen. In return for the warmth of the cooling radiator. Seats four. It was a fun and easy kit and would be at home in a million diorama settings. Highly recommended!
 -
As a cash strapped schoolboy, this was the first Tamiya kit I could afford, and I built it sometime around 1978. I have fond memories of it and have recommended it to a couple of people on here as an ideal starter for 1/35 armour. Time to put my money where my mouth is and build another one myself, just to see if it is as nice as I remember. I got this kit brand new earlier this week from Models For Sale for the princely sum of £8.99 (yes, really, a 1/35 tank plus figures and change from a tenner), so it doesn't have to be that good to be value for money The current box is unchanged from 1971. There was another release the following year that dropped the figures but I've never seen it. There is a sprue that has the turret and bits & bobs for the hull. Detail is nice enough (apart from that track for the hull fron ) and the mould would be pretty clean if it was new, never mind 50 years old. There are also a set of poly caps that help capture the wheels on the axles. Next sprue has the running gear and commander figure. All the wheels are single row which makes construction and painting so much quicker and easier. That commander can go in the spares box - there's nothing much wrong with him except his DAK uniform which ties him to specific time and place. There is a little bit of flash and some mould lines that I don't remember from last time, but it's really not bad and will take minimal cleaning up. Hull comes as a tub and a deck that has most of the superstructure and storage boxes moulded on. There will be a gap at the side where the storage bin overlaps the track guard - if it bothers you it would be a two minute job to box in with card. Or you could just not look at it upside down. There are battery guides inside the tub and slots in the bottom that betray the kit's motorised toy beginnings. Again, you can fix them or ignore them as you see fit. I'm going to ignore them. Tracks are typical 70's rubber bands with long prongs that you're supposed to push through holes then fix with a hot screwdriver. Small staples will do the same job. There are four infantry figures too, busy being all dynamic. Again, they're time and place specific (early in the DAK's involvement in North Africa, later I believe they would have short boots and caps instead of the long boots and pith helmet options - see Airfix's very nice HO/OO figure sets for examples) and again they're going straight in the spares box. Instructions are the standard Tamiya concertina. They have a lot of notes on unit organisation and an explanation of the differences in DAK uniforms over time but it's all in Japanese. Painting guide is basic in the extreme and gives no colour call outs (I don't know when Tamiya introduced their own range, I'm guessing some time after this kit appeared). There are decals supplied for 5 options though, and they cover just about every scheme the Pz. II carried which is great. I've done a bit of digging and fortunately German divisional markings often changed over time so I can pin the units, location and probable colours down: 1. 18th Panzer Division, Operation Barbarossa, Summer 1941 - overall Dunkelgrau (RAL7021) 2. 3rd Panzer Division, summer 1943 - Olivegrün (RAL 6003) or Rotbraun (RAL8017) splodges over dark yellow (RAL7028) 3. 15th Panzer Division, North Africa 1941 - overall Gelbbraun (RAL 8000) 4. 21st Panzer Division (after its reorganisation and redesignation from 5th Light Division) 1942/3 - Braun (RAL8020) with spots of Grau Grün (RAL 7008) 5. 6th Panzer Division, spring/early summer 1943 - overall dark yellow (RAL7028) I have my own preferred matches for all of those, but that's a can of worms for another day Time to just build it now. Andy
-
Hello! Just joined last night. I thought I would share the kit I am currently building. Does anyone still build a kit straight from the box? This for me has already gone out of the window. The best laid plans... A Miniart kit would have saved a lot of money and built straight from the box. But where is the fun in that? Hindsight is a wonderful thing. Here are a few shots of the progress so far whilst I wait on an aftermarket barrel, tracks, photo etch, skirting board ladder........ Most models I've seen of the SU122 have the front mud guards on. I'm hoping to build something looking like its seen some action, so the plan is to remove them. With them off the vehicle has a hint of Jagdpanther about it? Below is a reference photo of a knocked out SU122 featuring what's left of the mudguard fixings and bracket? I've made the brackets from photo-etch sprue and plastic rod. The hull also needed a little shaping around the plate welds. I'm reasonably happy with the results. It could possibly do with being more damaged. I will post so more when I get a chance. Thanks for looking.
-
Hi all, for some unknown reason I’ve decided to try my hand at some ww2 armour (apart from a few 1/72 tanks I’ve just built ww2 eto aircraft till now) so I was in the local model shop last week (I’m still lucky enough to have one!) I couldn’t resist the old tamiya 1/35 panther (think it’s an “A”?) and without cockpits to do and no canopy masking progress has been rapid. however I have a couple of questions. your starter for 10..... the hole shown here: the instructions show no part to be fitted above/below. My good chum @BIG X sent me a pic of a kit he’s doing that has a part over the top. Now progress has gone well beyond this picture but not to the extent I can’t do something with it if someone can tell me if it should have a cover on the top or as I’ve done just put a disc of card below it? And your follow on questions..... I’ve already painted everything xf60 and I have xf61 and whatever the other tamiya colour is (looked up the camo colours) so my question is does the camo extend to the road wheels and well, for want of a better description (please some one tell me! 😁) the “back” where the exhausts are attached? and your 2 supplemental questions..... the radio antenna- (to scale) how long (or rather tall) should it be? the tracks - rubber 1 part things. Someone said to soak them in warm water to “extend” them a few mm’s and also to make them more flexible. Is there any point priming then painting them with anything as I can just see it flaking off.... oh, and I see you can get etch for the “D” but not this kit - those vents are screaming out for some grills.... afv newbie so please excuse the ignorance! 👍 cheers. ian
-
First finished build of 2019, built as part of the Panzer IV STGB. Second build of the year built as part of the Tiger STGB hosted by me and Stix. Finished off in 2019, the Bedford boys hitting Omaha beach June 6th 1944. Built as part of the D-Day group build, 2nd Platoon Easy Company taking the first gun at Brecourt manor June 6th 1944. Built during a Models For Heroes session at Tedworth House. And finally mini Arts European tram and ICMs Sd.Kfz 251/6. Thanks for everyone who's given me advice of links to get aftermarket bits. Happy New Year everyone, happy modelling for 2020.
- 6 replies
-
- 6
-
-
-
- Dragon 1/35
- tamiya 1/35
- (and 1 more)
-
Having built nothing new for about five months (partly to do with loss of enthusiasm), I had a root through the cupboards where I keep my stash, trying to come up with something that would fire me up (you’d think that with 50 odd AFVs and trucks, it wouldn’t be too difficult). Several years ago, I built a Firefly 1c using a Tamiya M4 upper hull and a Dragon lower hull, but I made some school boy errors, and ditched it. It’s now sitting on a shelf, in pieces waiting to be recycled into other builds. Right, the current project. There is now a 1/35th scale model of the Sherman 1c with a welded hull from Dragon, but I still have a lot of spare parts to use up. Gathering the relevant parts together, I found that I was short of an upper hull, but an email to somebody I know on TL has got me a Tamiya M4 upper hull. There are some modifications to be made to it such as the radio pot (wrong shape) and a few weld lines on the glacis that need eliminating and some that need enhancing. The lower hull is also Tamiya and has been used in many different kits, but unfortunately has a (minor) problem; the moulded on base plates for the VVSS are 1mm higher on one side than the other which does make the completed model lean to one side. But it isn’t major and a sharp chisel blade and some sanding will remove them ready for new ones to be fitted. I have a Firefly turret left over from the original build which is in reasonable condition, but if I’m not happy with it, I have a new one (Dragon). Whichever way that I choose, I’ve also got a 17pdr courtesy of RB Models. The rest will come from my spares box such as the suspension, bins, stowage etc. The one thing that I’m not sure about at the moment are the tracks. If I don’t have the appropriate ones, then I will order a set from Panda Plastics. Also, not sure about the finish. Once I’ve had a look through my decals, then I’ll decide. So there you have it. I won’t be starting this off with any photos of sprues, box art etc as it’s not relevant, but my next post will be straight into the build, modifying the lower hull. See you then. John.
- 163 replies
-
- 6
-
-
- Tamiya 1/35
- Dragon 1/35
- (and 1 more)
-
 Hi All, some years ago I spent hours ad hours to improve the nice Tamiya kit. It was destinated to a publication for a well known magazine. I'm still waiting! Anyway it was a dare and pleasure confront myself with this work. Here the article, the wip pics and those of the completed model. The figure was from Hornet. Hope you like Ciao Filippo Last of the Lost Sd.Kfz. 182 Pz.kpfw. VI Tiger Ausfuehrung B Koenigstiger 3./schwere Panzer-Abteilung 511 Kassel area, april 1945 Introduction In general I like to represent a specific model with a story to tell. This help me to obtain a better approach with the project. This time I turn my attention to a Koenigstiger from a march 1945 production run attached to schwere Panzer-Abteilung 511[-1] . On 31 March 1945 the 3rd kompanie received 8 Koenigstiger through from Henschel factory in Kassel area where they fought the last battle. Unfortunately pictures of actual late production version are very rare. Anyway T. Jentz “V.K. 45.02 to Tiger II” volume (from now JD KT where J stand for Jentz, D for Doyle and KT for Koenigstiger) is an excellent source of informations. At the same time H. Doyle scale drawings did the rest. Koenigstiger march ’45 production run Koenigstiger march ’45 production run showed lots of external differences. A fews of these differences were introduced during previous production runs, others were specific elements of march ’45 production feauturing hull and turret. The hull differed from previous production runs with the following features: - 18 teeth drive sprockets; - single link Kgs 73/800/152 tracks; - two locks for driver’s and radio operator’s hatches; - dropped jack and wooden block on rear hull; - dropped track mounting cable on port side hull; - four vents lines for fuel system; - armour cover engine compartment vent on rear deck; - engine hatch stopper; - dropped metal meshes to prevent mine inserting; - squared instead rounded notches reflected on the sponson as squared grooves. - strenghtening front mudguards; The turret differed from previous production runs with the following features: - inverted U shaped guard welded over the gun sight aperture; - poison gas identification panels (two on rear turret and one on gun mantlet); - half cylinder armor guards welded onto each side of the lower turret torsion bars; - semplified squared rear hatch; - 40mm loader hatch cover; - four sets of two tracks hangers each one welded on both side of turret. Tamiya Koenigstiger The Tamiya kit n° 35164 is, as usual, an excellent base kit but it lacks some minute details. I divided my work in five steps: turret, hull, tracks, painting/weathering and setting. Anyway are some operations concerning both areas. As general rule at first I soften lower and upper hull, turret and other major components with a light sand paper. This helps me to “take contact” with the model components and to check all the imperfections. Then I filled all location holes with plastic rods and putty removing all details which were uncorrected or oversized. First step: the turret After closing and sanding the two halves of the turret I began the work reproducing with a sharp X-Acto knife a better interlock between the front, vertical and rear steel plates. According to JD KT, I enlarged the interlock in the lower part of the turret as it was 2 mm too short. I completed it adding a piece of strip with an hexagonal bolt from Punch and Die set. The 40mm loader’s hatch cover is well reproduced. This hatch was introduced in July 1944 with four U-shaped channels, welded on each corner which use was unknown. The remnants of the welds were made glueing two bolts for each one softened with liquid glue. At the end I added the key lock and paddock lock. The two hinges from Tamiya are U shaped; they are wrong as the correct shape was very similar to Porsche Tiger II so I build them from scratch. Around the hatch I added eight little holes and did the same around the Nahverteidigungswaffe. By august 1944 the commander’s cupola was not welded but bolted to upper turret plate with seven bolts so I reproduced the thin recessed area around the cupola with a sharp X-Acto knife. The commander’s cupola was completed with two Minimeca tubes welded diagonally across the cupola itself; they were rarely mounted the rain cover for tank commander similar to that used on Tiger I. At the end I added the hatch stopper just behind the 12 o’clock periscope. The Tamiya commander’s hatch is a single piece. Real hatch was a two-pieces one. I was a lucky man as I found another hatch left behind from an abandoned Dak Tiger I conversion. The pics show the two elements. At the end I added the devices for paddock: one onto the hatch the other onto the cupola. According to JD KT drawings the Tamiya spent cartridge ejection port is too far back. So I closed the hole for kit no. C8, removed the rain guard and made a new circular location closer to the welding line. I added the hole in the center for the closing mechanism, a new rain guard with photo etched strip and a stopper between the two hinges. Under the loader’s periscope cover is an oversize gap I fill with two pieces of plastic card. The commander’s targeting guide in front of the cupola is placed too far left and had to be repositioned in front of 12 o’clock periscope on the cupola. A piece of plastic strip as a rain guard was welded across the front edge of the turret roof. In September 1944 orders stated to weld an inverted U-shaped guard over the gun sight aperture to prevent fouling rain and blinding from direct sunlights. This modification anyway appeared only from January 1945. I reproduced this guard with a photo etched spare part cut to shape with some little difficult. The gun mantlet from Tamiya sports the ring detail on the center. I wanted to reproduce a solid cast mantlet but at that time Ardennes Tiger from Tamiya, which sports the feature, was not on sales. When I planned this project, Artisan Mori conversion kit n° MGP 02 was not available. So I modified the Tamiya mantlet covering it with Squadron putty. Then I worked it with my wet fingers to the desired shape. The rough surface was achieved using a new way for me. I covered the mantlet with a liberal amount of liquid glue; just before it was dry I pressed an old piece of steel wool and quicky removed, pressed and removed, more and more times. When all was totally dry I lightly sanded it. I’m satisfied by this process as it leaves a subtle rough surface in a non-symmetrical way. Little numbers from sprue tree were added for casting number “02” to the right side of the mantlet. To remove these numbers and letters from sprue you need a very, very sharp blade so pay attention to your fingers. The six-bolted collar of the mantlet had a wire running through the center of each bolt. I made the holes in the six bolts and added the wire using a thin line of sprue. The gun barrel comes from Jordi Rubio. Even if it lacks the six holes on gun half section it looks good so I added only the secure pin to the muzzle brake. The rear access door was a problem as mentioned before the only after market I knew was form Artisan Mori. JD KT call it as a simplified access door but under modelling view it is not so simply. I tried to modified the Tamiya piece n° D11 three or four time in different ways but with unsatisfied results.In effect the Artisan Mori rear hatch is really superb. The high quality resin has no bubbles and the details are excellent. I only added the handle and two reinforced plates on the lower side. The rounded armoured caps on pivoting bars were too long so I reduced to the desired length. The three pilzen sockets were in a wrong position and had to be repositioned. At last I added three poison gas identification panels from Aber: one on the gun mantlet and two on the rear of the turret deck. Koenigstiger from March 45 production had only eight hangers for spare tracks links, four per side. The six hangers per side came later with some particular, limited Wegmann turrets. Before the hangers were glued I simulated the rough effect on the whole turret using the same method as gun mantlet. The torch cut effect on the edge of the plates was achieved with a rectangular dental burr used as a chisel at low speed in my Dremel motor tool. At last I added welding seams. I do not use pyrogravure as, in my opinion, it gives an effect which is completely wrong and unrealistic. I prefer a different approach (I call it Greenland’s way) glueing a very fine plastic strip in place and burring it with the previous rounded dental burr turned at low speed. Then I cleaned the weld seam with fine steel wood, added a liberal mount of liquid cement to give an uniform texture and repeated the burring. The four per side holes just behind the frontal plate (which were use to ease it’s right allocation and welding) were too little and unrealistic. To improve the effect I enlarged the holes and closed them from inside with a plastic rod. These rods were not flush outside but with a little depression that I filled with very wet Squadron putty. Then I positioned a toothpick cut to the right diameter onto the hole and began to squeeze. This action create a realistic circular burr leaving inside the hole the typical rough effect from fusion. Second step: the hull The first modification was in engine deck area. Detailed pics shows that the joining line between the rear vertical hull plate and rectangular air vent presents a C-shaped aperture missing on Tamiya hull. To make it removed 1mm from the two rectangular air vent and rebuilt the missing area with three Evergreen strips of different length: one of the same length of the air vent, the others two of the right length to simulate the C-shaped aperture. After some try and errors I was able to find the exact and convincing sizes; so I glued the strips in place and sanded the joining lines. I wanted to simulate the C hooks on the rear hull were lost so I reproduced their location points with Evergreen rod. The closing mechanism was detailed with Aber parts and ModelKasten nuts. The Tamiya armoured guards for the exhaust pipes had to completed with four lifting pegs (two per side) that I made drilling the holes and glueing a plastic rod plus a plastic disk from Punch and Die set at the end. The rough texture, more heavy, was added using a burr in my Dremel at very low speed. These armoured guards need casting numbers. Using the same method used for gun mantlet I glued a “240” to the left armoured cap and a “259” to the right. Later I noticed that all pics of actual tanks show casting numbers on left armoured guard, only, so I had to remove those on right armoured cap. I left the exhaust outlets for each tube as they seem to me good and realistic. Since October 1944 were added four vent lines to ventilate all seven fuel tanks. These lines were made from copper wire while the securing pins were made from plastic strips and bolts. The engine access door needs some more details. At first the carburator air vent armoured caps were from different shape: to avoid contact with the turning turret forward cap had hedged shape while rearward cap was rounded. This correction was simple as it was sanded till the desired form. Unfortunately this operation deleted the disk above it that was reworked adding four little strips from plasticard. The same four strips were added either the rounded cap than the same armoured cap between the front hull hatches. At second, I added the hatch stopper “stolen” from my previous Dak Tiger I conversion. At third, the three rectangular rotating stoppers on the rim of the access door need three fine tubes that I made from Minimeca tubings. At fourth, the semicilidrical piece put between the two armoured caps was not solid. I completely removed it and reworked it with a brass strip rolling on a rounded pen. Remaining in the rear hull deck area: - I added four lifting hooks from Aber around right grill and three around left grill; - Two bolts just near the antenna mount; - A Minimeca tube as base for antenna must; - Aber wire meshes on rear grilles; - Squared location points for protection wire meshes. Since November 1944 driver’s and radio operator’s hatches had two repositioned locks. All the details were covered with stucco making the repositioned locks from 0,5mm Minimeca tubes. The handles with the same location as the previous hatches were made with Evergreen rods. I use the welding way to add the seams in which front and rear hull plates meet side plates. Welding seam around bow machine gun mount was a little unrealistic. I prepared a plastic card disk to which I gave an heavy texture with motor tool; then it was glued in place in an enlarged hull location. After that the bow machine gun mount was glued with a liberal amount of liquid glue. Bosch light was fine but its mount was too heavy so I changed it with a thin piece of plastic card. Then I added the electric line with copper wire Both Porsche and Henshel Koenigstiger reveal two (one on each side) curved notches reflected on the sponson as rounded grooves. These grooves, which allow the access to the rear plugs, were easily visible on late Koenigstiger as they were not covered with zimmerit paste and often lacked side skirts. This detail is well visible at page 97 in “Schwere Panzer in detail by B. Culver and U. Feist from Ryton Publications. I made the rounded grooves ciano-glueing two metal strips in two parallel lines each other. With a rounded dental burr I went up and down between the two metal lines until desired effect. The little imperfections were covered with Squadron putty and sanded. The details were completed adding two plastic disks. Anyway I must confess that on late KT sported squared and not roundled grooves but I found this detail too late so I decided to stay away from any other modification. Front armour plate ended onto vertical plates leaving visible the welding seam on both sides. Same thing on rear armour plate with vertical plates. I formed a rectangle with four plastic strips and glued in place. Then I reproduced the welding seams with Dremel motor tool, as usual softening the whole surface with steel wool. Koenigstiger was an huge and massive tank but without side skirts and front/rear fenders it looks more terrific and “bad”. So I preferred to remove all moulded attachment points on both sides of the hull using those included in the ModelKasten working tracks set SK-6. Removing front and rear fenders needs to add the remaining attachment points which look like an inverted C-shape (three on each mudguard) line. At first I reproduced these details using copper wire; it was fine but not enough as they looked to me a little out of scale so I repeated the experiment with plastic lines from sprue and they looked better. I completed the hull with the rough texture with Dremel and all welding seams. At the end I added: - on vehicle equipments from Aber set n° 35040; - chain hook for Mg cover just in front of radio operator’s hatch; - three lifting hooks for transmission plate from Aber; - two clamps on transmission plate from Aber. Third step: the tracks I used Friul tracks n° ATL-37. The set contains two 18 teeth drive sprockets but I must admit I preferred previous linkage way even if it was more weak than the new one. In fact the worst problem of new linkage is that the track pin insertion hole stands on the outside of the track run, instead of standing inside, and these holes are all visible. The only way to solve this problem is to cover each pin with a plastic pin end from Punch and Die set. A very tedious job as Koenigstiger need 86 tracks links on right side and 88 on left side but it worth the time as when finished it gives a very realistic sag. Fourth step: Painting and weathering At first I covered the whole model with a light over spray from white Tamiya primer. This helps me to uniform the different materials used in this project and to find errors and imperfections. At first I pre-shaded the model with Tamiya Black XF1 in order to evidence the details. Late Koenigstiger base coat is not a simple choice. Were in effect two different options: red oxide primer and Dunkelgruen paint (RAL 6003) base. On September 1944 a first order from OKH stated that the armour components had to be coated by the suppliers with red oxide primer onto which Henshel (for hull) and Wegmann (for turret) completed the camo scheme with Dunkelgelb (RAL 7028) and Olivgruen (RAL 6003). A later order from OKH on November 1944 stated that the armour components had to be delivered with a Olivgruen (RAL 6003) paint base leaving assembly firms to complete the camo scheme with Rotbraun (RAL 8017) or Dunkelgelb (RAL 7028) sprayed paints in sharp edges. This second order started with 1 march 1945 but OKH itself stated that, due to raw material shortages, old paint stocks can be used up to may 1945. So it could be possible that Koenigstiger from march 1945 production runs were covered with red oxide primer or with a Dunkelgruen paint base. We had to add that all major components (hull, turret, gun and wheels) came from different firms, which had the order to paint the component before it’s delivery to Henschel and Wegmann. So it could be possible that i.e. a Dunkelgruen Koenigstiger had a different shade between the turret and the hull or that another Koenigstiger had the camo scheme on turret or hull only or vice versa. With this guesswork in mind I sprayed first the hull with a Dunkelgruen base coat using Humbrol no. 105 in a cloud pattern. Then I added some Humbrol White to base coat and sprayed the turret. This gave a subtle, different shape. Concerning the camo stripes I had in mind the so-called octopus pattern. It consisted in Dunkelgeld sharp-hedged waves painted with brush on (in my guesswork) vertical surfaces with randoming Rotbraun hand painted circles inside. As always I reproduced the general 1/35 line and size of Koenigstiger on a transparent plastic card; next I reproduced with Tamiya yellow tape the camo scheme using the general 1/35 line as template; carefully I removed the tape and put on the model with some little adjustments (in effect are many differences passing from a two to a three dimensional surfaces). I find that Humbrol no. 105 is perfect to simulate Olivegruen (RAL 6003) but the choice for the right yellow stripes was another story. I tried Tamiya XF59 Desert yellow, XF60 Dark yellow, XF57 Buff, Humbrol Sand no. 93. No one satisfied me. At the end I tried Humbrol no. 81 At first looking at the bottle I said “Terrible!” but when sprayed I was perfect. So I sprayed the camo colour paying attention to cover the green base zones. The brown circles were hand painted with Tamiya XF64 red brown . At the end I gave the whole model an overall coat with Tamiya Buff XF57 to reduce camo contrast and add a first weathering effect. In weathering process, to simulate rust, dust and oil stains, I used for the first time the excellent powders from MMP in particular Rust red no. 009 and Pure black no. 017. To prevent Panzer-Grenadieren from heating I bended a three-tone Panther side skirt and positioned to cover exhausts pipes As actual pictures told, I left the model without markings and Balkenkreuz. So this time no Archer Dry Transfer decals! Fifth step: diorama setting I’m not a diorama lover. First as I’m not able to create realist settings! Second as I prefer to concentrate the attention to minute details which could be lost in a dio setting. This time I change idea even if I did not want to make a dio but a simple and realistic setting. I prepare a cloud base with a paste called Das (very similar to Cell clay). It was later covered with a white glue solution where at random I put some grass and sand. The whole was sprayed with Tamiya Sand Yellow to tone down a too bright green grass. Then I added my Koenigstiger and the figure when the ground was still wet. The lone soldier comes from Wolf range with Hornet head. It helps me to show the dimensional contrast between the man and the huge mass of the machine and to underline the sense of desolation and pity. It was painted using Humbrol enamels for skirts and oils for face. The red crosses on helmet and arm band are from Verlinden range. The Red Cross soldier does not stop himself. He looks at with no apparent emotions and pass away. Who is “The last of the lost”? The soldier or the tank? Items - Tamiya Koenigstiger kit n° 35164 - FriulModel working tracks, kit n° ATL-37 - Minimeca assorted tubing - Aber photo etched set n° 35040 - Artisan Mori set n° MGP02 - Tamiya acrilics XF1, XF2, XF57, XF59, XF61, XF62, XF64 - MMP pre-mixed weathering powders - Olympus Digital Camera C-2500L References - Germany’s Tiger tanks, VK45.02 to Tiger II, Design, Production & Modifications by T.L. Jentz and H. L. Doyle, Schiffer Military History (*) - Germany’s Tiger tanks, Tiger I & II: Combat tactics by T.L. Jentz, Schiffer Military History - Schwere Panzer in detail by B. Culver and U. Feist from Ryton Publications - Tiger in Combat I by W. Schneider, J.J. Fedorowicz Publishing - The Combat history of schwere Panzer-Abteilung 507, edited by H. Schneider, J.J.Fedorowicz Publishing - Achtung Panzer no. 6, Dai Nippon Gaiga (*) - King Tiger Heavy Tank 1942 – 1945, by T.L. Jentz and H. L. Doyle, New Vanguard 1, Osprey Pubs - Tiger Model Fibel no. 468, Model Art - Sd.Kfz. 182 Pz. Kpfw. VI Tiger Ausf. B “Koenigstiger”, volume 1 by W. Trojca - Sd.Kfz. 182 Pz. Kpfw. VI Tiger Ausf. B “Koenigstiger”, volume 2 by W. Trojca - Bulge King Tiger by Mario Eens in Military Modelling Vol. 32 No 4 2002 (*) (*) highly recommended Brescia, may 2019 Filippo Chessa [-1] 3./510 received on 29 march 1945 six Tiger II from Henschel factory in Wilhelmstal/Kassel
 -
Hi All, I'm a new member from Italy. I've just completed my 1/35 Tamiya Austin Tilly. A little gem to mount as usual. I added some details to the interiors cab and into the rear cargo area (wooden bed from Tamiya was not correct). I used a combination of Hussar resin wheels (civilian and military pattern). Very good. About camo I was a little in doubt until I saw the well done Austin by Bullbasket John. I never knows that 51st Highland Divisioni was in Italy (thank you, John!). So I decided to paint it in the same way😀. I have a little doubt about area where the Divisioni was assigned. Here the pics. Hope you like and feel free to any comments. Ciao Filippo
-
Postie has been so I've got something to build. Just split with the girlie so I've got plenty of time and the most excellent Sergeant Squarehead sent me a pile of references so I have a vague clue. Title refers to this being basically a StuG III Ausf G superstructure grafted onto a Pzkpfw IV hull with the gaps plated over. Must have worked as just over 1000 were built. No excuses now, let's get this show on the road... Box shot. Sprues later. Andy
-
This has taken up about 2 months of my retirement and was built utilising the Tamiya 1/35 SAS Jeep kit and the Long Range Desert Group Kit with terrain techniques taken from AK's Diorama FAQ. It was all about me trying to build a desert! I hope you like it; your comments and critique are as always welcome!
- 33 replies
-
- 28
-
-
- Tamiya 1/35
- SAS Jeep
- (and 1 more)
-
 I did say I was going to build something in this GB. I have chosen the Tamiya kit from the stash & will be going for a OOB build ( although it does have a little PE fret). Be gentle as this is my second ever 1/35 tank, I mostly make things with front wings and back wings! Any advice or comments along the way are appreciated, it’s the only way to learn. Box shot
 -
Hi ,following a vicious and uncalled for critque of my painting skills and technique ,i have decided to repaint the following models . Scraped most of the decals off ,next step a fresh coat of dark yellow .
-
Built this a few years ago ,planning to try and make a rust bucket using the hairspray thingy
-
HHi,just a touch of weathering to suggest Normandy dust
-
I've had this kit, Tamiya, for years and haven't built any armour for almost as long so thought I would have a crack after seeing the Panther build by PlaStix. Tracks are the individual kit ones and are a weak point. I just need to do the crew now that came with the kit. Kit: Tamiya 1/35 Tiger I E Late w/commander and crew. AM: Aber zimmerit in PE, metal barrel/brake, some of an Eduard detail set. Paints: Vallejo Model Air and Tamiya.
-
Hello, Attention, fresh painting, don't touch. I dropped the others to carry out that. Well, I turn over to finish (not finnish... ) that, it's for Saumur 2017.
-
Hi everyone. Having 'overdosed' on aircraft recently, I'm keen to try something a little different and since it seems like forever since I last dabbled in 1/35 and even longer since I even so much as looked at armour, post '45, this seems like the perfect excuse! Due to my woeful lack of intelligence on post war Soviet armour and my total inability to ever find what I'm looking for on the internet, to ensure compliance with the rules, I'm wheeling out this 'golden oldie'..... ....which was for years, apparently, the best injection moulded option in 1/35 Despite having been thoroughly 'blown out of the water' by the recent family of T-72's by Trumpeter, I remain 'twitchy' about their high parts count kits having burnt my fingers on their 1/72 Famo and 1/35 Railgun in the past, so for the sake of my eyesight and sanity, the comparatively simplified, but much more 'builder friendly' Tamiya version is the one for me Some 'after market' will make an appearance.... ....but only where it genuinely makes a difference. I have no interest in replacing perfectly serviceable plastic with PE, just because its on the fret - it will have to earn the right to cause me the inevitable aggravation! I'm sure I say it every time, or at least think it. but its worth saying again - I am really looking forward to this! Craig
-
Hi Pals, I finally finished the recovery / update Tamiya Merkava. I liked (modestly) it was finally enough. And it is that a aerbrush is essential to achieve good results, without forgetting the brush of course. I have some material in 30 years, which can also be improved, and seen how was this encourages me to try yet. Link to WIP below http://www.britmodeller.com/forums/index.php?/topic/234998843-the-lion-of-the-desert-merkava-mki/ Thank you for watch and comment, cheers mates And some shot on detail.... Thx for watch and comments, cheers mates
- 71 replies
-
- 60
-
-
- RECOVERED
- TAMIYA 1/35
- (and 1 more)
-
Hello, I used to build some armor even if i'm mostly an aircraft modeller... This australian Matilda was done in 2007. Thanks for looking at !! Anis
-
Hi Everyone, Thought it was about time I did one of my dodgy AFV builds and put it up for you to see My attempt at Tamiyas 1/35th Type 97 Chi Ha Built completely OOB IDone as a tank of: 1st Tank Regiment..... in the Malay Operations (according to the instructions) Hope you enjoy,thanks for looking Cheers Russ

.thumb.jpg.2c282efcc138b7cf7f1e1586a9c534d2.jpg)


-1-1MINIATURA.thumb.jpg.bd7a7e672869500d45ee6e80478f6f25.jpg)

.thumb.jpg.d17ff607fc7e89ed057e63fcb6f2a888.jpg)