Search the Community
Showing results for tags 'Revell'.
-
 Hi Everyone, This is the first time I have posted a model in the RFI section. As the title suggests this is the recent 1/72 tool Hawk from Revell (04921). The kit is good despite surprising amounts of flash for its age and bright red plastic (well it is a Red Arrows kit after all). As the kit only includes the very early short fin fillet and curved rear of the fuselage, I decided to complete it as XX164 of the Central Flying School, RAF Valley 1979. This meant I had to modify the kit seats to add the wider headbox. These were completed with homemade masking tape belts. I also lengthened the intake scoops behind the canopy, as these are too short in the kit. Various other details were scratch built like the pitot tube (albion alloys brass tube) and underside antennas (plasticard). The kit features no intake trunking, so these were blocked off with covers scratch built also from plasticard, referencing photos online. The moulded in beacons on the spine and ahead of the airbrake were replaced with offcuts of the clear sprue, sanded to shape. Photos online suggested that this aircraft lacked the blade antenna on the spine in its early days, so I left it off. The main decals are from Xtradecal's X72-166 set and the stencils are from the X72-168 set from the same company. The model was primed with UMP white followed by Mr Hobby's White and Light Aircraft Grey. The red was Revell Aqua Gloss Fiery Red. After some light weathering in was coated with Ammo by Mig Lucky Varnish Satin. The canopy detonation cord was hand painted as the detail is raised on the inside. I have plenty more Hawk decals left from the Xtradecal sets so I will have to build some more In the future. I hope you enjoy. Mark.
- 35 replies
-
- 79
-

-

-
Around 2001, I was working in the F-15 System Program Office (in the USAF, the notorious SPO) we were responsible for the acquisition of F-15s and related upgrades. I was the chief of the test division. Like most units in the US military, parting gifts are bestowed to those leaving the office in good stead, be it retirement or transfer to another unit. Most units, as a minimum, give the departee what has become known as the "crumby squadron plaque", often a metal unit shield on a piece of wood with a brass plate engraved with the person's name and dates of service with the unit. For a long time, the F-15 SPO crumby squadron plaque was an 8"x10" framed mirror with half of a solid model F-15A affixed to the mirror with the appropriate brass plate. Certainly more distinctive than the unit emblem, which in our case was pretty weak anyway. One of my test managers was leaving the office for the F-16 SPO (oh the gall), and I decided he deserved something more than a crumby squadron plaque. This was the result: one of my prior crumby squadron plaques in the background... It's a Revell 1/48 Kit with stores from the Hasegawa weapons sets. The white data instrumentation pod is a cut down AIM-9. Orange is the typical color denoting a piece of equipment that has been modified for test purposes, in other words, don't mess with it unless you really know what you're doing. In the image above, the orange patches replicate the sheet metal coverings for the empty cannon bay on the actual aircraft. The orange portions on the GBU-31 Joint Direct Attack Munition below, indicate an instrumented weapon - usually one with inertial measuring devices and telemetry units to send data back to mission control. The markings are home made, printed on Experts Choice laser decal paper. The unit markings are for a jet with the 40th Flight Test Squadron at Eglin AFB. The airframe itself is built OOB with the cockpit details omitted. The fuselage is filled with expanding insulating foam to give it some rigidity. A wooden block is epoxied inside on the keel to give the brass pins in the acrylic stand something to hold on to. All paints are ModelMaster enamels. The orange patches on the underside represent mounting plates use for carrying stores separation cameras. Pin wash is Paine's Grey oils. Of course after this, others in the office were asking me to make other models for people leaving. I did quite a few, and at one point I was making models for the office and not putting a dent in my own expanding stash. I eventually put a stop to it (after about ten years!) but I did do one just before I retired a couple of years ago, an F-15QA. I've got images of that around here somewhere! Thanks for looking, Sven
- 12 replies
-
- 24
-
-
This was my choice for a quick build between finishing HMS Muskeeter and whatever I pick up at Telford, unfortunatly it rapidly turned into a nightmare............... no fault of the kit which is great (no Hunter expert this is the first i've ever built but it seemed like a very nice kit, if there's any real issues with it I didn't fix them!) Right from the off things went wrong Paint finish is a mess..... white turned yellow, masking was crooked, red overspray on grey areas, the red wingtips should extend further inboard (should have looked at pics instead of just relying on the xtradecal instructions) I then managed to place the two upperwing roundals assymetrically which meant positioning of the scratchbuilt pylon lumps on the upper surface were wrongly positioned..... and to round it all off I managed to pull the starboard serial number off with an errant piece of masking tape just before finishing up.... ETC Arrrhhhh really glad this ones behind me, may well build another in the future as the subject and kit look good (won't bother with the flightpath detail set as it proved to be a bit of a fiddly pain in the A***)
- 14 replies
-
- 37
-
-
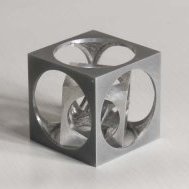
Kanonejagdpanzer 90 Revell 1:35 By 1960, the M47 Patton old 90 mm was still a potent weapon. Pending replacement in the Bundeswehr, it was decided to reuse it in German-made tank-hunters. General design tended to be close to the very successful ww2 era Jagdpanzer IV. Specifications were made and transmitted to three manufacturers, the German Hanomag and Henschel and Swiss MOWAG which produced prototypes. After trials, only Hanomag and Henschel were retained for pre-production. the KnJgPz-90 was indeed closely based on the wartime tank-hunter, which was derived from the Panzer IV. However, this was only superficially as the sloped armour was mostly copied from it. Everything else, from the chassis, suspensions, engine and transmission, armament and targeting devices, fire control, etc. were genuine. The hull was longer, but narrower and lighter than the original vehicle. The frontal armor was not 80 but 50 mm in thickness (still around a 80 mm equivalent) also on the sides, and 10 mm on the bottom and roof, engine deck and rear plating. The mantlet allowed a 15° traverse and -8° to +15° elevation/depression. The hull upper armour was stepped on the rear engine compartment. The driver sat on the right, with a hatch above him, and there was a secondary periscope at the left of the gun. There was a secondary hatch behind the driver, and a commander cupola to the rear, left of the fighting compartment. The drive train consisted of five doubled-road wheels independently sprung on torsion arms, with three return rollers, rear drive sprocket and front idler. One machine-gun was coaxial in the mantlet, the other was externally mounted on the second hatch ring. The main gun carried 51 rounds 4000 were stored for both 7.62 mm machine-guns. The KnJgPz-90 was protected NBC and fitted with infrared vision and targeting system. The vehicle was considered a success, due to its low profile and superior mobility, compared with the high profile of the M47/48 Patton series. However, by the time USSR unveiled its T-64 and later T-72, the KnJgPz-90 was considered obsolete. The manufacturers proposed it was up-gunned with the latest 105 mm, but in 1983 it was decided to convert 163 of these as Raketenjagdpanzer Jaguar 2 anti-tank guided missile carriers, firing TOW wire-guided missiles, which was far more effective. These vehicles also received extra modifications like spaced and perforated armour. A few others were derived as Beobachtungspanzer (without the main gun) to guide mortar units. The regular vehicles were gradually phased and put in reserve. The last were in active commission with the Heimatschutztruppe by 1990. The Model While the kit was originally released in 2008, it feels like it is much older than that in my befuddled memory. That said it is a typical Revell product that is packaged in their flimsy end opening box. The mouldings are good, with no signs of flash or other imperfections on any of the parts. Inside the box are nice sprues of grey styrene four lengths of rubber tracks a length of fine wire and the decal sheet. Detail is average to slightly above average, and if the modeller wanted they could add quite a bit more, but replacing the kit barrel with a metal one is all the modeller would really need to do. The build looks nice and straight forward with nothing really to catch anyone out. There are two variants that cvan be built from the one kit, the Panzerjagdpanzer, (PaJaKa), or Beobachtungpanzer, (BeobPz). The build begins with the assembly of the ten road wheels, each pair of which is attached to their respective axle and finished off with the outer hub. For those that like working tracks the wheels are made so that they can rotate. The same goes for the six return rollers, two idlers and two sprocket wheels. The tracks lengths are then joined together by passing the pins through the holes and melting the pins with a hot screwdriver or your preferred device. The wheel assemblies are then glued to the lower hull and the tracks fitted. Naturally, you can leave the tracks off until after painting. The two upper hull sections are joined together, followed by the upper hull sides all of whom require holes to be drilled out before the assembly is glued to the lower hull and the front mudguards attached. The upper hull is then festooned with detail parts, such as headlights, towing eyes, brackets, spare track links in their holders, and ID plates. There are also a pair of Jerry cans and their holders attached to the rear bulkhead, as is a five piece box, which looks like it could be an NBCD filter. The rear bulkhead is also fitted with a two piece stowage basket, light clusters, clamps, brackets and some pioneer tools. The engine deck is fitted with a pair of grilles, exhaust, more pioneers tools, vents, smoke launcher mountings. The bank of eight smoke dischargers are then fitted to the mountings, while on the fighting compartment roof is fitted with a pair of aerial bases, and aerials made from the thin wire provided in the kit. The commanders cupola is made up from two parts, as is the gunners. The drivers position has three vision blocks and the hatch hinge glued into place. The modeller then has the option of fitting the three piece MG 3 for the PaJaPa of a two piece optical sight for the BeobPz version. The main armament is then assembled. This begins with the IR light box that sits on top of the main gun, followed by the two piece mantle and two piece barrel, which could be replaced with an RB metal one should you desire. The barrel is glued into the mantel, along with two machine gun muzzles, with the IR box sitting on top via to mounting brackets. The whole assembly is then glued to the front of the glacis plate. If you’re building the observation vehicle, leave the barrel and IR light off and fit the blank into the mantle hole instead. The model is finished off with the fitting of the last detail part that include the option of two types of rear-view mirrors, two more light fixtures, light guards, towing eyes, and more pioneer tools. Decals There are three decal options for the PaKaJa and one for the BeobPa, the decals are quite nicely printed with good opacity and in register. The options are:- Kanonenjagdpanzer of Panzerjaegerkompanie 160 based at Schwarzenbek, North East Germany, 1980/81. Kanonenjagdpanzer 5 of Panzergrenadierbatallion 353, based in Hammelburg, Bavaria, 1984. Kanonenjagdpanzer 2 of Panzergrenadierbatallion 44, based in Gottingen, Lower Saxony, 1980. Beobachtungpanzer 6, of Panzergrenadierbatallion 152, based in Schwarzenborn, Hesse. Conclusion It’s nice to see this kit re-released although I really thought it was much older than it really is. It certainly will be a nice, relatively simple build that would make for a great first kit or for a quick weekend mojo rejuvenating build. Revell model kits are available from all good toy and model retailers. For further information visit
-
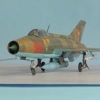
Allllllrighty then! My recent conversion from the dark side (Armour), and ensuing Mojo restoration and reinvigoration has resulted in my actually finishing something, albeit two builds belonging to my teenage son, who incidentally still has not noticed that my S.O.D. has nudged his to one side, but that is a horse of a different colour, the upshot of all this is that like a convert to anything, not smoking, not drinking, bdsm, I find myself compelled to "spread the good news"! So for you good people here tonight I will begin the hopefully short WIP of my first build for ME since the early 90`s when I had a go at a Hasegawa Blackhawk and a Hind! The "Leg Iron" has gone to France for a couple of weeks during the interminable summer break that teachers get, so I reasoned that a brief trip to the local model shop (Waterlooville model shop, although it`s actually in Portsmouth) would not be spotted, the juices were bubbling and I needed a fix and I found two kits that got me revving, I read a lot, and two of my recent reads will resonate with a lot of people on here, " Carrier Pilot" by norman Hanson and "On and off the flight deck" by Hank Adlam, so when I saw this I thought this is a go! Now I`m not going to detail all the arguments regarding the accuracy of this kit, either way there are pluses and minuses but at less than seven quid I`m happy! I had a search on the site for builds of this kit, there is one currently going on although putting a link in and so forth is currently beyond me, I`ll not insult your intelligence by pretending I've not had a cider or two, but it` s saturday night! Now, the main issues as far as I could make out were broad chord prop and for want of a better name "drop tanks", on the other build the broad chord prop was brought in later than the serial number of the kits serial number, so I need a later serial number, So we`ll go with the FAA Corsair decals from Eaglecals, nice late serial number there! (can you guess the next build?) "Drop tanks"? bin em.............. Along with the decals I got a "Big Ed" set of seat belts/harnesses for allsorts, so I read that Corsair IV`s were fitted with Q type harnesses , that's dealt with, Ok, it`s sideways but it`s a canopy mask set, but it was well cheap! Job jobbed! So I just thought I would have a quick look at the various bits and bobs............................. All washed and gleaming, whats not to like? Yeah these fell off, but they're ok! And then BOOM! the thing built it`s self..........................almost The wings went together without issue, there was a bit of fettling with the coolers, but seriously, five minutes............ a swipe of filler and these will be good to go.................. engine and cockpit were quick and easy, nice detail and in the booth quicker than you could say knife! And finally for today a shot of stynylrez before painting tomorrow................. So that's me done for today, minimum aftermarket and half the kit built in an afternoon............just like being 12 again! Granto
-
Hi guys, I will build the 1/72 Revell B-17F. I will build it out of the box including one of the options. The option I chose is "the Shamrock Special" It is a plane from the 8th Air Force and belonged to the 401st Bomber Squadron that was attached to the 91st Bomber Group. Here are some pictures of what is in the box. The plane I chose. And I have already started the model this weekend at a SIG meeting from the IPMS. I have made the bombbay and placed it on the left fuselage halve. It is not much, but a start. Cheers,
-
 This is probably one of the rarest Revell kits nowadays. The first release was in 1957 with only 2 or 3 re-releases the following years,one being a Revell/Lodela kit with VARIG decals and one with a special livery of an American football team if I remember correctly. As with the Revell Convair 990 kit,I also found this rarity on a Swiss auction plattform,and also here I got together ,with the new kit,a finished one with some missing parts and apart from the applied decals,it was completely unpainted. As there are no aftermarked parts available,it was not easy to repair this kit. One wing had the propellers missing as well as the spinners and the rear cabin door was also gone. I decided to leave the propellers and mount it on one of those original Revell swivel stands and present it in-flight with "turning" props...by simply fit in new spinners that I found in my spares box.The are not completely accurate but they do the trick. I wanted to rebuild the kit in its original markings and I also found a wonderful new set at Vintage Flyers. My first attempt of painting an all-natural metal fuselage left me not very satisfied,so I went for a,at least for me, new approach. When I found a picture of a flying American Airlines Electra with that shiny bare-metal fuselage,I decided to use Bare-Metal foil to wrap the whole fuselage to achieve the same result. It was a tedious task and took hours to apply all the foils but the final result is very pleasing. The wings and engines are painted with Testors aluminium as these parts didn't look as hiny on the picture as the rest of the plane. Compared to the Minicraft 1/144 kit,Revells over 60 years old offering is far more accurate than the Minicraft version.It also has its faults,but the overall look beats the Minicraft in my opinion. Too bad that Revell altered the moulds to create the Orion out of it,so its impossible to ever see a re-release of this gem. The Electra logo on the stand comes from the original Revell decal set.It was stiff as a board but I managed to get it on the stand with lots of decal softener and laquer... Enjoy
 -
 Hi everyone Well, it's been a while since my last posting as I've been dealing with my wife's breast cancer treatment, etc, but I have not been idle. I've done a few kits here and there which I hope to get on here soon. In the meantime this one I have now nearly completed. As usual I have added working lights but, this time, I have modded the inside to convert it into a camper van with an extended roof and luggage rack. All I have to do now is connect all of the wires to a switch box and it will be ready to post in the RFI section. Here is just a little sample:
 -
Hi Folks! The latest product of my sick leave - 1/32 Revell MiG-29UB with Zactomodels upgrade set (3x more than the kit cost) and Eduard exterior PE. Finished in Xtracrylix with Begemot's amazing decal sheet. For info on using the Zacto set, the build thread is HERE Usual high quality pics taken outdoors in the dying sunlight.... Happy to answer any questions, comments etc. Al
- 31 replies
-
- 9
-
-
- Begemot
- Zactomodels
- (and 1 more)
-
 Dear fellow Britmodellers, being primarily an aircraft modeler, I'm rarely contributing to this subforum; however, I'm proud to present one of the few tracked vehicles I finished recently. This is Revell's 1/72 SdKfz 7/1, built with the addition of Schatton metal gun barrels. Represents a vehicle of Heeresflak-Abteilung 281 (mot), 116th Tank Division "Windhund", operating in the Aachen region in late 1944. Read more about combat actions of 116th Tank Division here: https://en.wikipedia.org/wiki/116th_Panzer_Division_(Wehrmacht) I painted with Gunze acrylics and weathered with artists oils and pastel chalks. I still need to improve on my weathering techniques for combat vehicles, but I hope you like the outcome. All photographs by Wolfgang Rabel. Thank you very much for your interest in this topic. With best greetings from Vienna, Roman
- 11 replies
-
- 21
-
-
-
Little Patches B-17G 91st Bomb Group. The name "Little Patches" was acquired after the aircraft's first combat mission with Lt William Major's crew when Frankfurt flak put many splinters through the ship. The damage was primarily cosmetic but the skin required numerous small aluminium patches prompting Lt Major to name the ship. Building the Revell 1/72 B-17G isn't difficult in itself, difficulties start begin when you are trying to use Eduard Biged. I only can say, that the main technology during the build of this model was soldering, not gluing. In addition, the following extras are also was used; - vacform canopies (Pavla models); - decals for "Little Patches" (Microscale); - resin wheels (Eduard). Well and some scratchbuilt parts of course. Thank you for looking, any comments are welcome.
- 29 replies
-
- 67
-
-
Have just picked up the Revell boxing of Zvezda's T-14 Armata Beautiful looking kit.................dull decals !! I have been searching for other options anyone know of any ? Cheers Paul
-
Flakpanzer IV "Wirbelwind" (2cm Flak 38) 1:72 Revell 02367 The origins of the Flakpanzer IV Wirbelwind can be traced back to the North African campaign, when large numbers of Wehrmacht vehicles were decimated by fighter bombers of the RAF Desert Air Force. A number of temporary solutions were put in place, generally involving converting a range of vehicles to carry single flak guns. As the German military situation deteriorated, particularly on the Eastern Front, it became clear that a more permanent solution was required. A number of solutions were tried and tested until the first true Flakpanzer appeared in the shape of the Wirbelwind. All-in-all, between 87 and 105 Wirbelwinds were converted from existing Panzer IV chassis. The turrets were removed and replaced with an open-topped version surrounded with 16mm armour plating. The turret was fitted with the quadruple 2cm Flak 38, providing a high rate of fire. Most of the completed Wirbelwinds were deployed to Normandy in the wake of the Allied invasion. They didn't fare particularly well in combat though, with most being destroyed, captured or abandoned. Ironically they were more effective against soft skin vehicles and infantry than aircraft. For a type that was built in reasonably limited numbers, the Wirbelwind has been reasonably well-served by model manufacturers. In 1:35, there are several options to choose from, including kits from Dragon, Tamiya and Academy (the latter based closely on the Tamiya kit). Tamiya also have a kit of the type in 1:48 scale. In 1:72 you can choose from older kits by Hasegawa or Esci, as well as this kit by Revell. The kit is effectively a reboxing of the MACO kit released in 2015, which in turn is based on the Revell Panzer IV; a kit released way back when Bob the Builder had a Christmas number one and the Millenium Dome was still a thing. Inside the compact end-opening box are five sprues of grey plastic which hold a total of 190 parts. The sprues are well laid out and the mouldings are free from flash. Surface detail is clean and crisp, and first impressions are very favourable. As is usually the case with military vehicle kits, construction starts with the chassis. There is plenty of detail to add to the hull, including a multi-part exhaust system and towing hooks. No shortcuts have been taken with the road wheels, which are proper two-part jobbies. Take it from me, however, that painting the road wheels on thirty-two individual wheels will drive you bonkers. The tracks are of the link and length variety and have been very nicely moulded. Once the running gear is in place, construction moves on to the upper hull. In keeping with the rest of the model, this is nicely detailed and extra parts such as spare wheels, tracks and pioneer tools are all present and correct. The hatches may also be posed open if desired, although there is no interior. The quadruple Flak 38 mounting is a separate sub-assembly which replaces the kit's original turret. Revell/MACO have done a good job with this part of the kit, and the high part count points to a very good overall level of detail. You will need to drill out the barrels of the 2cm cannon, but that is no hardship. You can choose from different turret configurations, although differences are small. One is described as the 'series' turret, while the other is labelled '12 PD.'. Lots of additional details such as spare magazines are provided too. The kit is calling out for some crew figures, but sadly none are included. Two different options are provides for on the decal sheet. Flakpanzer IV "Wirbelwind", 12.PD Turret, Panzerregiment 12, Bretagne, France, Summer 1944; and Flakpanzer IV "Wirbelwind", Series Turret, 10. Panzergrenadierdivision, Berlin, Germany, April 1945. The decal sheet is small but nicely printed. Conclusion This is a great kit based on a great kit. Revell and MACO have done a really nice job with the conversion parts and the result is by far the best and most detailed Wirbelwind available in this scale and it should be a nice kit to build. Highly recommended. Revell model kits are available from all good toy and model retailers. For further information visit or
-
After searching everywhere for one of these with them coming up NLA and ones on Ebay going for silly money, @Witness pointed me in the direction of the main Revell site where they still have stock Thanks mate It took less than a week to come and cost about £40 delivered from Germany with a free torch thrown in as a bonus I bid on one on Ebay and that went for over £40 with P&P to add on, so I'm happy Don't know how many they have left, so I'd get in quick if you want one as they might not be around for long
-
 This was a fabulous kit to make, all the parts fitted really well and with good instructions, as well as a nice array of stores. My first 1/48 kit. I think I left the wing strakes a bit too long, and I haven't got the skill to fashion the three tiny canopy mirrors, plus she's a bit too satin not matt, but I hope she captures the essence of a Jag from the days when it was so much fun to hang out at the end of Coltishall's runway, or see them screaming low over Norfolk! All comments welcome ...
- 16 replies
-
- 30
-
-
I found this aircraft listed as a future release for October on the Hannants website, and I´m wondering if it´s going to be a reboxing of the Eduard Bf 109F-2. The price is really tempting too. https://www.hannants.co.uk/product/RV3893
-
Here we have Revell's 1/144 Lockheed Sea Shadow, dating from 1996. A bit of an unusual build, due to its shape, with a little care the kit goes together well, with a nicely detailed interior which can be glimpsed through the glazing and the open doors. The only problem with the assembly is you are left with two gaps between the underside and the outriggers on the inside, so a lot of filler is required. Hairystick painted in humbrol enamels, with a final satin cote. The decals were a problem, the set with the model were not in the best of condition, luckily i thought i found a spare set on evilbay. Being aware of ghosting especially on black i soaked the first in decal fix, the water;line decals broke and had to be put on in bits, fortunately i tried the inside of the out riggers first, when dry massive ghosting. Checking my research pics the waterline markings were removed later in the project, so i decided to go with the minimal decals i could, not to draw attention to the ghosting. So here she is for your perusal. All the best Chris
-
Hi guys, this one has been creeping up on me. But as promised I will build the 1/32 Revell P-39D. As you all may know, but this is a re-box op the special hobby kit. I will build it out of the box, but maybee I will get some goodies for it. I am thinking of buildig it as a Russian version. I will need to get a decalset for it or some maskes. The foto's of the box and content will follow later. cheers,
-
Calling this one done. Was quite a big struggle for me at times... Mainly due to it's size alone. I broke off almost all the guns during the painting... All in all I really enjoyed the kit. The interior is nicely detailed, as are the engines. I had some real issues with getting the engines lined up inside the nacelles, but I think it just about turned out OK. The 4 colour paint job was a big jump for me - and due to my using Belton rattle cans (which come in an amazing variety of colours - but can be very thick) some of the surface details were lost under coats. I am quite happy with how the camo looks, but on reflection would have liked to make the sand / sky blotches a little more intricate. I used the box decals - with larger markings I sanded them a bit before applying them, which made it easier to chip at them with a sharp blade once microsol was on. Part of me wishes I had bought aftermarket decals for the actual unit... Was largely built OOB except for some wiring added to the gear, and some scratched details for the cockpit... I mainly enjoyed experimenting with varying acrylic shades on the interior and legs... WIP thread is here for those interested in my shambolic work along the way! Thanks for looking! Bruce
- 32 replies
-
- 72
-
-
After finishing my two Chaparrals (see them here: https://www.britmodeller.com/forums/index.php?/topic/235043149-texas-roadrunners-chaparral-2c-and-2d/ ) I wanted to do one more automotive subject before moving on to some aircraft sitting on my "To Do" shelf. The Chaparrals were supposed to be a quick "out of the box" project, but they turned out to be more complicated than expected. What to do? While researching the Chaparral 2D coupe I found this photo from the 1966 Daytona 24-hour race: Ford's GT-40s dominated that race, earning four of the top five positions! I found a Revell boxing of the winning car, #98, on eBay and chose that as my new project. The Revell kit is, in fact, a Fujimi GT-40. Good news is that the Fujimi GT-40 builds up very nicely. The bad news is that Revell simply added new decals to a generic Fujimi GT-40, leaving out details particular to the #98 car. As a result, this project wasn't exactly the "out of the box" build I had been hoping for. I would have done better to purchase Fujimi's version, which is more accurate: More on that, later... On to the pics! U As I mentioned earlier, Revell's kit requires some modifications to better model the Daytona #98 GT-40. For starters, two air scoops on the rear deck need to be removed, as well as a "blister" on the roof over the driver's head: Also, I had to re-build the radiator outlet to replicate that on the #98 car: I replaced the front grill with some wire cloth left over from my Chaparral project: There are other inaccuracies in the Revell kit that I didn't attempt to fix. For example, the fuel filler cap is on the wrong side, and there should be blisters on the body over the front tires. The Fujimi kit fixes all of these errors, thus my statement that I should have bought that kit instead of Revell's. If you've followed along this far, let me show you a few more in-process pics: All in all, this was an enjoyable build. Aside from correcting Revell's errors, the only problems I encountered were of my own making. I foresee building a few more Fujimi GT-40s in the not-too-distant future!
- 11 replies
-
- 17
-
-
Morning all! The Tornado Gr.1 kit that Revell offers in 1:72 is probably the go-to kit when it comes to modelling IDS variants in that scale. However, despite producing a fabulous 1:48 Tornado GR4 and a 1:48 F.3 ADV kit in recent years, the GR4 in 1:72 scale remains an illusive subject for Revell- having only been covered by Airfix's "attempt" (which I'll be quite honest, I forgot existed until I googled it) and the Hasegawa kit (which is around 2-4 times as expensive as the Revell kit). I've built 2 Tornado GR1's before, both of them Revell: With the impending retirement of the Tornado GR4 from RAF service next year, I thought it would appropriate to have a crack at a 1:72 Tornado GR4. Kit: I bought this particular kit from the Newark Air Museum (I highly recommend a visit there, it's by far one of the better aviation museums that I've had the pleasure of visiting) and used decals from the Xtradecal "RAF and RN Update 2014-15 Pt.1". Detailing: Although I don't strive for 100% accuracy with my builds, the key differences between a GR1 and GR4 are the presence of FLIR pod, the removal of a cannon and the introduction of more digital displays in the cockpit. Instead of going for aftermarket sets (which I hear are rather good, and I'll look at using one for my next build) I shaped and scribed a piece of scrap sprue to match the rough dimensions of the FLIR pod. The cannon was "removed" by a splash of filler and a bout of sanding, and finally the instrument panels were slightly modified to look more like those of a GR4 (although in this scale you can't see much anyway!). The weaponry of Storm Shadows and ASRAAMs were taken from a Revell Eurofighter kit. Paints: Vallejo Model Air paints were used throughout, alongside a Dark Dirt wash from UMP and landing gear weathering was aided by the application of an AK Interactive landing gear Dust wash. Conclusion: So, that's it for this build. As I've found with my previous attempts, the Revell Tornado kit is one of those kits that is "fun" to build and comes with some incredible detail (just look at those rivets!) straight out of the box. I did make a mess with one of the decals from the Xtradecal set (the "...ary" in 100th anniversary were destroyed during decal placement on the left hand side of the aircraft) and although the repair looks acceptable from a distance, close-up it's quite obvious. I believe it to be entirely my fault and I still regard Xtradecal sets as some of the finest aftermarket decals that I've used. Thanks for having a look! Best wishes, Sam
- 12 replies
-
- 32
-
-
Star Wars Solo – Imperial Patrol Speeder 1:28 Revell Star Wars: Solo is the latest SW universe film tracing the younger years of smuggler Han Solo, and his hi-jinks before he hooked up with Ben Kenobi and Luke on Tatooine, which changed everyone's lives immensely. I've not seen this episode, but at some point Han gets chased by Imperial troops on Speeder bikes, who don't have the benefit of knowing how that turned out for them on Endor, but I can bet it doesn't end well for them. These Patrol Speeders are more of a sit-in than sit-on vehicle, although the controls seem broadly similar to those used by the Scout Troopers in Jedi. Their riders wear a blend of armour that includes accents from the Shore Troopers of Rogue One, and the familiar Stormtroopers from the original trilogy. The Kit Revell have the license for Star Wars model kits in Europe and the West, and it's good to see them back in action after recent problems resulted in a new management as well as ownership of the company. Solo's raft of new ship and vehicle designs have been committed to plastic in the Build & Play range, which my Son is very fond of and he can still be found playing with the originals a couple of years later, with their original batteries still going strong. His eyes lit up when he saw these, so there's little doubt where they'll be going the minute I've finished with them. All three of the kits in the initial launch have standard-sized boxes, with plenty of card inserts packing out the parts to prevent scuffs from rattling around, and parts bagged in small numbers where appropriate. This one has 40 parts split equally between two identical bikes, both of which have sound effect modules with two sounds at their heart. The figures are made from a flexible vinyl, and sit in a notch in the back of the speeder, with feet on open pedals, and hands on control grips, which they don't quite line up with. That probably won't bother the intended audience however, and they're close enough inboard not to notice. Construction is very simple, as the majority of the hull is already assembled around the electronics, with a small button disguised on the top. Two kick-stands are twisted into place, front & rear detail panels are pushed into their slots, and the seat is installed, leaving a small gap behind it, which is filled by the two rear cowling parts that are added next. Each side has two detail panels that allow some of the moulding underneath to show through, and are moulded in a slightly contrasting grey to accent the detail. The foot pedals and controls fit into holes in the sides, and a probe is fixed to the left of the hull in a large hole, which completes the bike. The rider has separate arms that are moulded with the chest and shoulder armour, which pushes into the front of the body, and is topped off by a head part, which makes it ready to play. Repeat that process for the other one, and then pull the little tabs out of the bottom to complete the circuit and set the 3 x LR44 batteries live and able to make sounds when you tap the button – which happens a lot during construction, just so you don't freak out the first time it happens. They're quite loud! The two sounds are startup and drive-away of the bike, plus a fusillade of blaster fire. Conclusion Marvellous! Two bikes to play with, or to chase poor old (mostly) innocent Han in his "Lego speeder" as I've taken to calling it. More on that shortly. Very highly recommended, and lots of fun! Revell model kits are available from all good toy and model retailers. For further information visit or
-
 Hi guys, To celebrate/commemorate the last day of sixth form for me (yesterday) I've decided to embark on a little project. Unfortunately I damaged the seals on my airbrush after trying to thin down Alclad with cellulose thinners; a new airbrush and official Alclad airbrush cleaner will need to be sought at the start of next week hopefully......Anyway... Running alongside my 1:48 Canberra pr.9 build (found here) I'm going to build an aircraft in a particular scheme that I have been wanting to do for quite a while. The kit is the new(ish?)-tool Revell A320 1:144 in an Ethiad scheme: I won't immediately reveal which aircraft I'm doing, I shall reveal bits and pieces as I go along (what a tease I am! ) but I shall start by giving a considerable hint; Red. Any guesses? That's all for now, at least until the airbrush is sorted. Kind regards, Sam
 -
Morning all So I have ended up with 3 kits on the go at once, not planned this way just happened. I started with the Airfix ME262 for which I also have the Eduard etch set, started out promisingly but the more I have done the less enjoyable this one has become for several reasons, firstly the kit fit has not been up to the recent new tool standards, wings halves not mating correctly, wing to body and engine to wing fit... well I'm still working on that. As you can see from the pictures this one has taken more filler so far than the last 3 kits put together! IMGA0209 by neil Connor, on Flickr IMGA0211 by neil Connor, on Flickr IMGA0210 by neil Connor, on Flickr Because the Airfix kit was starting to get under my skin I started the Eduard Spitfire mk9, this is a Profipack so no after market needed but I picked up some Techmod decals for Israeli and Egyptian aircraft, this is a fantastic kit, extremely detailed and overly complicated. IMGA0207 by neil Connor, on Flickr IMGA0212 by neil Connor, on Flickr This one although going together nicely, does not lend itself for a quick build so I started a third kit. This being Revell P47 Thunderbolt 2013 rebox from 1990's moulds from what I can work out, So far I have spent maybe 60 minutes on this one so far and have been surprised how good the fit and detail is for such an old kit. Better than the new tool ME262? we'll see as I get further into it. IMGA0208 by neil Connor, on Flickr IMGA0213 by neil Connor, on Flickr The only disappointment so far is the box art shows the aircraft with bombs and centre line fuel tank but the kit has 10 rocket and P38 fuel tanks on the wings, I may have to find replacements.
-
I was checking the instructions earlier today, and I noticed that Revell tells me I should file the top of piece C3 on step 3, but it doesn´t say how much or for what, can someone who has already build this model tell me how much plastic should I remove from this piece and why? Same thing goes for step 20, I´m told to sand the bombracks, but for what? Here are the instructions from Scalemates: https://www.scalemates.com/products/img/2/6/9/239269-81-instructions.pdf Thanks in advance.