Search the Community
Showing results for tags 'RAAF'.
-
This build occurred a few years back but I thought the steps may be informative for someone contemplating this build themselves. This kit was the 1980 issue Airfix Lancaster, with the addition of the DB Models Lincoln conversion kits. The kits include a number of parts in white metal, resin and vacform. First step was to cut the fuselage up and insert the vacform plugs. These actually fit pretty well and I used some internal bracing supports to ensure the fuselage wouldn't sag when supported purely by the plugs. Next, I drilled out the new nose and added some longerons and stringers I also utilised the White Ensign Models' Lancaster detail set for some of the internals. Following the joining of the plugs, the fuselage halves were trial-fitted to work out what was needed next. I also added some internal longerons to the fuselage. You can see the internal fuselage supports here.
-
After years of staring at the model in my cabinet, I decided last week after seeing yet another P-3 kit started that it was time to crack on with the restoration of this: I built this back in 1981, I think. Considering it was all brush-painted and the walkways painted, it wasn't a bad job but the seams were terrible, it needed nose weight (which I'd left out) and the decals were all faded (no clear coats on my models in those days!). I want to rebuild it as a flying desktop model of the EW version of the AP-3C, two of which will continue in service with 10SQN, RAAF for a few more years. I have the Hawkeye Models decal set I'll use for this and I managed to get a copy of the Hamilton Hobbies ELINT conversion set, too. It's suffering from the moulds becoming worn, so I'll need to do a fair bit of work on the castings for it to pass muster. I'll also be using the Quickboost prop set as I want to model it with #1 engine loitered (propeller feathered in flight). First step - strip with oven cleaner: It took a few goes and some resorting to the more-toxic-but-more-effective caustic stuff but it all came off eventually! The Lincoln at the bottom is not being stripped - it was in the hangar for a tailwheel repair! Some bits broke off but I'm not concerned as they're being replaced anyway. The sonobouy launcher section and all the pylons were then removed and the small galley/rest area windows, which had clouded over, popped out. I've made a plastic sleeve like the one I made for the USS Enterprise from plastic stock on Ray Seppala's suggestion. It'll go inside the fuselage to take the brass stand before I fit the replacement belly section. Lots of surgery required on the #2 and #3 engine fairings for the EWPS resin bits, the nose for the IRDS bits and wingtip replacements. Then it'll be time for some seam sealing...
- 68 replies
-
- 12
-

-
 Hi everyone, I started to assemble this Airfix kit: by Rodolfo Masti, on Flickr to make this aircraft: Source: 3 Squadron - Australian Flying Corps / Royal Australian Air Force A brief history: In early April 1945 'Dusty' Lane claimed one of No 3 Sqn RAAF's few victories on the Mustang III/IV when he shot down an Fi 156 over Yugoslavia. He flew KH676 regularly throughout the latter part of the month, including twice on the 25th in attacks on canal lock gates. The following day Lane attacked a ferry crossing in it, despite being opposed by heavy flak. The Mustang 111/IVs of No 3 Sqn RAAF proclaimed their Australian ownership by having their fins painted blue,onto which the unit applied the stars of the Southern Cross. A quick look inside the box: by Rodolfo Masti, on Flickr by Rodolfo Masti, on Flickr by Rodolfo Masti, on Flickr by Rodolfo Masti, on Flickr by Rodolfo Masti, on Flickr Eduard cockpit box contents: by Rodolfo Masti, on Flickr Main part of cockpit assembled by Rodolfo Masti, on Flickr by Rodolfo Masti, on Flickr by Rodolfo Masti, on Flickr by Rodolfo Masti, on Flickr
 -
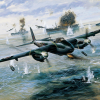
Finally, a perfectly good excuse to build a Tamiya Mosquito. I picked this kit up at our local swap and sell in 2021 for a good price with the inclusion of a True Details resin cockpit set. I've since sprung for a few more items to accompany the resin set. I'm not sure if I'll use the Yahu panel as the resin item should look nice with some crappy painting. It'll be a Mk.VI marked as SB-J from RAAF 464 Squadron flown by Flight Lieutenant Jack Palmer and his navigator Flying Officer Jack Rayner while the squadron was on task with 2TAF. The two Jack's were quite proficient at busting trains during their service with a typical load of four 500lb bombs plus the destructive power of .303 machine gun and 20mm canon rounds. A few pics of what I've got to work with. Cheers, Mick
- 38 replies
-
- 14
-
-
I finally got my new digs set up and have made a meagre start to getting the Macchi finished. It was left like this when I realised the paint work was not the best So decided to try and brush paint the corrections But it did not pan out so I rubbed back the brush marks and threw it into the paint station and resprayed the lower fuselage While I wait for that to dry I started to clean up the 3D printed gun pods and resin practice bomb racks
-
Here is my meagre effort for the year (so far). I managed 11 completions compared to 22 last year. Not as much locking down this year I suppose as well as a moved halfway across the country in the past 2 months getting in the way of further productivity. With the bench finally set up and damaged models repaired I can get on with finishing at least one more before the New Year. So in no particular order 9 of the 11 were RAAF subjects which were mainly done for the delay RAAF 100 display of the club I just left. 1/72 Welsh Models Boeing P-8A Poseidon, 11SQN RAAF 1/72 Airfix (original tool) De Havilland Mosquito Mk IV, 464SQN RAAF 1/72 Airfix (original tool) De Havilland Mosquito Mk VI, 1SQN RAAF 1/72 Italeri Bell UH-1B, 5SQN RAAF (delivery scheme) 1/72 Hong Kong Models (Hawkeye Models Aust) Beechcraft B200, 32SQN RAAF 1/72 Academy Boeing Washington B1 (B-29A), Air Trials Unit/ARDU RAAF 1/72 Airfix (Craft Master) Handley Page Halifax BIII, 466SQN RAAF 1/72 Mach 2 Vickers Viscount 849, 34SQN RAAF 1/48 Minicraft Sikorsky S-70A-9 (UH-60), 9SQN RAAF On to the 2 non RAAF builds 1/72 Airfix BAE Hawk Mk51, Midnight Hawks FAF 1/72 Airfix Boeing E-8C, 116ACW, USAF (from E-3D kit). While it was not an Aussie airframe per say this aircraft started life as a QANTAS B-707-338C VH-EBU A couple that were started but did not make it across the line.... 1/72 Airfix Fokker F27-500 Friendship, LADS A civil registered airframe used by the RAN for mapping 1/72 Hobby Boss HH-60J, USCG And some more progress on a long term project... 1/72 Anigrand Boeing C-17A, 36SQN RAAF
-
Thought some of you might be interested in this photo, that shows what was captioned as a No. 13 Squadron Ventura being loaded with what looks like a depth charge and 500 pound bomb. Never noticed how the curved extension at the front of each bomb bay door actually rested against the outside of the fuselage, as evidenced by the scuff marks. (A small detail for you to incorporate in your next Academy kit build, @tonyot!) Mike https://www.pastmasters.net/control-tower-museum.html
-
- 1
-
-
- No
- 13 Squadron
- (and 1 more)
-
Hello everyone… Going to throw my hat into the ring with this one. https://www.scalemates.com/kits/hasegawa-51552-f-4e-phantom-ii-thunderbirds--135582 I will build it in the S.E.A. Scheme with RAAF Roundel’s. The Australians operated a number of the early “E” type while waiting for their F-111’s. If I have time to do a second one it will be an USAF “G”. Dennis
-
C-130 A97-008 of 36 Squadron Royal Australian Air Force out of RAAF Base Richmond. She was supporting the F-111C deployment to Red Flag 81-1 at Nellis AFB, November 1980. Thanks for looking, Sven
-
I'm well acquainted with the rather prominent bulge for the Sperry autopilot on RAAF Beaufighters but being the curious type, I've always wondered what was the specific reason that RAAF aircraft needed these and Beaufighters operated by different air arms didn't. I could assume it was due to large distances having to be flown over the Pacific but beyond that, I'm stumped. Any experts care to enlighten me please? Thanks, Clive.
-
Hello to all of you good people.I hope you are doing well.I have just finished this Hasegawa 72 scale F-111C in the colors and markings of the Royal Australian Air Force.I added the eduard PE set in the cockpit as well as the extirior.Painted with Gunze paints and varnished with Vallejo matt acrylic varnish. Regards,Dragan
- 35 replies
-
- 103
-
-
Wedge-TailedEaglePortraitRaptorDomains.thumb.jpg.41a306d3445a68f0f2df773e01776ea6.jpg) Pilatus PC.9A, A23-051, RAAF Roulettes formation aerobatic team, CentralFlying School RAAF East Sale, Victoria. OzMods 1/72 painted with Gunze acrylics. Some antennae added from plastic card. Build thread over in the Unarmed Group Build. Very much a short run kit, some fairly agricultural looking plastic with no locating tabs and lots of flash, some nice resin parts (cockpit, exhausts, wheels etc) and three canopies, a rather nasty injected one and two vacformed ones. There is a choice of props, both in flight and feathered. A bit fiddly in places but with a bit of careeven an average modeller like me can produce a reasonable model. Thanks for looking. AW
Pilatus PC.9A, A23-051, RAAF Roulettes formation aerobatic team, CentralFlying School RAAF East Sale, Victoria. OzMods 1/72 painted with Gunze acrylics. Some antennae added from plastic card. Build thread over in the Unarmed Group Build. Very much a short run kit, some fairly agricultural looking plastic with no locating tabs and lots of flash, some nice resin parts (cockpit, exhausts, wheels etc) and three canopies, a rather nasty injected one and two vacformed ones. There is a choice of props, both in flight and feathered. A bit fiddly in places but with a bit of careeven an average modeller like me can produce a reasonable model. Thanks for looking. AW -
On Wednesday the postman delivered this, so I can make a start in the GB: Sprue shots: Usual short run fare, no locating pegs apart from one for the cockpit and four small lugs where the fuselage joins the wing. Flash on most of the parts and huge sprue gates. Detail is finely engraved. An additional sprue with a prop (the kit gives the option of flight mode or feathered), some nicely cast resin parts for the cockpit and three canopies, two vac formed and one (frankly awful) injected. I intend to use the injected canopy as a mask when it comes time to paint. Decals: The fairly straight forward instructions: and a couple of pages of painting and decal placement plans, in colour. I will be attempting this one: A start has been made on cleaning up the parts, the plastic is quite soft and cleans up easily, in fact care has to be taken to avoid over sanding. The undercarriage parts have a mould line that is particularly difficult to remove and the wheels would have been better cast in resin. I have had one small disaster with the spinner. One thick attachment point was successfully cut, but the second one resulted in a breakage of the rear of the spinner itself. I’ve stuck the broken bit back on and flooded the joint with CA so 🤞it holds. A dry fit has shown that there will be some gaps but I’ve seen worse on mainstream kits. Good news is the resin cockpit will actually fit the fuselage! I don’t know how far I’ll get with this model as we have a house move coming up and it’s looking like our new place will be ready earlier than originally thought, so there might be a break in proceedings. More to follow, thanks for looking. AW
- 38 replies
-
- 11
-
-
Ever had one of those kits that end up being just a little disappointing? I picked the old Esci 1:48 scale MB326 going cheap at the swap'n'sell at the local model expo last year. While there I also picked up a set of Hawkeye decals for an all grey 76 Squadron RAAF machine based at Williamtown, NSW late 80's/early 90's. Should have been straight forward - right? Well, it ended up being shelf sitter for the best part of six months. First off, why did they mould it in that hideous, hard to cover, orange plastic? The canopy was all scratched and semi opaque. It may also have been my cack handed abilities, but it didn't fit together very well either. With the finish line in sight, the decals were a bit of a disappointment. It is the first time I have used white decals to go under the main decals - and sadly the roundels were just a bit too big for the wings and too small for the fuselage. I had to use some of the other markings from the Esci sheet - which silvered like crazy and were also very fragile. Finally I made a right mess of getting the undercarriage on. I wasn't going to let it defeat me though - I somehow managed to get to the finish line. I doesn't look two bad on the shelf from a distance, and it really is a very attractive little aircraft. Brush painted with Tamiya acrylics, a little bit of an oil wash and a final coat of semigloss clear from a Tamiya rattle can. Thanks for looking.
- 10 replies
-
- 27
-
-
- Macchi MB-326
- RAAF
- (and 1 more)
-
Hi All, With my multiple FAA Grumman build soon to draw to a conclusion, I'm eyeing up my next challenge. After seeing @bigbadbadge's marvellous Ventura target tug build (awesome work Chris!!), I fancied a bit of twin-engined yellow action, so what better than the old Oxbox? I also spent a considerable amount of my younger years around the dreaming spires (and more importantly, the ale houses and live music dives) of that great city , so the Oxford has a distinct personal connection! I am going to be building the 'Commonwealth Service' version of the Oxford, which I have not seen built on this marvellous forum. Here is the box art: Here's the obligatory sprue shots: One thing that immediately jumps out is that there is no option to open the large side door - I may need to rectify that. The engines also look a little underwhelming, but otherwise surface detail and moulding generally looks pretty good. Here's the transparencies and assorted resin components: Nice! There's also a decent-looking set of masks (thoughtfully including a circular mask for a large yellow area around the roundels on one of the options), and a PE fret: There are 4 marking options: two RNZAF aircraft, one of which is the boxart scheme. The combination of yellow and red stripes frankly gives me the heebies , so I'm trying to decide between another RNZAF and an RAAF scheme. First the RNZAF: Here's a photo of NZ1222: Or this RAAF scheme: I've found this photo - the rearmost aircraft could be LW926, but the serial number is illegible: Both are attractive schemes - for obvious reasons I'm leaning to the RAAF scheme, but also because I think the combination of Earth Brown & Foliage Green over Yellow is a good one. We shall see - I may make a gentle start on this tomorrow Thanks for looking, Roger
- 37 replies
-
- 10
-
-
- Special Hobby
- WW2
- (and 1 more)
-
 With my Halifax almost done bar a flat coat and with 2 more weeks in the GB I thought I would have a go at something that stays on the ground. Let's see how I go with this one, 1/72 scale to keep it simple and small. Decals are from a South Australian producer, DekLs who has included every RAAF tender in the sheet. I just need to decide which base's tender to build.
 -
Morning/afternnon/eveing all! I've just ordered an Airfix 1/72 Bristol Bulldog and intend to build it as an RAAF machine from the late 1930s but have a couple of questions about this aircraft in Australian service. First question regards the use of a tailwheel in place of a tailskid. I remember seeing a photograph of an RAAF Bulldog with a tailwheel, but can't remember if the caption mentioned it as an experiment or as standard. Could someone enlighten me on this or show that age plays tricks with memory? Second question is in regard to the roundel colours. I remember a discussion on BM about the blue in RAAF roundels being different from that used in the RAF. Was this the wartime roundel colour or prewar as well? TIA! DennisTheBear
-
 Howdy, another start, and hopefully a finish to this one, the A7M2 is going slow, scratch building parts and mods need a learning curve, more on that later. On the the GB contribution, one of maybe 3, follow on if you would like to see what else is up! Plan is to do OOB mostly with some "necessary" mods if needed. So I got the kit by the start date, hard part out of the way, so its all easy from here, scratching everything would be well a pain. Until I seen what lay waiting for me. Check out the sprue gates...use your imagination and you can see the part! By this stage i was most definitely no impressed, have had this extremely hard plastic close to shatter if cut wrong. Flash was bad, but not atrocious. this actually looks like desaturated Jade (stone) and has a feel much the same to boot. shatters too! Ok looking past the initial shock, i went to do a dry fitup of the fuselage halves and wing assembly. i must say with a spot of sanding the seams were spot on, with the lines being consistent and continuous. So far so good! Will definitely add some nose weight, she looks like a tail sitter at this stage and seeing other examples in a local hobby store. Regardless, first impressions aside, the Tasman models conversion to the fuselage and nose seems accurate, albeit with its own issues inherent to conversions. I would buy it again if my hands were tied for options. Till next time Darius
 -
This was started back in 2018 for the Maritime Patrol GB And continued in last year's They Also Server GB I am finally inspired to finish this off, I suppose it was after post on the Welsh Models Facebook page of a chap adding the weapons bay to his (not as far along as me) I decided I would get this finished. I took it down from the shelf to remind myself how far along it was After the last prime some more filling was done and that has been sanded off. I have also been adding more detail as I have been seeing it Including the the front and rear walls of the weapons bay itself. The first bay door has been installed and needs some clean up once the glue dries On the home stretch now and I am now looking at the weapons pylons to hang a couple of Harpoons from and modding some Hasegawa MK46 torpedoes to MK54s (or closed enough) to add in the weapons bay
- 25 replies
-
- 16
-
-
 Hello everyone... this is the first of my builds. It will be a P-40N from the classic Hasegawa 1/72 kit. Kit decals wont be used here but saved for a future build. Funny thing is the second P-40 I’m building has Dickie Cresswell’s Markings, two issues with that route. One Ive already done Cresswell’s kite, and two it is an incomplete set. The markings will be off of this sheet, I’m just not sure which one I will go with yet, though I’m partial to either “Hep Cat” with the Red,White,& Blue spinner, or with P/Ofc. Bob Barkla’s Disney noseart bird. Please feel free to ask questions, post comments or add thoughts. Dennis
- 27 replies
-
- 13
-
-
I will be joining in with the much maligned Mach 2 Vickers Viscount. I will be converting the kit's -700 airframe to a -800 by way of the Hamilton Hobbies conversion set. It will be marked as one of two aircraft operated in the VIP role by 34 Squadron at RAAF Fairbairn during the 60s, decal from Hawkeye models Australia
- 39 replies
-
- 13
-
-
Place holder for my Hornet build. AW
- 42 replies
-
- 20
-
-
F/A-18A Hornet A21-39, 77 Squadron RAAF Williamtown. This aircraft has worn this special scheme to celebrate successively 77 squadron’s 75th anniversary in 2017, its 77th in 2019 and most recently 33 years of Hornet operations in 2020. The unit ceased flying Hornets in December 2020 and is now converting to the F-35A. In September-October 2019, 77 squadron deployed 6 Hornets to Chitose JASDF base for exercise Bushido Guardian, the RAAF’s first joint exercise with Japan. The model represents the aircraft, flown by the CO Wg Cdr Jason Easthope, on arrival at Chitose. 1/72 Hasegawa with Quickboost seat and intakes, ResKit wheels, Brassin AIM-132 ASRAAM and AIM 3D printed ACMI pod. Painted with Mig greys and Gunze H6 green. Built for the ANZAC group build. Thanks for looking AW
-
 One early morning shortly before Christmas, 1944, Flight Lieutenant John Sims Archer. an instructor at the Royal Australian Air Force Central Gunnery School at Cressy in Victoria, went aloft from the school field for a gun camera exercise flying a 'tropicalized' Mk.Vc Spitfire. A hoary veteran at twenty-four, 'Jack' Archer was distinguished as the one pilot of a Wirraway emergency fighter to have ever engaged with good result a Japanese 'Zero'. That had been a little more than two years before, over Buna. In the interim F/Lt J. S. Archer had survived one mid-air collision, and flown a P-40N fighter-bomber over New Guinea with 75 Squadron, RAAF. The Spitfire Mk.Vc F/Lt Archer was flying, A58-173, had also seen extensive service. In England, it had been delivered in December 1942 to the RAF serialed JG740. By then the Mk.V Spitfire had been rendered obsolescent over France by the Focke-Wulf FW190, but the type was considered more than adequate still for overseas duties. JG740 was 'tropicalized' with a Volkes filter under its cowling, painted Dark Earth and Middle Stone and Azure Blue, then turned over to the Royal Australian Air Force. Shipped off on the S.S. Austral Star, it arrived at Melbourne in mid March, 1943, and was taken into the RAAF as A58-173. When the machine went on strength of the freshly formed No. 79 Squadron, RAAF, in May, it became the favored mount of the Squadron CO, A. C. Rawlinson, who was credited with eight confirmed victories in North Africa, where he had flown with 3 Sqdn RAAF under English command. With its Volkes filter stripped off its chin, and the Middle Stone of its 'desert' scheme overpainted with Foliage Green, A58-173 (still bearing its RAF JG740 serial) was coded UP*U (in deliberate invocation of 'up yours'). S/Ldr Rawlinson flew this Spitfire Mk.Vc throughout the antipodian winter of 1943. No. 79 Sqdn operated over New Guinea and the Solomon Sea, based first at Goodenough Island, and then on Kiriwani, charged with giving high cover to RAAF P-40 fighter-bombers of 76 and 77 Sqdns, and with interception of any Japanese raiders which might be launched from Rabaul. 79 Squadron saw very little combat during this time, but A58-173 UP*U was the aircraft from which the squadron's first victory was achieved, at the end of October. It was flown on that occasion not by Rawlinson, who was being promoted to command of 73rd Wing, but by Flight Sergeant I.H. Callister, who surprised a Japanese Army Ki-61 'Swallow' fighter, and shot it down. . In March of 1944, No. 79 Sqdn was committed to the Admiralty Islands campaign. From airstrips on newly-captured Los Negros Island, the squadron provided close support to troops on the main island of Manus, and escorted shipping in the Bismark Sea. No. 79's aging Spitfires proved difficult to maintain on an advanced base, and by May the unit was reduced to a skeleton, with only two operational machines, and a dozen needing repair. A58-173 was among the latter, and in mid June it arrived at 1st Aircraft Depot near Melbourne for a thorough overhaul. A58-173 emerged from the workshops in early September, with its Volkes filter restored and stripped of all camouflage paint, and was assigned to the Central Gunnery School at Cressy. Flight Lieutentant 'Jack' Archer's gun camera exercise on December 21, 1944, was to be the final flight of A58-173. The coolant system for the the Merlin motor sprang a leak, and the engine seized up. F/Lt Archer was forced to land, which he managed with little damage to the machine, near South East Meredith Railway Station. A recovery party was dispatched from the airfield at Cressy, and the aeroplane was got onto a trailer. Motoring back to the airfield, this was rear-ended by a civilian vehicle. Great damage was done to the tail of the machine, and A58-173 was written off as past repair owing to a traffic accident. Probably not a completely unique occurance, but certainly not one encountered often in the records.... This model of A58-173 was built from the old Heller 1/72 kit, in a very old Smer boxing. I made no effort to detail or 'improve' the kit, beyond replacing raised panel lines with scribed ones. I doubt many of these are still being built, but as can be expected from an old Heller offering, the kit is well designed, and fits well (with the exception of the optional Volkes filter under the nose). I did not like the three-piece canopy (hard to test-fit together), but they did all fit one another cleanly. The rearmost piece rides a hair high, and so does not quite properly 'blend' with the fuselage spine. The kit's wingtips are separate pieces, so it can be built with either full wingtips or 'clipped' ones. This would be no problem in a full wing model with a painted finish, but these seams did complicate foiling a bit, because burnishing down the foil could easily crack them. I am of the 'nothing looks quite so like metal as metal' school, and so always use foil for a bare metal finish. I make my own from kitchen foil, boiled a while with eggshells, and tacked down with MicroScale foil adhesive. I decided to build this kit, which I'd had a long time, soon after doing an old-tool Airfix Mk. I Spitfire. ( https://www.britmodeller.com/forums/index.php?/topic/235077256-spitfire-mkia-609-squadron-september-1940/&tab=comments#comment-3766657 ) When I went looking for Mk. V subjects, I was hoping to find something a bit unusual. An image of a natural metal Spitfire seemed just the thing, and led me to the ADF Serials site. They have something on just about every individual machine, and it caught my eye there was more text than usual in the entry the bare-metal A58-173 illustrated. I toyed with the idea of doing the machine in its New Guinea employment, where it was also well-photographed, but decided to stick with my original resolve to do a natural metal Spitfire. The fuselage roundels are leftovers from an Academy P40N kit, the rest are improvised with a smaller 'A' roundel (of the 'place yer own damn dot' sort) put down over a larger one, to match a 'B' roundel proportions. Some measuring was necessary, and so was some painting over unexpected tranluscence where the larger roundel had a a red center. Wife made the serial numbers and the identity letter from the school. It is rather an odd 'E', and it took some improvising to match the side-view photograph taken of A58-173 shortly after 'Jack' Archer's forced landing.
- 10 replies
-
- 18
-
-
Hi All, I've had a pretty reasonable year in terms of output - 12 models completed in all, so an average of once per month. It's not been that consistent really - I had a purple patch when I lost a job, and have slowed down since I got a new one! I hope you all enjoy, and let's hope that 2021 is a little less interesting! Anyway, down to business. First cab off the rank was Airfix' lovely 1:48 Boulton Paul Defiant, built as PS*V of 264 Sqn RAF, Martlesham Heath, June 1940: Next was an Airfix Sea Hurricane MkIB of 880 Sqn FAA, as flown by Lt 'Dickie' Cork DSO DFC from HMS Indomitable during Operation 'Ironclad', the campaign to recapture Diego Suarez in Madagascar, 1942. No WIP for this one, so there's an RFI link: Next, one of my favourite builds of the year, an Airfix 1:48 Supermarine Walrus, finished as an aircraft of No. 5 Communication Flight RAAF, based in New Guinea in 1943: Next, Tamiya's wonderful 1:48 Republic Thunderbolt MkII, finished in a SEAC scheme as RS*B of 30 Sqn RAF based at Chittagong, India, March 1945: One of my next favourites for the year, and my best attempt at some scratchbuilding yet, was Trumpeters 1:48 Westland Whirlwind, finished as P7116 of 263 Sqn, RAF Colerne, Winter 1941/2: Next up was a 1:48 Martin Maryland, presented as AH284 of 39 Sqn RAF, North Africa 1942 - probably my most challenging build of the year, and to my mind one with plenty of room for improvement: Next a change in scale for Airfix' 1:72 Vickers Wellington GR MkVIII, finished as HX379 of 172 Sqn, operating from RAF Chivenor in 1942: Next another 'quickie' build, Airfix' Hawker Hurricane MkI, finished as V6799 of 501 (County of Gloucester) Sqn, RAF Kenley, October 1940: Still with me?! A more unusual subject next - Academy's 1:48 Vought Chesapeake, finished as an aircraft of 811 Sqn at RNAS Lee-on-Solent in July 1941: I continued the FAA theme with a far more versatile aircraft - a 1:48 Special Hobby Fairey Firefly MkI, finished as Z1830 of 1770 Sqn FAA, which flew from HMS Indefatigable in July 1944: Next another challenging build - Eduard's 1:48 Westland Lysander, finished as a SEAC Special Duties aircraft V9289, a Lysander MkIIIA flown by 357 Sqn RAF, formed in Didri, India in February 1944: Last but certainly not least, Eduard's 1:48 Bell Airacobra, finished as A53-6 of 82 Sqn RAAF, based at RAAF Bankstown NSW in 1943: UPDATED 30TH DECEMBER My final build of the year is Special Hobby's 1:48 CAC CA-13 Boomerang, finished as A46-199 'Home James' of 4 Sqn RAAF, based in New Guinea in 1944, flown by Fl Lt Jack Archer: And that's the year done! I've really enjoyed being part of this great community over the last 12 months - the banter, positive comments and genuine support have been a real beacon in what's been a tough year for everyone. Thanks to those of you who have been so kind and supportive (you know who you are), and I look forward to sharing another year with you all! All the very best and season's greeting, and above all thanks for looking! Cheers, Roger
- 31 replies
-
- 31
-