Search the Community
Showing results for tags 'Meng'.
-
IDF Infantry Set 2000- (HS-004) 1:35 Meng Models With the profusion of Israeli armour that we seem to have these days, it makes sense to have some figures to go with them, and Meng have now released another set to complement their original vehicle crew set that we reviewed here some time ago. This set contains four figures that would be ideally suited to a foot patrol accompanying armour, with modern equipment that places them in this millennium. They arrive in a standard figure-sized box in a satin finish, and inside you will find four sprues in a shiny mid-grey styrene. The instructions consist of a painting guide on the rear of the box, and each figure's parts are together on one sprue for ease of construction. Each figure has separate legs, arms torso and head, plus a helmet with an oversize cover that looks unusual, but I believe has something to do with cooling and shading the soldier's neck and shoulders. Weapons are all Tavor (TAR-21) based, with either red-dot or holo-sights, and one has a 40mm grenade launcher attached under the barrel. Ammo pouches are also separate and are shown attached in various arrangements to the figures' vests, with additional pouches and day-sacks in various configurations. The figures are very well moulded, although a little flash is present, which can be seen from the photos. It's all pretty easy to remove however, and a good wash in warm soapy water is advisable, as there seems to be quite a lot of mould-release agent on the plastic, probably due to the complex nature of the mouldings. Two of the figures are in a walking pose, one with his weapon across his chest, the other holding it down to his side. Of the remaining two, one is standing with his rifle in both hands in a relaxed but ready pose. The other is on one knee shouting (judging by the size of his cake-hole) into a field radio handset, with his rifle cradled in his free hand. Colour call-outs are given in Vallejo codes, but it's easy enough to convert these to any other brand, or you could pick up the IDF colour set from Lifecolor that is within my review here. Be sure to check out my review of the resin IDF load-carrying equipment set here. Review sample courtesy of
-
 High Performance Flexible Sandpaper (MTS-042) (Extra Fine Set) Meng Model/DSPIAE via Creative Models Ltd We originally got this set in from Creative a month or so ago, but they looked so cool and useful that by the time we got round to reviewing them, they’d gone out of stock. Now they’re back, and we’re rushing to let you know about them. Meng’s range of modelling tools has been expanding, and since their tie-up with DSPIAE it has included metal tools, and lots of other useful bits & bobs that are enticing, as well as handy. This set of flexible sponge-backed sanding sheets arrive in a card box, with an attractive smoke-coloured translucent plastic box in a poly-bag. It is divided up into five individual sections, each of which has its own lid with snap-down closure and hinge. Inside are a five sections full of sandpaper of various grades, each on different thicknesses of coloured sponge, which corresponds with the grade of grit that it holds. The box lids have the grade engraved on the top, and each sponge back is over-printed with both the grade and the Meng brand name so you don’t forget who makes them. In the box you get the following: #1000 2 x thick, 2 x medium, 2 x thin #1200 2 x thick, 2 x medium, 2 x thin #1500 2 x thick, 2 x medium, 2 x thin #2000 2 x thick, 2 x medium, 2 x thin #2500 2 x thick, 2 x medium, 2 x thin That’s a total of 30 sheets, each one measuring approximately 70mm x 20mm. The sandpaper is 0.3mm thick, and the sponges are 2mm, 3mm and 5mm for thin, medium & thick respectively. They’re a useful size, with not too much “middle” that’s not quite as easy to use in precision applications, and with high quality sandpaper well-adhered to the foam that should lead to a long service-life, with refills of individual grits available for a reasonable price. You should remember that they are intended to sand shapes, and shouldn’t be relied on to create flat surfaces, as they have a tendency to round off flat surfaces when used extensively or carelessly. They are great for smoothing off shapes that you want to diminish or minimise, reducing flat-spots, and for gently sanding detailed areas where you don’t want to obliterate the detail. There is also a Fine set, which has more aggressive grits of 150, 250, 400, 600, and 800 in the same style box, with additional bright foam colours to tell them all apart, providing your memory is up to the task. Very highly recommended. Extra Fine Set (MTS-042) Fine Set (MTS-041) Review sample courtesy of
 -
Ford GT40 Mk.II ’66 (CS-004) 1:24 Meng via Creative Models Ltd Ford began taking an interest in endurance racing in the 60s after a falling-out with Enzo Ferrari during a potential take-over by Ford, and to improve their brand name awareness, which started in the UK in Slough with a Lola chassis, lacking in success initially. It was taken back in-house so to speak and carried on in the USA, using the genius behind the Lola GT6 that had shown promise, despite it failing to finish the race. They created the GT40, with the 40 stemming from the minimum height in inches at the time, using some of the Lola’s chassis and a Mustang engine in the Mk.I, which was far too rough and not at all ready for racing at that point. This led to another change in personnel, putting the famous and rebellious Carrol Shelby in charge, who with input from driver/mechanic Ken Miles undertook a series of significant modifications that gave it a great deal of power and success. The Mk.II was fitted with a larger 7.0L V8 engine that turned it into a beast that was mated with a four-speed gearbox, to be used by three racing teams to stunning effect. Those teams took 1,2,3 at Le Mans in 1966, leaving the previously successful Ferraris in their dust, which they continued to do for the next two years. As is usual with racing, improvements were made to the bodyshell, the carbs and other parts, although they were not without their problems. A technical failure took out every GT40 at Daytona in 1967, causing a brief return to prominence of the Ferraris, but they were back to their winning ways again for a total of three years, which is a long time in racing. Its successor began life as the J-Car, but after killing driver Ken Miles in a testing accident due to materials deficiencies and aerodynamic issues, it was redeveloped as the Mk.IV, but was often left in the garage at race-time while the Mk.II was still winning, as the older car was a more reliable platform. By 1968 the Mk.II was no-longer competitive, and the Mk.IV was fielded, but success was elusive. An attempt was made to continue the name with the Mk.V but this was more of a sports car than a racing car. A few kit cars carried on the look over the years, but in 2002 a new model was released by Ford as a sports car using the name GT, but it was negatively affected by Jeremy Clarkson’s unfortunate experience of persistent unreliability of his example, bought with his own money. 2015 saw a second generation launched as a street car, with an endurance racing team beginning in 2016 and carrying on until 2019 with a healthy number of victories. The Kit This is Meng’s second kit of the famous GT40, the first being the double-size 1:12 uber kit that was released in 2020 and re-released in a pre-coloured moulding this year. Taking advantage of their research, Meng have now downscaled the kit to 1:24, which was probably a lot more complex than putting it on a photocopier and choosing 50%. It arrives in a compact Meng style box, as it isn’t actually a very large car, and inside are three large and one small sprue plus two bodyshell halves in pale grey styrene, a clear sprue, four flexible black tyres, a quartet of poly-caps, a small Photo-Etch (PE) sheet, a sheet of sticky-backed flock material, a sheet of windscreen masks, and the instruction booklet with colour profiles on the rear pages. The detail is typical Meng, with a complete engine, transmission and suspension included, as well as the interior, which will be seen through some crystal-clear transparencies, although it doesn’t have the opening doors of its larger sibling. The decals are crisp too, and include instrument and tyre stencils into the bargain. Construction begins by choosing which of the three team vehicles you wish to build. You have the choice of the iconic pale blue Gulf No.1 (Ken Miles & Denny Hulme in 2nd place), black No.2 (Bruce McLaren & Chris Amon in 1st place) and gold No.5 (Ronnie Bucknum & Dick Hutcherson in 3rd place), as this makes a difference to the details of the model. The front hubs are the first to be made, trapping poly-caps between the two halves, then putting them to one side while the passenger “tub” has the pedal box, gear shifter and fire extinguisher added, and the upper front suspension framework inserted above the moulded-in lowers, with a sprung damper between them and the hubs slotted in place at the outer end of the frames. An overhead diagram shows the painting of the tub for each of the decal options, with another for the floor pan, which glues to the underside of the tub, while you also attach a linkage between the two front hubs so the wheels point in the same direction. Two inner arch inserts are installed around the front axles, and the radiator assembly is dropped into the front with two side supports over the front lip. The engine is built in top and bottom halves, beginning with the block, transmission and the ancillaries running from the timing belt, with the hoses for cooling extending forwards. The transmission has the drive-shaft boots moulded in, and this assembly is then dropped into the floor pan along with the lower suspension wishbones. More suspension trickery is inserted over the top of the transmission with a pair of crisply moulded springs and a filler hose included. At the rear, a “bike rack” slips over the two rectangular forms either side of the transmission, top suspension framework and twin oil-coolers fixed to their bases at the front of the engine bay. The top of the engine has the cylinder heads and rocker covers, air intake and distributor fitted, then the complex 8-port exhaust manifold is installed from four sinuous parts that join to create the two exhausts that project from the rear of the car. The rear hubs are made up from two halves and a poly-cap, linked to the transmission by a short drive-shaft that slots into the boots, one per side of course. The GT40 has two seats, with one just for show, while the other has set of four-point belts that are made from the pre-cut flock material, which is slid over the buckles and adjusters, then attached to the seat. The GT40 seats were perforated initially to save weight and keep the driver cooler, with holes through the padding and metal eyelets keeping things from fraying. While these seats aren’t perforated due to the scale making it impractical, the eyelets are moulded into the fabric and can be painted silver as long as you didn’t drink too much last night. The texture and deformation of the surface of the material part of the seat is also excellent, and gives a very realistic impression that will be accentuated by some careful painting. The engine firewall has some nice moulding present too, and has a few ancillaries attached to the rear face along with the glazing before it is dropped into the tub. At the other end of the tub, the dashboard is made up of a vertical panel with the dials inlaid, which all have decals, the horizontal coaming with moulded-in grille, and the steering wheel on a short column set to the right side, which also has a boss decal. The thick door card panels are also inserted into the tub at this stage, boxing in the sides of the cab. The GT40’s wheels were larger at the rear to get the power down more efficiently, and this is replicated faithfully in the kit, using two pairs of beautifully moulded hubs with separate knock-off wheel nuts, and flexible black tyres with a subtle tread on the contact surfaces, and pin-stripe decals in a pale blue that go around the circumference of the tyre rim, plus some undocumented curved Good Year logos should you want them or your references require it. The completed wheels push-fit into the hubs and are held in place by the poly-caps, which will come in useful during the rest of construction. Attention turns to the bodyshell, and the front cab and bonnet section is prepped with inner arch inserts and a couple of clear lenses pushed in from the inside. There are a number of ejector-pin marks on the roof that will need hiding if you feel they’ll be seen, which is best done before adding the rear-view mirror and the other external parts. Externally, there are three small raised button-fairings on the left door, some of which should be removed and smoothed over for the various options, and from the inside a pair of holes are drilled for two of the options to add a raised fairing on the roof of the right-hand door, which I suspect was there to accommodate taller drivers. A filler cap is inserted into the right wing, and clear lenses for the headlights and side lights are also glued into their recesses in the front. The rest of the glazing is next, starting with the large windscreen, the two aerodynamic clear lenses on the headlights, sidelights, and the fixed side-windows with their tiny sliding hatches moulded-in. Masks are included for the glazing, and they are pre-cut from a white kabuki tape style of material. The bonnet hatch is an insert with a sculpted exhaust slot to extract hot air from the radiator, supported by a central strake, which was absent from golden number 5, so will need to be removed if you are modelling that option. That completes the front of the bodyshell, and it is attached to the floor pan while the rear section is made. The rear bodyshell has a liner that is a convoluted shape that has a pair of intakes added to the sides, and an extended Y-shaped hose inserted through holes in the sides, which is then painted before it is inserted into the outer skin after putting the clear rear lights in the rear from the inside. Externally, the rear window with its mask is put into the frame, and an intake with clear cover just behind it, which also has a mask to keep it that way too. Two intake “horn” scoops are set on their bases either side of the clear intake, and the PE mesh panel that makes up a good proportion of the rear of the vehicle is added to the frame, leaving a rectangular gap in the centre for the exhausts to exit once it is in place, pivoting on a pair of hinges at the rear. Thanks to the liner, the bland interior of the skin is hidden, which would otherwise have been visible when the back was opened up. Markings As previously mentioned, there are three options from the 1966 Le Mans 24 hours race, where they took first, second and third place in a stage-managed echelon that went over the line together, sneakily robbing Ken Miles of his number one spot (yes, I’ve seen Ford Vs Ferrari/Le Mans 66). From the box you can build one of the following: 2nd Place, 24 hours of Le Mans, France, 1966 Champion, 24 hours of Le Mans, France, 1966 3rd Place, 24 hours of Le Mans, France, 1966 The decals are printed anonymously and have good registration, sharpness and colour density, with a thin gloss carrier film cut close to the printed areas. Conclusion The GT40 is truly an iconic racing car, and dominated endurance racing for three whole years, leaving a legacy that lasts to today. This is a well-detailed model of the Le Mans winners from ’66, and should appeal to a great many, even non-car modellers. I’m off to watch Steve McQueen in Le Mans now – similar but different. Very highly recommended. Review sample courtesy of
-
Hi All, quick question, just starting next build, starting with tracks, I have the Friulmodel ATL-160 but did not notice they were wide- even though it says it on box - doh , so did MkV use the slightly wider ones ? cheers Mark
-
Glass File (Long MTS-048a Short MTS-048b) Meng Model via Creative Models Ltd Meng have a growing range of tools thanks to their collaboration with high quality tools expert DSPIAE. These new files arrive in a card box with a header hanger, and inside you will find a flexible plastic box that protects the tempered glass file within. The box is printed with instructions, which advise you to avoid dropping the files, or storing them outside their packet – all common sense if you’ve ever experienced the explosive disassembly of a piece of tempered glass before. The recent concept of etching an abrasive pattern onto glass files has been around in the nail salon world for a while now, but they have been rustic, insofar as the pattern is random to cut in every direction. The engineers behind this more technologically advanced variant on the theme have etched a unidirectional “tread” onto tempered glass that will give an incredibly accurate result on an unerringly flat surface. The files have a mirrored finish on their abrasive side, with the logo in negative and again in positive on the opposite side. The short version has abrasive etched along its full-length of 90mm, across the 12.7mm width, while the long version has an average of 67mm of abrasive (it’s cut at an angle), with a total length of 110mm, and the same width as the shorter version. Apologies if looking at this photo makes your eyes go "gozzy". It really affected mine in a quite unpleasant manner, so you've been warned. No staring! In use they are strange when initially rubbed against plastic, but the result is shiny thanks to the fine abrasive. This doesn’t affect the speed at which the material is abraded away however, but you have to be careful not to dig one edge of the file into the surface, as this can result in a groove. With a little practice, flat, smooth surfaces can be obtained, thanks in part to the inflexibility of the file, unlike those rounded-off surfaces that can plague users of files with soft, flexible surfaces. The fact that these files produce such a smooth result also saves time, and to illustrate that, I have just taken a few seconds to remove a large blocky sprue gate with the file very quickly and to the exact height of the surrounding plastic, leaving no residual work left to do. When using it to remove material, you will notice that small shavings are thrown out of the path of the file, as the tiny shapes are performing a task somewhat akin to a wood plane, only on a minute scale. The phrase "nano-technology" is used on the outer box, so it must be modern! The instructions also advise not to use the files on anything harder than plastic, as it will damage the nano-blades on the surface, and shorten the life of the tool, possibly also ruining the smoothness of the results into the bargain. It’s best not to find out, so store them in their boxes and use them as advised on the out box. Conclusion A highly useful tool that will become a part of your toolkit to see frequent action in your modelling time. You might not use it daily, but when you do, you’ll be glad you have it. Highly recommended. Currently out of stock with Creative due to popularity, but keep checking back for new stock. Long (MTS-048a) Short (MTS-048b) Review sample courtesy of
-
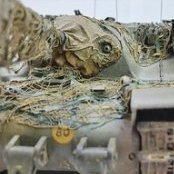
I've really enjoyed doing this one. Very nice model to make. Other than the fiddley running gear everything is a breeze. Even the tracks are fine since they are huge! I wanted to show this thing off with some sort of purpose since the only pics are the test P1-P6 ones which were pared down with little in the way of gear on the outside. The experimental element of this kit was the camo netting which sort of went how I wanted it to and I must give a big thanks to @Das Abteilung for the donation of the scrim and also inspiration from his build. 👍🏻 I thought I'd add a few bits to the back and made a crate for all the gear. All bar the jerry cans and flimsies are scratch built. The two straps on the rear near side and jerry are scratch plus a few other bits and bobs and I added the aftermarket side loading hatch. Taking inspiration from how Churchills were in WW2 I removed the central track covers and replaced with wire mesh. As in keeping with British armour of the time I also added a mantel cover which I think finishes her of nicely. There are a few pics of one of the actual test units sporting a cover so.... This was also my first go with dry decals from Archer. I have to say I'm a fan. Oh and a first serious go ate brush chipping. I went a little over the top but with most things modelling I soon realised that less is more. I'm rather chuffed with myself on the restrained mud weathering. Well done me 🤓 Set in about 1948 this little cutie would prowling around the German - Polish border looking for anything big and Russian! The crew have a keen sense of irony and conscious that this is a bit of a big girl so she needed a little help in the wardrobe department in the way of Camo netting. I think she looks pretty suitably intimidating And for size comparison!! The WIP is here - Thanks for looking all Andrew
- 23 replies
-
- 45
-

-
Boeing F/A-18E Super Hornet (LS-012) 1:48 Meng via Creative Models Ltd The original Hornet design lost the Lightweight Fighter battle with what became the F-16, but after some re-designing and tweaking, it won the contract for the US Navy’s do-it-all fighter to replace the Tomcats, Corsairs et al, becoming the multi-role F/A-18 Hornet. When more capabilities were required, a further re-design that was more of a total do-over but retained the same general shape and designation, only about a third larger for reasons best left unsaid, but probably budget related, and a way to get around possible restrictions or pitfalls barring a new type. This much larger aircraft became the Super Hornet, with the two-seater designated F/A-18F, and the single-seat variant E, both of which began production in the late 90s, entering service just before the new millennium. With the withdrawal of the F-14 Tomcat in 2006 they became the primary carrier-borne fighter of the US Navy and Marines, serving alongside the original Hornet for a while, but all of the “legacy” Hornets have now left US service, although they remain on the books of some foreign operators. You can easily tell them apart without a size reference by checking the intakes. Oval = Hornet, Rectangular = Super Hornet. The enlargement of the wing area, lengthening on the fuselage and installation of more powerful GE engines changed the characteristics of the airframe markedly, giving it more speed, weapons capability and range, with even more tankage hung from the wings, and buddy-pods allowing same-type refuelling operations without having a vulnerable dedicated tanker on station. There have been various upgrades over the years, and the Super Hornet has a wide range of munitions to choose from, making it a capable all-round war-fighter that is still nowhere near the end of its service life, although trials with pilotless carrier-based aircraft are underway. In addition to the E and F variants, the G, or Growler is a heavily modified two-seater with a huge quantity of Electronic Warfare equipment carried both internally and externally on pylons. The Kit This is a brand-new tooling from Meng, who have a habit of popping out an aircraft model every now and again, alongside their more regular armour range, which is similarly well-regarded. We have come to expect great things from Meng, as they have impressive skills and a penchant for high levels of detail in their kits. It arrives in one of their standard satin-sheened deep boxes with a painting of the aircraft on the front, and a host of goodies inside. Opening the box reveals eighteen sprues of various sizes in grey styrene plus two fuselage halves in the same plastic, five sprues in clear plus the canopy (all wrapped in protective self-cling plastic), three sets of small poly-caps, a Ziploc bag of ten flat-headed pins, a small sheet of Photo-Etch (PE) metal, two sheets of decals, a sheet of pre-cut paper masks, the instruction booklet with colour profiles in the rear, four sheets of card with information about the F/A-18 in four languages, and a similarly multi-lingual competition flyer to win cash prizes, apparently. Everything is separately bagged with mildly annoying staples closing them up, and once you strip these off you see the high quality of the parts within. Detail is right up there with the best, and has finely engraved detail, with raised detail where appropriate and slide-moulding used to improve details further without creating more parts that make some people shout “over-engineered!” because… well, I guess more parts are harder? Construction begins reassuringly conventionally with the cockpit, with the single-seat tub having a cover fitted over the rear, the sidewalls installed next to the detailed side consoles, a large control column part, chunky throttle, and a well-appointed instrument panel, which has a number of individual decals supplied for both it and the side consoles, the numbers for which are called out in a scrap diagram. The rudder pedals are moulded into the floor and could do with some more detail if you aren’t inserting the supplied pilot figure, which you can see in the detail photos. The nose gear bay is made up from the roof, shallow sides, front bulkhead and some thick trunking/hoses snaking through the bay. Those two subassemblies are mated then trapped between the forward lower fuselage halves, with the top half moulded-into the rest of the upper fuselage, to be brought together later. In the meantime, the upper fuselage is prepared by fitting the wing lowers with a choice of folded or straight wing-hinge supports, and another choice of ECS ram air exhaust types, the multi-tubular type having some impressive moulding. The F-18 runs two GE F414 turbofans, with long intakes to keep the rapidly rotating fans away from the prying eyes of enemy radar beams. The trunking is made from two halves, and has a few ejector pin marks inside, but cleaning those up before joining the halves should make the task easier. The rear is covered by a representation of the engine front, then the completed trunks are attached to the appropriate main gear bays, which are made from three parts, and have more highly impressive detail moulded-in, as shown above. The two subassemblies are inserted into the lower fuselage from within, and splitter plates are attached to the sides of the fuselage on two slots, with some fine detail moulded-in. The rectangular sides of the intake trunking and lower fuselage sides fit around the assembly, then a pair of pivots are slotted into the rear fuselage with poly-caps allowing them to pivot without suffering from modeller’s droop. The lower nose clips into the lower fuselage, then the upper fuselage is lowered over it, mating snugly even without glue from a quick test fit I made. She’s looking like an aircraft now, but the cockpit is unfinished and she’s got no nose. I won’t ask how she smells though. The coaming is first, and has the HUD sides added and a circular projector lens in the bottom. The two clear panels are inserted between the supports one over the other, with a scrap diagram showing the correct position, then it can be glued in place and the windscreen fixed over the top. At the rear of the cockpit the cover over the avionics bay is attached, followed by the nose cone and insert with the muzzle cover for the M61A2 Vulcan cannon at the top, joined to the fuselage with a stepped ridge helping to improve fit. The Hornet’s wings are moulded into the fuselage, but the slats and flaps are separate paired parts, the slats capable of being modelled deployed, or by cutting off the nubs in the leading edge, retracted. The flaps can also be depicted cleaned-up with one set of straight actuator fairings, or fully deployed by using a separate cranked set, with the gap between the sections filled by the upper surface inserts. If you chose the unfolded wing joint earlier, it’s simply a matter of applying the top and bottom sections to the link, adding the spacer, then fitting the appropriate flap actuator fairings for the flaps, and the slats in extended or retracted positions, again by removing the nubs on the leading edge. The folded wingtips are made up with retracted flaps and slats plus straight fairings before they are inserted into the L-shaped fold with a different set of spacers. The two vertical fins have a T-shaped pivot point inserted under a small separate section of the rudder, then the completed rudder is trapped between the two halves of the fin without glue so it can pivot later. A nav light is inserted into the outer side, and the other fin is a near mirror image. The fins fit into slots in the rear fuselage, and the elevators push into the poly-caps hidden within the fuselage sides later on. The twin exhausts start with a cylinder with the rear of the engine moulded-in, a PE afterburner ring, then a two-part length of trunking with a corrugated interior. A choice of exhaust petal types finishes off the rear, one set having straight petals, the other with cranked rear sections, and after painting they’re inserted into the two apertures in the rear of the fuselage. The rugged nose gear of the F-18 has to be sturdy to withstand repeated carrier launches and landings, and you have a choice of setting the catapult bar in the up position for parked, or down for an aircraft ready to launch. A landing light and a number of stencil placards are applied to the leg after painting it white, and the twin wheels fit either side of the transverse axle. Additional parts are fitted in and around the nose gear bay when inserting the gear leg, then gear bay doors are fixed around the bay, causing much perspiration when you have to add the red edges to each one. The main gear legs also have a number of placards added after painting, and the wheels are made up from two parts each. These too have additional parts added during fitting into the bays, closely followed by the red-rimmed bay doors and their actuators. Just in case you wanted to catch an arrestor wire, the hook nestles between the two exhaust fairings on a long lug. The instructions have you making up the munitions for a break before completing the model, but we’ll cover that later. The ejection seat is made up from a series of very well detailed parts, and although it doesn’t have seatbelts for an absent pilot, there are stencils for the headbox sides and rear. It is installed in the cockpit, optionally along with one of the pilot figures that come on the sprues, which have separate arms, a wrap-around flotation vest and separate helmeted head with O2 hose, and as there are two additional arms (x2) you could experiment with some alternative poses to add a little variety to your model. The canopy clear part is crystal clear with an external seam over the top that you can either leave there (it’s pretty fine), or sand flush and polish back to clarity. There is a frame insert to fit within the canopy, and a choice of two canopy openers, depending on whether you wish to pose the canopy open or closed. A blade antenna in the centre of spine finishes off the top of your model. Under the port Leading Edge Root Extension (LERX), the integral crew ladder is stored (on the real thing), and it can be posed open by adding the ladder with its two supports and the open door to the bay, or if you want to pose it closed, put the long narrow part that represents one edge of the ladder. Back to the weapons. This is where the pins and tiny poly-caps come into play, allowing you to switch and change your load-out whenever you want on some of the pylons. Most of the pylon types have the pins trapped between them, four of type-A, two of type-B, and one of type-C. Type-B also has an adapter rail fitted instead of pins, which is also made from two parts, and these fit on the outer wing stations, while the four identical pylons fit on the two inner stations per wing, and the solo Type-C attaches to the centreline. A pair of wingtip rails are made up with spacer plates, then you can choose which of the supplied weapon types to hang from them. Two GBU-24s are built from halves, with the perpendicular fins separate, a clear-domed seeker head and a locating plate on the topside. Inside are two cups that hold poly-caps within, and these are glued into position lined up with the pre-moulded holes in the sides of the bomb and its mounting plate. The same process applies to the GBU-16s, except all the fins in the front and rear are separate, and there is a clear “droopy” seeker-head, with the poly-caps inserted into chambers in the bomb halves. The AIM-9Xs have clear seeker-heads and exhausts, plus adapter rails, while the three AIM-120Cs are each moulded complete, with a slim adapter rail. The two AIM-9Ms have a clear seeker, and eight separate fins, then the AN/ASQ-228 targeting pod is made from two halves, a two-part rotating sensor mounting, and tubular rear fairing, which is mounted on a concave pylon that fits to the port of the underside fuselage. Scrap diagrams show the correct location of the missiles on their rails, as well as the targeting pod, while another larger diagram shows which options can be placed on which pylons. It’s always best to look at some real-world photos for examples for demonstrable and practical load-outs. Markings There are four decal options on the sheet, and you also get a set of canopy masks that are pre-cut from paper, using frame-hugging masks on the compound curves, so that the gaps can be covered by tape offcuts or liquid mask. There are also masks for the landing light and targeting pod lens, plus a set of toroidal masks for the wheels to allow you to cut a sharp demarcation with little effort. From the box you can build one of the following: Capt. James McCall, CO of CAW 8, VFA-31 “Felix the Cat”, USS George H W Bush, 2017 LtCdr. Carlisle Lustenberger, VFA-31 “Felix the Cat”, USS George H W Bush, 2009 LtCdr R J Prescott, VFA-87 “Golden Warriors”, USS George H W Bush, 2017 Pilot Unknown, US Navy Strike Fighter Tactics Instructor Program, 2019 Decals are by Cartograf, which is a guarantee of good registration, sharpness and colour density, with a thin gloss carrier film cut close to the printed areas. The main sheet includes all the markings for the airframe, while the smaller sheet contains the stencils for the pylons and the weapons, of which there are many on a modern jet. The colours are called out in Meng/AK codes, as well as Gunze’s recent water-based Acrysion paints, which don’t seem to be prominently available in the UK. Conclusion Of course, there are lots of F-18 kits in this scale, but those don’t make any money for Meng, and they have brought their own particular set of skills to the party. They have produced a highly detailed model, with some excellent moulding and markings to create a model that is excellent out of the box, without the necessity of aftermarket. Extemely highly recommended. Review sample courtesy of
-
Hi Everyone, Started my latest project, been looking forward to this, Meng MkV, Started it Two weeks ago, and following a different format, building more parts into sub assemblies and painting more parts on mass once assembled instead of all individual, seems to be working reasonably well. have only come across some minor fit issues, all with the side sponsons, I should be able to work it out after reading loads of tips in various posts, shame so much of the kit is hidden, just wish I had the skill to open up access panels to do it justice. Very impressed with the detail on the Ricardo engine, shame you will not see most of it. The rest of the engine cradle and drivetrain/clutch is rather nice too. Did no clean up at all on the rollers for the tracks, cut from sprue as close as I could and that’s it, they are totally hidden, added the PE plates on one side, but not on other, You cannot see them is one reason and also I may run some cables through here for the lights I am going to add to the interior, The guns look ace, currently researching correct/best colours for them, added the ally barrels from Aber Engine primed in Stynlrez Black primer, I think it has come out so well there is no point adding Black paint to it, just a little chipping and colour in places. Interior done yesterday, Stynlrez white primer, good enough as I think, then I decided even a new tank not long arrived in theatre probably would not still be white, so added Hataka interior Buff, definitely has right colour for tobacco and other staining, will be adding a bit more suitable grime as well. Got to tidy up engine cradle, should have at least painted that separately in retrospect, probably won’t see it I inside though. Got the idea of the cream colour from a good friend who did the work on the MkV at the IWM in London, then came across the Hataka Buff colour. So there is the progress so far, Cheers Mark
- 34 replies
-
- 14
-
-
Got it because online shop hasn't updated stock availability and I had to swap my original purchase. I think it's my favourite german plane, tbh, one of the 3 planes in front of I always spent most of my time in Cosford . Goal is to glue everything clean and neat and paint it with more vibrant colors than usual (and with more contrast). Might not be 100% historically accurate because of that. First thing I've done after opening the box: was glueing together few interior pieces and painting everything else in sprues: I've notice that there isn't any decal for control panels. First time in my life I've decided to paint everything inside with a brush. (only aftermarkets I'm going to use are Montex masks and Aires exhaust - mostly because I had to add something to have minimal order at Hannants ). I'm in the middle atm, and I'm quite happy how it looks tbh. Few things have to be corrected, have to add some mud on the floor and some cables at the back of control panel as well (back is going to be clearly visible).
- 11 replies
-
- 14
-
-
I really like the triangular black and red markings Mozambique use, but all the ones in my stash are for MiGs that are already well represented in this GB already. So I went back a generation to the 1965-74 War of Independence and looked at some of the Fiat G.91Rs operated as counter insurgency/ground attack aircraft by Portugal during that conflict. There is a set of decals out there that has 'my' scheme on and also an overall dark green aircraft from the early 70s. Meng made it easy for me by including the scheme in one of their boxings, so that's what I've got. Or will have. Sorry postie 😢 This is the box... ...and this is the scheme I'll be doing from it I've been reading up and a Portuguese member of BM built this one back in 2014 and painted it light grey rather than natural metal. I'm going to follow his lead. Hopefully mine will be within touching distance of how good his turned out. Andy
- 16 replies
-
- 18
-
-
My second planned build is Meng's Convair F-102A Delta Dagger. I have the George Bush boxing but plan to use aftermarket decals as I want something a bit more colourful.
-
Bending Pliers for Photo-Etched parts (MTS-029) Meng Model via Creative Models Ltd. Successfully handling Photo-Etch is a task that requires some fairly specific tools, and to get the most out of it you need to obey the mantra "use the right tools for the job". With this in mind, PE bending tools should be on your shopping list (really? ), and while PE bending brakes are essential for some jobs, they're not suitable for every job. PE pliers are useful for smaller parts, and for those where you have to bend parts close to each other, such as tiny boxes etc. You can use standard flat-bladed pliers with some success, but they generally tend to be on the larger side that aren't always useful. Even the Tamiya PE pliers are a bit wide for some jobs, so this new tool from Meng could well fit a gap in the market. Arriving in a well-appointed brown card box, inside is a high-density foam liner with the shape of the pliers cut out and the pliers well stuffed into the hole. They take a little effort to get out, and once free you can see that they have very narrow blades, at only 1mm at the very tip. The overall shape, especially the handles have a Xuron feeling, the jaws are sprung, and the red plastic handles (which look more orange in the pictures) are glued in place with a strong epoxy to prevent them from creeping off during use. The two blades are bent so that they mesh directly over each other, with about 20mm of useable bending length from front to back. The Meng logo and product code are etched into one side of the jaws behind the riveted pivot point, which allows zero play between the jaws for a positive action. The jaws are made from quality tool steel, and the springs should last a lifetime, making relaxing your grip as simple as opening your hand. To try them out I used an old Reheat PE set that includes WWII RAF seats and belts, bending up a seat with raised detail on the inside. The blades are easy to locate on the bending line, and grip is firm. With half-thickness PE next to the fold, it's wise to bend against a flat surface, such as a rule or a desk to prevent the weaker thin part from bending, and the blade's square edge results in a nice clean bend. The seat took a matter of seconds to fold up, and as you can see in the picture I didn't apply any glue to the joins, as this wasn't a test of my modelling prowess. I can see this being very useful for folds that have narrow gaps between them, such as equipment boxes often found in Eduard sets, which makes it a very useful part of your PE handling tool kit. Add a bending brake, some fine tweezers, a sticky wax pencil, some fine files for removing attachment point stubs and a few grades of super glue, and PE should present much less of a challenge. Practice also helps immensely as does magnification, so even if you initially struggle, you'll soon get used to the process, and wonder what the fuss was about. I have slightly chunky mitts, and they fall to hand well, being on the small side of comfortable, with the handles just about reaching the edge of my palm when held ready for action. This should minimise any dropping incidents, even though I've got a bit of an issue with that sort of thing due to my advancing age and a few medical conditions. Each handle has a small hole through it, which would permit the use of a lanyard if your grip is worse than mine, as a fall blade first onto a hard surface could be difficult to recover from. Conclusion A very useful part of any modeller's PE handling tool kit that will pay dividends once you get used to using them. Review sample courtesy of
-
I've had this in the stash for a few years now, purchased it when it came out, & here's a good excuse to get it made. I know it may be a small thing to some but I really like the quality of the box top & the artwork that Meng employs. I'll be using the Microscale decal sheet 72-363 which has an F-102A 56-0977 of the 32nd FIS at Soesterberg & Microscale's info says it's from 1961. Here's a couple of rererence pics of mine from a few years ago of 56-1032 at the National Military Museum at Soesterberg . Got some primer & relevant paint on the first stage parts that initially need painting before it goes together. They'l get an enamel wash for the cockpit & undercarriage bays. Primed with Ammo one shot which dried & set quickly then airbrushed with Mig acrylics. Before I close it up, will I need any nose weight? Is the 102 a tail sitter? So far I can see that this will go together pretty quickly. Martin
-
So, a King Tiger appeared down the chimney for Christmas 🙂 It has been suggested that I should keep it for the Tiger Tank STGB in May. However, as this is currently my only kit, I couldn't wait that long, so here it comes (maybe I'll just get another Tiger for May 😉) I've read and watched loads about potential suspension problems, so it was with some trepidation that I cracked open the box yesterday. First impressions: the dark red plastic is slightly strange to start with. However, detail is very good. There's a nice little bit of PE for engine grills, and they've helped out with the tracks by including some 'ready-build' straight sections. No metal barrel for me 😞 However, really looking forward to it. Also, coming straight from a Panzer IV build, this feels huge 🙂 Here goes... Straight into the chassis and wheels. The wheels come with poly-bushes which enable them to be taken on and off the chassis, which is really useful. Just sprue-attachment cleanup really. Despite the horror stories, the suspension sat really well, and the wheels are nice and flat on the surface. Maybe I just got a 'good kit'??? So I'm always learning. If you want to learn about the different Tiger II variants, then I can recommend this excellent video from the Tanks Museum: That's all for now... I'm not a quick worker, but will keep you all posted 🙂
- 47 replies
-
- 5
-
-
- 1/35
- King Tiger
- (and 1 more)
-
Modelling abhors a vacuum. After Wingnut Wings (WnW) demise (link) Meng is taking up the torch with a 1/32nd Fokker F.I, Dr.I (early & late) kit - ref. QS-002. Sources: http://www.meng-model.com/en/contents/59/290.html https://www.facebook.com/story.php?story_fbid=3079892082124095&id=195290177250981 V.P.
-
Hi there, F-102 & F-106 is looking to be a popular subject in this GB - which is no surprise as they are pretty cool airplanes I will join in with the Meng F-106: Box is literally full. Or bit more than full, all the parts don't really fit the box that well... I need a bigger box! It's a big pile of plastic. Not gonna take shots of each sprue... ... but just a detail shot showing the finely moulded panel lines - nice and crisp! Instructions and decals. But I will be using these aftermarket decals, 101st Fighter Interceptor Squadron of the Massachusetts Air National Guard´. That's a nice light blue that I will think look great. I just have to find a paint to match it as some of the details such as the insides of the airbrakes are painted with same/similar colour. Also thinking of getting the F-106 stencils by Fundekals as suggested by @Aardvark in another thread. Other aftermarket I have been thinking is the Master pitot tube (I'm always willing to use those, if available) and maybe the Meng resin sets but we will see. The kit looks pretty darn good as is. Thanks for looking in. Really looking forwards to building this bird
-
The Meng RR armoured car is something of a curate’s egg, with some lovely detail and not too difficult (so far) assembly, but it’s also a bit confused as to what it wants to be, offering wheels and paint schemes for early models which can’t be built from the kit parts. I suspect the prototype it most closely represents is the RAF Regiment replica of HMAC Ajax, rather than any historic example. Untitled by Jon Gwinnett, on Flickr Untitled by Jon Gwinnett, on Flickr
-
Meng Stowage & Accessories Set – British FV510 Warrior (SPS-073) 1:35
Mike posted a topic in Aftermarket
Stowage & Accessories Set – British FV510 Warrior (SPS-073) 1:35 Meng Supplies via Creative Models Ltd We reviewed the new Meng Warrior here after the second tranche arrived with Creative, but we’ve had this stowage set since the initial release, as it went out of stock almost as fast as the kit itself! They’re now back in stock, so here it is. The set arrives in a brown cardboard box with the contents shown in a large sticker that covers the majority of the top flap. Inside there are two bubble-wrap bags of resin, totalling fifteen parts, each with its own casting block, carefully attached with the smallest of contact points to reduce the amount of clean-up needed. The largest part is a long rolled up tarp/awning that is attached to the side of the Warrior’s slat armour, with three Bergen day-sacks, two jerry-cans, and three Camelbak-type drink reservoirs that a soldier can strap to his back or attach to his Bergen, with a drink-tube draped over his shoulder and a handy bite-valve ready for a quick drink at any time. These things must be a godsend for troops in the Middle East, where the heat can have you dehydrated in hours or even minutes if you’re working hard. The Camelbaks have separate straps that are attached on each side of the narrow pouch, and one strap has the drink-tube fastened in place, although the picture on the box shows them loose. If you wanted to portray that possibility, scraping the moulded-in tube off and replacing it with some wire would do the job, adding a drop of super glue to depict the blunt T-shaped bite-valve, shaping it when dry. A quick Google should tell you if the military tubes are blue, but I suspect they might be green, but you know my memory. With resin, you should take the precaution of wearing a mask when cutting or sanding it, as the tiny particles are harmful to your health if breathed in. Washing the parts in warm water will also improve the adhesion of paint, as there may still be some moulding release agent on the parts when you receive them. Take care not to use water that is too hot, as this may cause deformation to more delicate parts, but this technique can conversely be used to fix warped parts, using cold water to “freeze” the changes in the parts. Conclusion This is a beautifully crisp, detailed set, but it isn’t what you’d call cheap. If you think it’s worth a punt, pick one up soon, as they seem to be flying off the shelves. Highly recommended. Review sample courtesy of -
British FV510 Warrior TES(H) AIFV (SS-017) 1:35 Meng via Creative Models Ltd The Warrior was a design by GKN that won the MCV-80 contract at the end of a very long process, reaching service in 1984, twelve years since the beginning of the project. GKN Defence eventually ended up as part of the BAe conglomerate, with service and supply passed over along with the intellectual property. After lessons learned in the first Gulf War, upgrades to armour and other systems were made to protect the crew, which was made easier by the original design having no weapons ports on the side of the vehicle, which with the benefit of hindsight was a feature more suited to the last war than the next. The weight crept up to almost double its initial level, which required changes to the torsion suspension, upgraded to keep the same ground clearance as before, as well as new carbon-ceramic brakes that helped slow down the now bulkier vehicle, which is capable of speeds in excess of 40mph on metalled roads. It can carry seven full-equipped soldiers plus a crew of three, and is capable of keeping them safe within for 48 hours if required, but it wouldn’t be a nice experience by any stretch of the imagination. With operations taking place in the Middle East, an improved Environmental Control Unit (aircon) box was fitted to counter the hot and dusty conditions, plus the appliqué armour and cage armour outside that give protection against small arms fire and shaped charge weapons such as the Rockt Propelled Grenade (RPG). The small turret carries a 30mm Rarden L21A1 cannon, which packs more of a punch than the typical 25mm guns used in other current IFVs, although it is not designed with tank combat in mind, so doesn’t carry any anti-tank missiles for weight saving reasons. The recent versions have a fully-upgraded active night vision system and clear armoured glass around the top of the turret that gives the crew better situational awareness, and the added rear infrared camera above the rear ram-operated door allows the troops to exit the vehicle with a good idea of what awaits them during those vital few seconds after disembarkation. There are plans for an upgrade programme to keep the Warrior in service until 2040 and beyond, which involves a stabilised 40mm cannon as well as many other improvements to the electronic systems for battlefield awareness to keep the vehicle and crew in the best shape possible. As usual with these things, it is currently running over budget and behind schedule by a substantial margin, begging the question “was it ever thus?”. The Kit This is a brand new tooling of the modern Warrior, and we’re a little behind with our review because the first batch in the UK were very popular with the average AFV modeller, who snapper them all up, and who can blame them? The kit arrives in a standard Meng top-opening box and inside are five sprues and three separate hull and turret parts in light grey styrene, a clear sprue with self-cling wrapping to protect it from scratches, a turned brass Rarden barrel, a bag of individual track links, a tree of poly-caps, a small but thick fret of nickel-plated Photo-Etch (PE) brass, which is also protected on both sides by a sticky clear plastic cover. Detail is excellent and visible on all parts from the hull halves to the track pins. It’s also a comprehensive package, with wheel and track-pad masks on the PE sheet, and a two-part hinged track jig on the clear sprue that is a step above the earlier editions, as are the tracks – more on those later. As well as the instruction booklet there is also a four page detail booklet with holes punched in the top, giving a little information about the real thing you're building a model of. Construction begins with the lower hull half, which has C-shaped armour block added above each suspension mount, which then has the two-part torsion bars and swing-arms inserted to latch upon sockets in the centre of the hull. The upper hull has two hatches on the glacis plate, the larger one for the engine, which has a four-panel mesh grille, grab-handles and intake scoop fitted before being glued in place, while the smaller transmission hatch is just a single part. Lifting eyes are attached to the sides of these heavy panels, and grab-handles are fitted to the lighter transmission hatch, with another grille on the forward section of the upper hull and another on the raised intake on the left along with more grab-handles. The two hull halves are put together, mounting firmly on six pins and turrets within, and having the final drive housing installed on pins at the front of the lower hull. The rear bulkhead has the large stand-off brackets pushed through from behind before it is fitted, then the chassis is flipped and the armoured final drive covers and underside protection are glued over the original hull, and the idler axles are attached at the rear. Make up your own wheel pun here, and then make up twelve pairs of road wheels with a poly-cap trapped between them, the same for the smaller idler wheels, and a pair of four-piece drive-sprockets again with more poly-caps. The return rollers are also paired, but are fixed in place with glue so won’t rotate. The road wheels simply push in place onto the axles for ease of painting, which is handy. Notice I've already put a set of pins in this length, they just need a tiny bit of clean-up In the past Meng have supplied good tracks and bad tracks, but this design is IMHO is one of their best. There are 79 links in each run, and you will find the parts in two places. The main track links with moulded-in pads are in the bag, with one sprue gate per part for minimal clean-up. The links are put together by slotting them together on the pin moulded into one of the joints, holding together relatively well already. The two-part clear jig holds seven links, and when closed over it has slots ready to take the track pins, which should be left in groups of six on the carriers that they are moulded to. Insert the pins firmly to secure them in position, then open the jig and cut off the carrier to complete the job, giving the pin heads a buff with a sander if needed. They work perfectly, and the track is incredibly flexible with good detail throughout. With 158 to put together, it shouldn’t take too long, especially as there is almost no clean-up required. If Meng’s engineers are reading this, please stick with this method. The basic hull is completed, but there is a lot more to do still, to add the accumulated upgrades over the years. First up is the appliqué armour for the lower glacis with lifting eyes and a gridwork applied before it is installed. The front mudguards are also set in place at this time too. More armour is added to the upper glacis, with a palette of pioneer tools and grab-handles glued on with a wire-cutter and fire extinguisher to the side. This drops onto the original glacis with some more grab-handles nearby, plus a hatch and angled panel with grenade launcher also fitted. Nearby, the driver’s hatch is still vacant, which is filled by the two-layer hatch that has a closure handle and three clear periscopes inside, plus two exterior panels with their own miniature windscreen wipers moulded-in, all of which need a coat of transparent blue to show their bullet-proof material. The hatch is fitted, another triangular panel, front light clusters and other small parts are installed, followed by the clamshell top hatch with handles, louvered panel and headlight cages, then stowage boxes, other small parts including more grenade launchers are also glued in place. The rear door also has two layers and a glass vision port, and on each side of it are the rear fenders and large mudflaps to help reduce the dust kicked up, another fire extinguisher, an angled box with rear lights and cage surround the lights, a large tool box above it, and on the other side the much improved ECU, both of which are made up from individual panels to maximise detail. The first part of the bar armour is attached to the stand-off brackets on the rear door, then the side appliqué armour panels are first fitted with brackets, they have the nicely-moulded bar armour panels fixed, stop-ends and the Electronic Counter-Measures turrets on L-shaped brackets at the rear, before they are both added to the vehicle sides, and the curved panel on the starboard front, upstand panel on the glacis and a sinuous bundle of cables from the hull to the ECU are added on the roof. The turret has no interior, but instead has a cylindrical pivot inside with poly-caps slowing down the movement of the barrel when fitted. It is clasped between the top and bottom halves of the turret, with an additional panel under the mantlet. The roof is almost covered by the two large hatches, with internal inserts, handles and external grab-handles added before they and their hinges are fitted to the roof along with six clear vision blocks with armoured covers, an aerial base and rotating periscope. What little space remains is taken up by the dual sighting boxes with clear fronts and external housings that can be posed with the protective bullet-resistant covers either open or closed at your choice. The coax machine gun barrel is slotted into the inner mantlet, then the highly sloped outer mantlet is installed along with a lifting eye, then two large armoured glass panels are mounted on the sides of the roof, with the front being protected by two large outer boxes over the sighting gear. Smoke dischargers are mounted on pattresses on the cheeks, with more brackets, equipment and boxes that are later partially hidden by more slat-armour and a stiffening bar that spans between the armoured glass panels to prevent knock-down by enemy fire. The gun sleeve is slid into the mantlet, then the brass barrel with hollow conical muzzle is slipped into place until it stops, with a small section pointed out in 1:1 scale for painting in silver, representing the recoil length of the barrel in its sleeve. The turret twists into place on a pair of bayonet lugs, and that’s it. Markings Any colour you like as long as it’s desert sand. There is only one decal option in the box, but as there aren’t many decals on any AFV (for the most part), if you can source some extra number plate decals (there is ONE spare set on the sheet), you can depict other vehicles. From the box you can build the following: B Company, 3rd Battalion, The Mercian Regiment (Staffords), British Army, Durai East Region, Helmand, Afghanistan, 2011. There are of course the two PE masks for the wheels and track pads, allowing you to paint the hubs of the wheels and the rubber track pads without worrying about paint getting everywhere. The fit is exceptionally snug, but don’t forget to clean the PE parts if any paint creeps underneath, and take care with the quantity of paint you’re spraying or brushing, as thick paint stands more chance of seeping through. Decals are printed in China and of sufficiently good quality to be used with the model. Conclusion It’s an exceptionally well detailed kit that should please most modellers out of the box, and the bar armour is well-moulded given the limitations of styrene moulding. It’s already popular, and deserves to be. Very highly recommended. Review sample courtesy of
-
Russian K-4386 Typhoon-VDV (VS-014) 1:35 Meng via Creative Models Ltd The buzzword MRAP, or Mine Resistant Ambush Protected is a key feature of modern Armoured Personnel Carriers (APC), with the Allies learning hard lessons from their operations in the Gulf, where HUMVEEs and even Main Battle Tanks (MBTs) were ripped apart by Improvised Explosive Devices (IEDs) left by insurgents, killing and injuring many in the process. The lessons haven’t been lost on any major army, and since 2010 the Russians have been developing the Typhoon project to produce a line of MRAPs to protect their troops during transit, using common components such as engine, suspension and electronics to make a range of vehicles for specific operations. The KamAZ-53949 is a 4-wheeled armoured patrol carrier on which the K-4386 is based, which shares the modern design, angled undersides, protective seats and use of composite components, adding a large Remote Control Weapons Station (RCWS) that mounts a 30mm auto-cannon along with a coaxial machine gun on one side and grenade launchers on either side of the main weapon. As well as the mine protection, the windows are all bullet-proof, with seating for five in the passenger compartment, and three crew, capable of 80mph on metalled surfaces, with adjustable height suspension allowing a relatively high speed over rougher terrain, assisting with infil. and exfil. operations immensely. This variant is for the Russian airborne forces, the VDV (Vozdushno-Desantnye Rossii), they of the stripy tshirts, so is also air-deployable to maximise its capability. The Kit This is a brand-new tooling from our friends at Meng, only trailing behind the real vehicle’s deployment by a short while. As usual with Meng, the kit arrives in a compact box with their traditional satin finish and a nice painting of the type on the front. Inside are five sprues and two separate hull parts in a light grey styrene, a clear sprue, four flexible black tyres, four small springs, a short run of 8 poly-caps (not pictured), a fret of nickel-plated Photo-Etch (PE) brass containing just the radiator grille, a small decal sheet, and the instruction booklet with colour profiles in the rear, all bagged separately to resist chaffing in transit. One word of caution is that the springs are loose within the turret shell bag, and these small items could be easily lost if you open the bag incautiously, so I have put them in a ziplok bag with the PE to keep them safe. Meng have produced partial interior for the crew and passenger areas, with a lot of detail moulded-in, and sensible use of sliding moulds to improve detail and reduce unnecessary parts, which sometimes elicit cries of “over-engineering” from some quarters. The clear parts are especially clear, although I miss the days when you would receive them with a tint of blue/green that gave the impression of the thickness of a piece of laminated bullet-proof glass. It’s not a major issue, but I really liked the look of them and wish they’d bring it back. Construction begins with the angled boat-style lower hull, onto which the suspension and drive-shafts are fitted over a number of steps, resulting in the suspension able to move by leaving the arms unglued. The axles stubs are snapped into place at the ends of the swing-arms, with armoured covers fitted over the central section, with the front bumper/fender, steering linkage, rear cross-brace and the braking system fitted next. The struts have the working springs slid over them and are then slotted into the lower hull floor, with a quarter turn locking them into place in the receivers and the big mudflaps fitted while the hull is upside down - this gives the suspension some realistic bounce. The tapered lower hull with the axles is attached to the underside of the floor, and the four wheels with two-part hubs trapping a poly-cap have the tyres pushed over the lips, then are pushed into place on the ends of the axles. Attention turns to the interior, with the drivers and co-driver’s seats first to be built from three parts each including the long protective supports that prevent spinal injury from intense explosions under the hull. These are glued to the floor of the crew cab, then a near-vertical steering column with central gear-selector between the seats are both added, to be joined by the dashboard with instrument binnacle that has decals that give it plenty of visual interest and realism. The two pedals attach behind, then the trim panel is added to provide the attachment to the floor. That sub-assembly is installed behind the engine compartment and it is joined by the five wall-mounted three-part passenger seats in the rear. The uneven number of seats is due to the remote turret’s “basket”, which sprouts from the floor in a tapering enclosure that has a monitor screen and control box on its side, with decals for both the screen and the side of the equipment box, the former having a silhouette of a trio of 'Tangos' about to be blown to bits, plus another decal for the buttons around the MFD (Multi-Function Display). This is inserted into the floor in preparation for the turret fitting later. The lower hull has a set of tanks on the sloped sides, with handed duplicates on the opposite side, but the numbering on the instructions is a little unclear here, only noting one part number per tank, although as the parts are next to each other on the sprue it’s not difficult to resolve. The interior of the upper hull is painted white, and the two-layer bullet-proof glazing is glued carefully into the windscreen frames, the outer part giving it the bulky look that typifies the MRAP breed. The front grille has vertical slots, which are backed by the single PE part that has fine mesh where needed and solid sections for gluing to the rear of the plastic part. Clear lenses are inserted into the depressions on each side of the grille, with the LEDs depicted by a ring of small recesses around a larger centrral one, ready for highlighting with a little careful painting. The two-layer doors are essentially a very similar shape, but the rear one has the window almost totally closed over by armour panels, with just the smallest of observation windows and a thick chunk of bullet-proof glass behind them, plus pull-handles and locking mechanism added below. The crew doors have larger glazing panels and more standard handles and latches, plus a four-part door mirror for each of them, for which you’ll need to source some shiny surface, using a Molotow chrome pen, or the new Liquid Mirror from Stuart Semple which I’ll be trying out soon. The back door is fitted to the rear bulkhead, and along with an internal equipment box slides onto guides on the upper hull together with the front grille. The back door is flanked by a pair of panniers that act as passenger protection for them as they leave the bus, for a few steps at least, which can be crucial if you’re loaded down with gear. They are both made up from a number of parts including rear light clusters that need painting, and they then slide into the rear of the hull, butting up against the rear bulkhead. The deep-wading muffler runs up the starboard A-pillar with a quartet of windscreen wipers added in a fairing over the top of the screen and a pair of stop-ends finishing them off. A pair of bullet-proof observation windows are glued into place on the sides of the main compartment, which can then be dropped onto the chassis with no glue applied to the turret ring base. More accessories are added in the shape of a towing bar, aerial base, grab rails on the diagonal roof edges, stowage rails along the waist, crew steps at the rear and sides, then a turret ring adapter on the roof. Turrets are fun in my estimation, with this one having an almost complete outer, that has four lift-eyes on the roof and six grenade launchers on the mantlet face. Inside is the pivot point for the 7.62mm coax MG attached to the side with a poly-cap inside for later. The main gun has a semi-cylindrical mantlet with two axles on the opposing flat sides, attached to the turret base by a pair of pivot-points that again have poly-caps inside them to allow the gun to elevate. The turret is closed up and the 30mm 2A42 autocannon barrel is shrouded and has a TV box on top, with the same process except for the top box, for the 7.62mm PKTM machine gun. The MG slips into its slot and is retained by the poly-cap, while the main gun is glued in place in the mantlet, completing the build, save for twisting the turret into place on its bayonet fitting. Markings There are two decal options in the box, which is fair because it has barely seen service. One is Russian green, while the other has a tri-tonal faceted camouflage scheme, which is the more exciting of the two. From the box you can build one of the following: Army 2017 International Forum, Kubinka, Moscow, 2017 Russian Generic Tri-colour Camouflage Decals are printed in China with good registration, sharpness and colour density, with a thin matt carrier film cut close to the printed areas. Conclusion After their Gaz Tiger, this is a welcome addition to their Meng Russian/Soviet product line, with lots of detail moulded-in that is everything we have come to expect from them. Very highly recommended. Review sample courtesy of
-
Individual Track for T-72 and T-90 Main Battle Tanks 1:35 Meng Model Meng's new(ish) Supplies line is expanding steadily, and now includes these two optional track sets for T-72 and T-90 main battle tanks, culled from recently released kits and now available separately in case you have the need for such things. Apparently, both types of tracks have been used on both vehicles, and with the T-72BA the single pin tracks were replaced later by the more robust double-pin tracks to cope with a more powerful engine. Both sets arrive in a figure-sized white box with line drawings of the tracks on the front, and instructions on the rear. Inside are the track parts in black styrene with the jigs to help you build them also included, some of which are black others clear. Single-Pin Tracks for T-72 & T-90 (SPS-029) This is the simpler track set, which gives you a bag of track links in pairs on little bits of sprue, so you have only one gate to clean up after nipping the parts off. There are two pieces of jig in clear styrene, and you place six links with their guide horns downwards into the bottom section, securing them in place with the top jig. They are secured in place by a run of five pins on one side, which are applied whilst still on their block of sprue and then set free by cutting them off with a VERY sharp blade. On the other side, a moulded-in pin holds things together, which means that the parts are placed in the jig at an angle so that it can engage with the hole in the next link. In practice this is a wee bit fiddly, and the first run I did was a bit messy, falling apart in one place when I nipped off the first pin. Once I'd seen the error of my ways, I held the pin sprue in place while I cut the gates, and it proceeded with much less hassle. Pushing the pins firmly home with the tip of your tweezers will ensure that they don't fall out in a hurry too. The friction fit isn't hugely strong however, but once painted they should stay put. Double-Pin Tracks for T-72 & T-90 (SPS-030) The tracks are the same design as those for the Terminator and more recent T-72B3 reviewed here, and have three black jigs to facilitate construction. Firstly, the guide horns are cut from their sprue and here the instructions tell you to leave them in pairs with a little piece of sprue between them. I had to test this theory, as it looked rather unwieldy to me, and I did indeed find it so when I attempted the first run of six links. For the second run of six, I removed the horns and cleaned up their sprue gate marks first, then clipped them onto the links via the moulded-in pins that run the full width of the links, whilst holding them on the jig J3. It was less fiddly, and a knack was soon stumbled on to get them clipped together. With six links on the jig, a top part J2 is clipped over the lower, holding the links in place. You then insert a section of sprue containing five flexible styrene end-caps into the third part of the jog J1, and cut them loose with a sharp blade. These are then offered en-masse to the pins on one side of the tracks, pushing in only one way due to the shape of the keys on the sides of the jigs. Here you have to be careful to insert the end-caps in the correct orientation according to the scrap diagrams in this section. Optionally, you can finally install a set of track-pads to finish off the length, or leave them rough and ready for cross-country work. They fit into recesses in the outer surface of the links, and glue in quite easily, but be sparing with it, as you'll ruin all your work if the glue gets into the pins. Conclusion In conclusion on the double-pin tracks, they are fiddly, delicate and really require your full attention, so don't expect to have them finished in an hour. The single-pin tracks were a little easier, but take care when cutting the pins free of their sprue block. I was already speeding up production by the time I'd made the 2nd run of six, and the results are worth the effort, being detailed and workable, but be prepared to put in the effort – For each run you'll need to make 96 links for the single-pin tracks, and 81 for the double-pin. Highly recommended with the caveats mentioned above. Review sample courtesy of
-
Just seen the Meng photo etch bender in the new arrivals on the Big H site. How much??? I felt everything clench when I saw that! 😜 Is a decent photo etch tool really worth that much? Martin
-
German A7V Tank (Krupp) 1:35 Meng After the British Mark IV tanks crashed (clanked and sputtered) onto the battlefield in 1916 at the height of WWI, the German army went into overdrive in an effort to bring their own landship to the front, but in the meantime pinched and re-purposed as many of the British tanks as they could as Beutepanzers in the meantime. Their design was intended to include a re-useable chassis that could sport an offensive armament, or a cargo body, with only a pitiful 20 out of 100 in the initial order. They weighed in at around 30 tonnes with only mild steel for armour plate, which although it was 30mm at the front and 20mm at the sides was still ineffective compared to a hardened alternative. The running gear was based on a Holt Tractor that was borrowed from the Austrians, and the blockhouse body housed a single 57mm cannon in a cylindrical casemate, which allowed limited traverse as well as elevation. There were also six 7.92mm machine gun emplacements, and under the top-mounted driver's position were two Daimler petrol engines that could propel the vehicle at up to 3mph on uneven ground. It entered service in 1918 in time to engage in the first tank-on-tank battle, where a three tank patrol met three British Mk.IVs, the Females being damaged by armour piercing machine gun rounds and forced to withdraw. The Male Mk.IV brought its guns to bear on the lead A7V and knocked it out with three shots, after which the two remaining German tanks withdrew. It proved to be about as reliable as the British tanks, and no more were ordered, although some other designs were in progress when the war ended. The only survivor of the twenty, numbered 506 and named Mephisto was abandoned by the Germans at Villiers-Bretonneux, and recovered by the Allies a few months later. It was taken by the Australians as a war prize, where it remains today. The Kit We appear to be in the middle of a renaissance of WWI armour, and that pleases me immensely as someone that's quite fond of the ugly old clankers. We have been treated to a number of kits of British Mk.IVs from Takom and Tamiya, with a Mk.V and Whippet light tank on the way from Takom, so this new issue from Meng fills an important gap, and sits well beside their two Renault FT-17 tanks that were used byt the French in the Great War. Previously we had only the Tauro kit in this scale, and that wasn't very good, having a totally fictitious interior and clunky tracks, as well as being hard to get hold of in recent years. This new tooling by Meng offers a fairly comprehensive interior that has a much firmer grounding in reality, and it can all be shown off by leaving some or all of the access hatches open. The box is standard sized Meng fare, and inside is a plethora of plastic that fills all the available space, requiring careful re-packing. There are nineteen sprues in sand coloured styrene, four in black, two pairs of black poly-caps, a small Photo-Etch (PE) brass fret, a length of synthetic braided cord, and a decal sheet of moderate proportions. The instruction booklet is bound in a colour cover, with extensive text on the genesis of the A7V in four languages at the front, and painting diagrams at the rear. As always with Meng, the first impression is of a quality product, right from the satin finish on the box to the instruction booklet. The sprues are very well detailed, and use of slide-moulding is evident on a number of parts to ease our job of putting it together. Construction starts with the many road wheels, of which there are two types with and without flanges on the edges. Two of each type are sandwiched in a bogie of which there are six in three pairs. The idler wheels are built up on their track tensioning device, while the drive sprockets have a stub axle for later fitting to the hull. Each pair of bogies are added to their sub-frame, which is very well detailed indeed, and these are further detailed with additional linkages and dampers on the tops, and are later installed on the underside of the chassis in between the return roller racks that are built up and added to the underside of the chassis. The lower frame of the chassis has a floor panel to which the final drive is added, which houses a pair of poly-caps, and deep girders are then added all around, after which the aforementioned return roller racks are installed, of which there are two types. Small bogies containing two return rollers each are attached to the racks, and at this point the idler and drive sprocket wheels plus the exhaust muffler are also added. The three main road wheel bogies are installed on the underside of the chassis, and that's the end of that – the chassis is then turned over for the addition of the tracks. The tracks are individual links, and can be found on the black styrene sprues, of which there are four. You will need to make forty eight for each side, and each link is made up from the track plate, and separate linkage part, but fret not – there are only two very dainty sprue gates on each part, and the moulding is very nice indeed with large domed rivets, slide-moulded lightening holes and click-fit track pins. A little glue to mate the two parts is all that is needed, and once dry you can clip each run together with the minimum of fuss, resulting in a set of very well detailed workable tracks that just need a lick of paint and some weathering. The interior is the next job, and that begins with the addition of the floor panels, which have tread-plate detail moulded into them. The floor is broken into front and aft parts, in between which would be the two engines, with a pair of narrow walk-ways outboard. The engines aren't included, which might seem a shame on initial inspection, but when you look at the finished item, the area is so deep within the bowels of the machine that it wouldn't be seen under normal (non-endoscopic) circumstances through any open hatches. Some enterprising soul is bound to bring out a resin set to fill this area if you have eyes that can see round corners though. The driver's area is raised above the main floor, on a pair of T-shaped brackets that are moulded into the chassis sides, and the raised floor fits on top, with a pair of crew seats, hand controls and foot pedals for both the driver and co-driver for redundancy. The radiators sit at the front and rear of the raised area, against two bulkheads with large circular cut-outs in which the cooling fans would have been placed. The radiator cores sit outside the bulkheads, and have a PE mesh added to the front, and three protective bars running horizontally across the front. More bracing struts are added to each corner, and a number of additional controls are applied to the portions of the bulkheads that project up above the raised floor. The main gun has a slide-moulded barrel, to which the recuperators and cradle are added, plus the aiming devices, the sights and the vertically curved portion of the splinter shield. The gun then slots into the main shield from the open back, and a PE top is added to the cylindrical shield. The gun is supported on a tapered octagonal base, which the gun fits atop after installing a sector gear and spacing device that clips round the shaft. An ammunition box and six seats for the machine gunners are built up next, with the ammo placed behind the main gun, which is installed on an octagonal depression on the front floor. The machine gunners' positions are able to swivel on a single point outside the seat-pan, presumably to facilitate access to the gun for re-loading and fast exit in the case of bail-out. Two are placed in the front compartment, with the remaining four at the rear. The guns are built up from a one-piece breech and barrel, with separate hand-grips and mounting parts. The guns mount to brackets attached to the side of the hull, and each one has a nicely moulded belt of ammo that can be flexed to fit its position. As a bit of extra detail, a rack of four rifles can be made up in the rear compartment, with additional "potato-masher" hand grenades, two extra rifles with bayonets attached, and a pair of Bergmann MP18 sub machine guns with separate side-mounted snail-drum magazines, although these were only used in the closing months of the war. Each of the machine guns are added to the insides of the hull plates before they are installed on the hull, so you'll be doing some internal painting at this stage unless you're leaving all the doors closed up. They are attached to the walls via plates on the mounts that mate with corresponding depressions in the walls. Each gun slot has a pair of triangular panels protecting the cylindrical mount (plus the gunner's face), two of which can be posed closed if you aren't fitting the rear guns. After this, the sides, front and rear are joined to the hull and your A7V starts to take shape with the addition of the lower glacis and valance front and rear. The four large towing shackles (two each front and rear) are covered by wedge-shaped armour panels, which can be posed raised for towing, or down for normal use by cutting off one or other of the two mounting lugs, which are roughly 90o opposed from each other. The crew doors are built up with separate pistol-port covers, handles, and a fold-down jump-seat that is stowed vertically to open the doors. They also have an appliqué weather bar riveted to their bottom edge, which is a further separate part, and a decal for the inside surface stating the tank's number in case the crew forget which one they're in! As well as the crew doors, there are double doors on each unused machine-gun slot, and four inspection/maintenance hatches along the track runs on each side, with a further two low down on the front of the glacis plate. One of the smaller panels in the middle each of the sides are propped open by the exhaust pipe, which snakes up the side and away from the gun ports, with a bracket separating the solid pipe from the hollow tip. At this stage the tank lacks a roof, as well as a protective cab, which is next on the agenda. The front and rear walls of the cab have a bifold door that covers the opening on the inside, and a pair of sliding doors for the outside, the latter having PE guides added to each side. The instructions show three positions in scrap diagrams in the open, closed and half-open position to assist you in working out how they should look. The side walls have only one hatch each, the doors for which operate in the same manner as the others, while the roof panel has a circular hatch in the centre, a hinges vented panel over one driver, and a clam-shell door over the other. The main roof is moulded as a single part, and has a large central cut-out for the driver's cab, and numerous parallel ventilation slots cut in the roof, which are covered by armoured grilles. Inside hang a number of toggles for the crew to steady themselves on, and a strip of PE covers the front edge of the main gun's "window". This and the driver's cab are then placed onto the hull and the inside is closed up. The length of string/cord is cut into two lengths of 148mm and a scrap diagram shows how it should be folded over and attached to three sleeves in 1:1 scale, with 3mm between each sleeve. These are then arranged on the top deck and tied-down by shackles, which is probably best done after main painting has been finished. That's it! Markings Only one scheme is provided in the box, that of Schnuck, No. 504 of Abt.2, German Army, in Northern France in Autumn 1918. It has a three colour scheme of sand, red brown and green, with five views showing how the areas flow across the hull, leaving you in no doubt where to put which colour. The decals are larger than most AFV sheets due to the size of the few decals on the sheet, and include eight old-school crosses, plus two further in a ghosted "shade" with a red I in the centre. The other decals are two white "Schnuck" markings, and the 504s for the interior doors. They're printed by Cartograf as usual with Meng, so quality, colour density, sharpness and register are spot on. Conclusion This new one from Meng makes me supremely happy, as I'd got a Tauro Models kit in my stash that had been thrown back in there when I realised the size of the job I'd got to render the interior anything like the real thing. Meng have done their usual fine job of rendering the lumpen riveted surface of the hull, and the inclusion of most of the relevant interior is just gravy. The kit deserves to do well, and will look great next to its adversaries that seem to be popping up like London buses at the moment. Very highly recommended. Review sample courtesy of
-
Royal Mail Ship (RMS) Titanic (MOE-001) Meng via Creative Models Ltd There can’t be many people on this blue marble of ours that haven’t heard of the tragedy that befell the RMS Titanic on its maiden voyage where a combination of bad luck, bad design and poor decisions led to the ship sinking and the loss of over 1,500 lives, mostly from the lower class cabins, due to the well-documented failure to fully utilise even the inadequate lifeboats the ship was carrying. Over a hundred years later it is still oft discussed, and there have been many films on the subject, most notably James Cameron’s eponymous Titanic, the research and his obsession partly responsible for finding the location of the wreck deep in the ocean over 12,000ft down at a pressure of 450bar, which are some astonishing numbers in themselves. The Kit In this super-sensitive era this kit could seem a little incautious, but taken alone and as part of their cartoon range, it has an appeal, and as someone that would like a full-sized Titanic model but doesn’t have the time or room for one, this might be an acceptably simple solution. It’s a new tool from Meng, and fits into their cartoon line, with their new MOE branding in the corner, which led me to wonder why? Apparently, Moe in Japanese means cute in popular culture, and the Chinese version of this is Meng. Coincidence? I don’t know. Kawaii desu ne? The kit is a snap-together model, and has pre-coloured parts with much of the external detail of the real Titanic, while having the (don’t say egg, don’t say egg…) shape of a cartoon, which we understand to have been designed in collaboration with Mr. Liu Naizhong. The kit arrives in a chubby top-opening box, and inside are six sprues and three separate parts in anti-foul red, black, off-white and yellow, as is appropriate for the parts and their location. There is also a tiny sticker sheet and a suitably minuscule instruction booklet in full colour with 3D isometric drawings for each step. Construction begins with adding a pair of inserts for the port and starboard propshafts, then the screws, including the central one behind the single rudder that gave insufficient steering authority to properly avoid the iceberg. Then the hull is pressed together from four layers, red, black and white, with the deck pressing inside the top part. A pair of anchors are hung on the bow (I almost said “front”), and the superstructure is pressed together with three layers, then decked out with four runs of three lifeboats and two extras at the front of the superstructure, before having the bridge pressed into the front so that the completed assembly can be joined to the hull. The four funnels are moulded in yellow with nicely detailed black inserts in the top, and these are pushed into holes in the top deck four inline. The front and rear masts are in the same colour, and there is a little white crane on the bow, with a spoiler (I’m kidding) at the stern. Markings If you aren’t painting the model, you might still consider adding a red stripe to represent the boot-topping, which could be made from red decal strip for ease. The sticker sheet has two white Titanic name plates for each side of the bow, plus a larger golden one for the stern that is positioned centrally. They have a thin clear backing, so there won’t be any annoying edges to cover. Conclusion I quite like it, but you decide for yourself. It’s nicely detailed, simple to make and I wish it came with a stand. A fun project to share with a child, with an opportunity to also share the history of the ship with them, and tell them how hard-won the lessons it taught maritime designers really were. Recommended. Review sample courtesy of