Search the Community
Showing results for tags 'Luftwaffe'.
-
I like this tiny 1/144 kits as I take them as a stress-reduction therapy between bigger projects. I wanted to give it a try to a couple Luftwaffe jets, the first one being this, the F-104G from Revell. The kit offers two options for markings, I will build the 26+53 from WTB61 (Technical Test Facility 61) at Manching, 1991. The kit provides a decent cockpit, main wheel well, workable front wheel well, nice landing gear, and jet engine exhaust, scribing is really nice. Only thing I would have expected is an option for open canopy, only closed option is available. Fuselage is split in left/front and front/rear halves. The ejection seat has enough resemblance to the real one, just adding couple seatbelts and it will be good under the closed canopy. The fitting between front-rear fuselage gave me issues, not that it was a big gap, but where it was located. Tamiya gray putty and patient sanding solved the issue. I don´t like fitting the main landing gear at this stage, but there is no other option. Detail inside the front wheel well is completely lacking, I had to issue a "floor" for the front half of the wheel well (the rear will not be visible under the landing gear structure). The kit provides a decal for the instrument panel, looks nice for the scale. Not much will be noticeable at the end anyway. The cockpit had a crack where it joined the sprue, cleaned and sanded as much as I could, will try to hide some more when I paint the cockpit frame. Can´t imagine what is the purpose for that neat gap below the tails of the fuel tanks. All the 4 of them have the same issue. Filled them with putty. And here I am, about to start painting this tiny Starfighter. Marco
-
I'm new to late war Luftwaffe colors. I'm working on a 1/72 FW-190A-8 with a late war scheme (RLM81/82/76). I am using my Hataka (Lacquer) Late war Luftwaffe set and this is the result of the RLM 81 and 82: Of course shooting it was maddening, because I couldn't quite get the colors right, but this is fairly close. In reality the green and the violet are a little more vivid. As near as I can tell, the RLM 82 green is about right, but the RLM 81 is really a puzzle to me. I seem to remember seeing paintings of green and violet German A/C (Me-262s), but most often the RLM 81 is more of a brown than a violet. It just seems awfully purple to me, but I'm new to this so i could be wrong. Eduard's instructions for late war FW-190A's look about the same for the Violet, but a little darker for the RLM 82, but in general it seems like my paint would be authentic. The reviewer on "the modelling news" seemed to think that the Hataka Acrylic version of RLM 81 was a little vivid, but felt it was in the realm of possibility. Any thoughts?
-
 After tackling ICM's 1/48 Dornier Do215 (see my other RFI) I decided to jump in to my second ICM build the Do17Z-10, from ICM's1/48 Dornier family. The kit has all the same mouldings as the 215, except of course engines/cowlings and nose, a lot of these required injection pin marks to be removed(seems to be a hallmark of ICM kits). I used the Eduard p/e sets for the interior and exterior, also a set of masks. The interior had a little extra detail added to it including the MG151 cannon which can now hardly be seen. I closed up the bomb bay and added the fairing to the top of the rear fuselage, hollowed out the tail wheel fairing for a more authentic look. Wing and cowling fitting was excellent compared to the 215,even using the Eduard p/e in the u/c bays. the kit went together quite quickly and easily. One thing I did to get a decent wing to fuselage join was to leave out the three bulkheads in the bomb bay as they sat too high impairing a good join. I therefore suggest dry fitting and trimming of these bulkheads to get a good result, I will certainly be doing this with my next Do17Z build (yes I have another one 😱 ). The remainder of the build was pretty straightforward, I used gun barrels from the Eduard 109/190 kits that I had spare, as they have hollowed out tips. I decided looking at a couple of photos of the prototype that all the glazing at the nose, bar one on the port side, were plated over so I puttied over the glazing to give this appearance (rightly or wrongly ???). I also tried to duplicate the extra recognition lights these machines had, 2 above the tail and 2 below the cockpit, I drilled shallow indents painted them silver then filled them with clear ultra-violet glue, not brilliant but acceptable to me!! For the glazing that housed the infra-red search light I painted the rear with Tamiya clear red paint, then coated the top of that with black, trying to achieve a dark red finish - not very successful! I finished the kit with AK True Colours NATO Black, which is actually an extremely dark grey, possibly one step lighter than pure black. This gave to my mind a much better finish than black, please be your own judge as to the result! Panel lines were highlighted with medium grey which gave a pleasing but not very accurate result. I finished the kit as R4+GK of 2/NJG.2 based in Holland ( this machine was shot down in May 1941 by a 25 Sqdn. Beaufighter). The letter 'G' may have been red but having no photographic proof decided to have it grey. I used the kit decals for the national markings with some trepidation, having read some bad criticism of ICM's decals but to my delight they went on perfectly. The code letters were from the Xtradecal Do215 sheet and were not as good as ICM's!!!!! I really like the look of this particular if unsuccessful member of the Do17 family. Cheers Andy
- 13 replies
-
- 32
-

-
This is the result of my first build of an ICM kit, even though it was purchased when it first appeared back in 2014 I never got round to building it till now. So armed with the kit, Eduard's interior, exterior, bomb bay p/e sheets and masks, Quickboost's resin spinner/props and exhausts, finally Xtradecals sheet the build commenced. I had read the reviews and builds by others and was left with mixed feelings about ICM 1/48 kits especially the Do215, but plunged in anyway!! It was certainly not one of the easiest kits I've built and took me far longer to complete than I expected, at times I nearly gave up the whole project but in the end persisted hopefully the end result is a reasonable replica of this machine. There were an awful lot of ejector pin marks to remove which would have been visible on the finished kit, a problem I've noticed on the other ICM kits in my stash. Which led me to purchasing a fibre glass pencil which is a great way to remove these marks. I found the instructions a little confusing at times (when I used them!!!) usually for placing certain items in the cockpit. The Eduard etch caused me some problems especially in the u/c bays where a Dremel was used to sand down some of the parts attached to the u/c bay walls. This was to try to get the engine nacelles to fit reasonably to the wings. When it came to fitting the wing to the fuselage the join was terrible and required much sanding and filling. I have since come to the conclusion the bulkheads in the bomb bay need some trimming down to allow a reasonable wing to fuselage join. I also added strips of card to lower wing to fuselage join to alleviate the poor fit. I added some extra detail to the cockpit ( which I painted dark grey rather than RLM02???). I also decided to glue the cowlings closed even though replicas of the engines are supplied which I found to be rather simplified. One of the faults with this kit is the rear fuselage which does not have the bulged fairing over the tailplane, this has been rectified by an aftermarket resin product which as it costs half the price of the kit I decided not to purchase!! I did however modify the fuselage to show this feature, reasonably successfully I hope? The tailwheel fairing is one moulding including the tailwheel its self, I managed to hollow out the fairing leaving the tailwheel to look like a separate item. As it is a recce. machine I added a resin camera to the entry hatch/camera fairing from my spares box. I used AK True Colours to paint the kit and Xtradecals sheet for the Do215, I was rather disappointed with these decals as they seemed to be a lot thicker than I'm used to and took quite a lot of solvent to get them to look reasonable! This machine was from 1.(F)124 Stavanger, Norway April 1940 (couldn't resist the undersurface mottle!!!!!) Now then where's that ICM Do17Z-10 😱 Cheers, Andy
- 12 replies
-
- 28
-
-
These two kits were built together, the Siebel Si204 using aftermarket i.e. Eduard 'Big Ed' etched and masks plus CMK resin wheels, seats and spinners. Where as the Bucker Bu181 was built virtually otb, both kits were Special Hobby 1/48 scale. The Si204 wasn't the easiest of kits to build, some of the parts not fitting together too well. The canopies were a bit of a trial to get a decent fit but was successful in the end. I also re-scribed all the panel lines as I found the kit ones to be rather shallow. On the plus side the interior detail was excellent, unfortunately mostly lost when fuselage halves are joined! Not a shake and bake kit but worth the effort put into it, Special Hobby certainly give us replicas of aircraft mostly ignored by other manufacturers and are to be congratulated for their choices. Aircraft was finished using AK True Colours, decals from kit and spares box. This particular machine was taken from a colour photo found on the 'net' the code only showed 3 letters L,Q & D so first letter is a guess B!!! These last 3 photos show the interior detail :- The Bucker Bu181 was built otb without any modification except cutting out and deflecting the control surfaces. Again a Special Hobby kit this one with no surprises and finished quite rapidly for me!!!! Machine is finished as per photo found in a Flugzeug Special on the Bu181, it appears the codes had been painted out except the one on the yellow bands the S is speculative. Unit badge is home made decal, finished again, with AK True Colours. Now S.H. where is the 1/48 Focke Wulf Fw58 😉 Cheers Andy
-
 Current Luftwaffe Insignia (FP-1120) 1:48 by Fantasy Printshop Ltd. When the Luftwaffe was reformed in post war Germany there could be no way WWII insignia could be used. The decision was therefore taken to revert to the Pre 1920s Iron Cross or Balkenkreuz. Not a lot can be said other than these are current / post WWII Luftwaffe insignia in 1/32 scale. These scale out at 1ft, 1.3ft, 2ft, 2.3ft, 3ft, 3.3ft, 4ft, 4.3ft. They can also we would think be used in 1.72. The decals are sharp and in register on the white which to be honest a lot of kit decals are not. Recommended got your next Post war Luftwaffe aircraft. Review sample courtesy of
 -
Current Luftwaffe Insignia (FP-1130) 1:32 by Fantasy Printshop Ltd. When the Luftwaffe was reformed in post war Germany there could be no way WWII insignia could be used. The decision was therefore taken to revert to the Pre 1920s Iron Cross or Balkenkreuz. Not a lot can be said other than these are current / post WWII Luftwaffe insignia in 1/32 scale. These scale out at 1ft, 2ft, 2.3ft, 3ft, 3.3ft, 4ft, 4.3ft. The decals are sharp and in register on the white which to be honest a lot of kit decals are not. Recommended got your next 1/32 Post war Luftwaffe aircraft. Review sample courtesy of
-
 Greetings Brits- Now that my modelling skills are improving... I decided to tackle the Eduard Fw-190D-9 in 1/48... This model has alot of detail and some reviews suggesting a tough build. Well, I did have some snags but everything went together fine for me, and even though this is designed as a kit with open gun hatch and wing root cannon hatches open, I followed the instructions and closed them up. It was tougher to do, but the next one I build will have these hatches open just to add variety in my display case. I built from the kit and the only thing I changed or added was the Eagle Strike #48003 decals for Black 1, 5/JG26 (II Gruppe), Wk No 210972 and a scratch built exhaust deflector on the starboard side. I did not put in all the fiddly PE instrument panels in, I used the nicely molded kit instrument panels... The only issue I really had was the drop tank in the kit did not attach to the ETC rack! The instructions say glue it on but the shape of the tank and the ETC rack had no attaching feature or interface of any kind! So I had to leave it off... I wanted to do a Standard Fw190D-9 Scheme from the FW Cottbus Plant, and the Wrk No 210xxx is for November 1944 to December 1944 production with the RLM 75 Grey Violet and RLM 83 Dark Green all over RLM76 (back when they still did paint the FW's in all underside in RLM76!) This ship had the later blown canopy possibly added in the field..., The photo I have of the original plane looks very well maintained and just has exhaust stains. It did have the later 'cigar' drop tank, which I cant find in 1/48 and will have scratch build in the future. The ETC rack is in the dark grey so I painted it like that... I assumed RLM66 for it... Enjoy the pictures! Its freshly finished on the workbench! Thanks for looking!
- 14 replies
-
- 32
-
-

-
Here's my ICM Ju 88C-6b in 1:48. The decals on this kit are of the ones that stick at first contact with the surface. I lost three of the main decals and had to improvise.
-
 Hello guys, here's my next project, ICM's Ju 88C-6b. I hope it fits well. I'll be painting it as Heinrich Prizn zu Sayn Wittgenstein's machine.
 -
Hello guys, here's my latest model, Gerhard Barkhorn's Bf 109G-6 in 1:48. I used Eduard instructions to guide me with the camouflage scheme, I think it came out pretty good.
- 2 replies
-
- 5
-
-
- Hobby Boss
- Luftwaffe
- (and 1 more)
-
Hello guys, I finished another model. This time it's the Hobby Boss 1:48 Ta 152C-11.
- 3 replies
-
- 8
-
-
- Ta 152
- Hobby Boss
- (and 1 more)
-
 Hello peeps. Well, uk is in lockdown and I am working from home. In between work I will get some bench time. So time to have a play with an experimental aircraft. I bought the PM ho 229 from Tornado models in Birmingham and I set about engraving the panel lines and was all set to start until I managed to break the canopy.....The canopy was broken beyond repair and I couldn’t find a replacement and asked the good folks here for help getting a replacement. Then the very generous and superb gent @dogsbody kindly offered me the pioneer kit all the way from Canada. Blown away by his generosity that kit has now arrived and I will be building the pm kit and pioneer kit side by side. It will be a slow build but thanks to mr dogsbody (who I owe a pint to when all this blows over) I have crash moulded a new canopy. Here is the wonderful box art of the pioneer 229. It will be an adventure! At least the pioneer parts seem to fit. The pm one..........stay safe and enjoy the ride as I build both of these side by side.
 -
Hi comrades! Here my recently finished Luftwaffe's shturmovik, built from profipack box with small additions from scratch This kit is IMHO bad! I hope, the 2ed of Fw-190 by Eduard is better Only light weathering is added - I believe, because of new weapons, logistics problems (mainly fuel shortage) it's makes only seldom flights Thanks for looking!
- 11 replies
-
- 14
-
-
Hello and welcome to my most recent thread. Here, I'll be posting my build of the Hasegawa Junkers Ju 87G in 1:32. The aircraft will be decalled as Hans Ulrich Rudel's machine. Here are the initial photos: Boxart: Decals and Instructions: And the Sprues: I hope to have a better fitting kit than Revell's Ju 88 in 1:32. Follow the build of you wish to receive an email each time I post an in-progress photo.
- 17 replies
-
- 8
-
-
- Ju 87g hasegawa
- hans ulrich rudel
- (and 1 more)
-
Evening all, I'm after details relating to the above aircraft which is pictured at Zatec airfield in 'Air War over the Czech Lands' by Jiri Rajlich. There is just one photo, in which the aircraft is partially dismantled; the accompanying profile shows it with a replacement tail unit in 74/75 and no markings at all apart from national insignia and the 'A'. Has anyone seen other images of this aircraft? I'm very keen to find out more about its camouflage and markings, and also about its history before it ended up in pieces at Zatec. Any help much appreciated!
-
Immediately after finishing my Fw 190D-9 from Gertrud Barkhorn (still needs its proper RFI photos), I "start" this one. It'll be my third attempt at this kit. The kit decals were printed in 2010, so this boxing is 10 years old (I already know the original kit was made in the 70s), they aren't cracked, so they should work fine (as long as they don't take much time from moving away of the backing paper). I'll be building the boxart plane. Click on the follow button if you wish to see how this build goes.
-
I bought this resin model from Ebay some years ago, it's an aeroplane that has interested me for sometime a 1930s design that lived on till the end of WW2. These aircraft used by the Luftwaffe for night harassment on the Eastern Front make a change from all the usual 109s and 190s I have built. Onto the kit all the basics are there in resin plus white metal undercarriage legs, injection moulded wing struts, vac formed windscreens and decal sheet. Unfortunately I should have checked the contents of the kit a little more carefully when I received it as some of the smaller detail parts were missing ( good old Ebay!!!!). I managed to get some reasonable idea of the layout of the cockpits from trawling the net. Incidentally it seems the French have an example of this aircraft preserved, it originally was liberated by the French Resistance! The kit detail in cockpits was basic 2 floors, 2 seats, crude instrument panels, two radio sets, moulded interior framework (removed) and a missing control column! I added as much detail as would be seen, the cockpit openings are not that large. Fuselage was glued together and sanded down. The wing was supplied in left and right halves which I joined using small metal tubes to add strength, the weight of the assembled wing meant that the interplane struts supplied in resin were not going to support it, they would have been better supplied in white metal. My solution for this was to fabricate struts in metal using some brass Strutz streamlined wire I've had for many years, this was quite a reasonable solution I'm pleased to say. The joining of wing to fuselage still caused me a lot of frustration and cussing but eventually came together quite well. I painted the wing and fuselage seperately also applying the decals before joining them together. I fabricated the exhausts using 2mm soldering wire as the exhausts supplied were not suitable for a night harassment aircraft. A note about the colour scheme and decals these came from an OWL decal sheet I bought after buying the kit, they were quite thick and a couple of the items broke apart when applying them however I managed to get them on successfully in the end! The aircraft is He46c of NSGr.1, Idriza airfield, Eastern Front early 1944. Not one of my best builds but I highly doubt we'll see an injection moulded kit of this aircraft, watch the Czech kit producers prove me wrong 😁. It would be great to see some of these neglected second line aircraft in kit form (1/48 of course). Thanks for looking Cheers Andy
- 17 replies
-
- 31
-
-
Hello again, I sincerely hope you don't mind me asking two consecutive questions about similar subject but I am planing a multi build of Eduard's Fw 190 A-3 and would like to find a proper references for the decal sheets I have! This time I am looking for a photo reference (or any secondary source of info) regarding Focke-Wulf Fw 190 A-3 featured on Cutting Edge Decal sheet CED48196 "Fw 190 Reich Defenders Pt2" (can be seen here: http://fineartofdecals.com/goodies/148-treasures-axis/ second decal described on the page) Decal sheet instructions are mentioning the photo but they do not list any references which we could check to make our own assumption! I somehow remember this machine from some of the discussions on some of the forums over the last 20 years and I thought I have saved the photo & even the discussion in my "archive" but I am unable to dig it out! From the decal sheet: "First is Fw 190A-3, Red 7/Blue 1 (starboard) AND Blue 1/Red 7 (port), of an unknown unit. This very interesting A-3 features a late-war ground concealment scheme consisting of RLM 82/83 over the original 74/75. It IS possible that was an eastern front aircraft and received the infamous JG 53/54 experimental schemes using Russian paint stocks. There is no evidence of a yellow stripe under the fuselage cross visible in the photo. The exact colors of the numbers is also unclear. The 7 is darker than the yellow undercowl, but much lighter than the 1. The 1 is lighter than the Swastika. We think the colors are as shown, but the one could be black, and the seven could then be yellow or blue. Since the 7 is applied in the standard number position for the Fw 190, it appears the 1 was the new number for the aircraft during its final days." Is anyone able to help me locate a photo or two of the mentioned machine... I would really appreciate it! Thank you very much in advance! PS It's the first machine from the top - in the decal instructions:
-
 Ju 87 D-3, Hs 129, FW 190F-8 "Luftwaffe Ground Attackers vol.1" 1:72 Exito Decals Polish company Exito are an online retailer of all things scale modelling. They also have a nice line in decals with a 'twist'. Unlike most rivals, their sets are packed into large, A4 sized packets backed with a piece of heavy card. Each of the schemes included on the sheet is replicated as a high-quality colour print on thick, glossy card, with a painting diagram and other information on the reverse. The overall impression is of a very high quality product, albeit one which is surprisingly reasonably priced. The set includes markings for three aircraft: Junkers Ju 87 D-3, W.Nr. 100082 (Stkz. BP+DD), coded T6+HN of 5./StG. 2, Achtirskaya, USSR, early summer 1942; Henschel Hs 129 B-2, W.Nr. 140405 of 4.(Pz)/Sch.G.1, USSR, summer 1942; and Focke-Wulf Fw 190 F-8, flown by Major Theodor Nordmann, Kommandeur of II./SG 3, Riga-Spilve, Latvia, 1944 There is no secondary theme that ties these schemes together, other than the that described in the title. The decals themselves are printed by Cartograf, which is a guarantee of good registration, sharpness and colour density, with a thin gloss carrier film cut close to the printed areas. Helpfully, there are sufficient national markings on the sheet to model each of the three options. Colour references are provided for Mr Hobby and AK Interactive, as well as the RLM codes appropriate for each shade. Conclusion This is yet another professional and attractive package from Exito. As well as some interesting decals printed by the company everyone else is measured against, you get profiles of all the options that are of such high quality that they could be framed or incorporated in the display of your finished model. Highly recommended. Review sample courtesy of
 -
F-104G Luftwaffe Starfighter (K48083) 1:48 Kinetic Model The F-104 starfighter was designed by the famous Kelly Johnson from Lockheed after a series of visits to USAF Bases in Korea where he sounded out pilots about what kind of aircraft they wanted. Their main focus was on a small simple aircraft with a high speed/altitude capability. The new General Electric J79 engine was chosen to power the aircraft and he would wrap around this the lightest possible airframe he could. The new aircraft would be all metal with wings located further back than most designs to allow a minimum drag angle of attack. The aircraft would feature an internal 20mm Gatling gun with additional missile armament. One downside to the new aircraft was the downward firing ejection seat which was developed after concerns of a normal seat clearing the tail. The seat would later be replaced by a conventional one, but only after a significant number of deaths during low altitude ejections. Many operators would replace the Lockheed seats with Martin Baker ones. The F-104G was developed by Lockheed at the time the USAF was not happy with the aircraft. The Luftwaffe at the time was looking for a new multirole aircraft and the Starfighter was reworked with a stronger fuselage and wing, larger fuel capacity, a larger vertical fin, new landing gear, and upgraded avionics. Many of these models would be built under license by Dornier, Fokker, Fiat, Canadair and SABCA. The aircraft had a poor safety record with the German forces leading it do be dubbed the "Widow maker", pilot workload was high and it emerged that original fatigue calculations had not taken into account the new role of the aircraft. It would later transpire that underhand methods secured many overseas orders with German and Dutch officials accused of accepting bribes. The Kit This is a new tool from Kinetic. The Box top is branded as Kinetic Gold, with no explanation anywhere to what makes it a "Gold" kit. The kit features an open electronics bay behind the cockpit, nose radar There are three sprues of grey plastic, a clear spure and a small PE fret. The plastic looks to be upto the recent high standards of Kinetic., the panel lines are very fine and I fear will disappear under primer and paint to a greater degree. Construction begins with the cockpit, and the seat is the first thing to be built up. This is multipart affair and there is a C-2 seat and a Martin Baker one. The back and sides attach to the seatpan, the head part with the handles is attached and the seat gun fitted to the back. Seat rails are then fitted to the sides. PE belts are then fitted. The cockpit tub is built and the control column followed by the seat are installed. Next up we have a few sub assemblies to make. The radar and electronics boxes for the nose are made up. Its worth noting there is no parts in the kit to fold the radome back to expose the radar? The rear jet pipe and the exhaust nozzle follow. For the undercarriage the front and rear bays are made up, and lastly the nose cone is put together. All of these can then be added into the main fuselage and it closed up. Some additional panels are then added to the underside. The top to the T tail is then added as is the rudder. The three part intakes (each side) are built up and added to the fuselage. The nose wheel is now built up and added as well. Two different types of wheel are included, however there is no information as to which to use for any aircraft, so the modeller will need to check their references. The nose boy doors can then be added after the nose gear is in. The main gear is now built up as well, again two types of wheel are supplied, and again without any information. Once the gear is on the doors can be added. Moving to the rear of the fuselage the air brakes can be installed. We now move onto the stubby wings. There is a main centre section with separate leading edges and flaps. Holes must be made if using the underwing pylons. If not using the wing tip tanks then there are PE faces for the end of the wings. Once made up the wings can be attached. Back to the fuselage the cover for the electronics bay behind the cockpit is added. This can be open or closed. The glazing is now added. There are PE parts for inside the canopy. Small parts are then added to the airframe including PE AOA indicators. For stores, fuel tanks are provided for the wing tips, and underwing pylons. A double sidewinder adaptor is provided for under the main fuselage. Markings There are designed by Crossdelta and printed by cartograf. It is noticeable there are very few stencils on the sheet. 22+39 Fighter Bomber Wing 34 Memmingen 1984-87 With Earlier type Splinter scheme 21+64 Fighter Bomber Wing 34 Memmingen 1984-87 With Later type subdued scheme 26+60 German Naval Air Wing 2, Eggebek, 1985 Conclusion This is a great new tool from Kinetic. Highly recommended. In association with
-
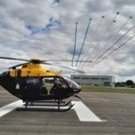
Hi Guys, Images from the Deutsches Technikmuseum in Berlin. The museum from the footbridge over the Lanwehr Canal. The C-47 used to sit outside the big terminal at Tempelhof. Europe 261 This is a model of the Deutsches Luftfahrt Sammlung, the Nazis' big aviation museum, which opened in 1936 to coincide with the XI Olympiade, the centrepiece of which was the Dornier Do X. Choccy fish if you can name all the aircraft. Europe 265 This is what the main entrance looked like; note the Spitfire at bottom right. The museum caught fire during an air raid in 1943 and most of the collection was destroyed, some airframes survived and are now in the collection of the MLP in Cracow. The Airco DH.9A at Hendon used to be there. Berlin Tour 15 This is a 'then and now' comparison. It was taken on Alt Moabit next to the Berlin Hauptbahnhof, just across the Spree River from the Reichstag. Berlin Tour 14 Arado Ar 96. Europe 266 Nord 1100 Noralpha. Europe 268 Ju 88G and Fi 156. Europe 269 Bf 110 and Fw 44. Europe 270 Ju 87. Stuka A slice of the Dornier Do X. Europe 271 More to come.
-
This is my Hobby Boss 1/48 FW 190 D9, a nice kit and relatively trouble free build, I managed to keep the canopy moveable and the rigging wire drops down when opened which is a nice touch. Finished in MRP and Mr Color Lacquers and weathered with oils and pigments. Eduard belts and brass tubing for gun barrels were added.
-
Hello everyone Here is one of three 1:144 Focke-Wulf Fw 190Ds in fictitious schemes and/or variants I built back in 2013. In this case, it's a Platz Fw 190D-9 kit in an MTO scheme representing a fictitious machine from 4.JG27 based in Italy in 1945. The Dora never served in the MTO and I thought (correctly) that it would look great. The kit was built OOB and fully painted, weathered and varnished with brush. The JG27-specific markings (emblem, number, etc) came from a Sweet Bf 109F kit. Thank you for looking and all comments are welcome as always Miguel
-
Recently I "recovered" my DML Ju88C bought over 15 years. It's kit No. 5540#, based on Shanghai Dragon 5536# C-6 version, with a new nose and radar antenna added. Another difference is the dorsal (is it a proper name?) gun position, or B-stand. 5536 has 2 MG17s same as A-4 version: 5540 has a single gun replicated this photo: It seems that the latter one only appeared on Nacht Jagers, so can we speculate that C "Zerstroyer" usually converted from bomber version, so remained the gun layout...... although not so crisp, we can see "bulge" on canopy. .......while Nachtjager might be new built or modified at factory? So all modifications applied? Earlier C-2/4 also had single gun fitted. However, twin guns also seen on Nachtjagers....so how to figure out them...