Search the Community
Showing results for tags 'Luftwaffe'.
-
Hi Friends... I started a 6 model Luftwaffe build binge... I am on my second plane, a He162 wk number 120067, otherwise known as White 4. I have found 4 to 5 photos of this plane that I am studying. I even found a parted out photo of it late 1945/46 with faded paint, but topside of wing visible... The help I need is from Experten on late war German aircraft... i have read that the early builds of the He162 (which this is) had the fuselage painted in RLM71. From the photos, the power egg is darker than fuse, so its probably RLM81. The fuselage is slightly lighter than this, but way darker than RLM82 light green. Do you guys know if there was truth to the RLM71 fuselage rumor, or are bets that its fuselage is RLM83 dark green? The 83 worries me as its darker than 81, and power egg is darker than the fuselage. Anyone out there done a He162 and careful about colors? Thanks for any help you have...
-
Deleted.
-
 One of the things one can say about the Luftwaffe during WW2 is the sheer amount of projects, prototypes and machines that did achieve frontline service. The Focke Wulf Ta 154 is not one of them. Originally designed by Kurt Tank at Focke Wulf as a plane to counter the legendary RAF Mosquito, its first flight was on July 1st 1943. The plane was also to be built using wood, with a especial glue, Tegofilm, used to hold all the wooden parts together. However, as luck would have it, the RAF bombed the factory that manufactured the Tegofilm in Wuppertal, putting the factory out of comission. A replacement glue was used, but it disolved the wood, and that caused accidents. After the accidents, Tank ordered to halt the project, being accused by Göring of sabotage. Lots of to and fro was done and, in the end, the project was cancelled. I bought this kit yesterday with the Spitfire from Revell/Hasegawa in 48th. One of the things I did before walking away from the hobby shop was to check if the wings were warped (as Tom Cleaver had mentioned in his Modelling Madness review). Luckily, they weren't so I walked away happy. There're a total of six sprues, five in grey plastic and a clear one. There's no flash present. Decals, though being from 1999 (22 years old) looked OK. Not like Revell's current decals printed by Cartograf, but OK. I tested a small one and was happy to see it didn't break and it moved from the backing paper in no time. The single option is for Ta 154A-0 TQ+XE. Anyways, enough talking! Here are the photos. Boxart: Instructions and decals: Sprues (bagged to avoid losing parts):
 -
Hello guys, I finished this one yesterday. Excellent kit with minimal filler needed, and fit issues were caused by my own clumsiness.
- 8 replies
-
- 20
-

-

-
- messerchmitt bf109
- Luftwaffe
- (and 1 more)
-
I put this together as a little bit of fun while working on my 1/32 scale Stuka, build thread in the WIP section. It is the old dragon kit and goes together with little fuss and even included a fret of PE with seatbelts and some other details. All I added was a scratch built seat to replace the blob that came with the kit. The finish is nice and clean as, let’s face it, they didn’t see a lot of use! For anyone unfamiliar with the subject, this is a Bachem Ba 349 Natter (Viper) rocket powered interceptor. They were designed to take of vertically to attack allied bombers before the pilot would separate the nose from the rocket motor in the rear. The pilot and motor would then parachute safely to earth to be reused for another mission. Armament was 24 unguided rockets fired in a single salvo at the hapless bomber. After seven piloted test flights (one fatal) the allies overran the factory and ended the project, probably to the relief of all potential pilots! Anyway, here is the finished article. I hope you like it.
-
Hallo I am working with Hasegawa kits and the Huricane Mk. I in 1/48. I want to build 2 of this aircarft: One Luftwaffe and one Russian. Does anyone have original photos of these 3 aircraft? Many thanks in forward! Happy modelling
-
Hallo Out of the Stuka bomb post, I want to give you the following information. Finn posted these links: http://www.lexpev.nl/downloads/dluft43001942.pdf http://www.lexpev.nl/manuals/germanyold.html Today I made a download. Since German is my mother tongue, I was astonished what I read and saw. This is the explicit description of German Luftwaffe bombs. Here I found the most vital modeler’s question answered. Which color does the bombs have? From 1942 onward RAL 7027 !!! So next question to all: Does anyone have a Luftwaffe prime source for the color from 1939 until 1942? As I said prime source, not photo or guessing! Next question: Has anyone a prime source about British RAF bombs? Just a kidding question; Did anyone paint on German bombers the bombs in the correct color? I guess not. Me too! Happy modelling P.S.: In the second link you can get an idea about so many kinds of weapons, also the Luft - Torpedo! It is incredible.
-
Welcome to my newest project, the Revell/Hasegawa 1:32 Bf 109K-4. I'll be receiving the kit in November (hopefully of this year), and I'll be making a start accordingly. I've searched for photos (why can't I do like when I was younger in just following the painting instructions, I don't know) of the three schemes offered in the kit: Red 7, Adolf Borcher's K-4 and Black 15. I've found photos of those three, but I'm also tempted in painting my aircraft as my previous build, but with a different number. If I wish to go with the latter option, I'll have to buy a new, finer brush than what I have available. Anyways, I'm sure inspiration will hit me once I actually get the kit. For now, some photos I came across of the kit's colour schemes and other random K-4s. Kit schemes: Red 7 (or Blue 7): Black 15: Adolf Borcher's K-4: Random, unmarked 109K-4 photos I found while looking for the kit schemes: 148: The mystery aircraft, no numbers (nor wings), just a fuselage with the Crosses and Swastikas (probably): 199: And finally, the boxart of the kit: I hope this long introduction convince you guys of following the build. If you have more unmarked photos of a Bf 109K-4 (except of the Red Tulip one), make sure to link them! Bye for now.
- 25 replies
-
- 5
-
-
- Luftwaffe
- messerschmitt
- (and 1 more)
-
Here are the photos of my most recent model, the Eduard Fw 190A-8 (new tool) modifed into an A-9. I used the 14 bladed cooling fan, paddle bladed propeller and Aeromaster decals to make an Fw 190A-9 from Schlachtgeschwader 10. My only complain is that the swastika seems too big, but I didn't want to use the one from the kit.
- 7 replies
-
- 14
-
-
- Focke Wulf
- Germany
- (and 1 more)
-
Eduard's (new tool Fw 190A-8) 1:48 Fw 190A-9
Sturmovik posted a topic in Work in Progress - Aircraft
Here's a preview of my next project, Eduard's Fw 190A-8 that will be transformed into an A-9 from SG 10 by using the 14 bladed cooling fan and the broad bladed propeller. One thing I won't do is to lengthen the cowling 30mm. I guess 30mm IRL must be negligible in a scale model. Here are the decals I'll be using (left, Aeromaster) next to the Eduard ones (right). The version I plan on doing. I like the yellow on this one. -
Hello guys, I have the Aeromaster decal sheet "Reich Defense Part 3" in 1:48, and got interested in the Fw 190A-8 "Yellow 1 and Bars" from JG 11. The painting profile suggests the aircraft was painted in RLM 81/82/76, with a replacement empennage painted in RLM 75/76. However, I found this photo of an aircraft very similar to the one in the sheet. This one looks to be much more different than an A-8 (doesn't seem to have the 13mm machinguns in the nose, and lacks the later 190 landing gear doors). But it does have the blown canopy, characteristic of late-war 190s. Guiding myself with the colour profile of the Eduard Fw 190A-6 for Anton Hackl's aircraft (from JG 11 too), I assumed the empennage of the aircraft I'm interested in is white, with a replacement rudder, and painted in RLM 74/75. This aircraft also has the earlier landing gear doors. Could this one be Frankenplane, with a mix of parts to make one functional 190? Any help in identifying this aircraft will be welcomed! P.S: I intend to build the Eduard new tool 48th 190A-8, and the beginning (and acquisition) of this project depends on the solution to the identification of this plane.
-
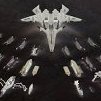
Today I bring you Mistel 5. Being a combination of He162A-2, Arado E-377A flying bomb and Rheinmetall-Borsig take-off trolley, it was one of countless wicked ideas that German engineers came up with by the end of the WW2 and never left design phase. Model is the old Dragon release with some scratch built details like antennas etc. Painted mainly with Vallejo Air.
-
Dear fellow Britmodellers, here's my 1/72 Sabrekits Henschel Hs-126, built from the box. Painted with Gunze/Mr.Hobby acrylics, photographs by Wolfgang Rabel. My buying impulse for this kit was the marking option for an aircraft photographed in Austria (my homecountry), at the end of the war. According to the paint instructions, this aircraft had black undersides and belonged to FFS(B)11, a blind-flying school; according to my research, FFS(B)11 never existed. I came across an online photograph which does not support the 'black undersides': https://commons.wikimedia.org/wiki/File:German_utility_aircraft_in_Austria_1945.jpg The simplified type of markings rather suggest this airplane served with one of the Nachtschlachtgruppen (night harrassment units) or a close-range recce squadron. All the confusion aside, the Sabrekits model is difficult to assemble and has a few surface irregularities, making for a troublesome build. There are no positive location tabs, just shallow depressions, where the struts are supposed to go. The landing gear legs are butt-joined to the fuselage, the instrument panel is just a flat piece of plastic, and while some of the struts were too long, others were too short. I was reminded of short-run-kits from 20 years ago. I have not seen the new 1/72 Brengun kit of this type, but I heard rumours that fellow Britmodeller @Redboost is working on it. It would be interesting to hear his opinion to compare both offerings. Thank you for your interest in this topic. Best greetings from Vienna! Roman
- 13 replies
-
- 38
-
-
- Henschel Hs-126
- Luftwaffe
- (and 1 more)
-
I am going to start this new project I got Eduard PE seatbelts and a friend of mine gave me Brass antennas for the natchjager variant, but I am still wondering which camo I will be using, I decided I want to go with the green scribbles over the spot camo, but I love how the black underside looks on night fighter aircraft of this era, I haven't found any information about the aircraft represented on the artbox, so maybe I will be taking some artistic liberties and mix both options provided in the instructions. Basically I am thinking of doing the first scheme, but with the underside black camo of the second.
-
This is my second build of this year and also of an A & A Models kit! As with the Me109T, this is a short run kit, in this case of the Messerschmitt Me209V-4 (1/48). This aircraft was an adaptation of the Me209V-1 airspeed record breaker, an idea of Messerschmitts' to find an eventual successor to the Me109. This aircraft of course failed in that respect but is well worth a place in any Luftwaffe collection. The kit is very cleanly moulded and comes with a small fret of photo etch, canopy masks both inside and out plus wheel masks. A small decal sheet for two markings options and a glossy, well presented instruction manual. I built this kit O.O.B adding a few wires inside the cockpit, which is very well detailed. The instrument panel was an injection moulded with detail in relief, with a decal overlay which with a coat of Micro Set which gave a well detailed panel. I must add here I was a little unsure of the decals being matt finished with no apparent clear overlay but my fear subsided when I used them, full marks to A&A. A little filler was needed but it was a nice easy build ( I look forward to A&A's forthcoming Me209V-1). The machine modelled was, of course black 14, with the wonderful snake decoration (couldn't resist}. A&A call out for the machine to be RLM02 which is probably correct but just to be different I decided to finish it in RLM63 the difference between these colours is actually minimal, at least in AK's Real Colours paint range. The only photo I have found of this aircraft shows what maybe a mottle effect on the surface finish. Whether this is just the poor quality of the photograph or the true finish, appears not to be known. My answer was to apply some mottling using the base colour to give a similar impression to the photo, I leave you to judge as to its effectiveness. This aircraft was test flown at Messerschmitt's factory airfield at Augsburg in 1939:- It appears my mottling is too subtle to show up very well on my photos but it is there - honest 🤔 Cheers Andy
- 15 replies
-
- 36
-
-
- Luftwaffe
- A&A Models
- (and 1 more)
-
Hallo you all See this drawings! I would like to discuss with you the camouflage on German aircraft. Specially after 1941 to 1945. This time, the aircrafts had the cockpit painted in RLM 66. The camouflage on the outer surfaces, wings and fuselage and rudders should be in our focus. I found some drawings about the 109 G version. Without date. The same for the 262 even without date. What is interesting: The edges of the color of the wing between RLM 75 and 74 (valid for the RLM 80 range too) should have a 100mm zigzag pattern. That means, there is no straight exact line at all. Lacerated and zigzag. In a scale of 1/48 it means a 2mm width. First question: Are you aware of this? Second question, if yes, how do you achieve a proper result? Next theme: Stenciling on a aircraft with operational camouflage. I do not see on photos aircrafts like this a proper stenciling pattern. Most stencils are omitted. Exception fuel markings and electric markings. Well, I would like to know your findings and your handling with this matter. Happy modelling
-
This is my first Bf 109 in the bigger scales in a long time. I used to have two Trumpeter 109Es and a 21st Century Toys 109G-14, but neither of them reached the decalling session. Here are the photos of my first successful 109 in 1:32. Decals were of "meh" quality, because the white isn't opaque enough to cover the mottling.
-
Hi, guys... This is my last kit for 2020, and it's a refurbishment of an old favourite. I bought this kit in 1990, although I used an article in a modelling magazine from 1985 to make some basic improvements at the time. It has been repainted twice since then, this being the third and hopefully, the last. Perhaps the modelling gods will give us a more up to date kit in the coming years. Anyway, I stripped off the old camouflage and markings, right back tothe gaudy coloured plastic which this company became renowned for. I wanted to make the later version, the Do18G with the cannon installed in the rear fuselage turret. Matchbox gave the option for making this variant, but the turret left an awful lot to be desired, it having been made to fit the same space as the MG position, rather than having been provided with a fairing so as to accommodate a better representation of this assembly. I also added on various bits and pieces from the spares box and acquired a Kora beaching carriage to finish off the revamped look. So, to business... I had long-since filled in the trenches of the upperwing and engine cowling panels and had no intention to rescribe, either then back in the day or now, although I did leave the underside panel lines intact... no, I don't know why either. I removed the seats in the cockpit, gave them a passing coat of paint and attached some makeshift, homemade seat belts. I slightly and carefully widened both openings for the weapons, the nose MG position being furnished this time round with the insert from the Italeri He111 dorsal MG position, which also includes an integral seat. The MG mount was made from fuse wire. In the first image below, the internals of the aft turret have been removed from a Revell Fw200C-4 Condor kit, including the cannon, and the transparent turret can be seen test-fitted prior to building up the sides of the fairing. So here, the fairing to the turret has been made. This was done by using a small part of two upperwing engine nacelles - the rounded rear tip - from an Italeri Me323 kit, inserted under either side of the turret overlap, and padded out with filler, which would later be sanded smooth. Strake lines for the upper fuselage were made from stretched sprue. You can see that both the fuselage and to the left, the wing, have now received an undercoat of pale grey in preparation for starting the camouflage. Once happy with the turret fairing, I added in two upperwing exhaust outlets for the front engine; the outlets for the rear engine had been made years back by hollowing out six circular openings either side of the rear set of cowling intakes; when using the magazine article all those years ago, it suggested the two poorly moulded intakes, sitting one in front of the other, should be removed and four put in instead, but I have since learned that not all versions had four intakes in this position, therefore later in the build, I was obliged to remove the front two as they didn't properly represent my chosed variant. The camouflage greens are from the Humbrol Luftwaffe-specific range, although I'm not a fan of the darker shade straight out of the tin, and always mute it somewhat by mixing it with the lighter shade. I thinned but did not replace the flap/aileron attachment pins. Once the paint scheme was complete, a couple of coats of floor polish as varnish were applied and once dry, the markings went on and varnish applied again before a blackwash was put on and left to dry slightly before the excess was removed. This gives a slightly weary look which I quite like. Again, the aft turret transparency was test-fitted and a DF loop was made from fuse wire and sometime thereafter attached between the turret and the fin leading edge. The canopy was provided from the relevant Falcon vacuform set and any small misalignments were carefully tidied up. Some time thereafter a few coats of a homemade satin mix were applied and this give the model a lovely dull sheen; all of the small antennae were then re-attached, and the main struts supporting the wing were re-rigged using elasticated thread. The propellor blades were also sourced from the previously-mentioned Fw200 kit as they were more slender, and a pointed spinned was fitted to the rear propellor. The one you see will have to suffice until I can get a better offering that will cover the exposed area between the propellor backplate and the spinner. The small rudders under the fuselage were also re-attached at this time. For a little bit of added interest, two small bombs were used from the spares box - previously part of an old Airfix Ju87 - and the RATO units were taken from a Dragon Ar234 jet bomber kit. So, now to the beaching carriage... a nice item from Kora, made from resin, but sadly, no instructions as to where the pieces should go and only a sketch of the carriage once built, was provided. I had to consult the internet to see how things should go together, and another modeller provided the basis of something approaching correct in his build article. In real life, I imagine there was sifficient weight ahead of the centre of gravity to ensure this aircraft did not tilt backwards and off the end of the carriage, as there was no rear support for its rear fuselage; in the world of the modeller, however, the kit is too tail-heavy so I attached a small transparent support to the back of the carriage where it sits discreetly and largely unseen. Sadly, I also have to rely on a piece of Blue Tac under the small front wheel of the carraige to ensure the model stays put on it. If I had realised this was going to be a problem, I would have inserted some type of weight into the upper fuselage opening prior to attaching the wing and sponson, and pushing it as far forward behind the cockpit bulkhead as possible to ensure the kit was front-heavy. Hindsight is a great thing, I suppose... And finally, two photos to finish, showing the completed model. All markings were sourced from my spare transfers box with the exception of the unit emblem, which was printed onto white-backed transfer paper, sealed using Halford's car laquer and then water-slid into position like any other waterslide transfer. Due to the amount of laquer I apply, the transfer is sometimes a little reluctant to move from the backing paper, so this is a delicate job and patience must take precedence. Also remember your face and eye covers when using the laquer in a well-ventilated area. So that's us done... this was an enjoyable kit to revamp and it represents two weeks' work. I hope you like the end result as much as I do. Keep safe and here's hoping 2021 will be a better year for all. Regards, Paul
- 14 replies
-
- 40
-
-
-
Good morning everyone, hope you are all doing well! Rather than waffling on too much about what went well and what didn't with this model I will just post a few photos and a rundown of the build. So, this is another one of those kits that i've had for a few years now. Im pretty sure alongside Eduard's 1/48th Spitfire Mk.IX this was one of the first kits I build and used an airbrush on when I was around 16; I actually had this model built somewhat broken in a box so dug it out to compare as im 21 now so its been 5 years. I have to say, even though this kit can be a bit tricky to fit together in some places its an amazing kit and so even the one I build when I was 16 holds up okay thanks to Eduard opposed to my lack of modelling skills starting out. Lets just say if it was an Italeri kit I decided to go for first, it probably wouldn't have still been kept. I honestly loved every stage of this build, im not a huge fan of photo etch sometimes and have to be in the right mood to build a kit with PE parts but this didn't put me off this time as I knew I wanted to build the kit in my chosen scheme and also wanted to test a couple of new airbrushes even though there wasn't all that much mottling on this model its the first time i've used an airbrush freehand for the camouflage which is really fun. Now this kit is done, im hoping to move onto Tamiya's F15C before making a start on some trickier jets. I hope you all have a great christmas and a happy new year! Thanks, Ryan
-
 Just finished assembling Tornado IDS (Revell 1/144), mostly OOB but without the "white tiger" scheme, don´t like that one at all, so I used the Norm 87D scheme that it kept for a while when transferred from the Marinenflieger to the Luftwaffe. Only complication was issuing the Squadron logo, the tiny tiger, which I issued with old decals and some freehand painting. Nice kit, camo was the most difficult part as it requires lots of masking/unmasking/re-marking. I changed the pitot tube for a more realistic metal one, and added dorsal position light and landing lights inside the wheel well doors. The only thing I would appreciate from the kit, is providing some plugs for the big gaps where the wings fit into the fuselage when retracting, this is the price to pay for moving wings, which are worthless if you are going to use the underwing ordnance anyway. The rest, is quite nice and accurate. Marco
 -
Possibly preaching to the converted but just came across the following Facebook page that has lots of colourised images of Luftwaffe aircraft and may be of some use. www.facebook.com/Luftwaffeincolour/photos/ Regards Colin.
-
Hallo Here are some pictures of Luftwaffe equipment from WW2. It may be interesting for you, if you want to build any model cockpit more accurate. Happy modelling
-
Starting this tiny Tornado IDS, Revell 1/144. As other recent Revell kits in this scale, this one is beautiful, with enough parts to assemble a very decent cockpit, wheel wells and landing gear, fine negative scribing, moving elevators, swinging wings (although choosing that option, means not using any underwing ordnance...). Two marking options, I don´t really like the Tigermeet scheme, but I´ll assemble that same Tornado (43+46) in the Norm 87D scheme used when transferred from the Marinenflieger to the Luftwaffe (no Tiger stripes this time). I started with the cockpit, folllowing instructions. I used Light Gull Gray for interior color (real ones were Dark Gull gray, but compensating for scale effect). Decals for the instrument panels and consoles are really nice, some retouches here and there, corrected the ejection seats headrest, seat belts added, and the cockpit nice, This time, lot of the cockpit will be seen after the canopy gets installed. I thought necessary adding some detail to the jet exhausts. Notice that as provided in the kit (right exhaust), they are shallow and devoid of detail. I bored them open (left exhaust) And added some detail to make them more intersting. And started masking wings and elevators, will paint these before starting assembling, easier. Marco
-
 This is my second build from the Eduard Royal Boxing of the Bf109F 1/48th, this time an F-2. Virtually built O.O.B. with some extra detailing in the cockpit. I chose this particular machine for its colour scheme, originally delivered in standard RLM 74/75/76 it was overpainted in the field with mottle consisting of RLM 02/70/79. Model was painted using AK True Colours, decals from kit, Black 12 came from Tamiya Fw190D-9 kit. The name under cockpit was home printed, yellow outline painted freehand. I used Mig Lucky matt varnish for final coat, not too sure of this stuff took about three coats and I wasn't too happy with the final result seems to be very uneven finish! This machine is a Bf109F-2 flown by Uffz. Peter Bremer, 2./JG54, Russia, Autumn 1941:- You have to admit the yellow theatre markings and striped pitot certainly add to the 'Low Viz' idea!!!!!!!! Cheers Andy
 -
Good evening guys, I hope everyone is well! I decided to share the photos of the build I finished today, which as the title suggests is Tamiya's Bf-109 E-4/7 Tropical, 8 / JG 27 in 1/48th scale. I attempted to do a work in progress section for this build, however forgot to upload the photos until I had just finished painting the model and so it was a bit of a short lived work in progress with only one update before completion. However as mentioned in the work in progress update, I chose to build this after watching a youtuber by the name of Keeto who was using fillable acrylic pens to do mottling work which I found pretty interesting, he made it look quite straight forward, and until I build up the courage to re- try my hand at Luftwaffe mottling, I thought this could be my substitute. I got the Luftwaffe paint set by AK interactive to test out their paints as I had never bought one of their sets prior to this, and was really impressed with them. I felt their colours looked pretty accurate to me and the paint sprayed really nicely and also flowed out the pen well after a bit of testing with thinners. The only downside for me with this approach to mottling is that it looks too well painted, rather than the usual misty outline on usual mottling, but I still kind of like this even though its not totally accurate. Its safe to say, I think I will continue to use these pens, especially being that they're around £3 or so on amazon, I've got my eye on a Japanese scheme to use with the pen next, I think its a Ki-47? I loved the build, I was making it to fill in the gaps between making my Eurofighter Typhoon, however it took over pretty quickly and now the Typhoon has been put aside as and when I feel like working on it. It was really refreshing to go back to a Tamiya kit after working on some models that have been eating away at my time. Due to the model being a bit of a test for the Acrylic pen, I thought i'd try a few different things to get a different finish, this being trying to get an interesting weathered effect. I feel it came out alright but next time, i'd be a bit more refrained rather than taking a piece of sponge and splatting away at the painted model, you can see in the photos it didn't go completely to plan. The only problem I had which was a big mistake on my part was after I put an enamel wash over the kit. I decided to use Vallejo's varnishes inbetween paint layers rather than Klear which is my usual go to and I think this might have been what caused the problem... Once the wash had dried after about 10 minutes or so, I got an old rag out to start rubbing the excess off and was having no luck, I had ran out of my enamel thinners and haven't bothered buying any more since as I never usually have an issue with the washes but started worrying, it looked a complete mess. I came on here for previous articles on alternatives to get the wash off and hoping that I wouldn't have to drive into town to go to my local hobby store. Luckily I read that I could use white spirit to try and fix it; it kind of did the trick but ate away at some of the varnish and subsequently a bit of the paint underneath which is why there are some pretty heavy stains on the model. Either way, I think the White Spirit saved the model from being a total disaster even with a few messy marks left behind. I think, with my next paycheck the first thing im gonna do is buy some new varnishes (let me know if anyone has what they feel is the best) as I always seem to have issues with Vallejo's. I hope you all enjoy, let me know on any fixes to the issues I had if you like or any criticism, its all appriciated, im still working on my finishing with models. Thanks everyone, stay safe! Ryan