Search the Community
Showing results for tags 'Hurricane'.
-
Hi Folk's, finished today,Tim built one of these recently and when I saw it I had to have a go,i'ts a snap together kit but obviously I glued her up tight. rumour has it PH copied it's shape and detail's from Hasegawa's kit it certainly looks like a Hurricane to me,few parts and chunky details with the most awful colour plastic could spoil it for some but it's cheap and a good base for superdetailing fan's I only added masking tape belts to the cockpit,decals be warned are too light I used airfix spares but the kit codes and serials.Colours are for 303Sqn RAF piloted by Witold Urbanowicz.Many thanks for looking in build here http://www.britmodeller.com/forums/index.php?/topic/235036346-yes-another-hurricane/
-
Hi! Finished another one yesterday. It´s the new tooling Airfix Hurricane. I did everything OOB except for fishing line (0,10mm) for the antenna wire. I´m not sure if I got the wire right... I used War Scenic enamels (that´s a brazilian brand of paints). There are some good things here in Brazil but most of the time it´s just a crap country. I forgot to do the navigation lights early in the build so I left them unpainted. Don´t hesitate in giving me feedback.
- 22 replies
-
- 41
-

-
I can’t quiet decide at the moment which one of these I will fail to build for this GB. All have some merit. The Swordfish looks appealing but I suspect new decals will be required and I may succumb to a doomed attempt at rigging. The Camel is quite charming but is very small and I fear will end badly, on the other hand it’s size means rigging is out of the question. The Sea Hurricane is probably the favourite but I was horrified to find that I’d bought some Eduard PE for it sometime previously - if I can force myself into an OOB build it might be the one.
-
 Well...now that the Hart is done and on the shelf, I figured I would waste no time and officially unbox the 1/72nd scale Hawker Hurricane from Airfix. No surprises here for any of you, I am sure, and since this is my very first Hurricane in all my years of modelling, I hope there will be no surprises for me either. I will build 100% OOB and mark it as VY-C since VY-G from the same kit has been built on another thread. I found an excellent 1/24th scale build on another website that has nice pictures of very subtle weathering and will make use of the 'Hurricane' information thread that is currently on this forum. And it is blowing 9 Beaufort outside, so what better time to begin a Hurricane than on a blustery Sunday? I have primed the plastic... --John
- 33 replies
-
- 5
-
-
- Airfix Hurricane
- Airfix Hurricane Mk.I 1/72nd scale
- (and 1 more)
-
 Hello fellow modellers. Here is my 2nd build. It's the Airfix 1/72 Hurricane Mk I in Belgian colors. This one is a gift for my father who is no modeller but still for a good part responsible for me coming back to the hobby. Thanks Dad, I love you. It’s an OOB build as per instructions except for the later type exhausts (as all Belgian Hurricanes had been retrofitted with these before may 1940). No weathering as my father prefers everything to be neat and tidy (a bad excuse for my laziness, isn’t it?). I used Eduard superfabric seatbelts (RAF early set). Not as realistic as the metal ones but far easier to place. A very nice kit. I just had problems aligning the upper and lower wing parts and placing the landing gear required to be quite careful. I’m not completely happy with the result as I insisted to fit the canopy in an open position, so I made a crack in it and I was heavy handed with the glue so that it affected the clear part and the paint under it. But my main goal was achieved, as it simply was a thinner and more even paint coat than on the P-40. It was airbrushed with my H&S Evolution Silverline (0.2 needle) and my “usual suspects” Gunze and Tamiya acrylics. Primer: Stynylrez grey Camo: Gunze H73 (dark green), H72 (dark earth); underside: Tamiya XF16 (flat aluminium) Cockpit: Tamiya XF71 Clear coat: Gunze H20 (flat clear) As said, all mishaps and mistakes are mine. Still I hope you'll enjoy it. Fire at will!
 -
Hello all, hope you are well? I've not done a build thread for a very long time. Tell the truth, I sort of fell out of love with making build threads. Nothing to do with you lovely people or the great site in general. It was a reaction to the Photobucket situation. However, that was now several months ago, we've all got new hosting sites and have moved on. Time for me to do the same, and what better way then with a Hawker GB? I'm going for the Airfix 1/72 Hurricane Mk.1. Here she is boxed up and ready for action! The first task was to get all the bits which will be black ready for paint. I'm undercoating the cockpit with black where necessary. The exception to this is the prop. I'm going to undercoat this in whatever primer I choose and will paint the brown front bit first. I think it'll be easier to mask the front and paint the rest black rather than the other way around. And here they are painted in Tamiya Rubber Black. The exhaust stacks are painted black effectively for an undercoat. I've also got all the aluminium bits ready for paint/assembly. I was a little concerned about the wheel well. It's complex how it goes together for 1/72 and with the soft Airfix plastic and lack of totally positive fit, it raised alarm bells. But actually this was misplaced, it went together a treat and a dry fit indicates I should have no issues further on. Next step was the cockpit green. The instructions call out for a lot more metal and other colours I've not really seen before on Hurricane interiors, but I'm not following them. I'm really not going to get bogged down in the pit as the canopy will be closed. I image it's going to be 90% invisible by the time I've finished! I'm just going to pick out one or two details in black, quick wash and dry brush and move on to more on. I've being doing this a few years now, and while I'm not claiming to be any sort of expert (the opposite in fact), I have learnt there's things which are more worth while putting time into than others... Not a comment at all on the amazing work others do, it's just that I regularly get bogged down and miss deadlines! So that's it, more soon! Val
- 45 replies
-
- 13
-
-
As part of a modelling project called ‘RAF in Africa, 1939-1945’ I am trying to find out about the methods of transporting airframes from the UK to Takoradi on the Gold Coast. From this base the aircraft were flown across the Sahara to Egypt. I have found a couple of photos of Hawker Hurricanes being unloaded from packing cases and being reassembled at Takoradi – see http://www.vintagewings.ca/VintageNews/Stories/tabid/116/articleType/ArticleView/articleId/413/Harry-Boyles-Tango-over-Takoradi.aspx Does anyone know if these packing cases were a standard RAF stock item? If so does anyone know of any diagrams/plans for the packing cases?
-
Hi folk's,as mentioned in chat It's been a good six month's since I did a 1/48 scale kit and nearly as long since I did anything other than a Matchbox or Frog aircraft kit.As a lover of Airfix's newer tool 1/48 kit it was a logical choice for this GB and a return to this scale. Love the box art on this issue,the kit is well known to most now and there are a few incarnation's in this GB,I want to take my time with this one and won't start till the Hunter's done which will be a week or two.
-
Hi folks! This is mas last completion, the really good Airfix Hurricane Mk.I in 1/72. Straight from the box. The only modification is that I vacuformed the sliding canopy. I hope you like it, althought I made several mistakes and it´s not my best kit. Best regards from Uruguay! Ignacio
- 24 replies
-
- 43
-
-
Guys, question for you all. I’m building a Hurricane Mk. I kit right now, and I need to know what color the wingtip lights were. From various pictures I’ve found online, I’m getting conflicting info. I recently completed a Tamiya Spitfire Mk. I kit and its kit instructions said blue on the port side light, red on the starboard. This kit’s instructions don’t give specific instructions (Airfix 1/48 scale kit); instead they have some color illustrations (for showing decal placement) which give conflicting depictions! Some show green on starboard side, red on port, others vice versa! (Don’t get me started on Airfix “quality control”). So which is it? Anyone seen the real deal up close and can tell me? Thanks in advance.
-
Hi all, I finally got around to joining a group build for the first time. I'll be entering the only two Hawker aircraft I have in my stash; a 1/72 hurricane and a 1/48 hurricane. This build thread will focus on the 1/48 one. First of all the obligatory box shot and sprue shots Thanks for checking in -Cam
-
Hi Chaps This is my second GB for the year as I am well advanced with a Hawker Hunter FR10 in the Britmodeller 10th anniversary GB. I usually have 2 models on the go so I can tinker with one while I'm waiting for something to dry on the other. I picked this kit up last month in Singapore having read the review on Hyperscale last year. I have to say I am very impressed with the and the level of detail is not far short of the 1/24th scale Hurricane I made 20 years ago. That includes the engine which is about the only difference. So in good tradition despite having 20 years worth of kits in the stash I opened this and will build it next. Don't tell the wife! Well before I start here are the box and sprue shots. I have had a little look at the components and although the level of detail is excellent there are a few issues with alignment and distortion I do believe the angles should be 90 degrees and the lines straight. I might need to review the assembly sequence. Colin
-
 My entry will be a 1:72 scale Sea Hurricane I, built from the new-tool Airfix kit using the Alley Cat conversion set and decals from the DP Casper "Forgotten Operations" sheet for Operation Pedestal:
 -
Two Hasegawa 1/72 Hurricanes for my first build. I jumped a LITTLE bit assembling both stock cockpits tonight so I can start scratching some sort of improvement on the very spartan Hasegawa rendition. But it is official, I'm in! Greg in OK
- 28 replies
-
- 10
-
-
I came across a Kits World decal sheet for 1/72 Hurricanes. It has a couple of schemes that have peaked my interest. In particular, the Romanian Air Force one stands out in my eyes: Can anyone comment on the accuracy of these decals and the schemes illustrated?
-
With a few successful quick builds and a couple of shelf sitters sorted, I think my mojo has recovered sufficiently for me to make a start on my first serious build of the year. Just before Christmas I picked up the Airfix 1:48 Hurricane Mk 1 in its more recent outing in its Tropical form. I rather liked the silver doped machine, however while searching around on the internet I found an Australian example, a single Hurricane Mk 1 fitted with tropical equipment presented to Australia by the UK government in 1941. The aircraft officially had the serial A60-1, however flew with its RAF number of V7476 throughout its career, information about which can be found at the following website: http://www.adf-serials.com.au/2a60.htm. I also found information on the markings from the review of an Aussie Decals sheet for this aircraft at the Aussiemodeller website: http://www.aussiemodeller.com.au/pages/Reviews/Decals/A48060Hurricane.html. My intention is to complete the aircraft in its final markings of overall silver with blue and white RAAF roundels and a red spinner. A quick rummage through my decal collection confirmed that I am able to put together the appropriate markings with what I have. Any advice or comments gratefully received!
-
Before Christmas I decided on a quick "out of the box" twin build of the Airfix 1:72 scale Mk I Hurricane. It all went well until I hit the canopies - which I made a complete hash of and had to strip and start again. They are still not terribly good - not sure what went wrong. Just out of practice I guess. Brush painted with Tamiya acrylics, with the white and aluminium undersides coming from Tamiya rattle cans.I tried a wash with oil paints rather than my usual water colour wash, and I finished with a matt coat from a rattle can (Tamiya Clear Matt). Pretty happy with how that worked out - although note for future reference the matt coat didn't react well with the aluminium undersurfaces of the 111 Squadron machine (even though I thought I had covered it enough with gloss coat). Both completed straight out of the box, the first as a 111 Squadron machine from 1938, the other as a 85 Squadron aircraft in France, May 1940. Thanks for looking. And some photos outside in the late afternoon sun.
- 15 replies
-
- 36
-
-
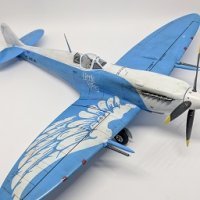
Woohoo!I finished one! THE SSV NORMANDY REMEMBRANCE FLIGHT (link here for what this is.) Jacob Taylor: Hawker Hurricane Mk.I The Hurricane was chosen when research into the family tree of Jacob's wife, Brynn Cole, showed that it was the type that an ancestor of of Brynn's flew during the war. The paint scheme is chosen for Jacob and Brynn's son, Luka Shepard Cole. Overall it didn't come out too badly given the massive amount of trouble I had in the finish stages - it's not exactly my finest hour but it's acceptable. If I feel so inclined I might come back and redo it at a later stage in the project. Stuff I like: - The quality of the paint pattern. - The seams have come together really well, with no loss of detail. - The filler on the (few) fit issues has come together really well. - The decals look good. Stuff I don't like: - The cockpit. - That awful, awful gloss job. - The weathering washes. - The many issues caused by the aforementioned awful, awful gloss job. Well, I finally got one of my Mass Effect planes done, and it was a surprise outsider which got there first! I'd screwed up my main airbrush by accidentally letting a bunch of paint dry inside it, so I decided to buy a cheapo model to test out my alternate airbrush, which I hadn't used before. When I got to the shop they had one of Airfix's newest releases, the 1/48 Hurricane, so I decided to spend a little extra and buy that - it's still pretty cheap if I ruined it and I'd heard really good things about it. At that point I thought, "You know what? Sod it. I keep starting so many models and taking months to finish them. I'm gonna do this one in a weekend." At this stage I'm still experimenting with different paints, finishes, weathering processes and so on so I kind of messed up the cockpit - there's nothing wrong with it per se, but I just kind of feel like it came out a bit grey and boring. Everything went together fine, it's a nice kit with pretty good fit between parts. There were only a couple of bits that gave me issues in the actual build - there was a fairly big (about 2mm) step where the underside of the wing section met the underside of the nose. A bit of Squadron putty and a lot of sanding got that really nice and contoured, and you can't even see the join there now. You can see this area on the photo of the underside, forward of the engine air intake and the landing gear bay. Unusually for a kit of this scale, Airfix give you the option to open up the wing to show the gun bay, so I decided to do this on one of the wings. It's pretty tough to cut out the access panels without ruining them, so Airfix thought to include separate panels if you want to do this. The guns were painted dark iron and then drybrushed with silver, which worked quite well, but I'm staying away from Tamiya metallic paints from now on. The metallic particles seem really big, and the few issues Tamiya paints have seem to be magnified in their metallics. Still, with ammo boxes painted the body colour and copper ammo in the feeds, they went together alright although the fit between the guns and the ammo boxes wasn't great. On to painting the exterior. Everything got a coat of Tamiya fine surface primer, then flat green - I'm not keen on my other airbrush, as it turns out, and I'm very glad my main one is fixed. I went with the green as it's a colour that's not used as much on the other planes I have planned, and the black just because I really like that colour combination. The starburst design came from mucking about testing my new knife on some masking tape - the design isn't perfect and it leaves the tail a bit bare, but the execution is spot on, I'm really pleased with it. Once the tape was on for that, a quick coat of Tamiya flat black completed the main painting. Decals went on next with no real trouble. Couple of coats of Future went on first. I wasn't using all the RAF roundels or anything, but I did apply all the little functional "No Step" and "Fuel goes here" labels. By coincidence the pattern worked out so there wasn't any issue with a black decal on a black background or anything. I got the decals flat to the surface with Revell Decal Soft - it actually frosts up Future and makes it go all milky, but another coat of Future over the top completely eliminates that. It was at this point I got a big blob of Future under the cockpit canopy by mistake, which I was really annoyed about. Then it all went t**s up. First of all I decided to do a subtle weathering wash. Tried it with oil paint, but it was too subtle - it pretty much just wiped straight off leaving the model completely clean. Then I tried a premade Humbrol enamel wash, which made the surface hugely tacky and when I was wiping it off the flat surfaces it tended to leave more of the cotton bud on the plane than wash on the cotton bud. I eventually got most of it off. Then I put the plane down and saw it - Some chemical had reacted badly with some other chemical and eaten away the paint. There were huge patches of bare plastic where my finger and thumb had been holding either side of the tail. Thankfully there weren't any decals or pattern in the affected area, so I was able to touch it up with green seamlessly. With my main airbrush fixed, I decided to gloss coat with actual Tamiya clear gloss rather than multiple layers of Future. Christ, I hate that stuff. It's goopy and sticky and will NOT do what you want it to. So, with my airbrush covered in sticky goop I had to immediately and completely strip down and clean that while my plane collected dust and bits of crap. The gloss got everywhere, including where I didn't want it, which is why the wheel bays and gun bay look so weird in the pictures. The surface is uneven and pitted, and is generally not very good. The real life Hurricane was made of fabric stretched over wood for a large part of the fuselage and tail, so I was going to do a further matt clear coat over those parts, but at this point I decided I didn't want to mess with it any more. The last thing to do was make the aerial, which I did by taking a piece of spare sprue and melting it with a lighter until it dripped to the floor in a super-fine (and very straight) filament. I superglued this to the tail and the radio aerial, cut off the ends and gave it a coat of Vallejo black paint. It actually came off the mast just as I was preparing to take the photo, which is why it goes downward in the photos. Oh well. That's Jacob's plane, then! I'm fond of it despite the havoc wreaked by that last clear coat.
-
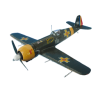
I`m posting this not with the expectations that my model will impress anyone, but with the hope that the subject might inspire others. It was started as part of a GB here, but having to take a long break from modding I have only managed to complete it this month. I apologize for that! I did take pictures with the work in progress and kept some notes but posting in that GB section is no longer possible so I`ll skip right to the completed model. It represents Hurricane no.15 in Romanian service. This is one of three ex-Yugoslav machines captured by the Germans and sold to Romania. The other 12 Hurricanes in Romanian service were British built and of the late Mk.I type, with metal wings. Very soon after finishing the model I bought a new book on the Romanian Hurricanes (pity some of the information included in it reached me too late for this model) and since I took a picture of that for a review I thought it fun to pose the model on top of it for a few shots. You can find my review of the book here: http://www.britmodeller.com/forums/index.php?/topic/235031176-hawker-hurricane-voli-of-the-illustrated-history-of-romanian-aviation/&do=getNewComment By the way, all Hurricanes served with the famous 53rd Squadron which gave the country its first three aces. Incidentally, the 53rd Squadron has been recently reformed and is now equipped with the first batch of F-16 to enter Romanian service (text in Romanian with a history of the squadron in WW2 and relevant photos to be found at page 28): http://www.roaf.ro/ro/cer_senin/arhiva_pdf/2016/CERSENIN_4(147)-2016.pdf I chose to largely follow the instructions from the old AZ model kit and the profile from Romanian Fighter Colours for the camouflage pattern instead of properly studying the available black and white pictures. When I finally did the latter I wished I had made some of the shapes and colour dispositions differently, but that`s that now. The kit used is Airfix`s A01010, but I`ve replaced the wheels with the 5 spoke resin ones from CMK. I`ve also replaced the mast with a 0.9mm brass tube because this particular kit did not contain the baton aerial that my subject required. Inside (not that visible) I`ve used Eduard`s Superfabric RAF early seatbelts (awesome product!). The crosses and emblems are from Radu Brinzan`s RB-072008 decal sheet (great quality decals!), but I`ve had to mask the tail numbers myself since there was no decal available for these when I started the project. In the meantime though, Radu has released a decal sheet for this very subject: http://www.britmodeller.com/forums/index.php?/topic/235028180-new-romanian-hurricane-decals-rb-productions-in-telford/ I`ve had problems masking the canopy (among other things) as the paint mostly lifted with the aftermarket mask and after masking it again with tape and achieving the same result I simply painted it by hand, hence the result. The model is - obviously, I suppose - entirely brush painted and for the camouflage I`ve used Italeri acrylic paints which I choose according to the FS codes listed here: http://www.britmodeller.com/forums/index.php?/topic/234951133-yugoslav-hurricanes-recommended-schemes/?p=1524398 4709AP Flat Dark Tan 4726AP Flat Dark Green 4797AP Flat Pz. Schokobraun RAL 8017 4778AP Hellblau RLM 65 The interior is Vallejo`s 70.974 Green Sky. Happy Holidays to everyone!
-
 Hawker Hurricane (vol.I of the Illustrated History of Romanian Aeronautics) by Horia Stoica and Vasile Radu I bought this recently published book and since it is a bilingual edition (text in English and Romanian) and the Hawker Hurricane is one of my favorite aircraft I thought I would do a review here. This is supposed to be the first number in a - hopefully - long series of titles devoted to aircraft in Romanian service so I guess it would be important for it to do well. The book is very much an album with its 88 pages devoted to showing the Hawker Hurricane in Romanian colours through 135 photos. It does not contain colour profiles or scale drawings. The text is kept to a minimum which means usually a commentary for each photo, a two pages (four pages actually, but they are split between the two languages) Preface which briefly describes the Romanian acquisition of the Hurricane and its service as part of the famous 53rd Squadron (it gave the first three aces of the Royal Romanian Air Force in WW2) and a Finale with a page worth of text. There is also a Glossary at the end providing the English translation to various Romanian terms and ranks. As far as the text is concerned I have one minor complaint regarding the fact that it starts so close to the binding and this makes it a bit difficult to read the words close to that. Most of the photos depict the aircraft, with some of them dedicated to the personnel and some showing documents (many are reports detailing various incidents). One minus here for a non-Romanian reader is that while the commentaries that accompany the documents` photos are available in English too, so you can get the main idea, the actual text of the document is not translated. Technically, the book is colour printed (which shows in the case of the documents), but the photographs of the planes and crews are all black and white. That said, the photographs chosen for this book are very clear, in my opinion, many are new to me (which makes sense given the claim of "previously unpublished photos" on the RB site - see bellow) and even for those that could be found online I think the detail quality included in this book is superior. As a modeller I found them most useful (among other things to see that my recently finished Hurricane model has an incorrect extra band on the propeller). The book itself is helpfully structured along the aircraft numbers of which Romania had a total of fifteen, conveniently numbered from no.1 to no.15. The first 12 of these were of the late Mk.I type (with metal wings) bought directly from Britain with the other 3 being Yugoslav built (early type with fabric wings), captured by the Germans in 1941 and sold to Romania. Each of the first twelve - British made - machines has its own short section showing photos of the aircraft in question, the men who flew it, documents where available and occasionally, photos of non identified aircraft to portray something relevant to the section. An exception to this is the no 10 for which there are no photos available as it crashed shortly after arriving in Romania resulting in the death of the pilot (Cpt. Av. Drăgănescu Gheorghe) and the destruction of the aircraft. The three ex Yugoslav planes are all presented at the end of the book with photos showing individually only the no 15 and no 14 (the single picture showing it in an original post-maintenance camouflage). The Romanian Hurricanes went from the neutrality markings to the Axis identification elements and some to post maintenance paint-jobs so in this respect there are various differences not just between them but also for each aircraft, depending on the period. This means that for a modeller it is quite convenient to have a photographic resource structured by plane number and I have to say that, overall, I personally liked this book. Based on the text from the back cover one of the following numbers will be devoted to the Bristol Blenheim in Romanian service so here`s hoping! From what I read at the end of the book, Radu Brînzan (of RB Productions and author of "Vânător - Romanian hunter: The I.A.R.80 and I.A.R.81 in Ultimate Detail") was responsible for the English translation and indeed, the book is available on his site: http://www.radubstore.com/index.php?main_page=product_info&cPath=118&products_id=719&zenid=b8b477f645e6d6133b44d94a1b8486d5 Incidentally, RB Productions has recently released a decal sheet for the Romanian Hurricanes in 1/72, 1/48 and 1/32 scales. The author of this Hawker Hurricane volume is on facebook and the series (Illustrated History of Romanian Aviation) has its own page here: https://www.facebook.com/groups/1285649678148929/ so one could also try to buy or inquire about the book that way.
- 3 replies
-
- 7
-
-

-
- Romanian
- book review
- (and 1 more)
-
Hi everyone My mosquito has been put to one side for a little while whilst I'm waiting for some oils to arrive from emodels so I thought I'd make a start on my Hurricane. I've seen some build reviews of the FLY Hurricane so I knew it was going to be a challenge to build but I didn't realise just how much, I think I've managed to break almost every part that I've removed from the sprues, the parts all require alot of clean up and the instructions are very vague at best, but if you want an accurate 1/32 Hurricane then it's the only game in town.....And I want a 1/32 Hurricane. I've made a start on the cockpit and my plan is to build as much as I can before I paint and detail it, it's gonna be a challenge but I think it will look ok once finished (fingers crossed). The Mosquito put safely to one side..It will get finished in due course. This took me about 3 hours tonight and as you can see the detail is very soft as is the plastic. I drilled out all the locating holes in the frame work and once I had it together I've filled the joints with my homebrew plastic filler which will hopefully give the structure some strength. I won't be doing much tomorrow as were off to Launceston for the Christmas market. Cheers all Iain
-
Hi folk's,more nostalgia for those of a certain age,Matchbox's Hurricane built for the ongoing GB.Again an OOB build no addition's just built the way we used too,the Decal's were usable as it was an eighties boxing but I used some Airfix spare's I will definitely do another in the future in the box scheme. thank's for looking in.
-
This is Airfix's very nice 1/48th scale Hurricane kit, I really enjoyed this build. I added a few details to the cockpit and gun bay, improved the landing lights by open the structure around them, removed the cowling Dzus fasteners and replaced them with a beading tool, added Brassin wheels, used the Aires exhausts which had to be cut apart and glue back together in the correct place as it has the exhausts are too far apart. Painted with Humbrol enamels and decals from Xtradecal.
- 25 replies
-
- 63
-
-
-
Hi folk's,laying a marker for later in the GB for the Hurricane,I've had such a great time with the little Spitfire I had to have a Hurricane too as digging around I found some spare decal's if the kit one's are no good £6:99 at King Kit be here in a day or two.
-
 Hi all! Been some time since my last creation, but finally found time to complete this: I built the older version of the kit some time ago, which I thought was pretty good. This has more detail, particularly in the cockpit. Let me know what you guys think!