Search the Community
Showing results for tags 'Hasegawa'.
-
Well not really! It’s actually Eastern Airlines 5th TriStar that was used for the 1972 summer world tour by the Lockheed Aircraft Company of California. The aircraft came to the U.K. to be demonstrated to the two British customers for the TriStar- Courtline Aviation, and BEA. Arriving at Luton airport the headquarters of Courtline, 305 was adorned with Court titles and logos in preparation for promo flights around various U.K. airports, ending with a flight to Palma, on the island of Mallorca-a typical destination for the airline. The next stop for 305 would be a short hop down to London Heathrow, where BEA titles and tail markings were hastily applied in preparation for further publicity flights and a residency at the ‘Farnborough 72’ trade show. Onto the model, this is the venerable but still very accurate Hasegawa example first rolled around 1980! Sadly these models are becoming rarer all the time and commanding extortionate prices on auction sites. The only mods I made were to add the early type thrust reverser jacks to the RB-211’s made out of plastic Rod, and the extendable tail skid (courtesy of a pin!) Paints used were Halfords appliance white, Xtracolour light aircraft grey, and Humbrol chrome silver from a rattle can. The only problem I encountered with the build was with the Classic Airlines decals. Although beautifully printed they did not seem to match the Hasegawa model, and required some trimming and touching up. One place where this is really noticeable is the Courtline titles on the aircrafts belly which do not represent how they appeared on the actual aircraft-and after referencing and re-referencing numerous photos of 305, it is not my painting skills at fault(!) Overall though I’m pleased with the finished result in this unusual hybrid livery. Any comments or feedback is much appreciated-Thanks for looking.
- 13 replies
-
- 33
-

-

-
From Scalemates, this is the original boxing from 1994. Typical Hasegawa fare of the time. Accurate, easy to build, good fit and not many parts. Interior detail is basic as are the decals. The model is OOB with only the addition of Tamiya tape harness and Uschi thread for aerial wire. Colours are from the White Ensign range (now sold by Jamie@Sovereigh Hobbies I believe) ACJ17 Nakajima Amber Grey(Ame-iro), ACJ08 Mitsubishi Cowl Blue-Black, ACJ04 Nakajima Interior Grey-Green + Hu27002 Bright Aluminium and Humbrol Metal-Cote Matt Aluminium. The carriage was gunmetal Hu27004 drybrushed Hu11. The wooden supports were Tamiya NATO Black to try to show the different material from the lower framework. I would have tried clear wood grain decal if I had had any. Wheels had Revell 83 Rust drybrushed and Revell Anthracite for tyres. Finally, Tamiya Weathering Powders were rubbed on and Matt Aluminium drybrushed with a cut down brush to show wear on the paintwork. Decals are from the kit (Lt Yamasaki, 802 FG) but were severely impacted by time with the usually fatal striations evident which would normally mean their exploding on contact with water. I used Microscale Liquid Decal Film on them and the effect was miraculous as I hope the pics show. Decal strip was used, only partially successfully, for vertical canopy frames. ( It wouldn't stick probably because I'd used coloured decal as a base + 2 coats of paint + decal film so it resisted curves) I added ignition wires to the engine but not very well. Fortunately they can't really be seen thru the cowling. Like the first stash clearance model I did last month, the N1K1 George, it's USP was badly done; in this case the float assembly did not fit at all well and because of its position it was not easy to fill or sand the join. I would also matt the spinner as it's too bright. I have learnt that Metal cote does not respond well to varnish so it was left as is. The photos also show I have a problem with fitting canopies! Anyhoo, enough of my ramblings I'll now attempt to post the photos. The box and instructions.
-
Hi. I present my completed last project. This is the well-known Hasegawa A-7D Corsair II kit. I enriched the kit with resin undercarriage covers from Quickboost, Aires resin ejection seat and set A Aircraft Weapons from Hasegawa. Model paintes mostly with Gunze and Tamiya paints, small details from Vellejo and Model Master. Weathering made with oil paints for artists.
-
Here is my model of the F-15 Streak Eagle Time to Height record holder. This started life as the Hasegawa set with the Streak Eagle nose probe and decals in the box. A few changes were made to the set as it was built to be a closer replica to the record holder in addition to using the extended nose probe from the kit. These changes were: 1. Over the shoulder video camera added behind ejection seat port side to view the instrument panel. 2. Additional antenna fitted under the canopy. 3. Front nose gear door fiited in the open position when on the ground. This was done because the plane accelerated so fast that the gear doors did not have enough time to cycle from closed to open and then closed when taking off. 4 HUD removed. 5. Cannon opening closed off. 6. Main air brake reduced in size. Other than that, all that needed to be done was complete the build and paint it. The Hasegawa set comes with a full decal set for this plane with the old off white colour Hasegawa used to have. The colour guide in the instructions was all black and white so something had to be done. These are lots of pictures out there of the Streak Eagle and they all show different colous for the same panel. I guess this is to do with the relative position of the sun. Microscale’s Streak Eagle decal set was bought was well. The decals were ‘white’ where they should be as well as thin. The placement guide was still in black and white though. Rocketeer decals bought out a decal set for this kit that came with a colour guide in colour that made sense when looking at the internet images. This set was used for the build and the painting guide. I am a big fan of Alclad 2 for NMF finishes so some experimenting was done. A couple of good things about Alclad that came in handy here is that you can mix the colours in your airbrush, and change the tone of a colour by misting a different colur over the top of it. Some experimentation was carried out as shown below. Copper, Brass, Pale Burnt Metal, Titanium Gold, Magnesium, Aluminium, Dark Aluminium and Jet Exhaust are some of the shades used, mixed and misted. Anyway, here is the plane in its multi coloured glory. There were about 15 different colours, mixes or mists used during the build. The Rocketeer decals were fantastic. Regards Toby
- 12 replies
-
- 36
-
-
- Hasegawa
- Rocketeer Decals
- (and 1 more)
-
Hi all, so my typhoon fgr4 is on hold for a bit so ahead of what I was planning I have started putting some work in on my kittyhawk diorama. So it's to be 112sqn based at LG91 as it supports the 8th army on its push from el alamein. Only concern is the yellowing of the hasegawa decals and as such I'm in two minds how to go around the markings I have chosen but that's well down the line so I have time to decide? As for now it's onto the cutting and fitting while I await the airfix Bedford and figures from reedoak to arrive.
-
 Time to start the New Year off with a fresh project, although helping my youngest daughter remodel her house is taking it's toll on the ol' modeling time... This is the first Blue Whale: Anyway, this will be a build of the 1/72 Hasegawa A-3B Skywarrior kit into a model of the very first Blue Whale, the XA3D-1. The Hasegawa kit: will be paired with the Obscureco Skywarrior cockpit set (the A-3A being as close as I could get for the cockpit of the XA3D-1), shown above right. There are some pieces in this kit that are excess to requirement as they are for other "Version" of the A-3, and they are not shown in the above photo. Also used will be the Muroc Model XA3D-1 conversion set: This conversion set has the correct "slanted" intakes, which only appear on the #1 ship, BN 125412. The #2 ship, BN 125413, as well as all subsequent variants, have "vertical" intakes. This kit also gives you a resin "master" for the cockpit, which allows you to vacuform another, should the need arise, as this canopy is different from later variants. There is also a rear gun turret, although the guns and it's controls were not installed on the first prototype. The is also a new nose and pod for the top of the vertical stabilizer. Sadly, I just found out the the Hasegawa kit does not have the correct wheels for the prototype or bomber versions, but instead has the wheels for the other "Versions" that followed later on. I have order a Reskit conversion for the wheels, and a comparison will be shown for the edification of fellow modelers, in due time. I'll begin with a seemingly simple task, installation of the front wheel well that is included with the Obscureco kit. In the second picture of this article, I failed to notice that the wheel well was stuck to the cockpit floor, but I can assure you, it does not go there! Below, it is shown glued to the right fuselage half with just a couple of drops of CA: Picture two, just above shows the fuselage halves being pressed together, to assure that the wheel well sits straight up and down, before properly gluing into place with more CA on the right side. The third picture above, shows the addition of other glue, a thicker, sticky glue, in case the CA ever fails. You may ask me HOW I KNOW THIS. Let me just say, that once a wheel well (or even a cockpit) comes loose after the fuselage is closed up, it will make you feel greatly discomfited! Before anyone posts that they've never had this failure ... yada, yada -- give yourself another 40 or 50 years of modeling without taking this precaution, THEN we'll discuss it! Please note that this mostly only occurs when bonding resin to resin, or resin to plastic NOT plastic-to-plastic, but, you never know with CA. For plastics, I like to melt the dickens out of it with Weldon #3, and rarely use CA to assemble plastic. Next order of business is to install the various components of the Obscureco cockpit, show in the following two pictures: There are a few things to note here. Because of my inability to find even a single photo of the major areas of the XA3D-1's cockpit, I am a little unsure of the pieces glued on, and marked with the two arrows. The upper arrow points to an equipment support bracket that Obscureco tells you where to put, but not how to orient. The lower arrow is sort of an equipment shelf (selected for the A-3A version -- again, as close as I can get to the XA3D-1). Lastly, the "G" marking shows the area where gun controls would normally be installed on a version with the tail turret, were the guns and controls mounted. Next, a view of the cockpit from the rear: In the above photo, the arrow points to the A-3A Bombardier/Navigator station selection from the Obscureco kit. Again, stations for other variants are provided in the kit. Anyway, because of my lack of photos, if anyone out there can chip in with knowledgeable placement on these pieces, or on correct cockpit colors for this version, I'd be grateful. In the absence of further guidance, I'll probably choose the usual black-over-Interior Green selection, although it could be black over black as well. While the later variants come in a variety of colors, the fact that this prototype was built more or less around 1950, before the gray interiors became mandated, give one pause to think. If you KNOW, please help! Well, at least it's a beginning. More soon, I hope! Ed
- 30 replies
-
- 15
-
-
- Muroc Models
- Hasegawa
- (and 1 more)
-
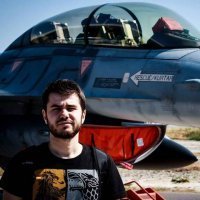
Hello, Here is my first post as an amateur modeller, this was my 8. finished project. I am aware of some major problems but I would like to hear your comments and advices. Turkish air force specific decals (some service markings and tail crest) are printed by me -first attempt so not the best quality-, other decals are oob. Since decal paper was transparent I had to paint the areas as white which will have decals on top (except tail vulture crest), worst part of printing own decals In the last photo you can see one of my previous projects - modified Revell F-16 Solotürk -
-
 #14/2020 After the Sonia, here´s my dad´s next finished IJ subject. This time an early version of the Kate bomber in an unusual and rare camo scheme, operated by the 12th Flying Group over southern China in 1939. Hasegawa kit, Eduard seatbelts, camo done with MRP Silver, Tamiya XF-52 Flat Earth and Gunze H59 IJN Green. The decals of this specific kit weren´t good. Tended to tear apart and especially the outer areas of the roundels slightly popped up again. So partly removed them again, used roundels form another Hasegawa Kate kit. The ones for the fuselage were slightly smaller so had to do some repainting too. Antenna wires were done with EZ Line. Build thread here https://www.britmodeller.com/forums/index.php?/topic/235068803-banzai148-nakajima-b5n1-type-97-model-1-kate-imperial-japanese-navy/ DSC_0002 by grimreaper110, auf Flickr DSC_0003 by grimreaper110, auf Flickr DSC_0004 by grimreaper110, auf Flickr DSC_0005 by grimreaper110, auf Flickr DSC_0006 by grimreaper110, auf Flickr DSC_0007 by grimreaper110, auf Flickr DSC_0008 by grimreaper110, auf Flickr DSC_0009 by grimreaper110, auf Flickr DSC_0010 by grimreaper110, auf Flickr DSC_0011 by grimreaper110, auf Flickr DSC_0012 by grimreaper110, auf Flickr DSC_0013 by grimreaper110, auf Flickr DSC_0014 by grimreaper110, auf Flickr DSC_0015 by grimreaper110, auf Flickr DSC_0016 by grimreaper110, auf Flickr DSC_0017 by grimreaper110, auf Flickr DSC_0018 by grimreaper110, auf Flickr DSC_0019 by grimreaper110, auf Flickr DSC_0020 by grimreaper110, auf Flickr DSC_0001 by grimreaper110, auf Flickr
 -
DSC_0011 by grimreaper110, auf Flickr
-
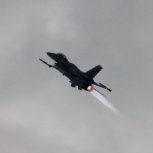
Good Afternoon, Sometimes you pick an aircraft that you want to model because the markings are interesting, or because there is a interesting bit of history behind it, or you really like the aircraft itself. In this case, I chose this build because of the absolutely ridiculous weapons load that was applied to this aircraft for testing purposes. Normally the A-10 is not cleared to fly with drop tanks and any weapons, but the fine folks at Eglin Air Force Base did some testing in 2013 to clear the aircraft for just that. See the press release here: https://www.eglin.af.mil/News/Article/814477/40th-fts-expands-a-10-fuel-limitations-in-combat/ This picture is what inspired me to do the build: 130814-F-OC707-052 by J Hooper, on Flickr This particular aircraft, being a test bird, has some differences when compared to a normal A-10C, but they are not too significant. For this build I used the Hasegawa A-10C kit, not because it is the best in the scale, but more so because I happened to have one in the stash. Pros: Good shape, reasonable fit in some parts, extra sprue with C model specific parts (the only kit to do so in 1/72) Cons: Raised panel lines, oversimplified details, poor fit in some other parts. Before construction, I rescribed the entire kit, my first time ever doing so. Rather than go nuts and try to correct any misplaced panel lines, I simply copied those that were already on the kit. I wanted to do some detailing with the kit, but didn't want to go crazy and spend too much time on it.
- 22 replies
-
- 10
-
-
Good evening! There was a bit of a work in progress thread for this build a while ago. The build has been done with it for a quite a while, but I worked on some photography this afternoon. I've got to work on depth of focus and few other things on the photography, but this was my first time shooting models in a light box. It's already much better than trying to do it on kitchen counter, but I've still got some learning to do. The air data probe is just press fit on the aircraft now. That way I can remove it if necessary and it doesn't get broken off. The wingtip pitot is complete, but not installed at this time for the same reason. On to the photos! P1030509 by J Hooper, on Flickr P1030512 by J Hooper, on Flickr P1030513 by J Hooper, on Flickr P1030515 by J Hooper, on Flickr Cheers, and I hope you enjoyed! Hoops
-
Not content with having the B58 and TSR2 on the go together I've got some spare drawers in my modelling desk and I have been waiting to build Airfix's GR7/9 kit for a while and while I was ordering the weapons set for the B58 I found the Hasegawa AV8B Plus II kit so that was ordered as well. This should be an OOB for both so I can compare the 2, Hasegawa's is from 2001 and the Airfix kit from 2011. So onto the kits, Airfix first. And the Hasegawa kit Initial impressions are good, the Airfix kit is the usual light grey plastic with slightly heavy panel lines and the Hasegawa has it usual shiny harder plastic with finer panel lines, the newer Airfix kit has multiple LERX parts, better decals and weapons, the Hasegawa kit has only one LERX option and one pair of AIM9's with fuel tanks. I hope to start cutting plastic this week.
-
About 6 weeks left and I reckon it's not too late for another entry - or two in this case. A pair of Hasegawa 1/48 Skyhawks. First up is an A-4C. This will be a Naval Air Test Center aircraft, using Two Bobs decals: The NATC used Skyhawks to test ordnance at China Lake in the 60s and 70s so it needs something to test. I found a photo online of the aircraft in question carrying an orange and black Walleye guided bomb, so I'll be using a Daco resin Walleye. Other aftermarket will be a Quickboost seat and Hypersonic corrected nose undercarriage door. The second one will be a Brazilian Navy TA-4KU, known as an AF-1B in Brazilian service. This is the Hasegawa TA-4J with a resin conversion by Phase Hangar. I built an OA-4M using the Phase Hangar conversion late last year - it was pretty straightforward, this should be the same, if not easier, as it's slightly simpler as i don't have to replace the kit's nose. I'll be using Quickboost seats on this one, and decals from FCM. I've made a start already - a bit of paint on the interior, fitted the jetpipes and so on. Nothing that's really worth photographing yet - will post an update soon. cheers Julian
-
Hi, I guess this is the right place for this thing. I normally build aircraft models, but this one was too cool to ignore. It's Hasegawa's 1/35 Yanmar YH6115 Rice Combine Harvester. This is a pretty new vehicle, and it seems to be the top model when it comes to rice harvesting machines. It's nicely detailed, although a bit simplified here and there, like the tracks. Fit is mostly very good, in fact, I didn't even use glue on many parts. It only took me 2 weeks or so to finish it. The parts already are more or less in the right colour, but I painted them anyway, using Mr. Color for the red and Tamiya white and black. And with a Lego figure to give you an idea of the size: The contrast between the white and the black parts doesn't make it easy to take good pics of it, but they'll have to do. Thanks for looking, I hope you like it.
-
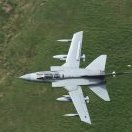
"SUMMER 1982 - INTERCEPTION" CF-104 Starfighter, Royal Norwegian Air Force, 334sq Kit: Hasegawa F-104J/CF-104 Starfighter (#D16) Scale: 1/72 Aftermarket: Master pitot, Eduard photoetch, Reskit wheels, Vingtor decals Paints: Vallejo Model Color, Model Air & Metal Color Weathering: Flory Models Wash, Mig weathering Products Good kit, a solid choice for 1:72 Starfighter. Early 80's was the last years of the Norwergian Starfighters - conversion to F-16 was already happening. Scratchbuilt display base. Built for Nordic GB. Build thread: Thanks for looking! Comments & constructive criticism welcomed
- 17 replies
-
- 51
-
-
- 1:72
- Starfighter
- (and 1 more)
-
Another 'wif' assembled in the middle of other builds. I was inspired by an artist's picture of a lend-lease Spitfire which I mistakenly thought had a top coat of white and Russian green (black paint on top of green paint). Halfway through the top coat, I sort of changed my mind and tried to darken the grey. The decals were gifted to me by a fellow builder here Reini78 - thank you once again!
-
Finish no6 for the year is the Hasegawa AV8B+2 Harrier as used by the US Marine Corp. I have been building this one simultaneously with the Airfix GR9 Harrier to see how they compare, see the WIP below. Should have been an OOB build but I found the cockpit lacking detail when compared to the Airfix kit so Eduard etch was used to dress it up but unfortunately most has been lost due to the canopy distortion. Eduard also supplied the AGM65 Maverick and I found the detail on this and its launch rail very nice, much better than any injection moulded weapon in 1/72. The Mk82 bomb came from Hasegawa weapon set no1. Weapon fit was based on one of the many on line pictures of Marine corp Harriers. All paints are Tamiya with an oil panel lines wash and MIG Ammo weathering powder's for the exhaust and gun staining (first time I've tried this technique). The kit builds nicely for the most part with the usual nice fine panel lines that Hasegawa are known for but I found the radome fit lacking and the canopy had a big mould seam to be dealt with. I found the kit indicated colour callouts a bit on the light side so I went with darker greys on the side and upper surfaces. Just need to finish the Airfix kit now. As usual all comments are welcome. And with its earlier siblings, all Airfix, AV8A, and 2x GR3's
-
As you can see after the RFIs on the PZL P.7 and Junkers F.13 my model making is devoid of themes, fads, eras or types, it just happens..ish. This will be my first WIP on here so a couple of caveats. 1. I am an assembler not a modeller tho I strive for betterment and 2. the choice of kit was part COVID enforced but mostly a clearout of the stash. After the tiny pieces of the PZL and the issues with the F.13, I wanted a straightforward kit with no issues OOB but hopefully with something that piqued my interest, a USP if you will. I considered the Trumpeter Wyvern and Gannet as well as the Arma Hobby Hurricane and Heller 109B before coming across this one which seemed better suited to what I was looking for. A long time ago someone was selling off kits of Japanese planes cheap and this, together with 4 or 5 others , arrived and has sat in the pile ever since. I discovered afterwards that Japanese things don't really rock my boat and, if ever I was tempted, something else came along and I went with that. I was hoping for a Blitzbuild but SWMBO has insisted I take a week off for garden related activities so it'll start slow but I'll try and get it done in a couple of weeks mainly to allow enamel paint (the transfer to acrylic is painfully slow and see the USP below) and polystyrene cement (so much better than superglue) to dry. Its USP? On another occasion back in the mists of time White Ensign were selling off paint cheap and I bought not only the Russian set but also the Japanese and this will be the first time I've used the latter. They have remained pristine in their tins for probably 10-20 years so it will be interesting to see how they fare. I've used some of the Russian set and they were pretty good so heres hoping. I beleive Nick Millman of this parish had some input to the colours so it'll be interesting to see if he, or anyone else for that matter, agrees with my colour selections. Anyway, after this taster, I'll be posting, prob this pm, the box art and my comments on whats in said box. In the interim I have a spreadsheet for my personal use of kits and their reviews as I come across them and this is the relevant part for this kit: "All Zeros have at least 2 mouldings. The latest is distinguished by its high price but also engraved panel lines, nice engines, a well detailed cockpit (for the scale) and are of a modular design. The cockpits have decals for the instrument panel. The canopies are all one piece, so you cannot display any work done in the interior with the kit canopy. Only issue is the top panel of the front fuselage which is of uncertain fit.Not exactly a shake and bake kit but typical of Hasegawa it has fewer fit issues than other brands. Only areas required attention. The front of the canopy didn't meet the fuselage and I used filler to fix it. Landing gear didn't feel stable and to make matters worse I forgot to dry fit the doors. This meant I hadn't notice two of the locating pegs were too long until after I glued the legs to the wings." This seems to have come from the latter of these 2 references https://www.britmodeller.com/forums/index.php?/topic/235070672-mitsubishi-a6m5c-zero-172-hasegawa/ and http://www.britmodeller.com/forums/index.php?/topic/234991676-172-hasegawa-a6m5c-zero-type-52-352nd-flying-group/ Onwards...
-
Hello , Here's my last completed build the old tooling 1/48 Hasegawa Zero A6M5c Type 52, in the marking of 261st Flying Group, in Saipan, 1944. This scheme is a tad original and is documented with 2 photos of these beeing shipped back to the States, on the deck of Aircraft Carrier USS Copahee. Whether it is extreme weathering or field applied overpaint is not sure, I 've been trying to match what I saw on picture .... This is the first tooling of the kit, dating back 1988, with raised panel lines and sparse details. It was scribed, but otherwise, totally out of the box. Used paints are mixes of Gunze and Tamia acryls. Base is IJN dark green, for the darker green (indeed ) and the same color enlightened with 40% Sky. Undersides is Gunze IJN grey. Hope you'll like her. Stef (#6)
-
 Hi everybody; after a couple of propeller builds, here I am back to a jet, and in 1/72! A few words to introduce this project: almost one year ago, I started the build of a Hasegawa 1/72 F-4 J Phantom II, this one: It was my first serious venture in 1/72 scale, and was a lot of fun. I learnt a lot from all the people who followed that WIP, and one in particular is Gene K; former USAF F4 pilot, he has been very helpful both in terms of technical info on the AC and in terms of modelling tips. Long story short, we became friends an I offered him, as a sort of way to thank him for the great help and as a tribute to his career, to build a model of one of the F4-s he has actually flown. He suggested the subject of this build, and not only that: he has actually donated me the two kits I'll be using for this, plus a lot of extras. Basically, following Gene's guidance, I'm going to modify an F-4 J Hase kit to become an F-4C, with the addition of parts coming from the greatly detailed MONOGRAM kit and a few aftermarkets (and some scratch building, of course ). This thread is going to be co-hosted together with Gene, and we'll go into more details in the next few posts. For now, what I have is: a completely cleared workbench (that is something totally new for me ) the kits Hasegawa parts to be added/modified: Nose sensor Stabs Seamless intakes, Gene's patented method Monogram parts: Tanks, pilons, gunpod etc Speed brakes and arrest hook Cockpit (amazing detail for a 1/72 injected kit!!!) Pilots!! One half fuselage has already been "treated" by Gene prior to sending me the kits, as an example to follow. He has also noted indications on the kit plastic Aftermarkets: Specific decals Stencils; these have been donated by another friend, Silvano (Phantom61 here on BM) AC Profile and most important thing: Now Gene will go into more detail about the project and the aircraft. Enjoy! Ciao
 -
 Good day all! Hope you are all keeping well, or as well as you possibly can. This is my latest completion, Hasegawas AR234 B in 1:48. I got this quite cheap as a second hand from my LHS so I also splashed out on a couple of extras. I used the Aires Cockpit detail set along with the landing gear bay set. Both of these sets are exquisite and beautifully cast. The cockpit set is well worth it as the greenhouse style cockpit canopy really calls out for some extra detailing. The landing gear bay is also beautifully produced but unfortunately the gear well door openings are so small you can really see any of the detail. I wish I had taken a couple of pictures before assembly just to show that area off! But alas no, still at least I know its in there! The kit went together very well as you would expect with a modern Hasegawa kit. I hardly used any filler and by careful test fitting the parts went together nicely. My only problem was for some reason I kept picking it up by the nose canopy area which kept cracking the glued joins and caused me great annoyance - but that was only down to my clumsiness though. Paints were all from the Vallejo Air range and decals were the ones supplied by the kit. I did have a couple of embellishments though, I really liked the set up for the recon cameras in the rear fuselage, I couldn't find any examples of the 'B' variant having these fitted but I installed them anyway with the glass panels. A bit of artistic license if you like. Any how this was a nice kit to build and went together quite quick, definitely recommend the cockpit resin set but don't worry too much about the undercarriage bay. Here are the photos... And just to show off the exquisite detail in the wheel wells! There is some there honest guv! This was as good a shot of the cockpit as I could manage! Thanks for looking in! Bob
- 10 replies
-
- 27
-
-
-
Incredibly this is my 8th finished model this year. This has been part finished for a good 15 years, but very happy with how it turned out. Only problem was the decals which were very fragile and cracked and shattered very easily. The yellow leading edge markings were especially bad and pretty much unusable. The date on the sheet was 2003, and they've been in the loft for most of the past 17 years so perhaps I shouldn't be surprised...…I ended up raiding the decals folder for some yellow markings from an old Tamiya F-84 Thunderjet Not perfect but pulled me out of a hole. The aircraft is from a training squadron based in Japan so I kept the weathering to a minimum. As she was when pulled out of the loft a couple of months ago And the finished article
-
Just finished this as a quick build between other projects. Built OOB with box decals for an F-16A of 50th TFW based at Hahn AFB in 1983. Mounted on a piece of rock found ages ago on Redcar beach. I think it is coke slag from the old steel works, but seems to lend itself well as a suitable base Paint is AK real colors, which were a pain and will not see the light of day again.
-
So this is the kit... It's a 2017 rebox, looking online it seems the Hasegawa moulding seems to go back to 1994, though possibly it predates that as it's quite a sparse kit. It seems the kit fantasy livery is based on a a Japanese Manga called "Area 88", I won't be using those - instead I have some aftermarket Flying Colours decals and will have my first attempt at using a vacuform canopy (shown here next to the supplied canopy). I'll probably go for the dark blue/dark green scheme.
- 15 replies
-
- 12
-
-
Isn't this too weird 🙄? I'm linking here the background story from the last year's Sharkmouths GB, for a build I completely failed to even start, that includes a link to another old GB, where I actually finished the same kit, and that thread has all the kit related pics etc stuff. Anyways, I thought the Big Lanc build would benefit from a little 109 being built side by side with it. Or maybe before it... This is the last of my AZmodel Joypack Gustavs. Good to get rid of it, there'll be another Hasegawa Finnish Combo in my stash by tuesday So here we go again, hyvä 🇫🇮! V-P