Search the Community
Showing results for tags 'Hasegawa'.
-
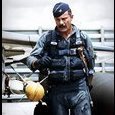
 Hi all. This is my first for 2023 though I started it a few years ago with the bulk of the work done last year. It's the venerable 1/48th Hasegawa F-16N. I eyed off the 72nd version when I was a kid but never built it so when this 48th version kit came up cheap on a swap and sell table I had to have it. Replacement decals were at hand to replace the old kit items in the way of the W&D Studio decals so the NFWS aka Topgun option was chosen. Sad to say they aren't all that great as heapings of decals softener barely moved them. The only other small enhancements are DXM pitot and AOA probe and fibre optic cable for the static dischargers. The pilot is from the kit and the base is courtesy of some offcuts from Bunnings. My wife recently bought herself a router so I added a 45 degree bevel to tidy up the base. The rod is some clear perspex that's sanded to frost it up. The F-16N was the true hotrod variant with its small mouth inlet and big engine exhaust so I had to put it in flight. I cracked the air brakes so the pilot could pull the nose over to get a gunshot on his blue adversary...who knows what happened next. Cheers, Mick
- 20 replies
-
- 47
-

-

-
Over the years I have often come across what I guess must be a quote from some General or other along the lines of "Even the best made plans seldom survive the first few minutes of battle" and that is certainly true of my plans for this GB. I had intended to just build some of my "stash queens" but all the research I have been doing on early USN jets has got me hooked so I bought this. I built both the Hasegawa Panther and Cougar when they both came out in the 1970's and have been thinking of refurbishing them for some time, but what with the fiddle of making undercarriages, having originally built them wheels up, and the cost of both resin wheels and decs, I never quite got round to it. I bought a replacement Panther a couple of years ago and now I have splashed out on a Cougar. During the first 20 or so years after the end of WWII there were far more individual aircraft manufacturers than there were later, and the USN was prepared to issue small production contracts to several at once, unlike these days where the pattern seems to be to issue orders for a few prototypes to just 2 and then have a fly-off. They also went through a phase of issuing new specifications for tender every one or two years, perhaps due to the uncertainty involved in the “new technology” of jet engines/planes and the fact that they were themselves still developing their ideas on what exactly they wanted and how they were going to use them – for example, a fast climbing fleet defence interceptor, a longer ranged escort fighter or a general purpose fighter/attack plane. As a result the mid to late1950's were an interesting time for new jet aircraft. The pace of development was such that by my count, the USN had no less than 13 different types of jet day fighter between 1944 and 1960 not including the Crusader which was just entering service and the Douglas Skynight which was a night fighter, 12 of which saw actual "proper" squadron service (the exception being the Vought F6U Pirate) but after the last of the them was retired from front line duty in the early to mid 1960's they had just 2 – the Vought Crusader and the McDonnell Phantom II, those in turn being replaced by the Tomcat and Hornet., all of which had a rather longer service life than most of their predecessors, which was largely due to a combination of more advanced design and better engines, but at greatly increased cost. If I can use however loosely the term “First Generation” for the 5 straight wing jets, then the second generation of USN jets which benefited from German wartime research were :- Grumman F9F-8 Cougar McDonnell F3H-2 Demon Vought F7U-3 Cutlass Douglas F4D-1 Skyray Grumman F11F Tiger There were also the three swept wing variants of the North American FJ Fury - the FJ-2, FJ-3 and FJ-4. I already have fairly recent models of the Skyray, Tiger and the F4J-4B attack version of the Fury and am building both the F3H-2 and F7U-3 in this GB, so I felt the overwhelming need for a Cougar!😆 Pete
-
 #2/2023 So, this is my dad´s last good old Hasegawa 109, only a few Eduard ones left in the stash. Markings taken from the Eduard Regensburg kit. Also Eduard seatbelts and cockpit fuel line used. Plastic rods and lead wire for the brake lines, EZ Line for the antenna wires, shortened the legs slightly to have a more realistic look. Painted with MRP RLM74/75/76. Some cracks in the underwing crosses but my dad decided to keep them. Build thread here https://www.britmodeller.com/forums/index.php?/topic/235118924-end-of-war148-messerschmitt-bf109g-10-mtt-regensburg-13jg27/ In 1945, IV.Gruppe of JG27was stationed in Germany and part of the Reichsverteidigung. The Gruppe was disbanded on March 31st 1945 and the pilots distributed to the rest of JG27. DSC_0001 by grimreaper110, auf Flickr DSC_0002 by grimreaper110, auf Flickr DSC_0003 by grimreaper110, auf Flickr DSC_0004 by grimreaper110, auf Flickr DSC_0005 by grimreaper110, auf Flickr DSC_0006 by grimreaper110, auf Flickr DSC_0007 by grimreaper110, auf Flickr DSC_0008 by grimreaper110, auf Flickr DSC_0009 by grimreaper110, auf Flickr DSC_0010 by grimreaper110, auf Flickr DSC_0011 by grimreaper110, auf Flickr DSC_0012 by grimreaper110, auf Flickr DSC_0013 by grimreaper110, auf Flickr DSC_0001 by grimreaper110, auf Flickr DSC_0001 by grimreaper110, auf Flickr DSC_0017 by grimreaper110, auf Flickr DSC_0018 by grimreaper110, auf Flickr DSC_0019 by grimreaper110, auf Flickr DSC_0020 by grimreaper110, auf Flickr DSC_0021 by grimreaper110, auf Flickr
 -
 Joining you with this Hasegawa 1/72 Fw kit. Bought at Fairford last year. Parts. Options. Have I mistaken the colours in some way? Instructions would have this aircraft two shades of dark green. but the boxart looks green/grey.
- 20 replies
-
- 6
-
-
- Hermann Graff
- Hasegawa
- (and 1 more)
-
 After about six months, I've finally completed my 1/48 scale Hasegawa F-4G Phantom "Wild Weasel". The kit itself was fine (other than the mysterious missing RWR), but I had primer related problems, or masking tape problems, or paint problems. Either way, I spent far more time scraping and reapplying paint than I'd have liked to. I wanted to do a Spangdahlem bird with shark-mouth, so decals came from Milspec (sheet 48-007), paints were Hataka (first time using them), a few bits came from my Eduard/Academy F-4, and I splashed out on a more correct AN/ALQ-131 from Eduard to replace the AN/ALQ-119 supplied in the kit. @Mark V provided some good information about colour schemes and likely load-outs - hence it's carrying a single dummy HARM missile (admittedly with fins), drop tanks, and an empty TER on the starboard inner pylon. Thanks also to @bar side, who was tackling the same aircraft at the same time and provided a lot of inspiration/information. Over-all, I'm mostly happy how it turned out. There are a few issues - the cockpit glazing's a bit wonky (could have done with the one-part canopy version), I messed up the starboard shark-mouth, and the tyres could be sanded/flattened so that both nose-wheels touch the ground. There are a few places where you can see I've had paint issues. However, the Hasegawa kit has held up well for its age and I'd happily build another one. Build Thread Here The photos are taken in my new light box, using a Sony A5100 with a 55mm prime lens. Still getting the hang of this serious-photography-with-an-actual-camera lark...
- 11 replies
-
- 35
-
-
-
 Here's my placeholder for Hasegawa's 1/32 FW190D-9... here's the kit: ... and the plasticky goodness therein: ... and the instructions: The kit contains a pilot figure who I may or may not use depending on how well done he is - I can't really see the parts for him in amongst the bagged sprues. If not, I have these: I also have the New Ware canopy mask set - inside and outside masks : The kit transfers look remarkably good for Hasegawa - I don't fancy the JV44 markings with the striped undersides (no offence @Retired Bob ) and the kit has two options for them, but there is another option provided: ... which I may use as it's a nice plain-looking one, but failing that I also have these: So I think I'm set. I've seen some different aftermarket gun-covers are available but I'm blissfully ignorant of the differences so I'll just hope the kit-supplied one is correct for whichever option I do go for See you when it all kicks off Cheers, Stew
- 147 replies
-
- 16
-
-
Wedge-TailedEaglePortraitRaptorDomains.thumb.jpg.41a306d3445a68f0f2df773e01776ea6.jpg) Our heroic host @TonyOD has bemoaned the lack of a Sea Harrier so far in this GB. As a fan of the great jump jet I feel it is my duty to rectify this situation, so: The Hasegawa Falklands double kit. I built its twin for last year’s Falklands War 40th Anniversary GB, its in the inspiration gallery. This one will use some after market decals so wont be one of the options from the kit. I’ll also need to scratch a proper cockpit, or maybe use the pilot figure, haven’t decided yet. And the nose gear well will need to be boxed in. All quite easy to do. Starting soon. AW
Our heroic host @TonyOD has bemoaned the lack of a Sea Harrier so far in this GB. As a fan of the great jump jet I feel it is my duty to rectify this situation, so: The Hasegawa Falklands double kit. I built its twin for last year’s Falklands War 40th Anniversary GB, its in the inspiration gallery. This one will use some after market decals so wont be one of the options from the kit. I’ll also need to scratch a proper cockpit, or maybe use the pilot figure, haven’t decided yet. And the nose gear well will need to be boxed in. All quite easy to do. Starting soon. AW -
 Hi all, I've a soft-spot for Naval Aviation and know @Grey Beema wouldn't let me hear the end of it if I didn't build something. So I'm in with this one which only had a service life of four years. Hasegawa F11-F1_Tiger_Box by Dermot Moriarty, on Flickr The second US Navy aircraft to go supersonic after the Douglas F4D Skyray, the F-11F-1 Tiger was soon replaced by the F-8 Crusader. I like how this is a little different and looking forward to giving it a go. Plan is for OOB, all the way! Hasegawa_F11-F1_contents by Dermot Moriarty, on Flickr Thanks for looking, good luck with your builds and happy modelling. Cheers, Dermot
 -
Hi, There are hundreds of subjects that fit into the Salty Sea Dog GB that I'd like to build. I'm going to limit myself to 2 Marineflieger F-104's. This one is going to be a Hasegawa F-104 enchanced with the superb Daco F-104 upgrade set. The set contains the Kormoran missile, but also the AS30. I'll build this one as a MFG 1 aircraft armed with AS30's. I'll start a second thread for a MFG 2 aircraft with the Kormorans using the Kinetic kit. The kit is an "overtrees" kit from Eduard. The Marineflieger F-104 Wings were part of a huge NATO effort to contain Warsaw pact navies in the Baltic Sea. In the 1970's, there were 2 Wings with each squadrons of F-104's. One squadron from MFG-2 also had RF-104's and made almost daily runs over the Baltic to keep the intelligence picture updated. The RF-104's were also capable of using the AS30 and the Kormoran. When MFG 1 converted to Tornado's (autumn 1981-September 1982), MFG 2 had a third F-104 squadron giving a total strength of 72 F-104's and 12 TF-104's. Although their bases were obviously under NATO protection, they also had their own ground-based air defence units. 40 mm Bofors at first, in the case of MFG 2 replaced by 6 (!) batteries of truck-based Roland missiles. I've seen a picture of a Marineflieger F-104 flying so low between Bundesmarine ships that he kicked up white spray. They were certainly salty sea dogs... Cheers, Stefan.
-
I will give this subject a go, been wanting to to do this for a while now. This boxing is very hard to source so I'll useHasegawa's G6 kit and after market antenna.
-
This is one of the earliest models I did upon my return to the hobby a few years ago - Hasegawa’s 1/48 A6M5c . This was before I decided that space (both storage and display) and finances meant that I settled on 1/72. It was all built OOB, and while the kit isn’t the newest and seems to have a mixed reception, I thought it was a delight to build, great fit, and nicely accommodating for someone looking to relearn some of the skills. This was my first go with an airbrush (at the time using a cheap Chinese brush) and also my first attempt at weathering. I used Tamiya Weathering Master which seemed to make it nice an easy, and Tamiya panel line wash (I now use Mig Ammo for a greater selection of shades) Painted using Tamiya acrylics, I definitely overdid the dry brushing (before I even knew about chipping!) but I had lots of fun. Thanks for looking!
-
 October 11th, 1948 In the chaos and confusion of the conflict against the forces of Syngman Rhee, a group of former IJAF and IJNAF turned Worker's Party of South Korea guerillas had begun a monumental endeavor. Knowing that the resistance would inevitably fall without some form of trump card to balance the odds, they had started to renovate a number of former Japanese aircraft located in hidden hangers on the island, dating back to the Second World War and whose existence was only known by the personnel who hid them. Though highly restricted in almost every measure possible, their efforts had finally readied a motley collection of IJNAF/IJAF aircraft, including D3A1/2s, Ki-51s and C6N1s to fly in attacks on the air-vulnerable South Korean army, to devastating effect... Alright, backstory over. I might continue it later with a number of different models... In all seriousness though, I did enjoy this build, although a few of the techniques I used did not work as well as I would have wanted, such as painting the decals, accidentally contaminating the Clear, etc... Nonetheless, I feel satisfied with it. As for construction, it was all out-of-box, bar the central and right bombs, which came from a Tamiya J1N1 and an unknown kit respectively. The only issues I found with the kit were that: A: The wing to fuselage joint is oddly-shaped, which resulted in a rather large gap that could not be satisfactorily filled with filler, B: The construction of the gunner's mount is vague at best, with various loose hinges giving the form of the completed result, pointing the seat at a 65 degree angle. Normally, this would not be such an issue, but given how cramped the gunner's position is without the mounting, as well as the fact that glue can only be applied once everything is all put together means that it took a solid 2 hours to wrestle it into place. As for markings, they fictional, taking inspiration from the early Indonesian Air Force roundel by overpainting the supplied Hinomarus with the South Korean flag's blue, and the fin-flash is the orange (or as close as I could get with my peeling spare Canberra decals) stripes of the People's Republic of Korea, the first government to exist after the end of the Japanese occupation. The camouflage is the regular IJN Green over Grey, with stripes of red-brown painted as make-shift additions to help better conceal the aircraft. Last of all, you will have to forgive me for the poor background (my workbench), poor photography (my 7 year-old phone and questionable photography 'skills') and even poorer lighting, as being occupied for most of the day led to it being nightfall far before I could take photographs. Please feel free to comment and critique, another opinion other than my own would be much appreciated. In any case, I wish all of you who are still in the 25th a very Merry Christmas, and to everyone a good night. ...Unless you are in somewhere other than Oceana or the Americas, in which case Good Day! Sincerely, Hurricaneflyer
- 6 replies
-
- 11
-
-
- Aichi D3A Val
- Hasegawa
- (and 1 more)
-
 Hello all, Joining for my second GB: again a very interesting theme to participate in! My plan is to build an A-1J Skyraider, from VA-145 “Swordsmen”, aboard USS Intreprid in the Gulf of Tonkin, ca. 1967. During the Vietnam war, US Navy aircraft carriers operated in open waters from a location known as “Yankee Station” in the Gulf of Tonkin, off the coast of Vietnam. Carriers at Yankee Station were referred to as being “on the line” (i.e. in combat), while conducting air operations: initially strikes over North Vietnam, but also CAS and Rescue Combat Air Patrol (RCAP) missions. U.S. Department of Defense, Public domain, via Wikimedia Commons - Public domain The above map shows the designated targets for operation “Pierce Arrow”, ordered in August 1964 in response to the Gulf of Tonkin incident, with Vietnam torpedo boat bases and an oil storage depot being targeted. Among the first wave of the strike sorties were A-1 Skyraiders from VA-145 Swordsmen at Yankee Station. The unit was already present in the region, flying RCAP missions in South Vietnam and Laos. VA-145 remained operational throughout the conflict, switching to the A-6 Intruder from 1968. The below picture shows two of the unit's Skyraider: an A-1H (back) and an A-1J (front), aboard the USS Ranger in 1966 in the area. U.S. Navy, Public domain, via Wikimedia Commons - Public domain I will be using the Hasegawa 1/72 kit, with a few small modifications. Decals for VA-145 are already in house (Printscale & Microscale), just waiting for some aftermarket stuff to arrive, then I will post some more pics. Thanks for looking! Patrick
 -
My main entry for this event is something I've wanted to build for a while, the PBJ-1H. The North American B-25 is one of my favorite aircraft, a medium bomber that became incredibly versatile. Used in the Pacific, these US Marine operated bombers were used in low level attacks and anti-shipping. VMB-613 started operating 15 PBJ-1H in early 1944. I'll be using Hasegawa's 1/72 kit. I picked up the kit for a good price, but the decals are missing. I'll have to source some, but in the meantime, I've picked up some accessories as well.
- 27 replies
-
- 19
-
-
On the workshop landed such a small and quick project Mc.205 "Veltro" from Hasegawa in 1:48. The model almost straight out of the box, the rest will come out during construction. As the model has its years this is the start of its construction. Another Italian but in JG77 camouflage.
-
 Hi all, Latest one to roll off the production line and the last one for 2022 is a Hasegawa 1/48 A-7D built as a YA-7D from the 6512th Test Squadron, 6510th Test Wing, Air Force Flight Test Center, Edwards AFB 1983. Built as part of my slowly expanding collection of aircraft from Edwards AFB this one would once more not have been possible with the excellent pictures taken and shared by our very own @Old Viper Tester, so another huge thank you to Sven for sharing these with us. Built mostly OOTB but with a Master data probe for an F-16XL grafted onto a piece of brass rod and a conical fairing on the tail made from scrap sprue, with the decals coming from the kit and various other decal sheets to make up what I needed for this fairly unique looking Corsair. Here are the pictures, i hope that you like them; And for those that are interested here is the build thread; thanks for looking, and as usual all comments and criticisms are gratefully received. Craig. 🇺🇦
- 17 replies
-
- 33
-
-
 Hobby 2000 is to rebox the Hasegawa 1/72nd Brewster F2A Buffalo - ref. 72064 - Brewster F2A-1/2 Buffalo - Limited Edition Source: https://ksmodel.pl/sklep/szczegoly/hobby-2000-72064-brewster-f2a-1-2-buffalo-limited-edition-1-72-26526/ V.P.
 -
So, my dad started the last Hasegawa 109 in our stash. Gonna do a Regensburg built machine using decals from the Eduard kit. DSC_0004 by grimreaper110, auf Flickr DSC_0006 by grimreaper110, auf Flickr DSC_0006 by grimreaper110, auf Flickr DSC_0005 by grimreaper110, auf Flickr DSC_0002 by grimreaper110, auf Flickr Eduard PE seatbelts used, battery cover from Eduard DSC_0003 by grimreaper110, auf Flickr DSC_0004 by grimreaper110, auf Flickr
-
This is my first build here. About a year ago I managed to buy such a kit from hands. And I got guns by Master this week. But I want to build A3's variant in Tamiya's kit 61037. First I installed the wheels bay. I cut the plastic incorrectly and cracks formed. I will remove them later. It was also difficult to install the bay in the center. I was upset when I found a stumps on the cockpit floor for his legs. So I made a elements that, in general terms, repeated the original. I will install leg bindings after painting. Edward's photoetch is often flat in cases where it is not. I made a handle instead of a flat piece. Engines are always my headache. Only if you are building a large scale model you are not be cut with a scalpel and your desk will not be covered in your blood when you remove the pushers of cylinders. I had made the pushers out of copper wire. My set is A4, but I want A3, so I had made new panels with holes. I wish you a enjoy watching
-
Kit - Hasegawa K25 Paint - All Lacquers Decals - Kit Extras - Loadout from spares. McDD F-15C Eagle 36th TFW Bitburg AB, Germany 1986 I know I cannot prove it, but this is the first-ever 1:72 F-15 kit I have built, and I've been nailing bits of plastic together since 1970 ! - Bought this for the massive sum of 10.00 GBP from Phils' Model Shop in Southport back in 1990, and it's sat in my stash ever since. Picked it up around three weeks ago and it's been an absolute joy ever since. We really did have it good back-in-the-day with Hasegawa issuing top-quality kits like this almost monthly. So what to say about the build ? - Apart from the thirty actuating rods for the exhaust petals which were/are a bl**dy nightmare, it's an easy, easy build. Virtually no putty or filler required anywhere, even the potentially disastrous wing/fuselage joint was a breeze. Cockpit area is beautifully detailed and mine is fully painted, however I snapped both the actuating struts when I was manipulating the (huge) canopy into place so reluctantly had to glue the 'glass' into place, shame really but that's down to my sausage fingers and general clumsiness, 'owt to do with the kit. The decals behaved impeccably even after all this time, I was fully prepared for them to shatter into a million atom-sized pieces when they hit the water and they simply didn't !. Paint is Mr Color lacquers and TBH appear a little too blue on the build, so I'll need to have that in mind if I use them on any other Low-Vis build in the future. So as ever thanks for taking the time to look and /or comment... next I'll finish my Tamiya Honda, then maybe a 'What If' project. All the best from Middle Earth. Ian.
-
 Hi folk's,I never consider Hasegawa kits as oldie's as I never really saw them till the mid eighties but thinking about it that was a long time ago now so in my current oldies mindset I picked up a nice example for £6 with decent looking decal's for a future entry for this GB fits nicely into the brief and my liking for colourful scheme's.It's a Hales boxing photo's when it arrive's. It will be in the Red,White and Blue scheme.
 -
Hasegawa 1/72 Ju-88R PJ876 Placeholder.
-
No, not that one, nor Ozzy, but this: flown by Hptm. Heinrich Prinz zu Sayn und Wittgenstein. AW
-
After 2022 (link) newsletters, the Hasegawa news for January 2023. Source: http://www.hasegawa-model.co.jp/month/202301/ V.P.
-
hi,every one!!😃 this is my Hasegawa 1/48 P-40N .. this kit is aged,but quite easy to build. I use P.E set for landing flap and add some rivets to this warbird. the oliver darb color is much harder than I expact.. not perfect..but I think the result is ok... hope you like it and here is the video build if you are interested🙂
- 13 replies
-
- 53
-
-