Search the Community
Showing results for tags 'GWH'.
-
 Finally managed to take photos for the gallery, I know photos taken quickly but you can see something on them. I invite you to view the gallery of the Northrop P-61 A "Black Widow" model. - "Lady Gen", Florennes, Belgium, december 1944.
 -
Hi, It's about time I start athread here. There are hundreds of subjects that fit into this GB that I'd like to build, but I've been busy with my P-38J and my F-84E from other GB's. I picked a subject that should be a relatively quick build and of interest to V-bomber enthusiasts. I'm not sure if this kit is in the UK already, mine came from a Czech webshop. I'll build this one as XD824 late in its service life, with camouflage for low-level operations. Earlier on, on the 28th of April 1958, XD824 had dropped the most powerful bomb that Britain ever tested. The 3-Megaton Grapple Y test. I'll build XD824 as she was just before scrapping, not in the white anti-flash scheme she had in 1958. Cheers, Stefan.
- 11 replies
-
- 11
-

-

Great Wall Hobby 1/72 F-14A - Now Bandwagon 202
Jon020 posted a topic in Work in Progress - Aircraft
Having completed Hobbyboss and Academy’s 1/72 F-14As I thought that I probably knew enough about the aircraft layout to tackle one of the GWH kits that were sat leering at me from my stash. Just to recap – this was Tomcat No. 2 completed a couple of months ago Wichita 103 HIP killer by Jonathan Hughes, on Flickr Familiarity would be useful given the borderline ambiguity in the instructions (lots of it but with wrong parts called up and add-in correction pages strewn loose in the box), and there are lots of bits to manage. So, armed with a little confidence, I thought I set about this with the belief that despite its complexity that there wasn’t too much wrong with the kit. Right? Well, perhaps that’s not quite right but those encountered so far have been addressed. Tomcat project no. 3 by Jonathan Hughes, on Flickr On opening the box, one can’t fail to be surprised at the number of parts crammed into the box attached quite well onto 29 sprues.... that’s quite a lot for a 1/72 aircraft kit. The instructions are as vague and error strewn as expected but at least all parts are labelled with an alpha and numeric so you can find them easily on the right sprue... or can you? Why oh why are there 7 A sprues? Where’s the sense in that? Did they forget to change the alpha designator I wonder. As for subject, having completed a VF111 aircraft and a VF1, I thought I’d go for one of the other famous fighter squadrons and have opted for a VF84 aircraft; aircraft of other squadrons will follow... promise. However, as with my last model, I haven’t chosen one of the oft chosen schemes instead pluming for a 1988 rendition of the Squadron Commander’s aircraft BuNo 162702 which had the hi vis markings despite most other aircraft being quite plain at the time. The image that captured my attention is on page 226 of the kindle edition of Detail and Scale Colour and markings of U.S. Navy F-14 Tomcats Part 1 (Atlantic) by Bert Kinsey (may he get well soon). The photo (and I’ve found others since) shows the aircraft presumably returning from a gunnery training mission, with a training AIM-9 round, an ACMI pod and plenty of soot staining around the canon muzzle. So, other than a twin AIM-9 LAU-7 fit on the wing pylons, it should all be do-able. The tan colouring on the radome adds a nice splash of colour to the rather weary looking finish it exhibits. I’d acquired the kit about a year ago (or so)... it took a while to get to me from China... but that was in lockdown. It’s easier to come by now, but despite the time taken, the seller kept me informed with tracking info. I bought the Eduard sets (I’ll probably use some of the bits but probably far from all of them) and just before I started in earnest, the Quinta Studios 3D cockpit panel set. I’d been very impressed with how the transfers settled over the molded detail on the Academy kit but my friend Brian was experimenting with a few cockpit tubs from different manufacturers and found that the GWH transfers were not as refined as the Academy ones and didn’t settle as well... much thicker. So, the Quinta items were secured as a hopeful solution. On closer inspection of some of the main parts, the panel lines seem quite nice but there seems to be a molding issue (mold alignment?) on some parts. One easy to illustrate example is on the nose halves. Here the starboard side and you can see that I’ve started to try to clean it up with some 400 grit paper. More work was needed, progressing to finer and finer papers until it was polished smooth and just a little re-engraving needed. This is not so much of an issue on the other nose half as it lines up with the gun panels, but it’s also evident on the intake trunking and lower fuselage half – each was addressed as above. Some smaller parts (such as nose gear) also exhibited this and they needed cleaning up a little more carefully. A check of the other two I had in my stash showed one to be worse and one to be about the same. I’d expected a little better in the quality control – or alignment of molds. At least it’s fixable... but at the cost of this kit, I’d hoped for better. Molding lines. Hmmmmm by Jonathan Hughes, on Flickr Before starting, I’d noticed another builder tackling the kit, or a D model version of the kit, presented by rymulus. This identified that the RIO’s instrument panel and coaming were too narrow. So, this was the first thing I looked at, not really wishing to take the approach that rymulus has done with a complete scratch build of the panel (and you should see the rest of the detailing being undertaken – quite mind numbing and something my fingers and eyesight just couldn’t master) I set about to examine this and consider alternative options. As you can see here, the coming is narrow – the instrument panels on the outer edge should overlap those of the panels that are in front of the cockpit side panels... evident here is that they don’t – the whole thing is far too narrow. I suspect that if you had the canopy closed, it’d not matter too much. I’m doing mine open, or I’d hoped to... so, problem. Narrow RIO coaming by Jonathan Hughes, on Flickr Rymulus’s solution was to cut the coaming piece in half add 1mm in the middle and make a new IP. After some ferreting around I came up with an alternative approach. Some time ago I bought an Aires cockpit set for the Hasegawa kit (nope, not made that yet either), but it was damaged in transit, so the seller sent me another one. That was more damaged in transit and at that point we gave up. But, the RIO panel was fine (in each). I took a look to see if that would fit. The sills in the cockpit are a little narrower than the Hasegawa I guess, so some thinning of the edges was needed, but I did managed to see that this would fit. Will this work? Aires RIO coaming to the rescue. Pre fettling by Jonathan Hughes, on Flickr One other item that I needed to resolve was that of the facia. Here the Aires item (right) and GWH item (left) are compared... with the Quinta 3D print (sized for the GWH kit) part 25. RIO panel comparison. Quinta 3D print behind by Jonathan Hughes, on Flickr My solution was to file the face flush and cut up the Quinta part into three items, as I’ve shown here positioned on the Aires panel. With some paint and touching up. I hope it’ll work. It’s what I’ve decided upon at least. As the upper panel is larger (again), I’ll retain that and paint it carefully. 3D print cut up and positioned on fettled Aires item by Jonathan Hughes, on Flickr With the Aires item added and the coaming side panels now all glued in place (tamiya thin) and sanded flush, the rear bulkheads looked decidedly sparse, so I decided to add some finesse with some stretched sprue, plasticard, microstrip and lead wire... some filler and some artistic license. The Aires coaming was actually a little damaged; it’s handle on the top was cracked and didn’t take to prising into position, so a new one from plasticard and stretched sprue was made and added... and some further lead wire details added. Cockpit tub detailed by Jonathan Hughes, on Flickr I’d a pair of GWH detailed seats that I’d made for the Academy kit that I could use, as I fitted the Academy seats in the end, etched out a bit to take a pair of Reedoak figures, but I decided to keep them to go in the VF1 kit should I decide to display it sans crew at any point and went to use the Aires seats that had come in the Aires cockpit set (that was damaged)... seats were fine. Width wise these sit fine, although I added a plasticard spacer under each to rise them to the right height. Detailed tub with Aires seats by Jonathan Hughes, on Flickr And shown here inside the nose section for a dry-test fit Tub trial fit by Jonathan Hughes, on Flickr Two other items that need attention at this stage of the build are the nose gear bay, and the nose gear leg (which I put “mostly” together at the same time to check, check, check and recheck fit – to confirm that it will go in later in the build. It will. The gear bay has some detail, but as rymulus shows in that build, the nose gear bay is the wrong shape (!) and the detail is molded quite heavily and still relatively sparse. I thought I took more photos that I seem to have (at a time when time was limited due to other commitments so I just build some bits when I could) but I added some plasticard and microstrip and lead wire to the nose gear bay to fill it out a bit. I did the same to the nose leg, mainly to add pipework etc, but not too much. Important – the nose leg still fits in. Nose gear in bay test fit. Fettled and detailed (Eduard, microstrip and lead wire) by Jonathan Hughes, on Flickr The nose leg is shown here after some primer and paint was added. It’ll be cleaned up and sorted before going further. I’ve left the two side actuators off at present (are they kneeling actuators?) so that I can paint the oleo easier. I’ll add them later in the build... they’re attachment is quite large to shouldn’t pose a problem. I’d had to add them in the Academy kit as they’re missing (as is the retraction jack)... again not shown here, but is best to fit into the bay, fit the leg, then attach the jack to the leg. I’ve tried several options. Detailed nose leg painted white by Jonathan Hughes, on Flickr Right, so back to the build. RIO coaming – I’ve a plan. Good. Press-on. Fuselage halves and intakes are quite a complicated set of assemblies but go together quite well. Dry fit several times before committing to glue... noting that some parts are a little vague in placement in the instructions, that opened rear top of the intake rear behind the ramps, being one example. Oh, and the rear ramp too. Anyway, with some trial and error and patience, it can all be dry assembled, except the jack on the rear ramp, and test fitted. On inspection through all angles, it became evident that there is a gap that can just be seen through the intake where the fuselage upper half joins (or doesn’t quite) the lower half. Discovered intake gap by Jonathan Hughes, on Flickr On looking at photos, a PE piece would be ideal for this to depict the framing of the item that sits here neatly, but I decided to make a couple of small, thin, plasticard inserts to attach to the fuselage lower half, big enough to cover the gap. And these are shown here Intake gap solution by Jonathan Hughes, on Flickr Added bits, another view by Jonathan Hughes, on Flickr When the two halves are now brought together, the gap is hidden. Not perfect, but it’ll do Gaps hidden by Jonathan Hughes, on Flickr A little filler was added to hide the injection marks inside the intakes although I wasn’t sure these would be visible or not. The forward sparrow recesses have a large hole at the front of each, possibly to allow location of the phoenix pylons. Why these are fully molded as holes when all other holes need opening out, I don’t know... but I put a small piece of plasticard over the inside and filled these too. You may be able to see a little filler at the rear of the gun port cover. Hmmm another kit error to explain. Some filler needed by Jonathan Hughes, on Flickr The kit comes with a choice of two gun port options, an early and later A model version. But both parts have vents at the rear that only appeared very late on in production; the rear panel may have an access hatch but no vents. Wrong gun cover by Jonathan Hughes, on Flickr As filler would not take in the shallow cut outs and the overall panel was too recessed, I cut out the offending panel to a shallow depth and added a new thin piece of plasticard to replace it. Fixing the rear of the gun cover by Jonathan Hughes, on Flickr The plastic was thin so I cut out the shape of the access cover Access cover hole cut out by Jonathan Hughes, on Flickr And added a new part to fit within the hole. Not perfect, but it’ll do and it corrects another error ... hopefully I’ll not find (too m)any more. Panel complete by Jonathan Hughes, on Flickr Today, I pressed on with some paint after primer and first cover coats had dried (Mig one-shot) ... intakes and bits, in white... along with nose gear bay etc., all with Mission Models acrylic; cockpit tub was painted in a 70/30 mix of mission models Light Ghost Grey and Light Gull Grey in an attempt to match the Quinta Studios parts; some black added to the outer parts of the coamings (MM paints 70/30 mix of tire black and black) and details were then highlighted some details and painted detail parts (coaming fabric, seats, tub details) with Humbrol enamels as is my preference on small parts. First proper paint session by Jonathan Hughes, on Flickr So, in summary, at least I’ve started. At the moment, I have less time for modelling than at any point in the last few years so maybe I should have chosen a simpler kit. The kit complexities were known and I’d been advised of the need for plenty of test fits to ensure all is well before committing to glue. The parts’ fit is quite good... but a little vague in areas. The kit errors and quality of molding is a little annoying as I had expected a little more in terms of quality... but I will persevere with the hope that it will provide something that is worth the effort. Thanks for reading. Jon- 70 replies
-
- 13
-
-
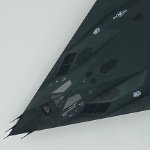
After my long absence I'm back with another workshop thread, this time I have a Northrop P-61A "Black Widow" from GWH and in 1:48 scale. The model straight out of the box I think, because I don't plan any additions to it. Unless something goes wrong. The model is familiar so I won't be taking photos of all the frames and will limit myself to just these photos. There are two camouflage paints, an all black Burma aircraft and a European theatre of operations grey/olive with invasion stripes and this is what I will be building. So much for the introduction.
-
 Great Wall Hobby is to release a 1/144 Vickers Valiant K.1 - ref. L1010 Source: https://twitter.com/ModelArtInc/status/1707642202518950268 GWH 1/144th Handley Page Victor kits thread - link GWH 1/144th Avro Vulcan kits thread - link V.P.
 -
Great Wall Hobby is to release a 1/144th Lockheed C-130H Hercules kit - ref. ? Source: https://hobby.dengeki.com/event/2090004/ V.P.
-
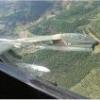
 Hello again, Time for another 1/48 fighter jet, this time an F-15e Strike Eagle from Great Wall Hobby. Decals were from DXM (Double Excellent Models), and the cockpit seats were from Quickboost. This took around two months to finish. This was intended to be a clean build, as I was trying to closely follow the real thing, referencing some brilliant photos by Jonathan Derden on his website (well worth a look BTW). It was going ok until the decals... don't get me wrong, they aren't bad decals as such, but the wings are something that really need to be placed in one take. The first one went on fine, but trying to line up the second one correctly.. it soon turned in to a ripped mess. If this wasn't enough, the 'sealing' varnish spray afterwards showed up how much the decals hadn't settled to the body as first thought. To make matters worse, I also managed to rip away the eagle face on the left hand side of the craft with no hope of saving the original decal 😂 I will admit to being slightly impressed with my own repair efforts by using spare decal, and painting in the eye freehand (I also found that GW/Citadels 'Administratum Grey' is a near identical match to the light grey decal colour) The last picture shows this. The other (many) mistakes were mostly masked with weathering, mainly AMMO Oilbrushers and Tamiya Weathering Powders. In general this kit was painted up using a variety of Acrylic paints, with various enamel washes used. The GWH kit itself is OK.. I'd read some mixed reviews after I'd brought it, so was expecting a bit of a challenge. Some bits just did not line up at all, whilst others fitted better than expected. Do have some plastic putty to hand though, you will need it. The Quickboost aftermarket seats were somewhat unnecessary as the ones included are of decent quality. There were plenty of times I hated how this was going with the multiple decaling issues. However now it's finished I think it isn't so bad after all. Sure the decal 'wings' aren't properly aligned, and there is still too much visible silvering for my liking, but could have been a lot worse. It's certainly given me a lot more respect for car modellers who regularly deal with large decals over difficult surfaces! As always, let me know your thoughts!
- 11 replies
-
- 43
-
-

-
Hi all, quick question...am almost finished the decaling of my Ukrainian Su-27UBM and was wondering about the weathering...anyone bulit one of these and if so how far did you take the weathering? From what I've seen these things are usually quite clean so was just going to go for a bit of dirt underneath and a blue/greyish sort of oil wash with a bit of chalk dust and powder to finish up with? Thoughts?
-
After countless learning on Haneto's posts. I have decided to learn the tricks and start my own Su-27UB. Starting with the ejection seat first! 2023-02-21 2023-03-22 Another day on continuing the cockpit. I must say I am surprised by the detail of this kit. GWH did a fantastic job of making sure the decal can fit perfectly on the panel. With some help with softer and heat gun, it can sit nicely with raised detail. This is better than the Quinto Studio in my opinion since printing always has pixel ink marks and blurry boundaries.
- 11 replies
-
- 10
-
-
-
-
Douglas TBD-1 Devastator 1:48 Great Wall Hobby The Devastator was an interwar design for a torpedo bomber that entered service in 1937 during the “Yellow wing” phase of American Naval aviation. Although a capable aircraft, it was outclassed almost as soon as the Americans entered WWII with only around 130 being procured for use by the US Navy. It was a slow beast, and not the most manoeuvrable, which although it performed quite well in its first uses against the Japanese, subsequent attacks suffered heavy losses, rapidly diminishing the numbers, and after the sad but heroic sacrifice of squadron VT-8 (the subject of this kit) during the Battle of Midway, the Devastator was withdrawn from active duty with fewer than 40 airframes still in existence. As mentioned above, this release is of the VT-8 aircraft that flew at the Battle of Midway, sacrificing themselves to throw the Japanese fleet into disarray and draw fighter cover off station, allowing later attacks to sink or cripple three of the Japanese carriers. These aircraft had distinctive twin .30cal machine guns, that were fitted just prior to the ill-fated attack. These parts are included in the kit, as are the standard single gun, which isn’t mentioned in the instructions. The kit arrives in a standard top opening box with a fetching digital painting of a torpedo laden Devastator flying uncharacteristically over a burning carrier. Inside are four sprues of mid-grey styrene parts, a separate cowling part, a sprue of clear parts, two frets of Photo-Etch (PE) brass, two white-metal wing hinges, a small sheet of decals, and a larger sheet of pre-cut and numbered canopy masks. The package is completed by a colour reproduction of the box artwork and a handsome full-colour instruction booklet, which again has the artwork reproduced on the top of the front page. On first look, the parts are exceptionally crisply moulded, with slide-moulding used on the two torpedoes and the three .30cal machine guns. The clear parts allow the modeller to pose the canopies open using seven individual parts, or closed using one very large part. Both sets are very thin and clear, and the inclusion of the masks will be a godsend, as each part has a minimum of four panes, with all of the attendant framing that requires. Construction starts with the cockpit, and a significant number of the kit’s part count will be used here, due to the quantity of separate parts. The pilot and navigator’s seat have a full set of PE harnesses, and the pilot’s seat is attached to the mid-bulkhead by the correct frame. Separate rudder pedals, plus various large control levers and the control column are also provided, and the gunner’s “baby seat” turret is again made from a number of parts, and has a PE lap-belt arrangement. Following the instructions, you will install the twin .30cals here, but if you decide to model a non-VT-8 aircraft, the twin-mount should be left off, and a single .30cal (part D7) with a goose-neck mount can be fitted in its place. Of course, you’ll also need to source your own decals. The fuselage sidewalls have ribbing detail built in throughout the whole length of the substantial cockpit, but there are a number of ejector pin marks here. I suspect that these have all been placed either in places where they won’t be seen either because additional parts are placed over them, or because the addition of the cockpit “topper” will render them invisible. If they still bother you however, a piece of styrene strip glued in to replace the missing portion of ribbing should cure it for most modellers. The cockpit sidewalls are festooned with lots of parts, from boxes to control quadrants and wheels, making for a nice busy area without resorting to aftermarket. The small side-windows in the pilot’s compartment are installed at this point, but you’ll need to make your own masks for both sides of these, as none are included on the sheet. The pilot’s instrument panel is split into two parts on the kit, with the upper part set forward from the lower. A full set of dial decals are included on the kit sheet, which is a great boon to the modeller, and a feature that other manufacturers would do well to follow. The separate cockpit floor is a little strange, and consists of a “tray” with a ribbed surface that sits under the feet of the pilot and navigator in the deep recesses of the fuselage, with a single window in the front, allowing the pilot a view from the underside of the aircraft. The radio gear is all moulded in one block, but detail is good, although there are no decals for the two dials in the top box or the data placards on the fronts. The final acts before closing up the fuselage is installing the arrestor hook into its small notch, and a wedge-shaped piece of PE lining to the underside window tunnel, which also has a pair of aerodynamic doors to allow it to be posed open or closed. Aligning the cockpit’s enclosing top deck must be done carefully here, to minimise the seam between it and the edges of the fuselage. Several plastic and PE parts are then added to the cockpit deck, including a large sighting unit for the pilot, and strengthening to the roll-over protection. Once the fuselage is closed up, the engine components are added one by one. The exhaust collector ring is attached to the front bulkhead, and has recessed exhausts either side. The recesses aren’t very deep, so some may wish to drill them out further, using the existing depression as a guide. The engine itself is made from seven styrene parts and has an additional PE wiring loom added to the front. The individual cylinders are crisply moulded, and once the additional moulding reservoir “pips” that help prevent short-shot moulds are removed, the seams can be scraped clean in preparation for painting. The cowling is supplied as a separate part, and has been slide moulded to obtain excellent surface detail all around. Open or closed cowling flaps are included separately, and are glued to the cowling before installation at the modeller’s choice. The clear parts, as already mentioned are supplied either in seven separate pieces, or as one continuous mould. Separate canopy masks are included for each option, as presumably, the sizing is slightly different for each option. The central wing section is a single part on the underside, with the two upper wing stubs as separate parts, and the flaps separate again. A cylindrical intake on the starboard underside of the wing is installed with a PE mesh grille at the end of the intake greeting enquiring eyes. The aerodynamic doors over the pilot’s lower window have PE skins attached to them to improve detail, which really compels the modeller to leave them open, even though it spoils the look of the aircraft slightly. The wing stubs are closed off by a pair of nicely detailed wingfold bulkheads, with matching pairs on the outer wing segments, which are of course made from top and bottom halves. If you are posing the wings folded, the white-metal fold mechanisms will hold the wing at the correct angle, and strengthen what is usually a weak point on models with folded wings. Some nice little PE parts are also added to the wing fold area, improving the detail and giving the area a better scale look. Again, it would be a shame not to fold at least one of the wings here. The ancillary or “sticky out bits” are next on the agenda, including the prominent aerial on the front fuselage, the sighting tube that penetrates the canopy (which has a hole moulded in), and of course the wheels, which can be built up in either up or down pose just by cutting off one of the retraction struts. Here appears to be a little weak spot of the kit, because the wheel recess – I hesitate to call it a bay, as it is simply a cut-out under the wing, has no detail within the wing, other than what is moulded into the underside part. I’m not sure at this time whether there should be any detail here, but it will look a little blank to the inquisitive viewer. The next job is the torpedo recess under the fuselage. If you want to depict the aircraft loaded with a torpedo, there is a shaped part, and if unloaded, there is a flat blanking piece. The two torpedoes provided are the Mark 13, which proved problematic to begin with, and the version with the rudders behind the props were the initial batch. The later modification to add wooden fin stabilisers slowed the torpedo on entry to the water is also included, although the wood grain texture is only engraved on the outer edges, and the inner edges have some ejector pin marks that could possibly show up on the finished item. If you elect to leave the torpedoes in the spares box, there are a pair of bomb carriers in the box that can be added to the fuselage underside, but you’ll have to source your own 500lb bombs, as none are included in the box. The decals are made in China (as is the kit), and appear to be in good register, with thin carrier film. Based on past experience, the decals should settle down well over the ribbed wings with a little Mr Mark Setter. The long black walkways are provided as decals, as are the multi-coloured prop tips, although if you wanted to paint them yourself, there are very faint lines where the demarcations are. If you would prefer to paint your national markings and the walkways however, GWH have thoughtfully included a set of masks next to the canopy masks to do just that. Circles and stars are provided, so the process would be a coat of white, apply the star correctly oriented, a coat of dark roundel blue over the star and apply the roundel, being careful to line them up properly. Then apply the top coat and finally unmask the roundels once you’re done. From the decal sheet (or masks) you can portray one of two aircraft from VT-8, 8-T-14, the mount of George Gay, the sole survivor from that fateful mission, or T-16, piloted by LCDR John C Waldron, the commander of the squadron on that day. This link to the International Group for Historic Aircraft Recovery (TIGHAR) is quite interesting, as it shows a submerged Devastator that the society wants to recover, and includes some interesting detail pictures that may be of use if you're planning on super-detailing your model. Conclusion Although the Devastator was a comparative failure as a fighting aircraft, this kit seems to hit all the right spots in terms of detail (with a few remarked upon exceptions), simplicity of construction, and quality of moulding. It’s a fitting tribute to the brave men that lost their lives on VT-8’s most famous attack, and should sell well. The inclusion of two frets of PE parts, the alternative canopy parts, masks etc., are all good to have, and the care with which the canopies are packaged, in their own bag and then a further protective expanded foam bag will ensure your kit is well protected until you’re ready to build it. Choice of two extremely nicely moulded torpedoes is a nice feature, although a pair of bombs for the underside would have been helpful. I understand that the twin mount for the rear gunner was a late addition to the squadron’s equipment, so if you’re modelling the aircraft prior to the raid, please check your references to see if they’re installed, and use the alternative parts if required. Highly Recommended Review sample courtesy of
-
 I’ll be making a maximum effort to get this build done by the GB deadline - a 1/72 GWH F-15E dressed as the 494th FS’s 01-2000 ‘Valkyrie’ during the unit’s 2018 deployment to Operation Inherent Resolve, thanks to the excellent (and popular here!) Two Bobs ‘Maximum Effort’ decal sheet. Basis for the build is Great Wall’s, by all accounts, err, great F-15E kit. The D-Day 75th anniversary scheme looks amazing but I wanted an operational bird. Plus I read GWH’s decals aren’t the best? The Two Bobs sheet is printed by Cartograph. Here’s the mandatory sprues shot. Lots and lots of sprues (polar opposite to the Italeri F-5 I’m working on over in the F-5 STGB!) and lots of lovely detail. I’ll be raiding my Hasegawa JDAMs/pods weapons set for GBU-31s and -38s and a Sniper XR pod and pilfering my spares box (from the Academy F-15C I built last year) for an AIM-9X and an AIM-120 (the kit only has 1 x AIM-9L/M, one x AIM-9X and 1 x AIM-120, and the AIM-9X‘s fins don’t look quite right). The Two Bobs set comes with a large stencil placement sheet with weapons load out diagram for OIR which will be very helpful. Looking forward to making a start very soon. My F-104J in the Century Series GB is pretty much done, I just need to progress the F-5 before diving in too deep on this one. But usually a build like this will take me two months, and I just looked at the calendar… So I resolve to apply maximum effort to be on time and on target so this Valkyrie can ride into battle…I mean into the gallery… Thanks for looking, comments and pointers always welcome. Gerard
 -
While my modelling set up is packed down for a house move, what else is one gonna do but surf for new kits right? 🤷♂️ I shouldn't really, I struggle to complete builds these days, but this little fella fell into the basket together with a couple of AM goodies (seats and ip) No need to introduce the plastic it's a familiar kit in the GB, but the markings are quite interesting with 5 lakenheath noseart schemes included: 391 FS, 366 FW 90-0237 / MO Ares 2018 391 FS, 366 FW 90-0233 / MO Guardian 2018 494 FS, 48 FW 91-1326 / LN Ravage October 2018 494 FS, 48 FW 91-0311 / LN Lady Liberty October 2018 and 494 FS, 48 FW 96-0204 / LN 2-Oh-40oz 2018 i might go for 'the guardian' perhaps gonna make it a used dirty airframe, they all returned looking worn from their six month deployment. this is my inspiration:
-
 Hello all, Here is my entry for this GB (another may follow, I'll see how I get on ) - Great Wall Hobby's 1/48 F-15E, which will be marked as 00-3003 of the 494th Fighter Squadron 'Panthers' during their Operation 'Inherent Resolve' deployment in 2018. Kit: Lots of plastic in there! Extras: I'll be using a Quinta cockpit set, BAM update set, Pavla seats, Caracal decals, KA models exhausts, resin FOD inserts and a New Ware mask set. One thing I find odd is that GWH do not provide you with a centre line pylon, but luckily @redcap sorted me out a while ago with a spare and some GBU-38s. I've studied quite a few images of F-15E OIR deployments and have decided to load this one with 2x AIM-120, 1x AIM-9x, 1x AIM-9M, 6x GBU-38 and 4x GBU-39 Small Diameter bombs along with 2x fuel tanks. Scheme: Real thing post deployment: https://www.jetphotos.com/photo/9203130 Essential reference: Some good shots of a 494th jet: The 492nd make a better video though Cheers Dave
 -
 Building period Aircraft: 5 months (Dec 2021- April 2022) Accessories and diorama: 3 months (April 2022- July 2022) Aircraft mostly OOB except D&W landing gears, resin nozzles, Master metal dischargers. WIP thread:
- 41 replies
-
- 39
-
-
-
After the MiG-29 (9.12) "Fulcrum-A" late version - http://www.britmodeller.com/forums/index.php?showtopic=234925828&hl=fulcrum - , Yufei (Haneto) and Great Wall Hobby 5GWH) are working on a new variant of this fighter aircraft, the MiG-29 (9.13) "Fulcrum-C". In the meantime Yufei has also announced the MiG-29 (9.12) early version... Here are the first pictures Source: http://s362974870.onlinehome.us/forums/air/index.php?showtopic=255187&st=500 V.P.
-
Hi, Here's my GWH Victor that I'll build as an all white Victor of No 100 Sqn. I've built XM715 before in this scale as a tanker at the end of her career. These two models should look interesting together. I know that I talked about entering a 1/144 Argosy in this GB, but I simply have too many unfinished models to work on. Cheers, Stefan.
-
Simply the BEST Flanker kit in any scale: Great Wall Hobby GWH Flanker family, with adequate detail level by easy+straightforward building experience. I simply hate those over-engineered mode kits(if you still call them model kits) because it's simply waste of my precious time and energy. Afterall the final effect is up to your skill, not the so called "details" from kit part number!! Will definitely build more of GWH Flanker kits. Have a nice weekend~
- 34 replies
-
- 73
-
-
-
Let's start my favorite theme "MIGs in foreign service". Now Mig-29A "Fulcrum" from GWH. I bought a minimum of add-ons: First time buying 3D-decals from Quinta Studio. Cockpit:
- 23 replies
-
- 10
-
-
 My summer project came to an end!! Ireally enjoyed my second bare metal journey!! Hope you like my effort to replicate this bare metal beauty!! Some more on her here...
- 22 replies
-
- 53
-
-
-
Good morning lads, I finally finished my new summer project GWH's 1/48th scale T-33A. My time was limited to present you an in progress work, but i will try to give you an idea !! The kit and some aftermarkets...also used some custom masks for the ''USAF'' and ''TR-411'' codes from my friend Alexis And the scheme i am for is the second one TR-411, here is the only photo i managed to find.. A few words about the kit....AWESOME!!! (my humble opinion!)....nothing more A few words about Caracal decals...the same!!! Awesome!! I started dealing with the cockpit as a usual...here i used Eduard PE for the cockpit and the pilot's seat! Cockpit... Seats... All together and weatherd... ....
- 15 replies
-
- 3
-
-
- Caracal decals
- t-33a
- (and 1 more)
-
y I had originally started this as a WIP thread, but after my first few posts I stumbled across Haneto's brilliant WIP thread, which is quite frankly the be-all-and-end-all of this particular model, making any of my attempts to be helpful completely worthless! 😂 But more usefully it gave me just about everything I needed to make the most out of this kit, as well as setting the standard ridiculously high... I didn't quite emulate Haneto's awe-inspiring work. Not even near in some cases. But now its complete I can appreciate it more. This is my third ever aircraft (my paint skills come from painting GW minis) and this has been my biggest project to date. Painted with acrylics (including the metal parts) from Vallejo, Citadel & Scale 75. I used the 'Russian aircraft' air paint set from Vallejo for the main base colours, although I used different colours from the set instead of the recommended 'flanker' paints, as I found them too dull and similar to one another. Weathering was done mostly via acrylic washes (the Vallejo washes are very good for manipulation with a wet brush/cloth for a good hour afterwards, despite being acrylic water based), although some enamel washes were used on the smaller parts. The exhaust and tail fins colour patina was partly done with the use of Tamiya weathering powders. Watercolour pencils were also used on various parts on the body. The 'lines' painted on the engine exhausts were done using inks (with the occasional help of a ruler!) A Molotow chrome marker was used on the brightest metal parts. I ended up using the Begemot decals with the set provided, as I had a few concerns over the GWH decals being a bit thick. Overall, this wasn't the case, and if you are considering the Begemot decals, be aware they are not a complete replacement, and you'll still need both. There is also a few errors in the Begemot decal guide, where the GWH one is by and large spot-on. The Begemot decals are generally much nicer and more detailed however. As far as the kit goes, it is great and generally fits together very well, but a few issues to watch out for; firstly consider scribing over the panel lines, as some of them are very faint and can easily be lost durng the priming and painting stages. Part of the reason why this kit looks so weathered is due to having to repeat washes where the wash just wouldn't stick in the panel lines. I also had to re-draw all the lines on the metalic parts of the rear fins, which was a hassle and why those parts may look a bit odd. Secondly, be aware that there are some very tiny parts on the main body that can easily be broken when handling it. There is a missing antenna thing from each side of the wing where they've got caught somewhere and subsequently disappeared, most likely inside the vacumn cleaner. Haneto did suggest in his thread to replace them with brass rod, but that's a bit out of my comfort zone. Next, you will need to shave off a good couple of minimetres of the main body around the insertion of the engine nozzles as that is not a good fit if left untouched. Finally, be very very careful with the landing gear assembly. I made a very annoying balls-up, but thankfully it's barely noticeable due to everything else going on with the craft. Once again this has come out more weathered than I originally intended, as I was going for a cleaner build. It's something for me to work on. My next couple of planned projects are to do a couple of scale 1/24 cars, which I am definatley not planning to weather! After that it should be an F-15e, also by GWH. Well done if you made it this far and thanks for looking. Huge shout out to Haneto for all the help and inspiration his WIP thread provided me (if you have no idea of what I'm talking about, go and look for it NOW - also to see what a SU-35 should really look like!) 😂 Any questions feel free to ask!
- 28 replies
-
- 60
-
-
-
 WIP is there: The pics: The Galaxy masks for the canopy, panels, missiles and engine area are extremely helpful. If you intend to build a GWH or Minibase Flanker, get some. The Galaxy masks for the digital camouflage are extremely cleverly designed, and almost idiot proof (I know, I used them). From what I saw, their design is better than the Foxbot ones. While we're talking Foxbot stuff, their decals are excellent. I used them rather than Galaxy and GWH ones when I could. MRP paints are as usual, ie excellent. The kit is one of the best designed kits I've ever seen. Can't wait for the next GWH Flankers (the Flanker B is on its way). Cheers, S.
- 12 replies
-
- 31
-
-
Hi everyone, I wanted to share my most recent build. This kit is spectacular and having built the 1/48th scale version of this kit, I'd say they are comparable and I'd almost prefer the smaller one. I really hope GWH gives the same treatment to the Su-27 and Su-27UB, I'd scoop them up in an instant. In addition to these pictures I also documented my process of painting the engines and heat staining patterns on my website. You can check it out here. Thanks for looking!
- 14 replies
-
- 31
-
-
-
I haven't posted anything in this section for a while but I've decided that this is about to change. Brand new GWH kit of the Su-27UB in 1:48 and from my initial inspection, I am quite certain you can make it into outstanding looking model without use of any aftermarket products. Progress is slow as I have a bunch of exams at work in the near future and parenting and other hobbies take a toll, but still, I am gaining momentum with this build nevertheless. First completed piece is front gear well - I am doing an early version of the UB so I've chosen the open bay with all the piping and structure visible but GWH provides a closed well for later versions as well.
.thumb.jpg.272d279b0681830e369bacbd49b18715.jpg)