Search the Community
Showing results for tags 'Dak'.
Found 14 results
-
Hello everyone, First of all, this vehicle was never called Sturmpanzer II. It was also never called Bison II either, as it is sometimes referred to by model kit producers. Its official name was: 15 cm sIG 33 auf Fahrgestell Panzerkampfwagen II (Sf). It was developed as a response to the need to provide heavy artillery support in the environment of highly mobile warfare. Panzer II was selected to fit the 15cm sIG 33 heavy artillery gun. This proved to be a big challenge, never to be solved completely and adequately. The prototype was first tested at Kummersdorf on 13 June 1940. Panzer II chassis was modified, by lengthening and adding one more axel (which helped to absorb recoil forces better and reduce the chance of tipping over) and widened by 40cm, which made more space for the crew. It was still very crowded and hard to operate, and only 10 rounds could be stored inside. The engine was not adequate for the increased weight and engine cooling was not adjusted for desert conditions. Alkett completed seven 15 cm sIG 33 auf Fahrgestell Panzerkampfwagen II (Sf) in December 1941 and five in January 1942. They were all sent to Africa and assigned to 707.schwere Infanteriegeschütze-Kompanien. and 708. schwere Infanteriegeschütze-Kompanien. Both of these regiments were part of Rommel’s 90. Leichte Afrika-Division and fought until the Axis surrender in Tunisia in May 1943. Vehicles were arriving in Libyia between February and April 1942 and were plagued by all kinds of problems. The engine could only run for very short periods of time without overheating, sand was thrown by the tracks into the engine air intake and the engine would constantly break. And there were no spare parts delivered. Basically, the vehicle was a disaster, they just added additional weight to the gun so it was hard to move it around. All 12 vehicles were present in the El Alamain battles, where half of them were lost, and the remaining 6 fought until the end of the war, surrendering in Tunisian in May 1943. Ark Model kit is the same disaster as the vehicle itself I will not grudge about it here... you can check my WIP thread if you are interested to see all the problems with the kit, but basically, it is really hard to build it into something decent without a fair amount of fixing, scratch-building, and AM parts. However, I must say that I enjoyed building it and fixing all the issues on some strange level Accuracy-wise, I can not comment much, I didn't want to check the dimensions, because I couldn't do much about it anyway. I used plenty of AM parts of this one. Friul tracks, Eduard PE set, Aber barrel and aerials, AFV Club ammo, and some additional Panzer Art, TMD, and Value Gear stuff. So basically I turned cheapest model I ever bought into the most expensive build The model is painted with a combination of Gunze, MRP, Tamiya, and Vallejo paints and weathered with Mig's pigments. The Interior and sIG 33 gun are a bit better detailed compared to the rest of the vehicle. Here are some shots: And here are some detailed shots, mostly of the stowage: Thank you all for watching and for your support in my WIP thread. Cheers, Nenad
-
Hello everyone, After wrestling with my Dragon Tiger build, I wanted to build something simple. I picked Tamiya Sd.Kfz. 222, that was on the shelf for too long. I wanted to build a vehicle from the start of Rommel's actions, early 1941, when these vehicles were still in their original RAL 7021. The vehicle belonged to 3rd Recon Battalion, 21st Panzer Division (at this time 5th Light Division). It should be a mid-production version (series 3 or 4). I did few minor modifications to the kit, because Tamiya kit represents later series 5 vehicle and added few AM parts: metal barrels, tool clamps and stowage. Also, replaced decals with Archer's version, because I don't like how Tamiya thick decals look on the dark background. Kit is super simple, and builds like a charm. Typical Tamiya kit. Details are meh, especially barrel, which is metal, but almost no details at all. Also, some things are oversimplified, like antenna base, jack, no tail light at all, etc. I plundered few other kits for spare parts. Also, added some generic Aber PE parts, like tool clamps. Model is painted with MRP RAL 7021 and weathered with MIG's pigments. Overall, a relaxing build, just as I wanted. Thanks for watching and thanks for feedback. Cheers and Marry Christmas, Nenad
-
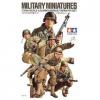
Ciao ragazzi, this time I built the old Tamiya kit of Panzer II DAK. I try to obtain a decent results due the age of the kit. The next step is to create a small diorama in order to include the Panzer with the soldiers. The Panzer commander was deforming due to the age so I remove. The rest of the soldiers are not so bad... we will see in the end... Stay safe and tuned Paolo
-
Hello everyone, These build took some time and it's finally finished. I must say I quite enjoyed it. You can see the whole process here. Thank you for following my WIP thread and for all the suggestions. The models here should represent two tanks: Panzer III Ausf. G from the 21 Panzer Division, as being photographed during April 1941 in Derna Pass during Operation Sonnenblume. Panzer III Ausf. H from the 15 Panzer Division, as being photograph during November 1941, during exercise somewhere around Tobruk. I used Dragon kits No. 6773 and No. 6775 as a base for these builds. Many aftermarket items were used as well as some scratch building. I apologize for soo many photos. Having to show two different tanks it was hard to keep the number lower. And of course, I was a bit lazy to make a better selection Here are some photos of Panzer III Ausf. G. Dragon kit is intended to be used for Touchpanzer version, so some changes had to be made. Also, there were some smaller field modifications, such as tools layout being changed, added roadwheel holders, etc. Model was painted with combination of MMP and MRP paints and weathered with MIG and AK products. And some detail shots. And here is the real thing. And some photos of Panzer III Ausf. H. Ausf. H and Ausf. G are quite similar, main difference being additional bolted armor and new type of wheels and wider tracks. Other differences depend on the production modifications that were continuous process. In this case, commander cupola is different for example. This one was painted with Gunze paints and weathered with MIG and AK. 15 Panzer Division tanks have more modifications compared to 21 Panzer Division tanks. Probably a learning process from the 21 PD experience. Also, this is the first time official RAL 8000 was used. Previously, it was yellow, light paint of unknown origin. And again, some detail shots: And the real photo of this particular tank. Thanks for watching and thanks for the feedback. Cheers, Nenad
-
Hello everyone, After building allied armour most of this year, I'm back on the other side. This is my version of uparmoured Panzer II Ausf C, belonging to 8th company, II battalion, Panzer Regiment 8, 15t Panzer Division, as photographed during Operation Sonnenblume, sometimes during April or May 1941. It's Dragon kit No. 6432. This kit is simply fantastic! There are just minor issues, the biggest one being that they forgot to include rear smoke grenade rack (actually they included the wrong one), so I had to use aftermarket version. Other than that it's just minor issues and it can be built very nicely straight from the box. Kit includes magic tracks, which are my favorite indy tracks. They are so easy to build. Oh, and of course, building instructions are a disaster, but that's quite common with Dragon kits of this period. I used some AM parts: E.T. Models detailing set (which includes smoke grenade rack), AFV Club jerry cans, Aber aerial, Value Gear stowage, and Archer Fine Transfers decals. There was some scratch building involved, mainly to make jerrycan and spare track holders. It's primed with Mr. Surfacer 1500, and painted with Mission Models RAL 7021 as a base color and Gunze Mr Hobby Aqueous Hobby Color H402 as final RAL 8000 camouflage color (my favorite version of RAL 8000). Initial batch of 15 Panzer Division tanks were not field painted. They were painted in Italy before being shipped to North Africa, so they were painted quite neatly (compared to 21st Panzer Division tanks for example). Details are pained mostly with Gunze Metal Colors and Vallejo Model Color. And here are some details: Weathering is Mig's nature effects and pigments. And here's the real thing: There are some inaccuracies in my build. For example, inside of the turret company marking '8' should be white, rear tail light should be convoy light and not the early version that I used, there should be two segments of spare tracks in the front, etc. But, as always, you notice some of these stuff too late. I left first two road wheels and Notek light Dunkelgau. They do look darker on the photo, but this is just a guess I did this just to make some variety. Let's say its repaired battle damage Hope you will like it and all the feedback is very welcome. Cheers, Nenad
- 31 replies
-
- 50
-

-

-
This is going to be my entry in the GB, dragons nice little kit of the PzIII ausf H in North Africa, supplemented with a tank workshop barrel with canvas cover. Other than that it will be an out of the box build in the hope I get it finished in time!!
- 59 replies
-
- 12
-
-
Hi all, Very much a tank novice but would really like to build a Panzer IV (either F-2 or G) in DAK markings and wondered it is possible to use an Ausf H to model a G and what are the most noticeable modifications that would need to be done. I do actually have a model of an E (the new Zvezda kit) and wondered if that could become an F-2 with the addition of the longer barrel for the main gun and some thin plastic card for making the hull armour a little thicker in places. I only ask as it's a lot easier, and cheaper, to get hold of decent Ausf H kits than it is F-2's and G's. Many thanks in advance. Craig.
-
Hi everyone, Here's one of my latest completions, a long time resident of the stash, Tamiya's 1/35 Africa Korps Type 82 Kubelwagen with sand tires, plus some scratch built jerrycan racks: This was bought when Beatties was still on the go, so it's been in the stash at least 15 years! It's hand painted throughout and is weathered in an "artistic" style! Comments welcome, Mike.
- 16 replies
-
- 16
-
-

1/35 Afrika Korps PanzerKampfWagen II Ausf. G
Bill.B posted a topic in Ready for Inspection - Armour
Since dipping my toes back into the world of plastic modelling with the classic Tamiya Panther some weeks ago and having a modicum of success I decided to try another cheap Tamiya kit to try out the world of DAK. As can be seen it's the humble little Pzkpfw II, but I've added a smattering of PE, Aber barrels, scale aerial, modified Tamiya Jerry cans & fuel barrel, and a resin sand bag to add a bit of 'realism'. The rope holding the barrel is simply sewing thread that's been dyed in a dark brown wash, allowed to dry and then run through an old tea light candle. This lightly waxes the thread and stops most of the fine wayward threads sticking up. Personally I found the desert scheme quite a bit more difficult to apply than the European type so please feel free to give me some useful criticism as it's the only way I'll learn.- 10 replies
-
- 11
-
-
Hi all, having had good feedback on my first AFV in well over 30 years from you kind people, I've decided to up my game and try a DAK project. Again I've used a cheap oldie from Tamiya in the form of the diminutive Pz.Kpfw II (Ausf. G) to experiment on so if the whole process goes south I won't be losing too much! Personally I believe it's harder to do a convincing weathering job on a desert vehicle rather than one used in the European theatre, but I'm sure there are some of you that may disagree with that theory. Anyway, the photo shows progress so far and as with my Panther I've opted to use Aber barrels and a smattering of Eduard PE. I'm not trying to create a masterpiece (I wish I could!), but a little extra detailing can make a big difference on a basic kit like the early Tamiya mouldings. Modifications I'm doing are as follows: Various items of PE added, a scale Aber aerial in the upright position (I've cleaned out the plastic moulded aerial in the stowage trough), Aber main gun barrel and auxiliary machine gun, 4 Jerry cans will be lashed down on the rear deck, some steel helmets will be stowed externally, a sandbag or two will be stowed on the upper turret and glacis area, and a wooden ammo box is mounted on the starboard side which will have another Jerry can stowed behind it. Having looked at numerous wartime videos and photos of various German tanks it seems that extra equipment was stowed in a variety of places and that in the heat of battle anything goes. This seems especially so with the stowage of spare track pins which were stuffed into engine intake grills and filling the centre of spare wheels. Finally, I'm still deciding what (if any) diorama to create with this tank, but whatever it is will be without any personnel present as I'm carp at painting them!
-
Hello there, this section isn't very big here on the forum, but I've got this project doodling along in the background. Picked up a HL no S or S 27Mhz Panzer IV and am doing a few modifications that some others may like to see. The pictures mostly speak for themselves, please comment or ask questions. It all starts with these and they just happen to fit perfectly inside the 8 screw sections that keep upper and lower hull together. Battery access will be by removing the upper hull. fire in the hole, lol adding a piece of steel coat hanger wire helps to centre the magnet keep checking for fit and make SURE the magnets are pulling each other and not pushing
-
 My first model and diorama made some time last year after over 20 year break. I've made it as a kind of exercise to test the materials and techniques that I wasn't even aware of when assembling kits as a kid (pre/post shading, weathering etc.). Brush painted (haven't had a airbrush yet) with Mr Hobby paints and weathered with pastels. I've done some photoshop work on two first pictures to blend the diorama with the background to look like an old photo. I haven't touched the model or diorama itself.
- 11 replies
-
- 19
-
-
- Messerschmitt
- Bf 109
- (and 5 more)
-
 OK! I wasn't going to build this as a Trop, but the included decals are both from ZG.26 which was sent to Sirte, Libya in 1941. They were actually the very first Luftwaffe unit sent to North Africa according to ZG.26's Wikipedia page ... From what I'm reading, there doesn't seem to be much difference between the D and E variants other than a "strengthened airframe" which obviously is not going to be noticeable on this model. So I'll probably paint this up as a France 1940 example, given that we're in the 75th year since the Battle of Britain. Someone please correct me if I'm wrong about the above, or if I would require a 110C to be accurate for France. I'll keep educating myself in the meantime. So, for now, obligatory box, sprue, and decal shots (I'm going to take a nap since it's raining and then start construction when I wake up ).
 -
deleted