Search the Community
Showing results for tags 'Corsair'.
-
Hi all, My attempt at the tamiya corsair. this time used a resin cockpit detail and eduard photoetch for external and engine detailing. learnt a lot regarding the resin detail especially how brittle it can be when removing flash. A few things could have been better and maybe put some more effort into detail prep as i got caught out a few times with the pipe /conduit detail. It took a while to build but i like the look of the finished article so the time was worth it critiques welcome Thanks Kev pics below
-
Hello again! As promised here is my 1/48 Hobbyboss F4U-1 Corsair on its scratch built display plinth. I wanted to capture the look of a sun bleached, beaten up Corsair waiting for the next sortie.
- 24 replies
-
- 42
-

-
 Just finished this one for a client. The stand is included in the kit and makes for an interesting display which helps show off the Corsair's sleek and powerful lines. No trouble with the kit on this one, but a few trials of patience with my own ham-fisted-ness. Tamiya spray paints sprayed by airbrush. Kit decals were used and proved to be thick and hard to work with. There is a small Work in Progress thread here: http://www.britmodeller.com/forums/index.php?/topic/235027527-132-f4u-1d-corsair/&tab=comments#comment-2835657 Thanks for looking comments and suggestions welcome. Cheers.
 -
Hello fellow modellers! I would like to show you my most recent finish. It´s the Italeri Vought AU-1 Corsair in 1/72. It´s a simple and well known kit. It has some inaccuracies, but I tried to improve it a little. I added some Eduard PE, vacuformed the sliding canopy, and some antennas. I used Print Scale decals for this aircraft. This brand has a lot of schemes for many different models, but there are always several errors. For example, the serial number for this plane says F4U-4, instead of AU-1. Some numerals are missing and the code letters are wrong size. However it ends different than the classic kit OOB. I tried to replicate some heavy weathering like seen on some photos. This time I didn´t use pastels, but airbrush and oil paints. The upper part of the flying surfaces was faded by elements and I wanted to show that effect. I hope you like it. Every critics and comments are welcomed. Best regards from Uruguay. Ignacio
- 14 replies
-
- 23
-
-

Tamiya Corsair MkII, Fleet Air Arm, 1833 Sqn
85sqn posted a topic in Ready for Inspection - Aircraft
Hi folks, have just completed this Fleet Air Arm corsair MkII, as flown by Lt. N Hanson of 1833 Sqn. This aircraft took part in several of the East Indies Fleet raids against the Japanese and is shown in a series of photographs having returned from attacking Port Blair in 1944. Lt. Hanson named his first 3 mounts 'Kathleen' after his wife. So this one is Kathleen III. I made a few changes to the kit, I used MDC conversion kit for British corsairs, added the underside scoop, placed the fuel filler caps in the correct place, added the whip aerials from stretched sprue, put the flaps up and cut out the rudder to reposition it. It was painted all with Xtracrylix and some enamel washes. The base I got off of Ebay, it's supposed to be portion of a British carrier deck. Thanks very much to David and Tony for their help. The Wip cane be found here: http://www.britmodeller.com/forums/index.php?/topic/234988298-148-tamiya-corsair-mkii-1833-sqn-hms-illustrious/- 29 replies
-
- 57
-
-
- corsair
- fleet air arm
- (and 1 more)
-
Hifolks, I have another Tamiya corsair to make so I thought I would use it to do my first wip. The aircraft will be finished as JT371 of 1833 Sqn based on HMS Illustrious. The aircraft was flown by Lt N.Hanson on several occasions, notably during the attack on Sabang and Port Blair. The kit is well known but I will use the MDC conversion kit which comes with several resin parts for the cockpit, air scoops, prop and fuel tank. I aim to display it with wings folded and flaps up. I have added a few ignition wires to the engine. The flaps have had their attachment points cut off and require new ones to go through the existing holes but are shown here glued in. Here the flaps are up on the outer wings and the necessary cut has been made on both wingtips. I'll use some clear sprue to create the wingtip lights.
-
Hi guys! This time I would like to show you my last model. It´s the simple Academy F4U-1D Corsair in 1/72. It has some Eduard PE and some improvements, like a longer tail gear and navigation lights. Decals are custom made and the bands are painted to represent an aircraft of the USS Intrepid. I hope you like it! Every critics and comments are welcomed! Best regards from Uruguay, Ignacio
- 10 replies
-
- 25
-
-
Hi fellow modellers, I'm building Italeri's AU-1 in 1/72 and I can't find any info about the wheel bays colours. At the end of WW2 most Navy aircraft had gloss sea blue fuselage, whell bays, landing gear and wheels. In Korea, this is mostly true for F4U-4's , but in the case of AU-1's I see that the main landing gear used to be aluminium and so the wheels, but the tail gear seems to be blue in most cases. Now, what about the wheel bays??? Can anyone help me with this topic? Best regards. Ignacio
-
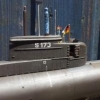
 Nose length Some publications are adamant the F4U-7 was the same length as the F4U-4 and others that it was the same length as the F4U-5/AU1. It is clear that the 7 inherited the AU airframe and its cheek cowling bulges. It is possible that the extra 10” was removed between the wing and cooling flaps but as a minimal change variant, I would think this unlikely, since the panel tooling for the F4U-4 was probably gone by then. In any case the following statement would seem to knock the short nose theory on the head From Lucien Dejeannot, F4U7 engine mechanic (1958-1961) at Telergma, French Algeria…. "The AU1 and the F4U7 were identical in size. When we use to disassembly the cowl parts, you could see very clearly the framework that was added on the lower sides to "reconstruct" the cheeks allowing the use of F4U5 & AU1 side cowls. We never received a "proper" F4U-7 spare [airframe] part catalogue. We used the AU1 one with some addition (mainly the ducting parts). We received in 1958 (if my memory is correct) a couple of "new" AU1 from the USA and they were (engine apart) VERY identical to the F4U7 we had. In some occasion, we did exchange cowl parts from AU1 to F4U7 without problem. Finally, be careful with museums. A friend of mine visited USA some time ago and he saw there one of our old U7 exposed...with a F4U4 engine and cowl which would maybe explain your confusion." Leading edge intake slots These were apparently different for all three variants. With the separate cheek carburetor air intakes in the nose, each F4U-5 leading edge intake slot (like on the F4U-4) now only supplied air to a front facing oil cooler matrix and, via three turning vanes, the intercooler buried behind the engine. With the AU-1 there was a blanking panel where the oil cooler used to be and the three turning vanes, formally used to supply air to the now dispensed with intercooler, were now used to feed air to the buried oil coolers and (I assume in absence of cowling intakes) carburetor air as well (am I correct?). For the F4U-7, the three guiding vanes were larger and spaced out evenly across the entire intake slot. I assume this fed air to the buried oil coolers and re-instated F4U-4 intercooler. I assume that if the extra 10” (not required by the F4U-4)was retained, there was still room for both the re-instated intercooler and the AU-1 style buried oil coolers in the fuselage. Alternatively (assuming the tooling for the wing root intakes had not been irretrievable altered) were the oil coolers moved back to the F4U-5 leading edge position with the guiding vanes providing a measure of small arms protection? The above modelling photo (in absence of any detail photos of actual slots) shows the F4U-7 arrangement on the left and AU-1 on the right. The F4U-7 chin intake It has been claimed elsewhere that when they stuffed the F4U-4's R-2800-43W into the AU-1 airframe to make the -7, they again needed intercooler space. The tooling for the wing root intakes had been irretrievable altered, since the AU-1 was the last planned variant and it was not economically feasible to retool for the limited number of French aircraft being purchased. So room was found for a single oil cooler in the nose, under the engine (thus the "chin" scoop was used to feed oil cooler air and engine combustion air was routed from the wing roots. As I have said above in relation to the 7’s leading edge intake slots, I think the oil coolers would have been either retained in the fuselage AU-1 style or (assuming the tooling for the wing root intake tooling had not been irretrievable altered) moved back to the leading edge F4U-5 style where they were afforded at a cost of some cooling efficiency some protection from small arms fire by the guiding vanes . My inclination is (assuming the nose length was as per the 5 and AU1 and therefore there was a spare 10" of space) the oil coolers remained in the fuselage AU1 style and the chin intake was for carburetor air as per the F4U-4. I assume that the F4U-5 cheek carburetor air scoops were not re-adopted because either the tooling for the cheek intakes had been irretrievable altered, or because the F4U-4s R-2800-43W auxiliaries set up, dictated a chin carburetor air scoop. I would love to know either way. Simon
 -
At the RAF Hendon show last month I snagged a Hobbyboss A-7D Corsair to see if I could top that Century Wings diecast version…delusional me… My eyesight sucks so most of this was attempted with me squinting like Mr Magoo despite an up to date prescription. Mainly out of the box, no after market embellishments aside from seat belts made from 0.4mm masking tape and scratched instruments using plasticard. HobbyBoss do not include a decal or anything for the front office avionics. Which is surprising. Office decked out with brass wire as ejection handles…. Painted cockpit but effect looks rough so hoping from afar it won't...… Avionics bay Filling wing roots, also seams needed treatment, but nothing too dramatic. Fit was good with this kit… Primed and pre-shaded….although I always seem to obscure the pre-shade. I shoot Halfords grey primer through an airbrush but should have polished surface before paint. Attempting freehand SEA camo – first timer as ditched the blu tac white worms in this scale so was a little nervous….here goes.. All three colours down (UK made Humbrol formula..but soon to defect to Gunze)….seems okay to my eye but I’m too fat fingered to get that perfect look that others amazingly achieve around here… Applying post shading filters by adding yellow to primary colours and then white to enhance the centre of randomly selected panels. Spraying at very low psi. Klear airbrushed for gloss and then polished with micromesh- should have polished before the Klear..live and learn. The boring bits…..spraying the tiny bits…like watching paint dry… Since the above sprayed more Klear as surface was not glossy enough…..decals next week and hoping to finish….. Thanks Sanjay..
-
Experimentation to achieve a realistic finish deck on a plastic kit. And work so far on the model next to a 1/144 206a submarine and 1/144 Bushnell's Turtle at a scale which shouldn't cause any despair when displayed together. 1/150 scale Tartane c.1810, Heller 1/150 'Corsair' kit...well made simple sailing ship kit, I recommend it!
-
 Howdy Folks It has been a very long time since I finished anything at all so I was very glad to finally get this one to the cabinet of glory. Very typical 1/72 Academy. Quite nice detail, good price but geez I had to wrestle with the decals! Paints were Testors Model Master. I chose to do a reverse wash on the wings and fuselage with sort of a greyish artist watercolour thinned with water and with a drop of detergent added. Some weathering and chipping with a silver pencil. Exhaust stains etc were my dry artist pastels scraped and dusted on. Some oily stains around the top filler forward of the canopy were just some thin artist watercolour Aerial is ezy-line. Seat belts are little fabric ones from Kami Zukuri (5 bucks for 6 sets) touched up with a silver pen for the buckles Here's the pics.....hope you like her. Thanks heaps for looking Cheers Bruce
- 21 replies
-
- 27
-
-
Here's my most recent build. I finished it as Reluctant Dragon from VMF-213. Paints used were mostly Tamiya and the aftermarket used on the kit were seat belts by Wako, Barracudacast wheels and Monokio decals.
- 6 replies
-
- 11
-
-
- Tamiya F4U-1
- 1/32
- (and 1 more)
-
This is my first post on here but I've been lurking on and off for a few years. I've been building model aircraft for a while but after a few years in which model railways have been my main interest I've returned to aircraft and over the summer I've built a few (finally finished an Airfix Eurofighter, Airfix Boston, Airfix Lightning F2A and an Airfix Vampire T11). I have built very few non-Airfix kits (just a few Revell kits) and this was my first Hasegawa kit. I picked this aircraft for no particular reason other than it looked interesting to build - it was very much an impulse buy. A little research later revealed that this kit is very old and as I discovered is rather poorly detailed. However for only £7.49 I think it was worth it! Overall fit of the parts was OK, except that the locating tabs on the undercarriage doors and weapons pylons didn't 'snap' home as some more recent kits do. The instructions, especially for painting were nowhere near as good as Airfix instructions, although as I have built quite a few kits now they didn't really cause me much trouble. I'm quite happy with the result, it's perhaps not my best paint finish as there are quite significant 'ridges' along the grey-white boundary. But I can cope with that. It was all brush painted and decals were those supplied with the kit. My only change was to replace part of one of the undercarriage assemblies with a piece of a paperclip cut to length because the original fell off or got lost at some other point, I never did quite work out what happened to it. Overall build time was 9 days, one of my fastest ever. Of that, construction probably only took about 4 days, if that. Anyway, on to the pictures: Thanks for looking.
-
Hello Buddies , this is my first post here in Britmodeller. This is my Corsair F-4U-4 Hobbyboss 1/72, this was a easy and funny kit to build, painted whit acrilyc paints and the decals applied whit acetic acid for a much better adherence. I hope you like it.
-
This is my first ever 1:32 build, and my first post on here, bar my introduction (in which I stated I don't build 1:32). I usually only do 1:48, as I find the large surfaces a bit intimidating in terms of painting / finish, but this was a gift. That said - I do love interiors - so this was a real treat. As I am sure many people will notice - there are a few screw-ups. I tend to rush, and got some bits on backwards or upside-down (see landing gear). Frustrating and embarrassing, but I will learn. Also - I am afraid to say I am not a big researcher - I just love the look of aircraft and love building models - so some of the markings and colourings are likely well off... All of that said - I was happy with this. I don't have an airbrush - so this is all done with brushes or rattle cans (Molotow, Tamiya or Citadel). With some very basic whole panel pre shading with primer, and a load of spot washes, pin washes and afters with pigments and so on. As ever - I struggled not to go overboard with weathering - as I really enjoy that part of every build. Think I might have kept it just about bearable. All markings painted with rattle cans using Montex masks. Thanks for looking. Any notes most welcome.
- 17 replies
-
- 22
-
-
Here is my ready for inspection Matchbox Corsair finished in post-war US Marines training unit markings. The model is built straight out of the box although the panel lines have been reduced and sharpened. I had one of these as a nipper, the box art is still a personal favorite. As a last reminder to all Matchbox fans and prospective Matchbox - Revell group builders. The 2017 group build vote is due to close at midnight on Sunday the 27th November. Matchbox desperately needs your support to qualify for next years group builds, please don't forget to vote. Some of our supporters are offering free lifts to the polling stations.
-
For some time I am trying to grab one of hasegawa`s AU-1 in 1/48 but without success, so have to pull out alternative! Thinking about converting some other corsair to AU-1, but dilemma is which one? As I can understand AU-1 was derived from F4U-5 but visually, at least to me, looks more like F4U-7 without under chin scoop!? I am thinking to convert F4U-7 into AU-1 by deleting under chin? Is cowling right then or still have some issues with shape? I also read, somewhere on net, that wheels are different in type (especially rims), and other little differences...? Should I use F4U-5 instead F4U-7? Any suggestions are welcome!
-
My son was diagnosed with ewings sarcoma (bloody nasty bone cancer), which turned out be a bone infection. Yes a relief. How anybody would get an infection on a bone has got me beat, and he hasn't had an injury. I lost interest in modeling, I lost interest in most things. I am going to build this nice little kit, and turn it into something better than my previous attempts. Another one from Toyworld Winenut. Box art; The little bits of pleasure and things to go wrong. If anybody can give some guidance in the building of this kit I would be appreciated. Thanks for looking. Stephen
-
Hi all, I was wondering what the interior colours of Corsairs used by the brits, Is it the British colour or were they left in the American colours (If it is the American colours it would be greatly appreciated if I could get the paint colours) Also what are the colours for Fleet Air Arm in the Pacific? Thanks in advance, Cam
-
My plan for this Group Build is to attempt to replicate a photo USMC Capt Donald Balch sitting on the elevator of his damaged Corsair after a fortunate safe return from dogfight over the Solomon Islands. HERE IS THE PICTURE. I'm planning on using the 1/72 Tamiya Corsair kit, and for the first time, I'm throwing all sorts of aftermarket at it. We'll see how much I manage to include. The aircraft in the photo has the flaps down, the elevators are drooped (one more than the other), the rudder is damaged and askew, and the tail wheel has either collapsed or failed to extend on landing. I've also invested in quite a few figures to try and replicate Balch and the crew standing on the wings, and hopefully with some mixing and matching, can come up with a decent diorama. Thanks Plastix, Neu and Blastvader for hosting this one, and thanks Enzo for being the new Mish.
- 169 replies
-
- 10
-
-
Thought you guys might get a kick out of this. A few years ago, an author named Stephen Chapis wrote a nice article covering the history of the specific Corsair airframes used in the 1970s television show "Baa Baa Blacksheep". Well he recently updated the article and posted it to Warbirds News. The article is a fascinating read as it talks about the history of these planes during their military use (what history could be found) how they ended up in private hands, their show use and where they ended up after. The ones that intrigued me the most were a pair of F4U-7s that apparently flew combat during the Suez crisis and possibly in Indo-China. There is also a former "Soccer War" FG-1D mentioned. http://www.warbirdsnews.com/warbird-articles/poor-lambs-corsairs-baa-baa-blacksheep.html The article has certainly given me inspiration for a possible project. For me it would be going full circle in my modeling history as my very first model kit at age 6 was a Revell 1/72 F4U Corsair because the show was on the air at the time. My brother "helped" (i.e. he did most of the work), but after that I was hooked and it started me on a hobby that has lasted almost four decades.
-
 F4U-4 Corsair Upgrade set & Masks 1:72 Eduard for Revell kit The set contains a nickel fret and a brass fret. The sets provide many parts for use in the cockpit; a new instrument panel, side panels, gunsight part, cockpit floor / tub, rear bulkhead, seat pan, seat belts, and throttle quadrant. There are a couple of parts for the canopy including mirrors. There are control linkages for the tail flying surfaces, drop tank fuel fillers, wiring harness for the engine. For the landing gear there are parts for the main and tail wheels, along with parts to box the wheel wells in. The wiring for the main gear wells is also included. If the modeller does not want the full airframe set then the nickel fret is available on its own. As well as the photo-etch set Eduard do a set of masks for the kit. These are for the canopy and wheels. Conclusion The Revell F4U is a good kit, however their are limitations in plastic which photo-etch can readdress, and masks always help. Recommended. Review sample courtesy of
 -
Hello everybody! Finally I had the time to put my dirty hands on some aircraft models. This is my third built, I wanna increase my abilities, I have really a lot to learn. First thing first: the cockpit. The dials aren't realistic, I just tryed to paint some lines, indicators and buttons, using brilliant colours to make them pop out. I need to resettle a bit the seat belts, conforming their shape with the seat. I also painted the pilot. Soon (maybe tomorrow) I will do the interior of the fuselage and the engine. Thanks for the attention payed, feel free to leave suggestions!
-
Hi folks, I'm posting an eclectic mix of some of my more recently completed builds. The reason for the post is that I'm looking at treating myself to a camera for my birthday next week in order to try and get better photos of my models. In the meantime a friend of mine let me borrow his DSLR to get a feel for it before I make a purchase - what follows is the result of my amateurish photography. Hope you like the models if not the photography!!! First up is the 1/72 Airfix Defiant- a cracking kit - and by far one of my favourite British aircraft.... ...followed by the 1/72 Corsair by Revell.... ....and last but not least the 1/72 Ar196 by Revell - I think the overall effect when completed is ok but it was a bit of a tough kit to crack - particularly the cockpit glazing which was a nightmare!! Thanks for looking folks - any feedback is greatly received as always Kris
- 16 replies
-
- 23
-