Search the Community
Showing results for tags 'Airfix'.
-
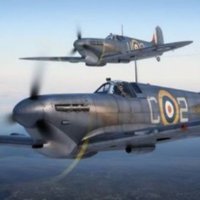 Supermarine Spitfire Mk.Vc, BR498 PP-H, Wing Co. Peter Prosser-Hanks, Luqa Wing, Luqa, Malta, October 1942 Subject; Supermarine Spitfire Mk.Vc, non-tropicalised, x2 Hispano Suiza 20mm cannons and x4 Browning .303's. Manufacturer; Airfix Scale; 1/72 Kit number; A02108A Aftermarket; Barracuda resin spinner, Kitsworld decals. Paints; Exterior upper, AK Real Colour RAF Extra Dark Sea Grey and Dark Slate Grey. Lower, RAF Azure Blue. Mr Finishing Surfacer White and X7 on spinner. Interior RAF Interior Grey Green and Xtreme Metal Matt Aluminium. Various Tamiya X, XF and LP. Posca pens for detailing. Primer; Mr Surfacer 1200 Varnish; AK Gauzy Shine Agent and Tamiya X35 Semi-Gloss. Weathering; Flory Dark Dirt and Grime wash, Abteilung oils, Ammo North Africa pigment and Tamiya weathering palettes. Extras; Prym Knitting Elastic for the antenna wire.
- 11 replies
-
- 41
-

-
I think I am starting to become a Meteor buff! Hot on the heels of the SH Meteor F.8 in SyAAF scheme, I started building the Airfix kit. I did not chose one of the schemes proposed in the box but an IAF scheme from the SH Kit: This is a good occasion to compare both kits and, spoiler alert, the Airfix kit is much much better! It is really well designed, the detail is excellent, the fit is top not notch and the moulding quality excellent. The cockpit tub is a 3 part assembly and has the characteristic horseshoe shape that its SH counterpart does not have: It is really easy to position it accurately inside the fuselage: Clever engineering. The seat is decent OOB but misses the harness and can benefit from a few added details: The fuel tanks have the rim that is missing on the SH F.8 and are more correct in shape. Note: the fuel tanks on the SH NF.14 are OK too. The engine heads are more detailed than on the SH F.8 but the SH NF.14 reactor heads are better. The IP, nose wheel leg and cockpit quarterdeck (is that correct?) have better detail: The air inlets in one part are a very good idea: No need to deal with an awkward seam between top and bottom half like on the SH kit. The engineering of the main landing gear bay walls is also really clever: 4 parts, a mortise-tenon system and you're done! The main landing gear bay roof only needs a black wash over the alu paint to make the details pop: I assembled the wings and painted the air inlet lips in black and white: The result can seem weird but the period pictures show they were actually painted this way on the original airframe. The flaps are provided as separate items but I always saw them level on the pictures. So, not really useful IMHO. I also painted the nose in black and white: But I have to re-paint it as I inverted the black and white areas! Doh! The main landing gear legs and wheels are the only letdown on this kit: Two gear leg halves and two wheels halves that have to be glued together. Filler is needed to get something clean. But that is only a minor gripe. So far, this is a fantastic kit and a real pleasure to build.
- 24 replies
-
- 13
-
-
Well who doesn't like a bit of nostalgia. I got this kit last October from the Glasgow Model Show first time in three years it had been on and it was back to it's usual self I am glad to say. While the base work continues on York and in-between other small work to give my eyes a rest and something to build at the Local Model club this is my Thursday night relief. I have already assembled the hull and paddle wheels but the area around the aft cabin windows will need some attention to sort out the gaps and raise the details this will be a change from the old grey navy I normally build. The only thing that looks a bit tricky is the ratlines have to be made using a jig the old kits used to have a pre-fabricated stuff should be interesting I think we will see. Stay Safe beefy
-
I recently purchased this kit second hand. Unfortunately on opening the box, there were no instructions or decals. However, I managed to download the instructions from Scalemates. I then contacted Airfix to see if they could provide me with the decals. After a couple of days, I received a reply asking for my address and telephone number "to help speed up the enquiry". That was on 9th February. To date, I have had no further communication from them (I emailed them a couple of days ago, but nothing). If, for some reason, they cannot provide the decals, does anyone know where I can purchase decals for the kit? I do have a load of spare decals from other kits, so could probably find a few basic decals, but would prefer to have the whole set. Thanks in advance.
-
 Hello all, This is my DHC-2 Beaver, as operated by the Royal Lao Air Force, in the '60s. I came across pictures of this aircraft, in its gunship configuration, on these 2 sites: https://aviadejavu.ru/Site/Arts/Art9878.htm https://dhc-2.com/id855.htm Thakhek West was also used by Air America, being designated "Lima Site 40". The armament of this aircraft, described as 4 small underwing bomb racks and a .50cal machine gun in the port cabin door, is also mentioned in the recent Warpaint Series publication on the Beaver. Here is another photo of a different RLAF Beaver, better showing the bomb racks: http://www.wings-aviation.ch/73-Laos/2-Aircraft/DHC-Beaver/Support.htm This Airfic classic has a pretty good fit, considering its age, but I did rework a few items: Removed most of the raised rivets and panel lines and rescribed the model; Added a few simple details in the cabin: a bit of floor structure and seat belts mainly; Replaced the entry steps on the landing gear struts and those below the main cabin doors; Sanded down the clear parts (except windscreen) as these were very badly molded, then polished them to get the clarity back - not perfect, but better than it was; Thinned the engine cowling; Scratchbuilt the pitot tube, a few small fuselage details and various antennae on the roof/bottom; Added a machine gun from a spare Hobbyboss H-34 kit. Paints were Tamiya/Gunze acrylics mostly, with a bit of Alclad on the engine parts. Markings were put together using bits and pieces from several decal sheets as well as a few stencils from the kit. Weathering with oil paints and pigments. Hope you enjoy the pictures: Credits background picture: freepik, photo by Kireyonok_Yuliya, https://www.freepik.com/free-photo/nature-background-dense-tropical-vegetation-palms_24172944.htm Thanks for looking and comments always welcome! Cheers, Patrick
- 20 replies
-
- 78
-
-
Morning folk's,I had this with half a dozen half started stuff in a box of doom,it was the later issue with the thimble nose version but all the parts were there for the earlier TFX in a nod to Airfix's other early issue of the Beaufighter I sourced a decal sheet fo a North Coates strike wing machine from a ninetees boxing of the golden oldie.A couple of years ago we hollidayed near Cleethorpes where a beautiful statue pays tribute to the squadrons that operated from the base conducting missions from Norway to the Bay of Biscay.The kit is a real beauty my only dislike was the three part centre section of the engine nacelles.Mainly brush painted and I used Hataka insignia white for the stripes which looks less stark than normal white dropped a wash in the panels too.Many thanks for looking in.
-
My entry to this GB. Wanted to try something in NMF as practice for something later in the year, and was thinking of getting a Su-11 in all it's flying stovepipe glory at one point. Other suitable kits I have are in need of added extra's, mostly decals and a few other bits (TrumpyBoss 1/48 F-100 and it's undersized main wheels spring to mind here, not even looking at that intake shape....). But ran across this kit at a hefty 55% off RRP, and immediately remembered how anything not a Lightning is by definition an inferior machine, and I should buy it immediately. So, box shot as it sits on work desk, freshly delivered. Want to do the box art machine, from the No.56 Sqn Firebirds aerobatic team. Trying to go for a mostly clean plane on this attempt, want to nail down my NMF skills before I beat the hell out of the XB-35 in June. I have a Cutting Edge M.B Mk 4 seat at home just itching for a permanent home, so that will be the sum total of AM for this kit. I might get creative with the pitot tube, not sure what I want to do just yet though, probably some brass rod would be my initial thoughts on the subject. Paint wise, I have a selection of Alclad II, Tamiya LP-70 Gloss Aluminum and Mr Hobby Super Metallics to play around with. Any suggestions what Tamiya or Mr Color would be a good match for the red, I'm all ears. Have Tamiya XF-7 Red, Mr Color C327 (FS 11136 - thinking this would be a good match personally) and C385 (IJN Aircraft Red) in my collection, but could get other reds in the Tamiya and Mr Color range easilly enough if needed. This will probably be a slow starter, need to get my other GB entry in the WW2 Twins closer to the finish line before I crack on with this beauty.
- 8 replies
-
- 8
-
-
- Airfix
- EE Lightning
- (and 1 more)
-
I generally build WW2 Allied aircraft, but I do have a bit of a thing for early British jets. So, I am going to go with an aircraft that amazed me in late 70’s at Duxford (I think) going pretty much straight up off the end of the runway. My dear old Dad used to drive me to quite a few airshows, so it might have been somewhere else. On reading up on the EE Lightning I discovered it was nicknamed the “Frightening”. I presumed this was to do with the rate of climb, the ceiling or more likely the speed. Some pilots said it was like being saddled to a skyrocket, but no…….. The Lightning was nicknamed “Frightening” because of its challenging crosswind landing characteristics. I would never have guessed that one! This is the 2013 tooling from Airfix. All the bits look pretty good. A little bit of flash here and there, but nothing bad. I did notice when I got the plastic out of the box how heavy it seems for 4 smallish sprues. I am planning on doing the green/aluminium scheme as I served in the Army in West Germany in the 80’s not long after these beasts! I've seen that @Enzo the Magnificent has beaten me to it on this one, so will keep a beady eye on his build for some tips 🙂 George
- 10 replies
-
- 13
-
-
Hi All, After a lot of googling, I cannot find the answer i’m looking for. I’m looking to replicate the Balderton Lightning using a tired Airfix 1/48 Lightning I have, complete with accurate graffiti. Obviously this aircraft has had a few expletives sprayed on it during its career as a motorway monument. So the question I’m asking is, would this be allowed on the forum, and further still, would I be able to display this at IPMS shows? As a Jewish person surrounded by swastikas at model shows, I see no problem with this but others may beg to differ. Help please!! ATB Ben
- 14 replies
-
- 2
-
-
- Balderton
- Lightning F6
- (and 1 more)
-
 I have been struggling slightly with modelling mojo - due mainly to workloads and family commitments. I am determined to get building again and complete my first GB for 2024. My chosen kit is the Airfix 1/72 Mig-17F from: I pulled this out of the stash last night. Who knows I may even do the Skyhawk as well (I will obviously do another thread if I do). I seem to recall some issues with this kit shape wise but it looks fairly Mig like to me... I thought I had some other decals for this but now can't find them and the Xtradecal set I wanted appears to be out of stock. Ideally I would do a middle east based plane (fits with one of my collection themes) but the North Korean scheme shown above will do just fine 😉 A bit of history from Wikipedia... The Mikoyan-Gurevich MiG-17 (NATO reporting name: Fresco) is a high-subsonic fighter aircraft produced in the Soviet Union from 1952 and was operated by air forces internationally. The MiG-17 was license-built in China as the Shenyang J-5 and Poland as the PZL-Mielec Lim-6. The MiG-17 is still being used by the North Korean air force in the present day and has seen combat in the Middle East and Asia. The MiG-17 was an advanced modification of the MiG-15 aircraft produced by the Soviet Union during the Korean War. Production of the MiG-17 was too late for use in that conflict and was first used in the Second Taiwan Strait Crisis in 1958. While the MiG-17 was designed to shoot down slower American bombers, it showed surprising success when used by North Vietnamese pilots to combat American fighters and fighter-bombers during the Vietnam War, nearly a decade after its initial design. This was due to the MiG-17 being more agile and manoeuvrable than the American F-4 Phantom and F-105 Thunderchief, which were focused on speed and long range combat, as well as the fact that MiG-17 was armed with a gun, which initial models of the F-4 Phantom lacked. The obligatory sprue shot: As always all comments welcome. Dave
- 10 replies
-
- 14
-
-

Gloster Javelin FAW.2 - XA801 1/48 - Airfix
Mikey-1980 posted a topic in Work in Progress - Aircraft
Morning all! My first memory of pretty much any aircraft as a child was seeing the odd shaped Gloster Javelin that was the former gate guardian of RAF Stafford. My dad was stationed there from 1982 - 85 before demobilising. The airframe was then later scrapped due to poor maintenance in 1994, as seen here in the video below My plan is to build XA801 and convert the Airfix FAW.9 to the FAW.2. Problem is, I cannot find the conversion kit needed to do so. I know there are only a few slight changes between the FAW.2 and the FAW.9, the most notable is the engine exhaust, as well as the FAW.2 did not have mid-air refueling. I know that a conversion kit exists, but I cannot find it anywhere, if any one is able to help point me in the right direction, or knows someone who has one that are willing to part with it, I would more than interest. Thanks all in advance -
Time for another old favourite, and my RAF contribution to this build. As Airfix is re-releasing this kit in 2024 in the Vintage Classics line, it means there will be no new tooling in the near future. That's the bad news. The good news is that I can now build this kit, and then replenish the stash in a few months, as I like this kit. I hadn't intended keeping this for the Airfix GB later this year, as I already have more than enough to choose from for that. I bought this kit in June 1999 for 9 Irish Pounds, c. 11 Euro in new money. The box was larger than the standard Series 4 box, and a flimsy 1-part design. The artwork is very similar to the 1968 original, which I assume was by Roy Cross. The first time I built this kit in 1987, it came in the boring "completed kit on the cover" packaging. The only other time the original artwork was forsaken was for a 2010 release. The Vintage Classics re-release will of course revert to the original artwork (and presumably just the one subject). The only missing part (which may be my fault) is one of the cylindrical tail fairings for the bombs. Easy to deal with if it comes to that. The last time I built this I closed the bomb bay, and I still have at least some of those four bombs in the spare box, pre-assembled. Naturally, the Swedish subject is off limits for this build, but I'd like to build it in the future, which is one of the reasons why I will probably be getting not just one but two more of this kit. Of the two RAF subjects. my current preference is for the 106 sq. aircraft, which unusually (to me) has the top camouflage continuing below the wings. I hope to start this in a couple of days.
-
Hi guys, my local model club with the backing of the LMS have set a club group build of 1/35 AFVs and in case, I won the Cromwell Mk VI by Airfix in 1/35. I used to build in 1/35 some years ago but space forced me to now build in 1/72-1/76. The rules are to build using the parts in the box, no AM but you can do some limited scratch work or add figures. I'll be building this OOB with an addition of a couple of figures. The box. The box of bits. Lots of plastic, choice of hard or rubber tracks, decals and even a little PE. The first couple of stages were carried out, the only clean up required was getting rid of the sprue grates and I must admit I am quite impressed but then the kit is relatively new. Next, the swing arms(?) were cleaned up and fitted, followed by fitting the side plates and side vents. Catch you later. Stuart
-
Hereby I present you another finished project; a Airfix Hawker Hunter F6 in 1/48. It's finished in the colours of 324 squadron, based at Leeuwarden airbase. You will have noticed that I've put on the wrong tail with parachute housing. Well... I thought it looked good, but I'm having doubts right now.. Will change that probably in the future. I've kept the other part.. build OOB with vallejo. Here are the pictures: Not 100% satisfied, but will try later. Thank you for looking!
-
Hi All, My second completion for 2024 is Airfix' lovely newish Mossie. Much has been said about this kit, not all of it favourable, due to the fact that Auntie mistakenly used scan data from a TT35 version, meaning that the bomb bay doors and rear fairing include some extraneous detail. The build was inspired by this photo of MM199 of 128 Sqn RAF, based at RAF Wyton in 1944/5: This aircraft was piloted by an Australian, Flt Lt James Wood, whom along with his navigator FO Raymond Poole RAFVR were shot down and killed by flak on a mission to Hanover on 4th February 1945 - this photo was presumably taken just over a month before that fateful mission. The build was pretty much OOB, apart from the addition of the cookie, which was from Airfix' RAF Bomber Resupply Set, which contains a wealth of goodies which will no doubt enhance future builds. I did add some magnets to the cookie and bomb bay, allowing it to be placed and removed ad infinitum. Here's the WIP if anybody is interested: Anyhoo, enough blabber and onto the photos: I've thoroughly enjoyed this build, and whatever the naysayers I think it builds up into a nice representation of a late-war Mossie. Thanks to all of those who have offered kind words and encouragement - it has been much appreciated! Now on to my next build - I shall not reveal too much, but it has been a long while since I built anything with a tail hook...😉 Thanks for looking, Roger
- 33 replies
-
- 66
-
-

-

-
 Hi all Been work on this lovely Kit, this is the Airfix 72nd TF.X built as a 144 Squadron machine, NE832. It was part if an informal GB but only a couple of us were in it. The scheme was chosen from the wonderful Aviaeology Decal set of the type. Although I don't have the 72nd Decal set so I used the stencilling from the kit and used code letters of the right type from Model Decal and Kits World although did not have black letters so had to paint them and serials from Xtradecal sheets. The cockpit has been enhanced using the Eduard PE set which really does take it to the next level and the undercarriage legs have been embellished with lead wire, fixed and flexible brake lines and hydraulic balance pipes and bump strips. The undercarriage doors are resin replacements for the Hasegawa kit and had to be extended a bit to fit. The Rocket rail bottoms were thinned and 0.45mm brass rods were used to make the twin round parts of the rails. The exhausts are a mixture of Quickboost and kit cut and glued together to get the best option. Paint is my go to Humbrol enamels and some Colourcoats brushpainted on . This one has had lots of post shading, drybrushing and oil washes to try and achieve the weathered appearance of this machine including the still visible ID stripes from D-day on the spine of the fuselage. The overall upper colour is very faded EDSG. Weathing after paint was with oil washes and weathering powders . This is what I was aiming for The above taken from the Aviaeology decal set sheet, for illustration purposes and can remove if required. Here's a link to the WIP This is what I ended up with Rudder actuators and rods added ang with trim tab ones too Edited as I have added the three aerials to the fuselage I would like to thank those who followed along offering support and encouragement and to Roger @Dunny for proposing the Informal GB too. Thanks for looking in Chris
- 29 replies
-
- 52
-
-
-
OK slight change of build plan, I said that the next on the bench would be the HobbyBoss Scammell Commander with the Amusing Hobby Centurion AVRE for a load well whilst at the South West Model Show at the Bovington Tank Museum I was given the Airfix Austin K2/Y by the friend that I shared a table with as he had ended up with two. He has built one as in the film Ice Cold in Alex but didn't want to build a second one so thought I might like to have it so it has made its way onto the bench and will be built out of the box using the Northern Europe markings in the kit. A start has been made with the basic chassis being assembled completing build sections one and two That's as far as its progressed more soon I hope Thanks for looking in your time is very much appreciated Stay safe Roger
- 49 replies
-
- 18
-
-
XW544 was an S2.B delivered to the Royal Air Force in 1972 and entered service with 15 Squadron at RAF Laarbruch. Here she is as at Luqa, 23rd May 1975. XW544 later moved to 16 Squadron in 1979, before returning to 15 Squadron in 1982. She spent many hours in the hangars due to fuel leaks and in only after a decade of flying, was withdrawn from service on 4 July 1983 into RAF Shawbury with 2227:10 hours of flight logged. The airframe was then placed into storage with its engines replaced with scrap ones, various other instruments were also removed to help keep the rest of the fleet flying. In 1984, XW544 was moved to No.2 School of Technical Training at RAF Cosford and gained the maintenance number 8857M. During its time at the SoTT, XW544 camouflage green was repainted, and 16 Squadron markings were readded. It also obtained a refuelling probe which it never flew or retired with. XW544 was seen at the RAF Cosford airshow in the 1990s alongside Buccaneer XW547 (now at Hendon).
-
 In the spirit of the era of pushing boundaries, I'll push my boundaries in this GB by building by far the largest model I've yet attempted - Airfix's 1/72 Handley Page Victor. Inside the box there is a LOT of plastic! Bottle of Mr Color for scale. Will really need to clear the bench to build this, both figuratively and literally. Plan is to build it out of the box, using the box art scheme - B.2 XL512 of 129 Squadron at RAF Wittering in the anti-flash white scheme circa 1963-64. So a late Boomer, but one that to me really encapsulates the bigger, faster further spirit of the early jet age. This kit would have been built dozens of times by Britmodellers, so all tips and pointers welcome. I've always loved the Victor's evocative shape and form, it really must have looked like the future when it first emerged in 1952. Hopefully I can build a decent representation of it, plus find a place to display it! Thanks for having this baby of baby boomers in this GB! Cheers, Gerard
- 50 replies
-
- 23
-
-
 With the situation in Lebanon worsening, the British Govt decided to send an air support presence to the region in September 1983. Having considered the RAF’s other attack types, the Buccaneer was deemed most suitable because of its laser targeting capability. Six aircraft were dispatched to Akrotiri; three each from numbers 12 and 208 squadrons. Here is the full story for anyone interested in further reading. http://www.naval8-208-association.com/NewsArticlesOpPULSATOR01.html This is the new tool Airfix S.2B and it’s a superbly engineered kit and great fun to build. All of the parts fit together well and only minimal filler was required. The cockpit is already good so I didn’t use any aftermarket apart from the decals. There’s also a decent array of underwing stores included, all I needed to do was alter the Paveway so the main body was the same size as a standard 1,000 lb bomb. Thanks particularly to @Phone Phixer and @Selwyn during the WIP, especially regarding stores and flare dispensers, etc. WIP here: https://www.britmodeller.com/forums/index.php?/topic/235135865-from-one-bucc-to-the-next-…-‘pulsator’-pirate-148/ The real XX901 at Akrotiri during Operation Pulsator … Anyone have any yellow ‘901’ numbers they’d be willing to sell!?
 -
I'm going to build this classic Airfix kit, with some improvements along the way. The livery is Alitalia, not the original pinstripe but the subsequent Landor scheme, thanks to these very good 26Decals. Quite busy at the moment with other GBs, I plan to start later.
-
As one that doesn't normally build wingy things, after Santa had been to the Grandsons house, I had no choice but to venture into the aviation world and was ably helped and 'supervised' by him to build this. Straight out the box, painted with the supplied paints, although thinned with water and no weathering ...... Personally, I found this enjoyable, albeit fiddly as I'm not used too working at such a small scale and the Grandson seems happy with it ...... phew! Keith 😁
-
 Hi all, The Airfix 1:72 Me-410 is finally complete! Started back in November '23, I got bogged down through Christmas and New Year, but here she is! Apart from the decals for this specific 410, everything is out of the box. I never make things easy for myself and this was very much the case when I saw this scheme on the Xtradecal sheet - I knew I had to attempt it! This is a fantastic new tooling from Airfix of a subject not very well covered in scale. There are signs in the kit that future variants may come (the A-3 Recon version would be very welcome)! As previously mentioned I slightly modified the kit to have the standard closed bomb bay doors to make this machine a true Me-410A-1 rather than the kit's A-1/U2 (or /U4). Hataka paints were used for this build for the majority with Mission Models US acrylic paints being the saviour to allow me to pull off the Wellenmuster camo using the re-fillable paint pen (see previous updates for details on this). These are some of my favourite photos of the build to upload now, but if the interest is there, I will upload the rest for everyone - let me know in the comments! A massive thank you to Phoenix Scale Publications for providing this sample at SMW'23 - this will be a full build article in a future issue! See you soon for the HobbyBoss 1:72 U-2A reveal!
- 19 replies
-
- 79
-
-

Austin Healey 'Frogeye' Sprite - +++ Finished +++
CliffB posted a topic in Baby Boomers GB 1946-1964
Hi. Here's another one from me. The Frogeye Sprite (aka the Bugeye in the States), was produced between 1958 and 1961, and utilised the 948cc engine from the Austin A35 and Morris Minor 1000. Whilst the A35's engine produced around 35 BHP (the clue's in the name), for the Sprite this was boosted to 43 BHP. This gave a top speed of 83 mph and a 0-60 mph time of 20.5 seconds. For its time, the car was pretty nippy and went on to provide an affordable way into motorsport on both sides of the Atlantic. The Airfix kit was first released in 1961, but mine's a '90s release. All my parts are still factory-sealed, so I'll open things up for a closer look, once I get started. Where possible, I like to base my car builds on real, preserved examples and I'll be using this beauty for this one. Cheers- 37 replies
-
- 20
-
-
With the Jet provost done and the other activities out of the way, it’s time to get back in the saddle and do some more modelling. For a bit of a mojo boost, I watched Top Gun, Top Gun Maverick and The Final Countdown on DVD’s. So tonight, out came the Airfix F-14A Tomcat (blueprint box) and the Revell F-14D Super Tomcat from the stash - both 1/72. I’m going to try to build them both together stage by stage (rather than build one and then the other). The Revell is better in detail as it’s a much later kit, but the Airfix one still has a certain charm to it - even with the raised panel lines which I’ve decided to leave to see how it turns out. So, the first stage was to build the two cockpit tubs. The Airfix one is much longer then the Revell and both have raised detailing in the some consoles in roughly the same depth. The ejection seats are worlds apart in detail, so I might see if I can 3D print something a little more interesting for the Airfix kit. Otherwise the offices are fairly well detailed considering….. Both tubs were painted with Tamiya XF-19 Light Grey (as it’s what I had to hand) and are drying off. They will both receive other colours to highlight the consoles and IP’s. I’ve also bought an extra set of Airfix F-14A decals which offers two options - TopHatters and the Black Aces - to go with the Bounty Hunter and Grim Reaper options for the kits.
- 44 replies
-
- 12
-