Search the Community
Showing results for tags 'Academy'.
-
Good day, Here is my sixth submission for the year. This is the new(er) tooled Academy F-14B Tomcat. The highlights are as follows…………… 1. Colors / paints used : A. Engine - Tamiya Gun Metal X-10, Tamiya Metallic Gray XF-56, Polly Scale Burnt Aluminum dry brush highlights B. Airframe - Upper surface aft of cockpit : Mission Models Medium Gray (MMP-072) FS35237, Nose and undersides : Model Master Dark Ghost Gray FS36320, Wing Gloves : Model Master Euro 1 Gray C. Misc : Tamiya Flat Black XF-1, Gunze Flat White, Gunze Flat Yellow, Model Master Light Ghost Gray FS36375, Tamiya Khaki Drab XF-51, AK Buff #AK11031, Tamiya Titanium Silver X-32, Gunze Silver, Tamiya Filed Gray XF-65, Tamiya Clear Red & Blue, Tamiya Dark Iron XF-84, Gunze Burnt Iron D. Washes : Mig Stone Gray ( main panel lines on entire airframe ), Tamiya Brown, Tamiya Black, Vallejo Light Rust, Vallejo Light Gray 2. Kit decals 3. GBU-16`s from Hasegawa Weapons set #VI, AIM-7 & 9 from kit 4. Photo etched seat belts 5. Aluminum metal rod added for support of canopy 6. Master metal pitot and AOA tubes 7. Chalk pastels : black, mid gray, and light gray The fit between parts, details, and options are excellent. The included decals are very good. I often use aftermarket ejection seats but these included with the kit are superb. While there are a multitude of parts, I highly recommend this excellent kit. I enjoyed working on it very much and I`m certain you will too. Thank you in advance, Mike
-
Being currently a lot into Helos, it is almost inevitable that I come across the Boeing AH-64. Also, as it followed the AH-1 in the service of various armed forces and the related tenders around the world, it's only consequent it will follow it on my workbench. So it will be the Westland build incarnation of the AH-64, and Academy has a nice kit in 1/72 available, and since quite a while, me in my stash. It's this: It includes decals for the one Capt. Harry Wales, Prince of Sussex flew at RAF Cosworth Airshow in 2013, and I am tempted to do this. You know, a little bit of glamour on the shelf, not always just blunt plastic in olive drab without any personality, but some glitz of the real world red carpet airfields we so rare get close to. And here's the chance - what a rare occasion for us in the airplane section...
-
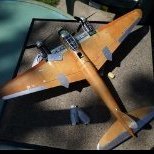
 IMG_4255 by Evan Bailly, on Flickr Following the early success of Germany’s Stuka dive bombers, the US Army decided that it had better get on the bandwagon and come up with a dive bomber of their own. Luckily, the US Navy and Curtiss were already well into the development of the “Helldiver” a then modern, large, single-engined carrier dive bomber. Curtiss had supplied the Army with three generations of Shrike attack aircraft since the 1920s, so it seemed a natural fit. The bean counters rejoiced too, this would be one of the first truly multi-service aircraft programs. However, transforming Curtiss’ bomber into a standardized jack of all trades for both services resulted in degraded performance through additional equipment and weight, delaying production for approximately two years, and exploding costs. By the time the aircraft, called the A-25A Shrike by the Army and the SB2C Helldiver by the Navy, was ready for acceptance, the Army had decided that it didn’t need a dive bomber at all. The P-47s had proven far more than capable in ground attacks. The initial variants used by the Navy were a disaster in combat, a fact that was rectified by a considerable Navy-only redesign. The A-25A never saw combat. Of the 900 built, around 500 were transferred to the Marines who used them in a few Pacific backwaters. The remainder ended up restricted from combat duty and were used as transports, trainers, and target tugs. A-25A serial number 42-79744 was assigned to the 3rd Target Tow Squadron at Fort Stewart Georgia. This and similar squadrons were notable in that they were almost entirely “manned” by women. “Kathie-M” was usually piloted by WASP Helen Wyatt Snapp, towing a large fabric panel to be used as a target by trainee fighter pilots, bomber gunners, and anti-aircraft artillery men. IMG_4190 by Evan Bailly, on Flickr My model started as Academy’s 1/72 Scale SB2C-5. A bit of work was required to change it into an A-25. A three blade prop was made from one provided by a Tamiya Corsair, the blades shortened and reprofiled. The spinner was made from a heavily modified one from the spares box. The wing armament and arrestor hook were removed and the gunner/radio station was modified: a gun mount was made with no guns and the life raft compartment was removed. Some other army specific details were added, some were left off as being more work than would be noticeable. Finally the aircraft was painted in Curtiss’ distinctive olive drab, medium green, and medium gray scheme with markings provided by Wolfpack Decals. IMG_4249 by Evan Bailly, on Flickr IMG_4253 by Evan Bailly, on Flickr IMG_4251 by Evan Bailly, on Flickr
 -
Hi folks, I'm late to the party with this one I'm afraid. Times just got away from me and this STGB had crept up without me realising. Anyway, thank you to @Corsairfoxfouruncle and @81-er for the greenlight to throw my hat into the ring as I really wanted to enter something into this GB as the P-47 is one of my favourite warbirds. So after a root around in my stash, I decided to go for this one: I've made a start and good progress so far - pics to follow shortly. Hopefully I'll be able to get cracking and be able to get her finished in time as I'm not renowned for being the quickest of builders 🤞 Good luck to everyone with their builds too - looking forward to seeing them all in the gallery. Kris
-
Hey, looking at the rapidly growing built models clogging up my bookcase shelves, I thought to myself " I haven't got a proper APC, yes I have the Namer (big) and the Nagmachon (So many metal bars!) but not the legend that is the M113. So Jadlam it was, and with express next day delivery selected I was hoping to have it in my hands before the weekend, alas it's somewhere between Bristol and the North East and the Royal Mail tracking is useless. So here's the box art from their website. Hopefully it turns up tomorrow or at least before the weekend (first child free one since lockdown), I'm curious to see what it's like as Scalemates doesn't have much on and the instructions are for a different version, the figures will be a first for me. Will be right out of the box, no eduard etch sets for me (that's money I can use on the Merkava 4) and I should have enough of the AK paint left otherwise it's a trip to the Folks/Brother for a bit of light robbery. Hopefully an update soon.
-
 Academy has just reboxed/reissued the Minicraft 1/144th Boeing E-3G AEW&C Sentry/AWACS kit under ref. 12629 Sources: https://www.hpd.ca/index.php?main_page=product_info&cPath=1625_1642&products_id=72336 https://mmzone.co.kr/mms_tool/mt_view.php?mms_db_name=mmz_free&no=397759 V.P.
 -
This is my complete model of Academy's M1151, painted with Tamiya lacquers and weathered with oils and pigments.
-
Some time ago, I can't remember if it was spring of 2021 or earlier, I started a 'quick' project involving a few T-6 builds: I like this subject a lot and already have a few built to which I wanted to add more. Unfortunately, as it often happens, this transformed in a lenghty/stalled/frozen project, mainly due to building kits of three different makes which had different issues to solve. In the end I had to face this as three separate builds to make some progress and here I am hoping to complete the whole project. The first iteration is an Heller T-6 in the last 'Red Chequers' livery, it is actually complete but for some reason I stopped before applying the final satin coat. Will have to remember the (surely good) reasons for that before doing anything and finding later why it was a mistake! While waiting for my brain cells to work on that, I present the second build, which is an Academy T-6 with the earlier 'Red Chequers' livery in silver/dayglo red and fern leaf roundels, also courtesy of a Ventura decal sheet. The third one for the moment I won't tell, just say it will be based on the Hobbyboss easykit. Cheers Fabio
- 43 replies
-
- 12
-

-
 Evening all, after roughly 2.5 years my carrier deck diorama is done - just in time for SMW! It's an F/A-18C CAG aircraft from VFA-113 'Stingers', with the carrier deck based loosely on CVN-76 USS Ronald Reagan, circa 2005. Carrier deck is scratchbuilt, utilising the Flightpath US Navy Carrier Deck Diorama set. The Hornet is the Academy kit with much aftermarket (see build thread linked below), figures from Reedoak (4) and Scale 3D (1). The decals are from Superscale (set no. 72-904). The A/S32A-32 'Spotting dolly' and Nitrogen Trolley are fantastic little resin kits from Brengun. The LED lights in the hangar roof are ready-wired sets from Small Scale Lights - really glad I included these as they lend a nice realistic ambience (IMHO). The build thread is here if you are after more details. The diorama is called 'Hornet's Nest' - thanks again to @AlxBNE for the inspiration! Final pics below, hope you like them.
- 47 replies
-
- 98
-
-

-
My other P-47 build will be of aircraft 42-8130, known as "Frankie". This Razorback operated in the Pacific, flown by Captain Samuel V. Blair, who scored 3 aerial victorious in this aircraft. Frankie was heavily damaged while landing in late '43, determined to be a lost and pushed off to the side at Hood Point Airfield, New Guinea. It was recovered in 1968, and despite initial plans for restoration, has been sold several times since. Most recently, this aircraft was bought by PIMA Air and Space Museum, where it will be restored. I've had the basic Academy 1/72 Razorback sitting around for a while, and figured this would be an excellent time to build it. Decals are by HGW Models
- 21 replies
-
- 13
-
-
Academy is to release a 1/72nd KAI KF-21 Boramae kit - ref. 12585 Sources: https://mmzone.co.kr/mms_tool/mt_view.php?mms_db_name=mmz_info&no=378735 https://www.facebook.com/permalink.php?story_fbid=pfbid05vADP7ySDLhkBhzp6ypqkzwhwTJmtdVAXHdGZfZvtgnH9fpDXTDZmk2vk9ay1v6zl&id=100012407280698 V.P.
- 22 replies
-
- 12
-
-
-
Place holder for my entry. Last year I bought this Academy Gabreski duo P-47 and F-86: The Thunderbolt I will build as Dave Schilling’s last mount, a P47M without the fin fillet using these decals: The Sabre I am saving for next years STGB. AW
-
 I am leaving my workbench for university! I will be studying Aero-mechanical engineering at the university of Strathclyde. These two models will be my last for a while... I actually started these years ago (B in 2020, D in 2021) but got bored of them, recently came back to them and fixed them up. Without further ado, here they are: P-51B 42-106750 and P-51D 44-15648 P-51B 106750 Historical photo from 1945 in Italy P-51D 44-15648 Historical photo of the aircraft from Italy during the second world war. Thanks for looking! I will definitely be staying active on the forums despite not making models, I do hope I can make something again soon.
- 12 replies
-
- 37
-
-
-
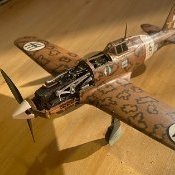 Hello colleagues! This is my first post in the armour section, I hope you'll like it. The previous Macchi C.202 was a challenge to finish because it is so delicate, this was rather a laborious kit to finish. For the main interior colours I used Humbrol 224 Dark Slate grey, and another Humbrol for the white, possibly Humbrol Ivory. The mechanical parts are gun metal + aluminium dry brush, and as a finish PLW Deep Brown wash. The shells are painted with Humbrol 54 brass metallic. For the main exterior colours I used: Tamiya XF-60 Dark Yellow, Tamiya XF-64 Red Brown and Tamiya Dark Green XF-61. The model is stock, but it was lacking interior decals so I bought Archer Fine transfers decals: German 88mm ammo stencils and Panther and Tiger stencils (for interior). I kept weathering and damage to a minimum, I do not have much experience in that anyway. I wanted a tank in a nice condition albeit oily, the wash is PLW Deep Brown. There is no varnish on this one, just paint. Here is the Google album with all the pictures.
- 23 replies
-
- 23
-
-
-
 Hi all. Our state show (QMHE for the locals) finished a week ago and as per usual I snaffled a few kits from the retailers, second hand dealer and the Sunday swap and sell. One of them was the 1/48 Academy Grumman F3F-2. Accurate Miniatures initially released the kit in 2000 and as most are aware they folded quite some time ago. Thankfully, numerous manufacturers have bought the moulds and those kits are now available again. Over the last few days I've painted and assembled the interior and engine. A small photo etch is provided that spruces the engine up with ignition leads. Followed by some painted and weathering it's come up a treat though I've made a tiny modification. The drive spline that attaches to the back of the propeller hub was a tight fit. I've installed some tube into the engine with an ID of 1.2mm and a corresponding piece with an OD of 1.2mm into the back of the prop hub. It allows a snug fit and aligns the prop with the centreline of the engine. The interior dresses up nicely with some paint and dark washes. I drilled the instrument faces so I could lay the decal onto the back of the IP. I sanded the IP thinner than it was but not thin enough as you can't really see the dial faces. For anyone building it I suggest laying the decals straight onto the painted kit item. Considering this a 23 year kit, everything so far has gone together effortlessly. More soon. Cheers, Mick https://i.postimg.cc/6qcMfT5G/IMG20230827123422.jpg
- 16 replies
-
- 11
-
-
- Grumman F3F-2
- Bi-plane
- (and 1 more)
-
Well another seadog going back to the land having been relegated to the kitchen table for any form of modelling I went back to the Old Academy kit just to keep building while the rest of the family have taken over my house and model room. Already built and base coated the main easy 8 now have to add the Dozer and crew with stowage just to keep me sane between all the decorating for the daughter's new house. Stay Safe beefy
- 23 replies
-
- 17
-
-
Hi all Just finished this one It's the Academy Hawker Typhoon Mk.IB Finished with Tamiya acrylics, water colour panel line wash, pastels and silver pencil for weathering and a final flat coat of Model Master Flat Clear Lacquer Gloss coat before decals was Future/Pledge thinned 50% with Tamiya X-20A The notoriously horrible Academy decals gave me a hard time but I have now got a system that seems to tame them Good gloss coat on model Very hot water for immersion of decal Pool of Micro Set on model to lay decal on Once settled into place hit with lots of Micro Sol Once that settles hit carefully only on the decal surface with Tamiya Mark Fit Strong Even then you can't 100% guarantee they'll be right!! The tailband over the fishplates was so bad I ended up masking it off and spraying over the decal to try and tidy up Probably if I do another one I would spray the tail band and the stripes and just forget about the decals Here's the pics Thanks for looking Cheers!
- 15 replies
-
- 35
-
-
-
Hi all I'd like to join with this 1/200 scale kit from Academy please. It's a simple kit, but the parts are nicely moulded. The decals look nice too, although I'll only be using the windows. The kit comes without any undercarriage and is intended to built built 'wheels up' (a stand is provided). A previous owner of my kit was obviously intending to fit an undercarriage using gear from some other aircraft (definitely not a B-17), and has ground away the retracted wheel from one wing. As I'll be going back to the 'in flight' pose, I'll need to reinstate the missing wheel. Keen to build an RAF aircraft, I've been looking for some suitable schemes and come across the decal sheet for 241 (MET) Squadron, based in Iceland. I'm attracted by the nose art (is this unusual on RAF Forts?), in particular 'Hekla Hettie' (I know an annoying cat called Hettie). Here's a link to the decal sheet. I'll need to recreate these markings in 1/200. Otherwise, the only modification that I think I'll need to make is to remove the ventral ball turret. I'm no expert though, so please do set me straight if necessary . Cheers
-
As mentioned in my other thread, a change of plan. Planning a Coastal Command build, I picked up this book: That contained this profile: Which was already piquing my interest as a future build, until I read the section on this aircraft (the only B-17 to get its own section) and realised the importance of the aircraft. This was used by the High Altitude Flight to test humidity and other atmospheric conditions at extreme altitudes (up to 37,000 ft), compiling a data set over the course of many missions that is still being widely used today and was vitally important during the war to predict the formation of contrails. Given the historic status of this aircraft, I’ve decided to bump it up the queue and put the other build on hold (although I will attempt to get that built in the GB after this if the time allows). As for the kit, Academy seem to be the only ones making a B-17E kit in 1/72 right now: As you can see, it’s all sealed up still, plus there’s a set of Armory wheels: I’ll need to do a few alterations to the kit for this. Firstly, FK192 was fitted with an astrodome (I’m hoping I can just take a mould of the one from the Revell kit for this), plus she had all guns and turrets removed to raise her service ceiling for the tests. I also need to investigate the psychrometers fitted to find some photos to base them on. I also need to hunt out a suitable colour for the deep sky undersides, which is aided by both colour photos of other Fortresses in this scheme and a reproduction of the colour chat in the book. Yes, I know about reproductions of colour charts, but said chart also includes all the other RAF blues, so at least gives me a guide for the relevant hue. FK192 appears to have been the only Fortress delivered in the high altitude bombing scheme to have not been repainted, probably due to spending 13 months in Montreal as a training and transport aircraft before being delivered to the UK for the high altitude testing. James
-
Heres my latest finished project, this is based on the Hawker Hunter Aviation group, its the academy kit with some after market pieces and some scratch building, the words are all individual letters and the camo was my first attempt at splinter cell camo with an airbrush. The decals are from old kits leftovers and some like the 91 I only had in black so I used them and repainted them.
- 13 replies
-
- 50
-
-
-
Although I don't build aircraft often, this is a kit that's been in my stash for a few years now, which I've just completed - my build of the Academy 1/48 F-4 Phantom, painted with Tamiya paints and weathered with oils and Tamiya weathering pigments.
- 14 replies
-
- 55
-
-
-
ICM's OV-10 is out so I decided to remove the Academy kit from my stash by building it. Here is the result:
-
"What's a Lockheed Gold Star?" I hear you ask: the answer is a silly idea I had whilst looking for a scheme for a 1/48 T-33 which I bought on impulse. It was an Academy kit, and I almost did one of the box schemes, but I was in a silly mood so this won out. No elaborate back story, simply that there was no Folland Gnat in my alternative world, which not only allowed me to put a classic scheme on this classic trainer, but meant I could use a serial that had belonged to a Gnat irl. As for the name "Gold Star", it continues two de-facto series: Lockheed aircraft carrying names relating to stars; and the RAF naming trainers after something academic. OK, perhaps not as academic as naming it after an Oxbridge college (eg Balliol), an Ivy League university (eg Harvard) or a teacher/professor (eg Magister), but still vaguely to do with school. Markings were a mixture of decals and sprayed with home-cut masks. It was done very quickly as a mojo-restorer, so don't look too closely at any imperfections, of which there are many: just see whether you agree with me that this classic trainer looks rather good in a classic trainer scheme it never wore in reality. I thank you.
-
The Boeing XB-47D Stratojet in 1/144th. The Boeing Stratojet is probably one of the nicest looking jets of the early jet age. In 1/72nd scale the Stratojet is very large model, and I have built two or three in the past. So, for a more manageable scale, I decided to use the Academy offering in 1/144th scale( Kit no 4443). The kit has been issued in differing guises over the years from the Hobbycraft variants B-47B, B-47E, and RB-47H issues, to the Academy B-47B variant boxing , and latterly offering by Academy which contains parts and decal options for all three that the separate Hobbycraft boxing's offered. So, for this particular build I wanted to replicate the XB-47D experimental version of which there were two airframes. These were conversions of the B-47B airframes each with two enormous Curtiss-Wright WT49 W-1 Turboprops driving 15ft 'Paddle Type' propellers in place of the twin podded jets under the inner wing. Two airframes were 51-2103 and 51-2046 with the former first flying on 26th August, 1955. Each Wright WT49 Turboprop developed 9710 horsepower and each 15' Curtiss Electric propeller had automatic feathering and also provided some ground reversing propulsion. My start point was an Academy B-47B/E boxing pictured, and the RetroWings XB-47D conversion set (RW44092), also pictured. I would probably need to rob my decal bank to make up the serials. My aim is to create something a little different than the normal B-47's seen on club tables or at shows. Anyway, onto the build......... The parts are crisply moulded and well detailed for this scale. After a little cleaning up the cockpit and undercarriage bays were painted in a Zinc Chromate Green type of colour, my mix is Tamiya Yellow Green XF-4 and Olive Green XF-58 roughly at a ratio of 3:1. Once dry the seats were painted up using various blacks, greys, greens, reds. To create a representation of seat belts I painted some thin paper pale brown, attached with PVA glue and some dots of black and silver to suggest buckles. I plan to add two instrument panels from thin plasticard and to be painted up to suggest instruments as the build enters its final stage. The XB-47D was converted from B-47 airframes so the panels in the fuselage were removed by gently scoring along the indicated lines and the early type RATO panels supplied in the kit installed. Some trimming and shims were needed to get a nice finish. I also found it helpful to add a brace behind the RATO panel to prevent distortion when filling/sanding. This meant that the rear wheel bay needed to have some plastic removed from either side to allow fuselage to fit correctly, luckily the plastic is thick enough to be adjusted without affecting the bay detail. Once done the cockpit was attached, wheel bays inserted into fuselage and once set the halves will be joined ensuring as good as a match as possible to minimise any filling. I will also attach the clear nose part for this version, the XB-47D was based on the B-47E, but the airframe retained the early more glazed nose of the B-47B rather than the solid of the B-47E, also the early internal RATO fitment of the B-47B. The wings were next up, and the outer engine positions cleaned up as there was a small gap at the rear of the fairings. This still needs a little more attention and some rescribing the lost/filled panel lines. Whilst on with the wings, I modified the flap layout and re-scribed the new altered flap using the resin flap inserts in the conversion set as a guide, rather than cutting the flaps out an the inserting the resin supplied flaps as indicated in the set. As for the new engines and pylons, I'm still mulling over the best way to tackle these.
-
Hiya I have decided to try this F-14A. I know it has it's flaws and fit issues, oh well. I couldn't afford the Tamiya. Fun will be had and satisfaction gained. 🤓


Wedge-TailedEaglePortraitRaptorDomains.thumb.jpg.41a306d3445a68f0f2df773e01776ea6.jpg)