Search the Community
Showing results for tags 'AZ Models'.
-
This is my 1/72 AZ Model's Douglas X-3 Stiletto. This is another kit that is not for the faint of heart or the easily discouraged and for more details on my trials and tribulations you can see my WIP entry at To summarize nothing that is supposed to go into the fuselage interior will fit and nothing on the right side of the fuselage lines up with the corresponding thing on left side. Including the canopy which is one piece. But it still built fairly quickly and I am happy with the outcome. So on to the pictures I am not sure why the canopy appears so cloudy in the pictures. It is not like that in real life. Here is a better view that also shows the small slit intakes I added ahead or the primary intakes; Next up is the newly remastered Anigrand Douglas XF5D-1 Enjoy
- 13 replies
-
- 26
-

-

-
I don't usually do WIPs, but since this is a new kit and it has received some negative reviews: http://www.kitreviewsonline.de/douglas-x-3-stiletto-im-massstab-172-von-az-model-az-7597/#more-41416 I thought I would do one so that those are interested can see my trials and tribulations. First the sprues of which there are 2: Just ignore the Sidewinders, they are for a what-if boxing. There isn't a lot of flash but there is some and it is in awkward locations, like the slot for the wings Next the transparency, which is...transparent: Decals, which look really good: Finally the instructions, they are simple and some placement is vague but they are adequate Following the instructions I assembled the cockpit, main wheel well and engine exhausts. Then I tried a dry fit, and nothing fit inside the fuselage. Not the wheel well This is after I had already done some sanding. Not the cockpit And not the exhausts, which I didn't get a picture of. So out came the grinding tool and sanding sticks. In order to get the exhausts to fit I had to do major sanding to them and some grinding of the fuselage. They are mostly hidden so it isn't too bad. So after that I was able to button it all up; The wings are just stuck in place and not glued, They are going to need some more work before they fit correctly. The canopy fit is OK, but there are gaps that will need to be filled That's it for now. Next will be seam filling on the fuselage and then attaching the wings. That will be in a couple days since I have another project to finish first. Thanks for looking.
- 67 replies
-
- 17
-
-
-
Hi folks, Those of you who followed my build thread on this will know that it was built from the AZ Models 1/72 kit of the two seat Spitfire, and it was painted up and had custom decals and masks made to replicate NH341, otherwise known as Elizabeth. It will shortly be in the hands of the owner of the real thing, but I thought I'd take advantage of a sunny half hour this morning to photograph it before it goes... Cheers, Dean
-
 Hello everyone. This is Messerschmitt Bf 109G-12 Yugoslav version, 15/9615, 83 Fighter Regiment, Yugoslav Air Force, Cerklje airfield, Slovenia, Yugoslavia, 1948-49. 1:72 AZ Model kit with Kora resin conversion set. Following the Second World War, Yugoslavia received some standard two-seater Bf 109G-12s from Bulgaria. Needing more, they converted a couple of one-seaters. This conversion visually differs from the original G-12 in the rear cockpit section where an Erla Haube canopy was used instead of the special G-12 rear canopy. As soon as I found out about this variant I went looking for options to make it and found a Kora resin conversion set with decals. This set was meant for a Fine Molds kit but I used an AZ Model kit from the blank 3-kit pack instead. This of course meant more work to get both to come together but in the end I managed and it came out nicely. Paint and varnish all applied by brush. This is the last 1:72 kit I've built so far (I build mostly in 1:144 nowadays) and I completed it last year. Thanks for looking and all comments are welcome. Miguel
 -
I have just finished this badge of 109's, which is no. 211-215. It is the Az model of the F and G. Build out of the box, with aftermarked decals. Cheers Jes
-
3 builds into my return to plastic manipulation its time to build a Spitfire or two! The 1st Spitfire will be a deviation from my primary theme of aircraft flown from US bases in Essex during WW2 in 1/72nd scale, but still has an Essex theme, a 131 Squadron MkVII Spitfire flown by Ft Lt C. 'Pete' Bearman. He was a close friend and colleague to my Grandfather at Essex Police before he volunteered to join the RAF . The 2nd Spitfire will be an Eagle Squadron MkVb Spitfire based at North Weald. I will be making the decals for this aircraft Onto the kits - No.1 AZ Models 1/72nd MKVII Spitfire - my 1st venture in limited run kits - hmm where are the locating pins No.2 Tamiya 1/72nd Mk Vb
-
Hi all. I have been away for some time due to some major building work I have been having done and doing myself . This is still ongoing, but now I have modelling time too. I have been busy on this little beauty which is a limited run kit. I have also used the rather nice Marabu photo etch set which is quite comprehensive. The fit is not to bad at all although lots of testing is required along with some fettling. The kits comes with various resin items such as seats although I have used the PE ones, Engines wheels etc. I am doing an overall aluminium painted Royal Navy Oxford II. I am going to finish this and a 1/72 Percival Proctor and Lockheed Ventura that I have on the go and move onto a PRU blue phase with a 1/72 Mossie to test paint techniques and then when I am happy with that a 1/48 PRU Hudson. The Cowlings come in two halves and go together much better than I thought they would and the engines sit on pedestals/mounts made out of sprue. The intakes are resin items which area added to the plastic kit items and look quite good after some fettling. There are no windows in the roof of the aircraft and I pondered this for a while. They are quite a prominent feature so I decided to model them using the chain drilling method. The rears will be done in Crystal Clear, the front ones were cut out and the bit between them was filed down enough to fit some clear sheet and then I made the frame in between flush with some plasticard. I am quite chuffed with this so far. Thanks for looking All the best Chris
-
 Here's a Messerschmitt Bf109 you don't see that often, the G-1. The G-1 and G-2 were the first of the G series (obviously) and the G-1 had cockpit pressurisation but the G-2 did not. AZ Models make a reasonably decent series of 109 kits, many of which you can't get from more mainstream manufacturers, so far 109 fans, these kits are brilliant. This one is from JG54 'Grunherz' and I believe it's one that Walther Nowotny flew. thanks Mike
 -
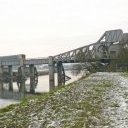
Just thought it might be timely to start a reference thread dealing with the Saunders Roe SR.53. Homebee has already started a thread advising us of the soon to be released AZ 1/72 kit here - I've attached a link to 17 relevant photographs c/o the Airliner.net website - http://www.airliners.net/search?aircraft=43331&display=detail I was just hoping that other BM members could contribute with any additional information / magazine articles to help us all make this most of this exciting new release. As far as I can see, there's not much around so any additional information or walkaround photographs would be much appreciated. Cheers and thanks... Dave.
-
Hello, Having been a long time lurker I thought I would take the plunge and post some of my efforts. They are nowhere near as good as some of the masterpieces that appear on here but I enjoy building them and each one is a little bit better than the last (or a I buy something which means I can do something that I couldn't previously!) First up is the AZ Models Bf109-G2, finished as Hans-Joachim Marseille's 'Yellow 14'. OOB apart from the aerial wire which is EZ-line. Paints were Vallejo Model Air applied with a brush over a white primer. Photography at my desk after dark with my Huawei P8 lite which I'm still getting the hang of.
-
Just finished this one fra AZ, build out of box, ok kit had some resin parts that did not fit well, brush painted witm Modelmaster paint, clear/mat lacquer with airbrush, decals from kit. Photo dok. from internet. Cheers Jes
-
Hi all! As a break from cramming detail into Matchbox biplanes, I embarked on one of my Telford buys, the AZ Chipmunk - on the suggestion that I needed a bit of a rest and a mojo restorer! It's quite a nice kit, with very delicate surface detail and a well-detailed interior. It's rather lacking in some of the finer details however- I added tie-down rings, actuator jacks for the flaps, pitot probe, catches for the sliding portion of the canopy, two blade aerials, a scoop on the cowling, the little strakes on the wing leading edges, brake lines, etc, plus drilling out the exhaust and all the scoops. Fit is questionable - it's been a while since I built a "proper" short-run kit and it was a bit of a shock! There's thick flash, the wing-fuselage joint needs a shim, and the cockpit won't close up unless you shave off some of the sidewall detail to admit the sides of the seats. You need to shave a goodly amount off the fuselage decking sections under the canopy Also, the tailplanes fit much better the wrong way up - I thought this was the correct way of fitting them until I noticed that the elevator trim tab was on the wrong side! Nothing a bit of filler and a rescribe couldn't fix... Decals are a right mix, on account of the kit schemes being a bit uninspiring and quite a few of the stencils being inaccurate. I raided the spares bank for an old Airfix kit sheet, which provided most of the stencils and the wing walkways (AZ provide these but they're the wrong shape and don't follow the panel lines). The markings for WP901/B of 6 Air Experience Flight (based at Abingdon in the 1970s-1980s) came from the excellent S&M "Post War Piston Trainers" sheet - although they're super thin and settle down like a dream I had to double up all the roundels in order to get them remotely opaque! The most outlandish decal source is the red First Aid cross - which is part of a 41sq insignia from the Italeri Jaguar! So a bit of a mixed bag - Not as easy to build as the Airfix, and like that kit is a bit of a blank canvas for added external details - but if you've got the skills to make it fit, it's a considerably more refined starting point, and you don't have to attack it with sandpaper to get rid of hundreds of scale fist-sized rivets!
- 14 replies
-
- 35
-
-
OK...to explain...I didn't read the fine print on the instructions when I thought, "I yeah...I'll do the Swedish one..." The Swedish aircraft was not the Morane 'WR'...it was the MS 3G Thulin B. I discovered this when I went to modify the wings for the WR (sawed off sections of the ribs) as instructed and then later that day noticed that the Thulin did not have the shorter wingspan. Luckily I didn't pitch out the removed sections so they have now been glued back on. Phew! I have also found some excellent photos of the real thing from a museum so I might try to replicate that...I'll post a photo or two in the chat thread. But for now... I removed the resin floats from their sprue and cleaned them up. Same with the prop, etc... Construction is basic. I have built this kit before when it was a Pflaz (Az Models also) back then...the moulds are pretty much the same. Basic Gnome-shaped motor, cockpit essentials...I may try to improve them a bit since you can see inside pretty well. I tried my hand at some rib detail...not so bad, not the best. I primed it with Humbrol Desert Sand rattle can and then airbrushed MrKit French Doped Linen on top. And as I write this I am suddenly aware that I have cleaned and painted the wrong motor! So it begins...with a sense of humour and some humility...as it should. --JDCM
- 46 replies
-
- 4
-
-
- AZ Models
- floatplane
- (and 1 more)
-
Two of the just released AZ Models Chipmunks arrived from Mr H in Lowestoft yesterday. I have been thinking of what to build for this GB and this little treat of an aeroplane is a goood start. Although a De Havilland Canada design, the majority of Chipmunks were built in the U.K. by De Havilland first at Hatfield and then at Broughton. So this should be OK for this GB. I will complete it as one of the Navy T10s. The Fleet Air Arm received a number from the RAF and indeed still have some in flying condition for the Royal Navy Historical Flight. I'm not 100% sure which aircraft it will be but I'll work on that. Anyway here's the box and sprue shots. Not a lot of it and a tiny little thing. But the detail is a lot better than the old Airfix kit and no Rosie the Riveter! Unfortunately none of the options are for a FAA aircraft or even one that got transferred.
-
Hi all, I was considering buying an AZ Models Spitfire MK VIII because of the SEAC markings that are provided, I am just wondering if someone could tell me about the quality of these decals Thanks in advance, Cam
-
Many moons ago I kind of started on this kit, I got a far as gluing the bulkheads to the floor, dry fitting the parts and tried to figure out how to position the gunner's tunnel where it made sense - gave up on that idea and quietly put it back in the box and placed a few more models on top of it hoping I'd forget about it and my kids could dispose of it after I was long gone. Well, the bug has bit to finish up those models that were never finished. I struggled with the fuselage trying to get the length of it not to look like a worm, as this one had a tendency to want to curve sideways. So after fighting this issue for 10-12 minutes I decided to glue it up as true as I could sighting down the spine. I'll then then add the extra bracing details in the interior. The tunnel was both glued with Tamiya glue and acc'd in place and then liberal amounts of Tamiya putty was used to blend it into the side walls and bottom of the fuselage. I don't remember building a kit with this much putty being used in the first hour nor having to use every clamp I have available and wishing I had more. Anyway we are off and running.
-
I will join this GB if I may with an AZ Models P-51B in Foreign Service. Its a limited run kit with the usual issues which probably means I am going to make a bit of a mess of it ;-) The kit: http:// http:// All three options look very colourful but I am thinking of going for the Swedish ex 356th FG plane. I have always have a soft spot for Swedish markings. Doing a bit of research I came across the following webpage which sets out the background to Swedish Mustangs much better that I could. NB the first picture is of the plane I am going to build but appears to be before it was repainted. If anyone has more info please shout. http://mustang.gaetanmarie.com/articles/sweden/sweden.htm All comments much appreciated. Dave
-
Hi guys, Well I've struggled with my mojo over the summer thanks in no small part to an SR-71 build thats stalled but I think its time to get back on the horse and I can think of no better way than with one of AZs lovely little Cobra kits. This time I have the Murder Inc boxing of the kit: I do like these AZ kits I have to say, I will be building this using Eduards lovely little etch set for this kit, you will also notice below there is a Pavla canopy in the image, not sure if I am going to use it yet as the standard one is actually looking in pretty good nick truth be told and I don't have that much time to get this build over the line. I was hoping to have got started on this yesterday but a combination of a cat induced lack of sleep and a PH crash in my marine tank meant I lost most of yesterday, I haven't really done much with etch before so this will be my first real go at it, so I spent what little time I did get going over the instruction sheet for that. I will start cutting sprue after work tonight though and hopefully be able to post some real progress! Cheers Mark
-
Based roughly on the Me 262 and using engines based on the BMW 003 the Kikka made one flight in 1945 but the length of the take-off run caused concern so for the second flight booster rockets were fitted. Unfortunately these were mounted below the fuselage so when lit they caused the a/c to rotate and the tail to drag on the runway and presumably in a high drag situation making take-off impossible. The a/c was badly damaged and could not be repaired before the war ended. One Kikka still exists in the USA A fairly typical short run kit in that some cleaning up of the parts is required. The only tricky bit a found was installing the 'bullets' in the engine nacelles - which I didn't do terribly well. I saw a revue of the original issue in a model mag a while ago and it mentioned using PE. None of this was present in the current issue. It also mentioned the lack of support for the nose gear - there is a gear bay in the current issue so there is no trouble there. There is some confusion about the decals on the upper wing surface. The diagram shows them as red with a white surround but the numbers on the decal sheet suggest red only. There are two colour schemes given. One orange all over and one with camouflage. Talking to the Japanese a/c Sig it was suggested that it should have been orange in accordance with Japanese practice but probably prudence resulted in it being camouflaged. The only pictures I have seen are of it in camouflage. John
- 3 replies
-
- 15
-
-
- 1/72
- Johns early jets
- (and 1 more)
-
This is my stab at AZ Models excellent little Bf 109 G-2 in late war Romanian guise. It depicts a machine post Romania joining the Allies in 1945, and built for the Great Patriotic War GB. The kit is very nice, with excellent detail straight out of the box, while requiring a little more care than a mainstream kit. The instructions are a little vague in places, particularly with regard things like wheels and aerial masts which varies between early and late model G-2s, so apologies if mine aren't quite right. I won't tell if you won't. Paints are my usual mix of Gunze & Tamiya acrylics, thinned with cellulose thinners,xand applied with my trusty Badger 100S. Thanks for looking. Karl
-
 Hi mates, here are some pictures of my latest build - a Supermarine Spitfire Mk. XIVe. This has the markings of 17 Squadron Leader and ace James "Ginger" Lacey in the SEAC theatre during early 1945. I used the 1:72 scale kit from AZ Models, along with a variety of aftermarket accessories. This was the first time I used one of the new photoetch cockpit sets from Marabu Design. It was a bit fiddly, but I think it looks great in the model, and certainly more to scale than the kit components. I may just use these on all of the AZ Spitfires in my stash. Project: Supermarine Spitfire F. Mk. XIVe Kit: AZ Models Supermarine Spitfire F. Mk. XIVe (kit number AZS7205) Scale: 1:72 (not quite as big as 1:48, but with more character) Decals: From the kit, representing 17 Squadron in the SEAC theatre during early 1945, SEAC roundels and fin flash from Model Alliance sheet 72118, and stencils from Aviaeology sheet AOD72S09. Photoetch: Marabu Design cockpit set M72014, Eduard Interior Set No. SS242, Yahu instrument panel 7209, and fret included with kit. Resin: Quickboost 72164 Spitfire Mk. XIV Propeller, 72240 Spitfire Mk. XIV exhaust (round), Quickboost gyro gunsight; SBS Four-spoke wheels 72027 Metal: Master 72006 Spitfire E Wing Late Hispano 20 mm Cannons & 0.50 calibre fairings Vacuform: Falcon Spitfire Canopy Set Paint: Gunze H73 Dark Green, H74 Sky, H75 Dark Sea Grey (masquerading as Ocean Grey), H309 FS34079, H47 Red Brown, H306 FS36270 (masquerading as Medium Sea Grey), H308 FS36375, H338 FS36495, H335 Medium Sea Grey, H329 FS13538 Yellow, H95 Smoke Grey, H93 Clear Blue, H92 Clear Orange, my own custom mix of RAF Interior Green, H12 Flat Black, H11 Flat White; Alclad 101 Aluminum, 111 Magnesium, 115 Stainless Steel, 314 Klear Kote Flat Weathering: All weathering was done after camouflage scheme and markings were applied through a combination of post-shading, pastels, and silver pencil. A panel line wash was only applied to the control surfaces. Improvements/Corrections Seat, instrument panel, bulkheads, harnesses, rudder pedals, control column, rear view mirror, tread boards, and landing gear doors are all made from Marabu, Eduard, and Yahu photoetch components. Instrument panel compass was scratchbuilt. Cut open the kit canopy, and used only the windscreen. The sliding canopy and fixed rear portion came from the Falcon vacuform set. Propeller and exhaust stacks from Quickboost resin Resin wheels/tyres from SBS Camouflage pattern was airbrushed freehand Added whip aerial with 0.005" diameter Nitinol wire All weathering done with post shading (the way real airplanes weather) Build thread: Link All told, this was a fun, relaxing little build. It's always good to sneak in a build like this in-between the bigger projects. This is the first AZ Spitfire that I've built (although I have a ton in the stash) and it went together well. I didn't encounter any of the problems that I've read about with these kits, and I think the finished model looks the part. That's great since the Spit 14 has always been one of my favourites. She's a beautiful, elegant, menacing bird! Note: The red doped patches on the wing leading edges are present in many pictures of SEAC Spitfire XIVe aircraft. Even though the outer machine guns were not installed, the bays were empty and the blast tubes present to allow changing armament if required. Consequently, the patches were applied over the blast tube exits. So on with the pictures! Here is a shot of the Marabu photoetch cockpit being assembled, and compared with the kit parts: And I'll leave you with the man himself, Ginger Lacey. Who liked to build model airplanes! Next project is the new 1:72 scale Buccaneer S.1 from Scale Resin. That will be a really fun build! Cheers, Bill
- 26 replies
-
- 46
-
-
- Ginger Lacey
- AZ Models
- (and 1 more)
-
I read with great interest about the using a combination of the Airfix Spitfire IX and XIX kits to make a Mk XIV, and thought I'd give it a try, using the nose and tail from the Mk XIX and grafting them onto the Mk IX fuselage. It was so much fun, that I did the same with an AZ Joypack Mk IX fuselage. And finally, since it's best to build Spitfires in threes, the AZ Mk XIV kit was built alongside OOB. A meandering WIP is here. Thanks for looking.
- 19 replies
-
- 35
-
-
 Well hello there everyone, what can I say, having just taken part in my first ever GB with being part of the F-5 STGB I have enjoyed the experience so much I have decided to dive straight back in with my first ever attempt at building a helicopter. For this I have decided to use the AZ Models TH-1G Training Cobra kit that I picked up the other week. I will be representing her as TH-1G c/n 34270, 70A scheme as shown on the box art. I've had a quick look at the kit and it looks quite nice, the instructions are a little confusing but compared to the Tiger Hobbies sheet I have been working off lately they're almost encyclopeadic in comparison. Anyway heres my box and sprue shot, all layed out and ready to begin when I get in from work tomorrow!
 -
This is my 1/72 AZ Models TH-1G Training Cobra I have built as c/n 34270 in the 70A scheme as shown on the box art for the kit. I built this for the helicopter group build currently underway. I picked it up for much cheap on a special offer over at the big H to build as my first ever helicopter kit and when I saw the group build it seemed the perfect opportunity. There are quite a few things I would like to improve but I get the feeling that it doesn't matter how much I touch this one up its not going to improve it any, truth be told it would probably end up making it look worse. Almost all of the issues I had were of my own making, fits really nice, details good and it comes with a small fret of PE. Decals are few and far between but are ok to work with. It's completly out of box with the exception of the light next to the main rotor which is just clear sprue stretched and painted. Painted with Tamiya acrylics and finished with Newton & Winsor acrylic varnish. Here's a couple of pictures for you, there is more in the build thread here, although I am waiting for some decent natural light before I add any photos to the group build gallery. I hope you like her!
-
Hello fellow Britmodellers, I've managed to finish two more Spitfires. They are 1/72 Mk XVI's from the AZ kit, one a high back and one a 'bubble' top, both in markings for 2nd TAF machines in 1945. The marking for both aircraft came from this Xtradecal sheet. WX-V, TD240, is a bubble top Mk XVI that 302 Sqn leader Boleslaw Kaczmarek inherited from Group Captain Aleksander Gabszewicz (an famous Polish ace whose first victory was over an He 111 on the opening day of the war). I just finished them, and they're already dusty! Welcome to New Mexico. JF-E, TD147, was the personal mount of James 'Stocky' Edwards, a Canadian ace who may be the only WWII ace to have demonstrably under claimed. The mighty Procopius pointed out this aircraft as soon as he found out I had bought the sheet, and I knew I had to build it. I hope to build one or two of Edwards' Kittyhawks in the near future. Thanks for looking. Edit: There is a WIP thread here.
- 13 replies
-
- 24
-