Search the Community
Showing results for tags '1:48'.
-
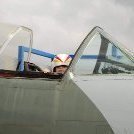
OK. So after my son's first build (and mine for many years) we took on the main event. A Hobby Boss 1:48 F4U-5 Corsair. Undeterred by the fact I had read somewhere the wings are historically inaccurate (too much canvas on the wings for this version?) we are going to crack on and make this OOB. Our main aims are: 1) Have a good time 2) Do a better job than last time 3) Experiment with exhaust and gun smoke, and try a little 'preshade' on the panel lines. 4) Not fall out about whether the undercarriage will be down or up (easier to display down, young boys want planes to FLY ) Yesterday we made a little start, painting some components on the sprue, the first two stages in the instructions are the cockpit and and engine assemblies. What I found interesting in this set compared to the Revell 1:72 is the detail in the painting (and the cockpit) seems a lot less. I'm glad we did the 1:72 as I took some of the detail / colours in the cockpit from that one. First win - thinned the paints a lot better this time. 4 coats and no detail lost, and just looking a lot better. First near win / miss. I was feeling really chuffed to find the thread in the tips about how to do perfect straight tyre lines by dripping a bit of thinner followed by the paint. Nice job. Reread the instructions and realised I should have painted the wheel first. Ah well at least I know the tip works 🤣 Next steps... Apply a decal to the forward instrument panel (the part had a spot of gloss varnish applied today). Decide if we're brave enough to maybe apply a little painted detail to the two consoles either side of the pilot and think about the cockpit assembly. First decision to be made... In the painting guide for this one if the undercarriage is down the 'struts' ((?) you know the bit the wheels connect to) are navy / sea blue. All the pictures I've seen they are white. Obvs hypothetical at this point as it won't matter if the undercarriage is up Thanks for reading this essay.
- 26 replies
-
- 10
-

-
- 1:48
- WWII Fighter
- (and 1 more)
-
This is Hasegawa's excellent P-39/P-400 built from the latest P-39N/Q boxing, but backdated to a P-400. The kit includes essentially all the parts needed for the earlier Aircobra, minus the early propeller and a few bumps and and lumps. I had a set of Montex masks for the markings. These were harder to use than I thought they would be. Read on. There is not much to say about the build, that isn't standard for a Hasegawa kit. It was fairly easy, but care was needed to ensure proper fit. I used a little bit of filler on where the back of the lower wing half meets the fuselage, but if I recall, that was it, Painting was also a pretty standard affair. I used AK Real Colors mixed with Tamiya and Mr. Color paints, and Mr. Leveling Thinner. I ran into some trouble with the Montex Masks and Hasegawa's decals. The masks for the US Army lettering, and the national insignia worked beautifully, but I had trouble lining up the different layers of the shark mouth. The result is that I have some white paint showing on the outside of the red lips, and it makes the red paint look "raised", like a thick decal would appear. I tried sanding it down a bit, but gave up. It only shows from certain angles and doesn't bother me enough to fix it. What bothered me more were Hasegawa's stencil decals. They are printed with several stencils to a large shape (for example a line of no walk signs), which is intended to make the stenciling process faster. However, the decals are quite thick, and it took a lot of sanding and feathering of the decal edges to get them to look flat against the finish. I would have preferred to just apply a thinner decal if each stencil separately. The boxing rooster and Hell's Bells decals came with the Montex Mask set, and are excellent. I weathered the plane to make it look heavily worked, but not completely worn out. These aircraft were on Guadalcanal in the fall of 1942, when supply lines were stretched, and conditions at Henderson Field were less than ideal. The result is a pretty dirty plane, exposed to the elements, and to many hours of combat. There are several sepia and green washes, acrylic glazes for oil and fuel spills, and tan and brown acrylic inks daubed on with a sponge to simulate mud on the landing gear and where crews walked with muddy boots.
-
Fiat G. 50 "Freccia" 1:48 scale model from Flying Machines company completed. The build went remarkably well considering it's a shotrun, the fit of the plastic and resin parts was very good, the sheetmetal fit was good too. Painting the markings from the masks makes the job a lot easier than applying decals. And replacing the rifle barrels with metal just added to the charm of the "Freccia", But here's where you need liquid to blacken them. The metal barrels came out great. Model represents a machine Fiat G. 50/AS, MM. 6393, flown by Capitano T. De Prato, commanding officer of 150a Squadriglia, 2 Gruppo Autonomo 1941.
-
Welcome! This time a quick weekend project and as usual Italy on tap. The chosen one is a Fiat G. 50 "Freccia" in 1:48 from Flying Machines FM48002. The only additions I have to the model are these: - Montex MM48198 - MASTER AM-48-054 Model will represent machine Fiat G. 50 "Freccia" bis/AS, MM. 6393, flown by Capitano T. De Prato, commanding officer of 150a Squadriglia, 2Gruppo Autonomo, 1941. If I'm not mistaken it's a smooth engine cover with no tabs. There is a square filter under the engine and the identifying marks with a white field. That's it for starters, model washed and is drying for tomorrow morning.
-
This is an Esci/AMT repop. The kit went together pretty well but pay attention to the instructions as Italeri mis-numbers several parts; they are pretty easy to figure out though. Another error was that a clear canopy was include and every photo I've seen has the smoked one. An easy fix for me as I swapped it out for the smoked one in their S-3A kit. The cockpit is pretty barren so the canopy hides this nicely. I had to remove and re-position some of the antennae. These things were all over the place so references are needed. I used Vallejo Model Air Barley Grey as it looks pretty close to the photos. I'm pretty much stuck on paint I have in stock due to this COVID thang. Italeri wants you to paint the canopy/glare panel Black but the photo shows Grey; I used Tamiya XF-53 Neutral Grey for this. I used the kit decals and I'm not sure if its my choice of lo-viz paint or their choice of lo-viz markings but they all but disappear. The tail marking...yes...that's singular. Its one piece except for the formation lights. There was no problem getting them into position as they were very sturdy. I got them to snuggle into the panel line but not completely. I made the FOD covers as I didn't feel like fiddling around with the intake seam; not completely accurate.
-
 This is the experimental lifting body flown during the late '60s, familiar to many (as the box art suggests) from the opening sequence of The Six Million Dollar Man. (Remarkably, Steve Austin left the B52 in an HL-10 and crashed in an M2-F2.) The kit doesn't have many parts, and those it has are relatively undetailed. The resin needed a lot of hot-dipping to straighten out various kinks, and a lot of filling and sanding to eliminate seams or improve fit, in particular at the join between upper and lower fuselage halves. The decal sheet was badly printed. I contacted Fantastic Plastic about this, but got no reply, so ended up scanning the sheet and rebuilding or replacing several decals using Experts-Choice decal paper. The paintwork is an experiment I very soon regretted. Other people appear to be able to use Alclad unsealed, but I'm not one of those people--the surface of my polished aluminium got distinctly unpolished and worn just with the very careful handling required to bed down the decals, and the different reflectivity of the decals is a bit of an offence to the eye from some angles. Altogether it was a dispiriting build, which very nearly ended up in the bin several times, and I never mustered the enthusiasm to begin a WiP thread. The highlight of the whole experience was the point at which I lost one of the control surface parts for a week, only to discover it in my trouser pocket while hunting for change for a parking meter. Old age doesn't come itself ... Here's what the real thing looked like: And here's what I produced. Some additional detail with styrene and brass rod. Paint is Alclad polished aluminium and matt white. Ejector seat straps are cannibalized from an Airwaves set, and the cockpit was detailed up a little using Airscale early Allied jet instrument decals. Either the kit undercarriage gear is too long, or I mistook part of the pour stub for part of the gear, so the model sits a little too high. This annoys me, but doesn't annoy me enough to make me want to revise it at present. It's a tail-sitter, of course, and I've made no effort to edit out the transparent rod I tucked under the engine bells for support. Thanks for looking, and well done for getting past the outpouring of negativity with which I started this post!
- 22 replies
-
- 45
-
-
- Fantastic Plastic
- 1:48
- (and 1 more)
-
Hello to all.After a long time I have manage to finish this awesome f-14.The kit itself is the well known hasegawa kit and all of the issues that I red about are true.I added the aires resin cockpit and the exhausts.The cockpit is a pain in the you know what to install.My customer asked for a closed cockpit and that complicated matters even more.The jasmine decals I partialy used are bad and innacurate so I had to use the hasegawa OOB ones for it. Enjoy the photos.
- 20 replies
-
- 62
-
-

-
 This beast has been my first kit in about 20 years! The Eduard Superbug kit is a limited run redox of the Hasegawa F/A-18E in 48 scale bundled with some of their aftermarket bits and some nice decals from Furball Aero design (printed by Cartograph). The kit is out of production but there are plenty still in circulation at retail price. As I've learned this is probably not the smartest kit for a first timer or long lapsed modeller, but I was still able to get a solid 80% result. Someone with a little more experience would be able to take it a little further. This kit would probably be ideal for someone who's got 2-3 builds under their belt, nailed the basics and wants to take their skills to the next level. I learned a lot working with it and it's great for introducing you to intermediate and advanced concepts like filling gaps and trickier masking. It's well made and the moulding was probably state of the art when it came out. Minimal flash and pretty good fit. I did have to do some filling and fitting but mostly on the underside and places that are only ever going to be seen if you go looking for them, so if you're new to these things this is a good kit to try it out on without fear of ruining things. I should note that the plastic is for an early Super Hornet with the early ECS pipes but the schemes were for a late one, aftermarket replacements are available but it does require some minor surgery. I've also added some Eduard ECS pipes, AGM-65's and AGM-88's. The ECS pipe conversion is very achievable if you take your time. The detail on the AGM-88's is exquisite. However the AGM-65's's are really hard to work with. This is no fault of Eduard as neither I nor their competitors can see a better way of doing it better. Getting both halvs of the missile off the casting blocks and making a nice parallel join is beyond me so mine are a little crooked. I also mangled the seeker head glass so I had to improvise with some UV resin. Someone with greater skills than mine can make these look really good, I'm just not quite there yet. The 32 scale version is probably easier to work with. WIP thread for a blow by blow Scalemates Project link Kit Link Eduard ECS pipe upgrade Eduard AGM-65 Eduard AGM-88 And now some shots of the real thing!
 -
 I haven’t made an aircraft kit since last Christmas and my local hobby shop has a pile of these in stock, so thought I would have a go. Sprue shots: Looks like just the right amount of complexity that I can handle at the moment - reasonably detailed but not too complicated. Transparencies still all wrapped up. A rather busy decal sheet - although I’m going to do the Army one, so not so many of the little stencils to be done for that one. Here is the one I am going to do - Middle Wallop was just a short distance from where we lived (for multiple postings) when Dad was in the Army. Started work on the cockpit straight away. This is going to be a straight out of the box job. All went together very nicely. Then paint, a couple of coats of Tamiya XF69 NATO Black were brushed on, followed by some dry brushing with a light grey acrylic. A wash with Army Painter Dark Tone wash, and the finished with a coat of Italeri clear flat. I used a few dots of Tamiya X22 gloss clear for the instrument dials. While the paint was drying I had a go at the canopy - which has me a little anxious. Airfix provide a little jig to align everything. It’s a bit fiddly, but I took it slowly, using very careful application of Tamiya Extra Thin Cement, and it looks like it’s worked ok. Couple of tiny gaps that some PVA will fix. That’s it for today, so far it’s a good start.
 -
Kit - Aifix 1:48 Paint - All enamels Decals - FCM 48053 Extras - Eduard kit-specific Zoom set. Gloster Meteor F8 'Jambock 4452' Santa Cruz AB, Brazil 1965 Not a straightforward build it has to be said. Fit issues getting the leading edge of the wing together inboard of the engines - I put both engines into place - I think that the installed engne detail is simply too tall and knocks the fit way out. Other than that it wasn't too bad, details are a little soft but we're sort of used to that from (new) Airfix. The blue was mixed by eye and sprayed onto the primer then masked using the vinyl masks that FCM give you with the decal set (and Tamiya tape for the fuselage band & wing-tips). I tested five different 'silvers' and of them all Tamiya enamel X11 was the best (but not by much) with almost no grain and great coverage, so I applied three light coats over a unifying coat of good ol' Xtracolour enamel EDSG - really pleased with the final finish. I left everything to cure for about a week before spraying two medium coats of Humbrol Gloss Cote (sic) then decals, a lightish Flory wash to bring out the panel lines but not too stark - I hate really dark PLW, makes your model look like a flying diagram !. All finished this weekend with a light misted coat of Humbrol Satin. That's all to say - the FCM decals are a joy to use, airfix decals are beautifully printed too. The Eduard set was really only needed to dress-up the seat and the IP, and that's fine. Overall a 7.5 out of 10 for this one, IMHO. No plans on building another but really looking forward to the Vampire and a Chipmunk or two... As ever comments questions and criticisms are welcome. Best from NZ. Ian.
- 12 replies
-
- 30
-
-
I consider Reggiane Re. 2002 "Ariete" model in 1:48 from Italeri as finished. It depicts a machine from Reggia Aeronautica. 239Ma. Squadriglia, 102 Gruppo Reggio Emilia, Italy, February 1943. Model made straight out of the box, I know the carbon paper is getting silvered because I copied it myself. Workshop - Reggiane Re.2002 "Ariete" 1:48 Italeri - Work in Progress - Aircraft - Britmodeller.com
-
I consider Reggiane Re. 2002 "Ariete" model in 1:48 from Italeri as finished. It depicts a machine from Reggia Aeronautica. 239Ma. Squadriglia, 102 Gruppo Reggio Emilia, Italy, February 1943. Model made straight out of the box, I know the carbon paper is getting silvered because I copied it myself. Workshop
-
Hello everyone! I'm throwing an instant Italian project into the workshop, and how could I not throw in another Italian. The hero of this workshop will be Reggiane Re. 2002 "Ariete" in 1:48 from Italeri, there will be no additions to it. Instant project so a word of explanation, the model will be at my friend's place on the shelf. Not everyone has the ability or time. Below is a small in-box of the kit:
-
A Hasegawa kit, no modification. It was when I wanted to test paint chipping by brush. The chipping was done using Tamiya enamel paint, applied using 0 size brush. Nanond
-
 Nearly 20 years ago I had won an Ebay auction that was including more than 100 scrap kits in 7 moving boxes. I have selected some of them as donors for my running and possible future projects and let the rest of them to go. An old Monogram F-15C was also one of the kit I have reserved. I have first disassembled her into every possible pieces carefully and stripped off the paint: And then assembled her back as good as possible: But this was around 10 years ago. The airplane was waiting her destiny in the dark corner of the workbench till I have bought a Fujimi F-15 Tigermeet. But to me its marking was not accurate and I have decided to make my own decals and use this old kit to test my custom decals. The aim is to build as accurate as the real one: Serkan
- 16 replies
-
- 10
-
-
 This is probably @Martians fault. The vacform tutorial build got me thinking about challenging myself to do something other than an injection moulded kit. I stick to 1:48 and almost always the end-of-the-cold-war through to modern era aircraft that I've seen at shows since my childhood. So there really isn't tons of choice in vacform, as soon as I saw the Lightning I knew it was the right one for me. I don't normal go for the un-boxing type shots, but a lot of you might be as new as me to this form of modelling. the box Unfortunately no longer with the etch or the redtops that have been redacted from the front The fuselage Wings Spine stiffener, belly stiffener and an over wing tank Another tank White metal parts for the undercarriage, cockpit, exhausts and nose. injection moulded parts canopy Decals and sticks attached to the bottom of the box First job, as it says in the instructions is to read the instructions. I might have done this in excess of 30 times before I was brave enough to do anything. But eventually the time came. I bought a new cutting mat Outlined the fuselage halves with a fine pen and with my new #11, cut the fuselage out of the backing. Sanding and more sanding until they fit together and also the nose and the exhausts fit snugly at opposite ends. I have no idea how that ended up working so well. Until next time.
 -
I hardly build Spitfires or Messerschmitt Bf 109s anymore. In my old modelling days I see to drift more and more towards the esoteric and strange when it comes to aircraft! I am not sure why, but I love these odd, hardly-built-at-all planes! The FFVS J 22 was built in reasonable numbers, but is still quite unknown to many aviation enthusiasts. But I had to have Planet Models new 1:48 kit of this and when I discovered there was an all red specimen amongst all the standard painted and marked ones, I of course had to make that one! It was called "Röda Blixten" which means "red lighting", quite appropriate, I think! I apologise for the rather bad images, I am certainly no photographer!
- 13 replies
-
- 29
-
-
- FFSV J 22
- Planet Models
- (and 1 more)
-
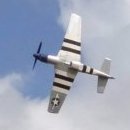
My latest build - Airfix Curtiss P-40B Warhawk 1:48 - An excellent kit, very good fit with no need for filler on par with some Tamiya kits. Pretty good detail especially in the cockpit with the addition of Eduard details it really pops - not a complicated build at all, managed to put the whole kit together within a couple of hours. Painting was a bit difficult to get the correct tones, underside was a mix of skyblue/light grey, camo was a sandstone base with a mix of olive drab/olive green/neutral grey - bonus was i picked this up from The Works for £10 let me know what you think! all criticism is constructive... From a Tribute To a Tiger Program in Honor of Flying Tiger & Naval Aviator: John E. Petach Jr. “Because he served, we are more secure. Because of the sacrifice, the lamp of liberty burns more brightly in the world. He has earned the undying gratitude of his countrymen and of free man everywhere. How honored of those who knew him; how proud of a nation to have borne such a son.” And my effort
-
 How could I not join an Interceptor GB with anything other than an Angel Interceptor!!! This is an old resin kit from UNCL, also known as the legendary 'Uncle' Bill Oram. I'd been looking for this kit for years as its been out of production for quite a while and then this one came up on Facebook last month for a reasonable price so snapped it up. Its UNCL's old cream resin, with a vac-formed canopy and some small white metal parts for the pilots arms and the wing skids. It came without decals but I have spares for the Spectrum roundels in 1:48 from my What-If builds, when I sourced a bunch of decals from JBOT in the USA. The large A on the underside will be masked and painted For the A on the tail I've got examples from the 1:24 Angel I built last year I have photographed to turn into an image I can print myself. I'll raid the spares box from some other decals for the ejector seat warnings etc. The first job will be to wash it all in soapy water and then cut all the excess resin from the pour stubs and clean up the mating surfaces and joints. This is going to be a bit messy so I might try to do some of it outside weather permitting. A mask will be worn of course, we're all getting used to wearing those beyond the resin modelling arena!
- 22 replies
-
- 15
-
-
- 1:48
- Captain Scarlet
- (and 1 more)
-
Ever had one of those kits that end up being just a little disappointing? I picked the old Esci 1:48 scale MB326 going cheap at the swap'n'sell at the local model expo last year. While there I also picked up a set of Hawkeye decals for an all grey 76 Squadron RAAF machine based at Williamtown, NSW late 80's/early 90's. Should have been straight forward - right? Well, it ended up being shelf sitter for the best part of six months. First off, why did they mould it in that hideous, hard to cover, orange plastic? The canopy was all scratched and semi opaque. It may also have been my cack handed abilities, but it didn't fit together very well either. With the finish line in sight, the decals were a bit of a disappointment. It is the first time I have used white decals to go under the main decals - and sadly the roundels were just a bit too big for the wings and too small for the fuselage. I had to use some of the other markings from the Esci sheet - which silvered like crazy and were also very fragile. Finally I made a right mess of getting the undercarriage on. I wasn't going to let it defeat me though - I somehow managed to get to the finish line. I doesn't look two bad on the shelf from a distance, and it really is a very attractive little aircraft. Brush painted with Tamiya acrylics, a little bit of an oil wash and a final coat of semigloss clear from a Tamiya rattle can. Thanks for looking.
- 10 replies
-
- 27
-
-
- Macchi MB-326
- RAAF
- (and 1 more)
-
Hi all, I had hoped that the "Adlerangriff" Bf109E that I'd ordered would arrive in time for the Battle of Britain Group Build last year. It didn't, which means I get to build it now instead! For this entry I'm going to build the first of the two included kits mostly out of the box, which includes photo-etch and resin parts. However, being lazy, on seeing the individual exhausts I decided to order some one-piece resin ones. I also have some extra decals on order because the kit didn't come with enough I wanted to build something still from the Battle of Britain period, but different. The aircraft I'm planning to represent here was flown by the top scoring Luftwaffe pilot between 10 July and 18 August 1940 (and no, it's not Galland, Wick or Mölders!). He filed victory claims on three major Kanalkampf operations which resulted in British shipping being sunk, and on two airfield attacks including the successful attack on Croydon Aerodrome on 15 August. By then time he was shot down on 18th August 1940 he had claimed 15 victories in the Battle of Britain, to go with 7 in Spain and five in the Battle of France or in the prelude to the Battle of Britain. The aircraft in question is this one: Its pilot is Horst Tietzen, who claimed 15 victories during the Battle of Britain, until he was shot down on 18th August 1940 (now known as The Hardest Day). Decals are from the Eduard Alte Hasen sheet. I also chose this because I like the scheme - plenty of yellow tactical markings but not on the nose for a change! And lots of mottling to have fun with. Right now my bench is strewn with Messerschmitt while I start painting the interior, and I'll start adding some commentary on this in the next few days. Thanks for looking! Matt
-
Has anyone built the Eduard AGM65 Mavericks? The main body of the missile and the base come as separate pieces on on different resin blocks. Does anyone have any advice on jetting a good 90 degree surface on both joins and mating them correctly? See images below
-
Hello everyone, After a bit of a break from the hobby, due to life getting in the way, lockdown has given me the chance to start again and the bug has really bitten! I must have started this one about 20 years ago (unfortunately, I am that old) but never made much progress other than sticking a few bits together but I thought it would make an easy way to start building again and try a few new things out as well. It's the old Esci kit in 1:48 scale with decals from the Ministry of Small Aircraft Production Condor Legion sheet, the original decals just disintegrating when I put them near water. It was painted using Xtracolour enamel and weathered using a mix of dry brushing, pastel chalk and water colour washes. Based on pictures of the actual aircraft I removed the antenna mast, added a faired tail wheel, seat belts, instrument panel and a few other bits. Considering its age it went together well with the only difficulty being the joints in the engine cowl and getting the top wing to fit. The decals on the upper wing also silvered around the edges despite being applied on a gloss surface prior to being oversprayed with matt varnish. I also discovered later that Xtracolour's interpretation of RLM 63 is too light but hey, you live and learn. As it turned out it would be the last kit I would paint using enamel paint but that is another story. Anyway, I hope you like it and I'm happy to get any pointers.
-
Kit - Hobbyboss AMX A11 / Ghibli Paint - Tamiya acrylics Decals - Gekko Graphics & Kit Extras - Brengun LAU-131 pods, Revell Iris-T AAM's, 'unknown' resin designator pod. Scratchbuilt radar nose & RWR. AMX Kaitiaki (Defender) 2 Sqn Afghanistan 2012 Ok, I know that there's often been some erm... 'resistance' to What If modelling in the past and that used to bother me, but I'm too middle-aged to care nowadays so here's my plastic model of an aircraft that doesn't actually exist in this form and let's move-on. I cannot prove it, but I've had this idea bubbling since before we decided to move to NZ in 2012, the fact that we did move here, simply made the the idea even more real, just a case of when not if I was going to do it. The kit is not great, but I couldn't find a Kinetic kit at a reasonable (to me) price, so you work with what you have, right ?. I made three or four experiments with old drop-tank noses and putty to get the radar nose but ended-up by using the kit nose that I'd removed and changing the length and rear contours with plastic card discs - odd isn't it how sometimes it's the simplest 'fixes' that solve the problem. The RWR pod at the bottom of the fin is plastic card and an old Sparrow missile head cut and shaped to how I wanted it to look. I did think about adding some 'warts' to the ECM bar at the top of the fin and may still do this in the future. The designator pod is an anonymous resin one was in a kit I bought off eBay a few years back, I cut down an old pylon from something I couldn't Identify from the spares box as HB doesn't provide one in the kit - strangely tho' it does provide FOUR droptanks for some reason. The LAU-131's were an indulgence, but they aren't expensive and were exactly what I needed for the 'Armed Recce' / FAC feel I was aiming for. For the paint scheme, I tried as hard as I could to NOT think about [other] contemporary aircraft and just go-my-own-way, now that It's done, it does seem to owe a lot to the CAF & RAAF Hawk 127 scheme, (again) I cannot prove it, but that is entirely coincidental. I've used Tamiya Ocean Grey & Medium Sea Grey with a lot of post-shading and XF-24 Dark Grey for the radome, RWR and fin tip. I have a whole back-story to go with the build but I'm not going to bore folks here with all of that. It's 'just a model' as mein Frau says, it was a great fun project that had a few hiccups along the way, but was definitely a shed-load of fun... pretty sure that's what the hobby is supposed to be about, right ? - Feel free to make any comments, ask any questions or hurl any abuse. All the best from NZ. Ian.
- 11 replies
-
- 23
-
-
The newest Mk.I kit with the fuel tank cover and landing gear issues. I had to add the padded headrest as per the photo, made from a piece of round sprue tree. Other than that, a great kit. This is WZ⦿H of 19 Squadron, Duxford, 4th May 1939. Innards were painted with Tamiya XF-71 Cockpit Green. Masking tape harnesses. The bottom was painted with Tamiya XF-69 Nato Black and Vallejo Surface Primer – White. Note the long area of white that needed to be masked off and when painting was done and the tape removed, no paint lift. Upper colours were done with Tamiya XF-81 Dark Green 2 (RAF) and Mr. Hobby Aqueous H72 Dark Earth. Antenna is Uschi van der Rosten Super-fine thread From Da Webs
- 12 replies
-
- 34
-
-