Search the Community
Showing results for tags '1:48'.
-
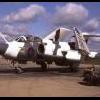
As an aside to my "Aircraft my Father fixed" project, I've decided to build examples of other 5 Sqn aircraft from periods when he wasn't ground crew. So to begin with, here is an EE Lightning, the 1:48 Airfix kit. This is pretty much OOB with just the addition of a resin seat and decals sourced from numerous places to represent a 5 Sqn aircraft. I opened up a couple of ports and intakes in the fuselage. I can't honestly say this is one of my best builds - I made a number of mistakes during the build which caused me a certain degree of grief. The paint is Tamiya Acrylics for the camo and details and Alcad Aluminium for the undersides. Its the first time I've used Alcard for large areas, prior to this I'd just used the chrome on the Routemaster handrails. I didn't have too many problems with it. So here are the photos with my new camera!
- 30 replies
-
- 24
-

-
Ever have one of those kits you regret starting? I picked up the ICM 1:48 Spitfire Mk VIII going cheap. Sink marks, very poorly fitting parts and a lot of flash. I had to use a humongous load of filler. But I finally managed to beat it into some sort of submission. Brush painted with my interpretation of fresh foliage green camouflage using Tamiya acrylics, underside is Italeri acrylic. A slight weathering with diluted oils and finished with a Matt Tamiya clear from a rattle can. Markings are for A58-504 flown by F/O Rex Watson, 452 Squadron RAAF, Balikpapan, Borneo, August 1945 from the Eduard Aussie 8 package. Thanks for looking. And some photos outside
- 13 replies
-
- 30
-
-
- Spitfire VIII
- RAAF
- (and 1 more)
-
The inspiration for this build was taken from a fantastic book showing the history of the famous Tangmere Airfield in West Sussex.Renowned for its role in WWII this historic airfield was built in 1917 and became operational in 1918. This build is based on a photograph showing a Ltd E Wilson 92Sqn stood next to a newly delivered Sopwith Dolphin waiting to be ferried across to France. It is so new that it doesn't have any squadron identification. Luckily for me Copper State Models have recently released a superb 1:48 scale Dolphin. I was able to buy the premium edition, which came with resin engine, photo etch and also metal cast exhausts. This kit is sublime, It is my first WWII subject and I thourghly enjoyed building it using my trust vallejo paints and ED Line for the rigging. I also purchased Copper States RAF airman to represent Ltd E Wilson along with Eduard Lewis guns (which is the only thing missing from the kit). The model is going to be part of my clubs build this year :101 (101 years of Tangmere Airfield).
-
Ok so over the last couple of weeks I have been finishing off projects that I started some time ago and this is one I started over 2 years ago! It is the HobbyBoss 1:48 Tornado F3 which I had given up on as the fit was poor and I got bored of it. Anyway I decided to have another go at it and this is the result. Its not bad but far from perfect but 'in flight' it looks pretty good in the special scheme. It was largely out of the box with resin seats and Xtradecal decals. Paints were Gunze and Tamiya with some Alclad. I love the Tornado F3 and am eagerly awaiting build reviews on the Revell kit which I am hoping is much better than the HobbyBoss one cheers chris
-
Considering how the Scimitar is a historically important aircraft; being last aircraft produced by Supermarine, how come there's not been an injection plastic kit in 1:48 ? Of course there's the Dynavector kit but that's both vacuumform and starting to become both uncommon and expensive ! Is there a reason as to why a kit was never made by Classic Airframes who appeared to make kits of most other FAA aircraft during the 1950's/1960's ? With the release of other post war FAA subjects within the last 5 years like the Sea Vixen and Sea Hawk surely someone should have made one by now ? Gareth
- 142 replies
-
- 1
-
-
- FAA
- Supermarine
- (and 1 more)
-
This thread will document the construction of my 1:48 Tamiya Mosquito B. IV. I will build this aircraft as a member of the Pathfinder Force, from no. 109 squadron. Pathfinder mosquitoes utilized specialized electronics, like the Oboe transponder in order to navigate to target areas where they would precisely (in 1940s terms) drop their fire bombs and flares, lighting up target areas, and marking them for the main bomber stream that would follow. The particular aircraft I'm going to build is this. The project will be right out of the box. I have always loved the Mosquito. My favorite being the NF II version. However, I chose the pathfinder for this build, as I think it better commemorates the immense contributions made by the RAF, and the scientists and engineers it employed, to electronic warfare, avionics technology.
- 26 replies
-
- 13
-
-

1:48 Bf109 G-2, Black 4, JG52 - Hasegawa
vesthepes posted a topic in Ready for Inspection - Aircraft
Hi chaps Back after a while, it's always nice to post something finally done!! 1:48 Hasegawa Bf109G-2 Black four, Kroat JG52 from the eastern front 41-45 It's not straight out of box, it includes a resin cockpit and Aeromaster decals. I did some riveting too, which is quite easy on a 109. It was a fun and quite quick build, the plan is to make room for the other newer 109s from Eduard and Tamiya, Hasegawa being a bit obsolete... but still in my opinion it still is a nice little kit. Feel free to comment- 11 replies
-
- 29
-
-
Blackburn Skua Mk. II Special Hobby 1:48 In 1934, the Air Ministry issued Specification O.27/34 calling for a carrier borne multi-purpose aircraft which should be capable of operating in both fighter and dive bomber roles. In those days, the concept of a carrier fighter aircraft as seen by the British military had to have a crew of two facilitating long flights over the sea and suited to fighting enemy’s patrol planes. In no way, any kind of fighting against opposing bomber planes or even fighters had ever been considered. As the best of all proposed projects was chosen the B.24 designed by Blackburn’s chief designer G.E.Petty. The aircraft was a low-wing type with folding wings and retractable undercarriage. Under the fuselage, it also had an arrestor hook and a recess for one bomb of weight up to 226kg. The first prototype aircraft, later to be named the Skua Mk.I, was taken aloft for the first time on 9 February 1937. Following a successful set of test flights, the mass production was launched instantly. The production machines were powered by a Bristol Perseus XII and were known as the Skua Mk.II. They saw service with front line squadrons no. 800, 801, 803 and 806 and were also issued to training units or to target tow units. Despite all the rush while being put to production, the machines really lacked abilities to serve as figher planes and were deemed to be quite obsolete. But when the war broke out, the Skua found wery quickly its way to operations both over the land and from the carriers. During their first ever bombing raid against a German sub, which occured on 14 September, two of the flight of three were lost to their own poor-quality bombs. On 26 September, two machines of No 803 Sqn managed to shot down a German Dornier Do 18 flying boat, achieving the very first confirmed victory of a British aircrew in the war. The Skua, however, had several more primacies under its belt. On 10 April 1940, during the Norwegian campaign, a group of 16 Skuas sank German cruiser Königsberg. Aircraft of No 800 Sqn led by Capt. R.T.Partridge and of No 803 Sqn under the command of Lt.W.P.Lucy took off from their base at Hatson on the Orkneys and performed what was the first successful aerial attack against a war ship of the Second World War. Skuas also took part in fighting over Dunkirk and machines from HMS Royal Ark fought in the Med, where, on 3 July 1940, they got famous for being the first British warplanes involved in action against the former British ally, the French. It also has to be mentioned that these Skuas were the first ones to be lost in that undeclared war. The last Skuas were withdrawn from Ark Royal in April 1941 and since then went on serving with non-combat units only. Their war career was rather short, and despite their low performance in the fighter role, several pilots managed to achieve ace (ie gaining more than five confirmed victories) flying these aircraft. The Skua could have been far more successful, mainly in the bomber role if it had just been used in a proper way by Admiralty, obviously to the detriment of the Royal Navy. The Model With a pair of Skuas flying over what looks like Norway on the box top you might begin thinking that you’ve seen this scene before, well you probably have as the same box art was used on the original release in 2007. Upon opening the kit is well wrapped in a poly bag with the decals and instructions loose. The model is produced on four sprues of grey styrene, one of clear, quite a few resin parts, a small sheet of etched brass, a small acetate sheet and the decal sheet. All the parts are nicely moulded with no visible imperfections but definitely short run style. The panel lines are finely done and seem to represent the aircraft structure well. The plastic is quite shiny and hard, which could indicate that it will be quite brittle. Construction starts with the cockpit, which is made up of the pilots and rear gunners floors, mid bulkhead, seats, joystick, rudder pedals, instrument panel, compass, pilots headrest, gunners backrest, fire extinguisher and PE seatbelts. The instrument panel is made up of three PE sections with acetate backing for the instruments, which will need to have a dab of Clearfix or similar for the instrument faces. The pair of fuel tanks that sit between the pilot and gunner are made up from three parts each. The cockpit assembly is then fitted to one side of the fuselage. The rear mounted machine gun trough is then fitted, as is the two part machine gun mount. With the addition of the tailwheel, the fuselage can be closed up. The wing centre section is then fitted to the underside of the fuselage and the three piece horizontal tailplane assembled. The resin engine assembly comes next with the nine separate cylinders are glued to the crankcase and the eighteen pipes that lead from the cylinders to the collector ring are attached along with the ring itself. There is a triangular frame that is glued t the front of the engine, to which pair of intake trumpets are fitted. The cowling sides are then attached and the whole assembly glued to the front fuselage. To the rear of the fuselage the horizontal tailplane assembly is attached, along with the upper and lower wing sections, which include resin main undercarriage bays. Although the upper wing sections are separated at the fold join the lower sections don’t appear to be and there are no internals, so, unfortunately, the wings cannot be posed folded without a fair bit of scratch building. On the upper front fuselage a pair of scoops are added, as are the clear lenses for the wing leading edge landing lights, whilst to the rear the three piece resin and plastic Lewis gun is fitted to its mount. On the underside the arrestor hook and its fairing are glued into position, as are the oil cooler intake, engine exhaust, and two piece main bomb swing. The main undercarriage assemblies are each made up from the main leg, two piece wheels/tyres, main retraction actuator, secondary actuator and two bay doors. The assemblies are then glued into place, along with the large pitot probe on the starboard wing tip and the four canopy sections, of which the gunners and pilot sections can be posed open if required. The model is completed with the fitting of the main aerial, single piece propeller and two piece boss. Decals The decal sheet contains markings and codes for three machines as well as some stencils. The decals are well printed by AVIPRINT, and are in good register and nicely opaque, although the red centres on the side and upper wing roundels do appear to be ever so slightly off centre. Blackburn Skua Mk.II, L2963, of 803 Sqn. FAA, embarked on HMS Ark Royal. The aircraft was shot down attacking the German battlecruiser Scharnhorst on 13th July 1940. Blackburn Skua Mk.II, L2940/A6A, of 800 Sqn. FAA, embarked on HMS Ark Royal. This aircraft shot down a Heinkel He.111 on 27th April 1940, but was lost on 13th July 1940 on the attack against the Scharnhorst. Blackburn Skua Mk.II, L2991/Q, of 803 Sqn. FAA, also embarked on HMS Ark Royal. This aircraft was also lost on the raid against the Scharnhorst on 13th July 1940 Conclusion Whilst he short run nature of this kit may put some modellers off, but with a bit of patience and lots of dry fitting a nice model can be produced. It’s certainly great to see it back in production and whilst not produced in great numbers, a very interesting and quite an important airframe in the history of the Fleet Air Arm, a time when they weren’t exactly endowed with the best aircraft types. Review sample courtesy of
-
Kit - Airfix (new) 1:48 Paint - All enamels Decals - Kit, Aeromaster & Old S4 Airfix kit Extras - Quickboost resin exhausts. Hawker Hurricane Mk. I 32 Squadron RAF Biggin Hill May / June 1940. Enough has been said & written about this superb kit, so no need for me to add to it all. Loved every minute of it, like the Defiant & Spit V I've already built (and I have the P-40 to come). Go buy one, build it and enjoy it !!. As ever please feel free to hurl abuse, ask any questions or make a comment. Next... a helicopter ! Ian.
- 17 replies
-
- 39
-
-

-
Hello gentlemen, It's been a long time i didn't complete anything, but here you are, a F4U-1a Corsair, of VMF 217, in Guam, 1945. Straight from the box except for an Ultracast seat (a little gem) and decals. stars and bars from custom made masks (Thanks a bunch, Fanch ! ) Weathering a bit on the heavy side,it's supposed to render the sun bleech of the Pacific sun and the operational wear .... Hope you'll like it. Best Stef (#6) PS : Click images to enlarge.
-
Kit - Tamiya 1:48 Paint - All enamels Decals - Superscale Extras - Ultracast resin exhausts & wheels, Master .303 barrels (added after photo), Eduard kit-specific Zoom Set. DH Mosquito FB.VI 107 Squadron BAFO Gutersloh 1947 Even though it's a Tamiya kit, I really took my time over it as I built it because I 'promised' a friend (and fellow modeller here in NZ) that I would, however that was four-and-a-half years ago. So after spending some considerable time on the 'Shelf of Forgetfulness' I decided to get my backside in gear and finish it as my first 'major' project following the recent house-move. So here you have it, please feel free to make any comments, ask any questions or hurl some constructive criticism. Thanks for taking the time to look, have a great weekend folks. Ian.
- 24 replies
-
- 48
-
-
Fokker D.VIII - Profipack Edition (8085) Eduard 1:48 The parasol winged Fokker D.VIII was the last of this companies aircraft to enter service before the end of the Great War. Originally designated the Fokker E.V. it was an agile little machine with a parasol wing and rotary engine, much like some of the early machines from the start of the Great War. It might have had greater success, had it not suffered from poor manufacturing standards. After barely two weeks service in August 1918, The E.V. had to be withdrawn due to failures causing the wing to disintegrate in flight. Badly made wings and poor materials were found to be the main cause. Examination of several sets revealed such things as incorrect wing spars, and nails that secured the plywood skinning completely missing the ribs it was supposed to attach to. Redesigned wings were manufactured under more stringent quality control, and the aircraft resumed production with the new designation of Fokker D.VIII. Surviving E.V.s were retro fitted with the new wing, and it seems were also then referred to as D.VIII's. Re-entering service in October, it did not much have much time to prove itself before the 11th November armistice brought the conflict to a halt. The kit. Not a new kit, as It has been issued before, but it is making a welcome return. Inside the box are three plasic sprues, one etched fret of details, a sheet of pre-cut masks, two decal sheets, and a full colour instruction booklet. The cockpit is well detailed, with the typical Fokker steel tubework well represented by finely moulded frames. Smaller details such as throttle and compass are provided, with the option of using alternatives from the pre printed etched fret. The seatbelts also come from this fret, and interior lozenge is provided on the decal sheet. The fuselage halves are closed around the completed cockpit unit, and the forward coaming attached to form the basic fuselage. The Etched sheet contains the forward underside panel, which helps to enhance the look of this area. The instructions show it being fitted after the wing is on, but personally I would fit it before. The little Oberursal engine also gets enhanced with an easy to fit 'spider' of push rods, to add to the finely moulded crankcase/cylinder unit. For most finishing options it will probably be best to leave the engine & cowling off until final painting and decalling is done. Various little etched footsteps, rings, filler caps etc are offered, all of which go to enhance the final look of the model. The Spandau machine guns can be fitted as solid plastic items, or you can remove the cooling jackets and replace them with finely etched alternatives. This is always worth doing as the slotted etched versions are far superior. Two wings are provided, which at first look may seem odd. The reason is that one is provided with a perfectly smooth finish, whilst the other has a lightly 'rippled' look that D.VIII's sometimes showed. The choice of which to use is up to you. Fitting the wing requires care, but is not as difficult as it may look at first glance. After painting or decalling the fuselage, clean out the locating points for struts C2, C6, C7, C10 & the pair of C31's on both the fuselage and wings. A fine drill is best for this. Glue the forward pairs of C2+C10 and C6+C7 first, and check that they dry fit and locate correctly into the upturned wing. Let it dry overnight, and then attach the wing to the strut ends. Add the C31's at this point and leave it all to set. This whole task is easier to do with the wing and fuselage upside down. Finishing off sees the undercarriage attached, along with control horns (etched or plastic), cable exits (etched only) and struts for the tail group. Decals Five options are provided. Four of them are D.VIII.s, but I assume that the Jasta 6 example dated August 1918 is an E.V. Two decal shhets are provided, the larger of them holds all the individual aircraft markings and is sharply printed with good colours and minimal carrier film. The second sheet contains a full set of upper and lower four colour lozenge fabric, applicable to four of the five options. Lozenge colours are always controversial, and personally I think these are on the bright side. I would tone them down after application with a brown 'glaze' as was often done in real life. Tamiya X-19 'Smoke' lightly airbrushed is ideal for this. Others may prefer to replace them with their favoured aftermarket brand. The instuctions show the wings being painted in Fokker 'streaky olive drab', which may well be the case. However it is now thought likely that they were painted in brown & green on top, with blue & violet undersides. Conclusion. This is a lovely little kit, I have already built two of them from previous releases. The moulding is very fine and free of flash, and all parts fit together with precision. There are no problems with its construction, the wing strutting is actually easier to do than most biplanes and there is virtually no rigging. Eduards 1:48 First World War aircraft are the best you can get in this scale, and this one deserves a place in any collection. Recommended. Review samples courtesy of One I completed a couple of years ago from a previous release of this kit;
-
Kit - AMT/Ertl 1:48 Paint - All acrylics Decals - Ventura Extras - Ultracast resin seat, Hasegawa wheels. Kittyhawk IV 'Gloria Lyons' 18 Sqn & 2.SU RNZAF Bougainville 1944 Hot on the heels of the Mosquito comes an (almost) OOB build... AMT's twenty-year old (give or take) P-40N built as the well known 'Gloria Lyons' just before it was returned to NZ and repainted & refurbished. At this time it was 'owned' by 2.SU and used by 18 Squadron at Bougainville. As ever thanks for taking the time to look and please feel free to hurl abuse, ask a question or make a comment. AFN Ian.
- 10 replies
-
- 30
-
-
-
- New Zealand
- AMT
- (and 1 more)
-
Good afternoon everyone! While I'm waiting for a spot of sunshine to photograph the recently completed Airfix Victor B2, I thought I would open up this thread in preparation for starting the build. Now, I should probably begin by saying that I do have a soft spot for the F-35: it looks sleek, sharp, crisp and its capabilities (from what I gather) are exceptional despite its initial problems during testing. You might be asking, "Hang on, why on earth are you modelling an RAF F-35A when the current focus is on the F-35B and the perfectly acceptable Kitty Hawk F-35B kit is already available?" After being made aware (thanks to BM's very own Mike, for making me aware of this) of the UK's possible future intentions to purchase the F-35A in order to compliment the Fleet Air Arm F-35B's, I decided that due to the rarity of the KH kit in physical model shops and online in the UK for a decent price, and having seen a review of the newly released Meng F-35A kit, I settled on the F-35A. The kit looks jolly good with a good fit of the fuselage halves straight off the bat! The RAM strips look a tad too prominent for the scale but I'll see what I could do (if anything) to correct this, furthermore I'm slightly sceptical about the colours of the kit decals (the painting guide shows F35's in a suspiciously dark shade of grey.....). Regardless, I needed some decals to do an RAF F35 so I bought these from the fine folks at Hannants: Here are a few snaps of the kit contents: So that's it for now. With Uni starting next week I hope you will forgive me if progress is sluggish (even more so than usual ). Kind regards, Sam
-
I will be building the 1:48 Eduard Lavochkin La-7 in the scheme of Soviet Ace Lt. Col. S. F. Dolgushin. This should be a relatively quick build as it is a weekend edition which means a low amount of parts and no photo etch, i will be building from the box so will use no after market parts. My plan for the finished model is to have a lightly weathered scheme with canopy open and gear down. Hope everyone enjoys the build as it progresses, i hope to add an update every few days if all goes to plan.
-
Fokker E.II Eduard 1:48. Weekend Edition. (8451) One of the most easily recognisable aircraft of the Great War, the ‘Eindekker’ was one of a handful of monoplanes to achieve front line service. Despite its modern appearance, it still used the old style wing warping control method, and was not a particularly manoeuvrable aircraft. It’s great advantage though, was the synchronised machine gun able to fire directly ahead through the spinning propeller. Apart from a few early E.I’s fitted with Parabellum LMG 14’s, all the others through to the E.II and E.III were fitted with Spandau LMG 08’s. Being virtually hand built, and under constant development, there were variations between individual machines. Essentially though, the E.II was the same airframe as the E.I, but powered by the 100 hp Oberursel U.1 instead of the 80 hp Oberursel U.0. And similarly the late production E.II was externally the same as the E.III. All of which creates some difficulty in the identification particular aircraft, especially when the different span wings are added to the mix. Entering service in July 1915, the E.1 and E.II heralded the start of the ‘Fokker scourge’ which saw them dominate the skies over the Western Front, inflicting heavy losses on the British and French air forces. By early 1916 the British had introduced the DH.2, and the French the Nieuport 11. Both were highly manoeuvrable, and tipped the balance of air superiority back to the allies favour. By the end of 1916 the ‘Eindekkers’ were mostly withdrawn from service. The Kit Eduard’s ‘Weekend’ edition of the Fokker E.II is a re-issue rather than a brand new kit, but is very welcome nonetheless. The box contains three large sprues and one very small clear moulding for the windscreen, thoughtfully contained in its own little zip lock bag. Also present is a 16 x 12 cm decal sheet offering two options. There is of course no etched brass fret, as this is the simpler and cheaper Weekend version. The sprues contain the options (wing, engine, cowlings, etc) to build an E.III, but these are marked as unused on the parts map. If you want an E.III you will need to get the Profipack version of this kit. Sprue A Moulded in Eduard’s now standard medium grey plastic, the sprue contains the starboard fuselage half, port wing, an unused starboard wing for an E.III, propeller, engine, cowling, and tailplanes. As will all the sprues, everything is crisply moulded with barely any flash and no sink marks. Sprue B Similar to sprue A, this contains the port fuselage half, the starboard wing, ammo case, cockpit coaming, and rudder. (Plus unused items port wing, ammo box, engine, cowling & propeller – all useful items for the spares box.). Sprue C The largest of the sprues, this one contains the many smaller detail items. All of the cockpit items are provided here, including the tubular framework for the sides. The interior detail is extensive, covering the usual items such as the seat, control column, and rudder pedals, but also providing the fuel tank behind the pilot, the pressurisation pump, and the supporting framework for the engine on the rear of the firewall. Seatbelts are provided as decals as there is no etched fret with this kit. The complex undercarriage structure is neatly represented, with a logical breakdown of parts that make assembly comparatively straight forward. The wheels are supplied as completely separate hubs and tyres, which makes painting them so much easier. A tip here is to use white glue to put them together after painting. Any excess can be wiped off with a damp cloth, rather than risk spoiling the paintwork. Again, there are a number of items surplus to requirements, which can go in the spares box. Lovely moulded in detail on the cockpit floor; Sprue D A single item, the windscreen is supplied here. Cleanly moulded, and crystal clear. Decals. Sharply printed, with good colours and minimal carrier film, they look nice and thin. All the national markings are supplied, plus a number of smaller details. The under fuselage stitching looks interesting, I'll be interested to see how that comes out on the model. A word on rigging. The instructions provide a clear rigging diagram, showing where all the lines go. It is not as daunting as it might at first appear, and in many ways a monoplane like this is easier to do than a biplane. Basically there are 4 main lines that run from the central pylon, through a wing to the undercarriage assembly, then back up through the opposite wing, returning to the central pylon. With holes drilled through the wing, these lines can be done as single pieces using smoke coloured invisible mending thread and cyano glue. Smaller rigging lines can be made with heat stretched sprue, attached with white glue. Measure using dividers, cut the stretched sprue to length, pick up with tweezers and dip each end in a blob of white glue, and apply to the model. Nothing to be afraid of. This is one I made many years ago, not from this kit, but from the original Eduard plastic/etch kit of the1990's, issued by Flashback. It illustrates what i have said about the rigging though; Markings. A. Fokker E.II 68/15 flown by Lt. Brückmann, Armeeabteilung Gaede, Western Front, late 1915 to early 1916. B. Fokker E.II 69/15 flown by Lt. K. Crailsheim, Feldfliergerabteilung 53,Western Front, October 1915. Conclusion. This is another beautifully produced Great War kit from Eduard. It looks very good in the box, with fine and crisply moulded parts. The surface detail is particularly impressive on the fuselage components, both inside and out, and the fabric effect on the wings looks just right. Although I already have four of these kits in the stash, I have not yet got round to building one. Having built 30+ of Eduard’s various other 1:48 Great War kits, this one looks so well moulded that building it should be as good an experience as all the others. It is such an important aircraft that it really deserves a place in any collection. Recommended. Review samples courtesy of
-
A recent scratch build project that i have completed, Focke-Wulf 190 T-1. This is a fictional design of a Fw-190 D-9 fitted with a turboprop engine and tricycle landing gear. For the paint scheme i used a Tricolour scheme from a Fw-190 A-8 With the colours of Yellow 15 from a Fw-190 D-9, the scheme was weathered using a graphite pencil and various washes. I was happy with the overall build of the model but was not as pleased with the paint schemes finish as i had to brush paint rather than using a airbrush due to my airbrush being out of commission. Thanks to anyone who took the time to look over my build, look forward to hearing any feedback.
-
here is My current build, Academy F-4C , Robin Olds USAF markings. Box and parts plus two Eduard sets and Aires resin cockpit. First I started with armarment... ... than some cockpit details, (Aires resin is great) Here some estra paint work need to be done, ..and front wheel bay, still work in progress..
-
I'm finally going to start a project that I've been planning for a long time. Hopefully posting the progress of the build here will give me a push to finish it... This is the background story. I work at the local museum at former Swedish Air Force base F 10 at Ängelholm, Sweden. I love to just sit and browse through the extensive photoarchive now and then. It is absolutely huge and full of interesting photos from 1940 up to 2002 when the base was shut down. Sometimes I happen to stumble over something that I haven't seen before. A couple of years ago I found some pictures of a different looking Spitfire at a different airbase. I discovered that these pics were taken at the F 14 base at Halmstad, Sweden. It turns out that no other than Jeffrey Quill made a sales tour to Sweden in this Spitfire 22 in June 1946 with the mission to sell airplanes to the Swedish Air Force. As you can see it was a slightly different looking Spitfire, it was equipped with a contrarotating propeller like the Seafire 47. Unfortunatly the timing was awful since the same day Jeffrey Quill landed his Spitfire in Stockholm the first of the new DH Vampires for the Swedish Air Force was delivered! The Spitfire was by 1946 old news when compared to the Vampire jets... However, the Swedish Air Force did eventually bought the Spitfire XIX and used them as S 31 for a couple of years. I'm very thankful to the photographer for this pic. Note that there is no gunsight. Jeffrey Quill and some beautiful details... :-) I actually did a quick build of the Airfix Spitfire 22 in 1:72 scale two years ago. I stole the propeller from the Special Hobby Seafire 47. I'm sorry for the lousy quality of this photo... Now I want to build me a bigger version of this rather sexy looking aircraft. I'm going to use this Seafire 47 in 1:48 from Airfix. Most parts including the propeller is already in the box. I think that the only thing missing compared to the Spitfire 22-kit is the lower portion of the tail rudder. I've collected quite a lot of aftermarket "candy" that will be used on this build. What do you think? Anything I need to think about before starting? I'm mostly interested in Swedish aircraft so this will be something new for me. To be continued... Andreas
- 17 replies
-
- 12
-
-
- Spitfire 22
- Airfix
- (and 1 more)
-
Had another go at some Armor - Sdkfz 222 1:48
Keeto™ posted a topic in Ready for Inspection - Armour
Hi everyone, Had another go at some armor and completed this little guy a couple of weeks ago. I think I improved a little bit with the color this time if compared to my first attempt here. And yes, the one cage on the turret is intended to be a different colour, I was trying to imply that one of them was recently replaced. Tamiya 1:48 Sdkfz 222 - Tamiya Acrylics, Abtulung Oils, Flory Wash, Black Dog resin bags etc, Vallejo Pigments. Enjoy and please constructively critique away.- 14 replies
-
- 16
-
-
 A few weeks ago, I was presented by a kit of A6M3 Zero in a christmas present exchange action in a forum. It was an old tool Tamiya kit of Mod.32 "Hamp". As I have no japs in my collection yet, I went on to start it! I got lots of goodies for it, but I managed to destroy the kit as my skills in engraving the panel lines are nonexistant.... Thus, I aquired a new tool Tamiya kit, its a different A6M3 variant (Mod.22, different wings), and started it after a few weeks of research. Following goodies are here, but its likely not all would be used. Sure use are only the BigEd set and the "Saburo Sakai" pilot, plus diorama items. I always want to make a diorama out of my kits, but noone makes the japanese mechanics working on the airframe! I asked Luis "Panzer vs. Tanks" on shapeways, if he can make a set, but its not yet there, and he's not sure he will make it in time for decision. CMK Sakae 21 Motor - only if ground crew would come CMK Weapon bays A6M3 - not likely CMK Rear conus A6M3/A6M5 - not likely, new Tamiya looks correct to me CMK Cockpit - most likely not Big Ed A6M3 - already HGW Seatbelts Zero - not really, pilot has the belts molded on Scale Aircraft Conversions Metal Gear struts - quite sure use, I always have a stability problem with plastic struts when transporting to shows SBS Model Seat - nope Squadron Vacform canopy - likely True Details Wheels - sure Techmod A6M3 "Aces" decal - sure For the diorama I got CMK Ground crew (winking) CMK Saburo Sakai IJN Pilot PJ Productions IJN Pilot Tamiya Kurogane 4x4 jeep Tamiya Komatsu G40 Bulldozer Barrels, crates, etc from different kits. The plan is to make an aircraft coded T2-165 in a highly weared green over the IJN glossy faded grey green. This machine was a mitsubishi build A6M3 Mod. 22, so mitsubishi specific coloring applies. It was a part of 204 Kokutai activities in the Solomons in 1943, based on Rabaul and Buin. It was mostly flown by the top ace Shoichi Sugita. Shoichi Sugita was one of the 6 pilots who were escorting Admiral Yamamoto's Betty when P-38 Lightnings ambushed the group and shot down both Betties, killing Yamamoto. Sugita shot down one of the Lightnings, but too late to save the admiral. 6 Pilots were ashamed to have failed, and swore an oath to fight the enemy with no respect for their own life. In a few months, 4 were killed, and another went home after loosing an arm, only Sugita remaining. He was respected as the most agressive japanese pilot, and shot down between 70 and 120 aircraft. He was injured a few times, but returned to action, fighting over Truk, Peleliu, Phillipines and japanese mainland. In 1945 he was a part of the elite 301 Hikotai, 343 Kokutai, which was commanded by Minoru Genda and flew the brand new N1K2-J George to a devastating effect (most likely my next build ). However, on 15. April 1945 US carrier Hellcats from VF-46, led by Robert "Doc" Weatherup, struck the airfield. Despite the order to get in cover from Genda, Sugita and his wingman Miyazawa ran to their fighters and tried to start, only to be blown to pieces on takeoff by Weatherup. The plane weathering should look like this (its another Zero from the same area) The profile is:
 -
 Casting around for something to do during the mid-winter (in Oz) break, I came across this which I picked up at the recent local model show: As well as the kit, which includes some resin parts for the cockpit, there was was also this Airwaves conversion kit: Whoever had originally owned this kit had already prepared the plastic parts, so that hard task was already done: So ideal for my second conversion, and a relatively swift build (although not finish - more about that later). The fuselage and wings went together well. I glued in the nose with plenty of superglue gel. I also painted the cockpit parts, although I am a bit uncertain as to the colour. I assumed, being post war, it would all be black, but after checking the internet it looks like that may not be so. It appears the sidewallls. May have been black and the other parts would be interior grey-green. Anyone have some advice for me? The wings needed a bit a bit of a spacer between the wheel wells and the top surface to ensure everything lines properly. Now as to markings, this may be a quick build but the finish will be delayed as I soon discovered that there are limited options in 1:48 for a Tempest Mk II. I found a copy of Model Alliance 1/48 Hawker Tempest Mk.II/F.2/F.6 Post War # 489021 on-line, but that will take a few weeks to get downunder. Plenty of time to choose a scheme I guess.
 -
Hello lads and gentlemen. Im going to build a 1:48 mosquito by tamiya, it will be good to have you along. I started this on the 29th march 2017 (you can check the picture dates) but have only just got around to uploading! Heres a photo of the kit and a couple of items I've acquired, Aries wheel bays. Decals Not sure which one to go for I've ruled out the silver one though . The green/grey F*EG is just a classic mosquito. The night fighter green grey black will be a good exercise in painting black (never done before...) And the Banff strike wing just look cool with all them rockets!!! Let me know what you guys think i should go for! I've also got a little bit of work start, Thanks for looking more to follow soon (: Joss
-
 My last build for 2017 is a commission from the navigator of XV426 which flew with 56sqn RAF. The scheme is from the final scheme of the aircraft including the red cockpit surround which was added by the Norwich Aviation Museum who now owns the cockpit section of the aircraft. Using the excellent, but now dated Hasegawa FGR 2 kit along with Eduard cockpit set. Painting was done using Vallejo air and the decals were a mixture of kit and spares. The Spooky II mascot is a 9G mm figure by aerobonus.
- 11 replies
-
- 42
-
-
...and done !! Built this because I hadn't done a 'What If' for a while and really wanted to reinvigorate my atrophied 'mottling skills' such as they are. In the end I'm quite happy with it, built really easily with no big issues, nice detail straight from the box including a perfect wee etch fret. If you're in to Luft '46 and 1:48 (or even if you aren't), go out and get one of these Hobbyboss Ta152's, they're cheap, easily available and look really nice when they're done. Not sure what's next for 'What If'ing', maybe the new 1:72 Revell Gripen or another Rafale... Stay tuned, thanks for taking the time to look and or comment, please feel free to say anything at all. AFN Ian.