Search the Community
Showing results for tags '1:35'.
-
Hi, This is a 1:35 model, the IS-2 heavy russian tank. This is an Zvezda KIT no. 3524. I made it as a moving model (the film about how can it ride is at the bottom). Additional parts are the Friulmodel tracks, handmade towing cables and small accessories. Constructive critique is welcome and some assembling photos
-
Hi! Let me present my last finish. A Dragon 1/35 panzerjäger Hornisse. I usually finish a few aircraft and ship kits each year, but this is my first 1/35 AFV in so many years. It's also my first time doing crew figures in action in an open-top vehicle. I also tried a full PE set for the armor plates. The fighting compartment armor is in full brass (I'm certain it will resist a 6 mm BB airsoft bullet at normal combat range, the paint won't survive though). So, the kit is Dragon's original release back in 2002. One PE set for armor plates and another set for interior details were from Lionroar, track links are AFV club and the crew is from Tristar. Originally the guy ramming a round into the breech was prepared, unfortunately I wasn't able to fit him properly with all the ammo boxes/tubes on the floor. (I did dry-fit them but perhaps not everything all at once. It's problematic because this build spanned over 7-10 years) In the end, the guy holding a round (from the same set) was brought in. The ammo doesn't seem heavy for him, if you notice. Anyway, it was done and I am quite happy with it. I'll certainly do more German panzerjäger and I hope it won't take such a long time to finish another one. Thank you for having a look. Comments are surely welcome. It is my pleasure sharing my model with you, as much as I'm enjoying your works posted on the forum. Nanond
- 18 replies
-
- 25
-

-
(250x229).thumb.jpg.48a57772b41ed148fdc8d15e3c202763.jpg)
A hole dug by a Hitachi Zaxis 135US Excavator
Svedberg posted a topic in Work In Progress - Dioramas
I have started on a diorama to show off the Hitachi Zaxis 135US Excavator i built earlier. If you care to have a look at the excavator itself it is here: Since an excavator is intended to dig, as far as I know 😀, I wanted the scene to show just that - an excavator digging a hole. I have settled on road work scene where one of the lanes of a street has been blocked off with barriers, and the behind the barriers the digger is at work. My scene plan/sketch looks like this: Apart from the stuff shown above I intend to add other details as well, like various signs, traffic cones and likewise. So far I have also cut the diorama base from piece of extruded foam. The foam is 5 cm (2") thick which hopefully is enough for the depth of a decent looking hole. -
T-14 Armata Revell 1:35 The T-14 Armata is a next generation Russian main battle tank based on the Armata Universal Combat Platform. It is the first series-produced next generation tank. It has entered serial production, with the first batch of 100 T-14 Armata tanks being deployed with the Taman division, and it is expected to be completed by 2020. The Russian Federation was expecting to order 2,300 new main battle tanks for delivery by 2020. In 2015, Russian media had announced that around 20 tanks had been delivered for testing, without naming a source, and at least seven T-14 Armata tanks appeared in the 2015 and 2016 Moscow Victory Day parade, five in 2017. But in 2016 the Russian defence ministry announced that it had signed a contract for a “test batch” of 100 tanks to be delivered by 2020, with the full project extended until 2025. In July 2018, Deputy Prime Minister for Defence and Space Industry Yury Borisov said there is currently no need to mass-produce the Armata when its older predecessors, namely the latest variants of the T-72, remain "effective against American, German and French counterparts”, saying, “Why flood our military with Armatas, the T-72s are in great demand on the market(s).” Instead, a modernization program of the T-72s, T-80s and T-90s in-service will take precedent. In August 2018, at the ARMY2018 Forum outside Moscow, the Russian Ministry of Defence signed a contract for the purchase of 32 T-14s tanks and 100 T-15 infantry fighting vehicles, with delivery to be finished by 2021 The Model This is a re-boxing of the Zvezda kit from 2016, as such the kit is quite well known and from what I’ve seen is pretty good when built up. Unfortunately Revell have used their own flimsy end opening boxes rather than the strong Zvezda type, but its fine if you don’t want to store it for any length of time. The kit itself is very nicely moulded and come on eight sprues of light grey styrene and a single clear sprue. There are also squares of mesh which need to be cut to size for the engine deck grilles and a small decal sheet. There are no signs of flash or other imperfections and only a few moulding pips. Construction begins with the fitting of the engine deck grilles, using the netting supplied. There are templates in the instructions for the modeller to cut to the correct size. For covers are then fitted on the underside of the grilles. The crew vision ports and hatches are then glued into position on the upper hull section, while on the lower hull section the two, three piece exhausts are assembled and attached, followed by a large panel on the underside. The upper and lower hull are then glued together and two more net grilles are added to the very rear of the ending deck. The rear bulkhead is then fitted with the numerous brackets, towing eyes, and tow hook before being attached to the rear of the model. The two rear mudguards are assembled from three parts and glued into place. The lower glacis plate is then fitted with the attachment points for the various engineering equipment tan can be fitted to most Russian tanks such as dozer blades etc. The front mudguards are then attached, followed by the assembly of the fourteen dual road wheels, idler and drive sprockets. The return rollers, four per side are glued into place, followed by the axles and, where required, the three shock absorbers per side. The idler and sprocket axle covers are also fitted at this point, as is the spaced armour, and spare track links for the rear bulkhead. The road wheels, idler and drive sprockets are now fitted to their respective axles followed by the assembly of the tracks. Each track is made up from link and length with separate guide horns, and while not quite as realistic as individual links can make it easier to assembled for the less experienced modeller. The tracks are then glued into place, but I would normally do this at the end of painting as it’s easier to paint the track and vehicle before fitting. Because of the size of the two, three piece side skirts, it is possible to get away with only making the lower length of track if you’re not too worried about doing something that can’t be seen. You can add the side skirts after painting and fitting of the tracks if you so wish. The engine deck is further detailed with the fitting of hinges, stowage covers, deck armour, cables, and hinge covers. The towing cable is then glued to the rear bulkhead and the upper lengths of the side skirts are also fitted. The attachment arms for the slated armour to the rear of each side of the tank are glued into place followed by the armour itself. Fortunately the arms are moulded integrally with their hinge points, making the setting of the correct angles so much easier than the Takom version of this tank. The turret is now assembled with a plethora of panels, vision blocks, additional armour, grab handles, lifting eyes, and the many defensive launchers. Be aware that there are quite a few panels that have to be fitted internally including the sight doors before the turret ring can be attached, and including the large active defence launch tubes. The main gun is made up from thirteen parts and is fitted to the turret ring section before that turret is closed up. The remote machine gun mounting is made up from twelve parts before being attached to its base and sight consisting of another eight parts. The mounting can be glued into position or left to rotate as required. The turret is then further detailed with additional sensors, aerials and other fittings before being attached to the hull. Decals While there are two paint options, there are only decals for one vehicle, that of the prototype shown at the 2015 Moscow parade. Conclusion Zvezda are gaining a reputation for producing nicely detailed and buildable tanks and have come a long way over the years. This does look a very nice model from the box and there shouldn’t be any need any aftermarket to produce a good looking tank for your collection. There are also numerous paint schemes available to be seen on the internet, so you could try your hand at one of those. It’s great to see Revell re-release this kit as it gives those modellers unsure of buying a Zvezda kit a chance to see what they’re like while being backed by Revell. It also keeps product coming from Revell while they continue their reorganization which will hopefully lead to more self designed releases. Revell model kits are available from all good toy and model retailers. For further information visit
-
I have been building this Hasegawa Hitachi Zaxis 135US excavator kit: If you care to have a look, the build thread is here: And here are some pictures of the result. I'm quite pleased with the outcome, but as always I also see a lot of flaws, but let's not dwell more on that right now. 😀 Please enjoy! Lennart
- 12 replies
-
- 14
-
-
Hi all! I'm tossing around ideas for a future dioarama scene including my recently built 1:35 scale Hitachi excavator. One idea is to have a dump truck accompanying the digger, but my Internet searches for such a kit have so far been negative. So I thought I would ask all knowledgeable people here. Does anyone know about a 1:35 scale dump truck kit? It should be a reasonably contemporary truck that can pass for use here where I am, so something like a Volvo, Scania, Man or similar would be nice. Like this, although this is only an example of the type of truck I'm looking for: I guess I really only need the truck itself. I can always build the flatbed myself. Any help greatly appreciated, Lennart
-
Afternoon all from the land of the Long White Cloud. This started life about a month ago as an experiment - First time using Ammo of Mig acrylics and first attempt at the 'modulation method'. So because I don't want to bore everybody here at BM with the intervening steps, here's what it looks like all finished-off, (apologies to folks with slow broadband as it's quite photo-heavy !). Built straight from the box with no additions, I will be getting a set of the MiniArt British tank figures to group around and in the model in the near future. Weathering after the main paint modulation, filters & decals (in chronological order) - Dirty brown oil pin-wash, chipping and scratches, streaks & stains, heavily thinned dirty grey acrylic on the lower sections & wheels to simulate road dirt and finally pigments & mud splashes. Please feel free to make any comment, ask any questions or suggest anything I can improve upon. This'll be the last armour project for a while as I've got an F40 to finish and I'm also about 50% of the way through a 1:48 P-51 (both Tamiya). AFN Ian.
- 15 replies
-
- 24
-
-
Kanonejagdpanzer 90 Revell 1:35 By 1960, the M47 Patton old 90 mm was still a potent weapon. Pending replacement in the Bundeswehr, it was decided to reuse it in German-made tank-hunters. General design tended to be close to the very successful ww2 era Jagdpanzer IV. Specifications were made and transmitted to three manufacturers, the German Hanomag and Henschel and Swiss MOWAG which produced prototypes. After trials, only Hanomag and Henschel were retained for pre-production. the KnJgPz-90 was indeed closely based on the wartime tank-hunter, which was derived from the Panzer IV. However, this was only superficially as the sloped armour was mostly copied from it. Everything else, from the chassis, suspensions, engine and transmission, armament and targeting devices, fire control, etc. were genuine. The hull was longer, but narrower and lighter than the original vehicle. The frontal armor was not 80 but 50 mm in thickness (still around a 80 mm equivalent) also on the sides, and 10 mm on the bottom and roof, engine deck and rear plating. The mantlet allowed a 15° traverse and -8° to +15° elevation/depression. The hull upper armour was stepped on the rear engine compartment. The driver sat on the right, with a hatch above him, and there was a secondary periscope at the left of the gun. There was a secondary hatch behind the driver, and a commander cupola to the rear, left of the fighting compartment. The drive train consisted of five doubled-road wheels independently sprung on torsion arms, with three return rollers, rear drive sprocket and front idler. One machine-gun was coaxial in the mantlet, the other was externally mounted on the second hatch ring. The main gun carried 51 rounds 4000 were stored for both 7.62 mm machine-guns. The KnJgPz-90 was protected NBC and fitted with infrared vision and targeting system. The vehicle was considered a success, due to its low profile and superior mobility, compared with the high profile of the M47/48 Patton series. However, by the time USSR unveiled its T-64 and later T-72, the KnJgPz-90 was considered obsolete. The manufacturers proposed it was up-gunned with the latest 105 mm, but in 1983 it was decided to convert 163 of these as Raketenjagdpanzer Jaguar 2 anti-tank guided missile carriers, firing TOW wire-guided missiles, which was far more effective. These vehicles also received extra modifications like spaced and perforated armour. A few others were derived as Beobachtungspanzer (without the main gun) to guide mortar units. The regular vehicles were gradually phased and put in reserve. The last were in active commission with the Heimatschutztruppe by 1990. The Model While the kit was originally released in 2008, it feels like it is much older than that in my befuddled memory. That said it is a typical Revell product that is packaged in their flimsy end opening box. The mouldings are good, with no signs of flash or other imperfections on any of the parts. Inside the box are nice sprues of grey styrene four lengths of rubber tracks a length of fine wire and the decal sheet. Detail is average to slightly above average, and if the modeller wanted they could add quite a bit more, but replacing the kit barrel with a metal one is all the modeller would really need to do. The build looks nice and straight forward with nothing really to catch anyone out. There are two variants that cvan be built from the one kit, the Panzerjagdpanzer, (PaJaKa), or Beobachtungpanzer, (BeobPz). The build begins with the assembly of the ten road wheels, each pair of which is attached to their respective axle and finished off with the outer hub. For those that like working tracks the wheels are made so that they can rotate. The same goes for the six return rollers, two idlers and two sprocket wheels. The tracks lengths are then joined together by passing the pins through the holes and melting the pins with a hot screwdriver or your preferred device. The wheel assemblies are then glued to the lower hull and the tracks fitted. Naturally, you can leave the tracks off until after painting. The two upper hull sections are joined together, followed by the upper hull sides all of whom require holes to be drilled out before the assembly is glued to the lower hull and the front mudguards attached. The upper hull is then festooned with detail parts, such as headlights, towing eyes, brackets, spare track links in their holders, and ID plates. There are also a pair of Jerry cans and their holders attached to the rear bulkhead, as is a five piece box, which looks like it could be an NBCD filter. The rear bulkhead is also fitted with a two piece stowage basket, light clusters, clamps, brackets and some pioneer tools. The engine deck is fitted with a pair of grilles, exhaust, more pioneers tools, vents, smoke launcher mountings. The bank of eight smoke dischargers are then fitted to the mountings, while on the fighting compartment roof is fitted with a pair of aerial bases, and aerials made from the thin wire provided in the kit. The commanders cupola is made up from two parts, as is the gunners. The drivers position has three vision blocks and the hatch hinge glued into place. The modeller then has the option of fitting the three piece MG 3 for the PaJaPa of a two piece optical sight for the BeobPz version. The main armament is then assembled. This begins with the IR light box that sits on top of the main gun, followed by the two piece mantle and two piece barrel, which could be replaced with an RB metal one should you desire. The barrel is glued into the mantel, along with two machine gun muzzles, with the IR box sitting on top via to mounting brackets. The whole assembly is then glued to the front of the glacis plate. If you’re building the observation vehicle, leave the barrel and IR light off and fit the blank into the mantle hole instead. The model is finished off with the fitting of the last detail part that include the option of two types of rear-view mirrors, two more light fixtures, light guards, towing eyes, and more pioneer tools. Decals There are three decal options for the PaKaJa and one for the BeobPa, the decals are quite nicely printed with good opacity and in register. The options are:- Kanonenjagdpanzer of Panzerjaegerkompanie 160 based at Schwarzenbek, North East Germany, 1980/81. Kanonenjagdpanzer 5 of Panzergrenadierbatallion 353, based in Hammelburg, Bavaria, 1984. Kanonenjagdpanzer 2 of Panzergrenadierbatallion 44, based in Gottingen, Lower Saxony, 1980. Beobachtungpanzer 6, of Panzergrenadierbatallion 152, based in Schwarzenborn, Hesse. Conclusion It’s nice to see this kit re-released although I really thought it was much older than it really is. It certainly will be a nice, relatively simple build that would make for a great first kit or for a quick weekend mojo rejuvenating build. Revell model kits are available from all good toy and model retailers. For further information visit
-
Hitachi Zaxis 135US Excavator - Hasegawa 1:35
Svedberg posted a topic in Work In Progress - Vehicles
This is a kind of experiment. I have not built a plastic kit in, I guess, 45 years! And I have always dreaded taking on air brushing. But now I have decided that it is time for some changes in both these departments. So I have started to build a Hitachi Zaxis 135US Excavator. A 1:35 scale kit by Hasegawa. No, I'm not into construction or civil engineering and thus do not know more than any ordinary citizen about excavators. So why an excavator? I assume I just found this modell to be cool. As I already said, airbrushing has not been a favourite of mine. Throughout the years I have made some attempts but only ended up with clogging and every other possible mishap. This time however, I have decided to make a more serious attempt. So far I have at least learned to not be outright scared bye the airbrush 😀 Regarding the kit at hand, I have put together the major sub-assemblies and given them a coat of primer. Like this: Yes I know, the primer is a little thin on the orange parts. But this will have to do. There will be other layers of paint on top. -
And so after 48 years of building plastic models, I have finished my first German WWII armour - started many, first time finished. Please feel free to make any comment, criticism or ask any questions. Have a great weekend all. Ian.
- 12 replies
-
- 16
-
-
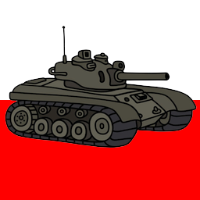
This is a 1/35 model made by me last year. This is an Academy KIT no.13234. I made it as moving model, and made side hatch opening. All the parts are original from the kit. Thanks for the comments in advance.
-
Standard B “Liberty” Truck ICM 1:35 As America's war effort ramped up in 1917, there was a collective realization that the fleet of vehicles needed to support a semi-mechanized army needed some standardization. The Liberty truck was the solution. It was designed by the Motor Transport section of the Quartermaster Corps in cooperation with the members of the Society of Automotive Engineers. A group of leading automotive engineers was summoned to Washington in 1917 to design standardized trucks for the AEF. It took 50 men 69 days to design a 1-½ ton "A" model and the 3–5 ton "B" model. Production of the Liberty B began in the fall of 1917, and the first models were delivered to the secretary of war on 19 October. Of the almost 9,500 produced by 15 manufacturers, more than 7,500 were sent overseas. The Liberty's four-speed transmission coupled with its 52-hp engine gave the truck a top speed of about 15 miles per hour. The Model The model arrives in a strong box with a separate top sleeve with a nice artist’s representation of the vehicle on the front. Inside, within a large poly bag, are four sprues of medium grey styrene and, in a separate poly bag, one clear sprue. On initial inspection the parts are really well moulded, clean, with no sign of flash. There are a number of moulding pips, some of which are on delicate parts, so care should be taken when removing. The sprue gates attaching items like the tilt rails are also quite heavy so again take care with their removal and clean-up. The build starts with the chassis, with each rail being fitted fore and aft leaf springs, each of two parts. Two of the cross-members are assembled from two parts each before being fitted to one of the chassis rails, along with three other single piece cross-members followed by the other rail. The radiator is then assembled from six parts before being glued into position at the front of the chassis. The single piece front axle is then glued to the front pair of leaf springs and a further cross-member is also glued into place. The rear differential is made up from fourteen parts which include the rear drum brakes. The front bumper beam and transfer box are also assembled and glued into position along with t he drive shafts and three piece front mudguards. The front wheels and single piece items with a choice of separate hub caps, the rears being made up of inner and outer wheels with separate tyres and hub caps. The completed wheels are then attached to their respective axles. Work then begins on the engine, which is made up from eleven parts. Once assembled, it is fitted to the chassis along with the two piece exhaust pipe and silencer. The gearstick is then added to the gearbox and the engine fitted with two more parts. The cabin is then assembled from twenty one parts before being fitted to the chassis over the gearstick, followed by the outer radiator grille, and two piece bonnet, which could easily be made to be posed open to show off the engine, even though it’s not shown posed that way. The next assembly is the truck bed, with the bed itself being fitted with the sides, rear, and front plank sections. On the underside, five lateral strengthening beams, and the sides with four vertical beams each. Two five piece storage boxes are assembled and fitted to the front underside of the bed before the whole assembly is attached to the chassis. There is a five piece searchlight and two piece horn attached to the cabin coaming and the steering wheel is also glued into place at this point. The pair of two piece headlights are attached to the front of the cabin bulkhead, while the bonnet latches, and grab handles, plus the cabin access handles are fitted, as is the starting handle. The cabin roof is fitted with left and right hand frames before being glue into place, and on the bed the modeller has the option of just fitting the five tilt rails, or the complete canvas cover which is made up from five parts, completing the build. Decals The small decal sheet gives the modeller just two options of vehicle, both in use by the US army in 1918, one with just unit badges and one with US Quartermaster Corps labelling on the tilt sides. The decals are nicely printed, clear and in good register with a slightly matt finish. Conclusion It’s great to finally see a WW1 Liberty tuck being kitted, especially in this centenary year. ICM have not only provided us with a nice tribute to one of the lesser sung vehicles of the First World War, but a very nice truck to build too. It’s not overly complicated, which is good to see, even though the truck itself was pretty simple, and would be a great kit for any level of modeller. Review sample courtesy of
-
If you check your modellers dictionary under the heading of 'Shelf Queen' you may well find a photo of this wee thing - Tamiya's 1997 Jeep... apart from the stowage, .30 cal belt and the M1 carbine, straight from the box. First figure I've painted in about 25 years and thoroughly enjoyed it. Started just before Christmas 2011 and finished this afternoon ! As ever please feel free to comment, abuse or ask a question. Have a great weekend y'all... :soldier Ian.
-
 Flettner Fl-282 Kolibri detail sets Eduard 1:35 MiniArt’s release of the Flettner Kolibri was a wonderful surprise when they showed it off at Telford in 2017. This surprise turned to a fair amount of joy when it was actually released. The model is great, straight from the box, but is their way, Eduard always try to help the modeller make a great model into a greater one. They have since released three sets for the kit:- Interior Set (32927) The parts are contained on two sheets of relief etched brass one being quite a bit bigger than the other, with one being unpainted and the other pre-painted, and not self-adhesive as Eduard seem to have dispensed with that feature. Starting with the pre-painted sheet, this contains a new instrument panel which comes in front and rear sections, the rear section painted with the various dials. You will need to use the original panel as backing but with the moulded detail removed. The same goes for he side panels. The sheet also contains a very nice set of seatbelts, there are both lap and shoulder straps plus the clasp protection panels. The straps are very nicely printed, complete with shading and stitching. The clasps and attachments are picked out in steel, which all looks quite realistic. The larger unpainted sheet contains a selection of panels which can be posed open and give a much closer scale thickness than plastic ever can. Some of the panels will need to be rolled to shape and fitted with internal bracing and frames. It you wish, you can leave these panels next to the aircraft to form part of a diorama, allowing the frame work and interior visible. Lastly, the engine is provided with a wiring harness which is fitted between the engine casing and the push rod ring. Interior Zoom (33195) This single sheet set is for those modeller who just want to enhance the cockpit area, and thus contains just the pre-painted sheet mentioned above. Masks (JX216) This set of yellow Kabuki tape masks for the wheels. As with most masks the tape is only provided for the surrounds of the wheel or covering a painted wheel, the rest being made up from masking fluid. Conclusion Once again it’s proven that there’s never a kit release without an Eduard set or two being designed for it, they are so prolific. Whilst not as comprehensive as some of the previous releases, they will add that extra level of detail sought by some modellers. Review sample courtesy of
 -
...
- 13 replies
-
- 18
-
-
- jagdpanther
- tamiya
- (and 1 more)
-

-
Hello everyone, I've been looking around here for a while and now it's my turn to contribute. I returned back to modelling a couple a years ago. And after building a couple of models I found that my creativity wasn't triggered enough by just putting together pieces someone else had made. I read all I could find on the internet and when I felt like I knew enough to start I kicked away. This build started somewhere last spring so I try to recreate the progress. Materials used, scrap electronics, cardboard, plasticard and spare parts from other kits. First step was using an old dock station for a laptop as a base and detailing it, this would later become the centre area underneath the spaceship.
-
Soviet T-34/85 with Riders ICM 1:35 History The T-34 was and remains a legend. It is not only the most produced tank of the WWII-era, with 84,000 built (compared to the 48,966 Shermans of all versions) but also one of the longest-serving tanks ever built. Many are still stored in depots in Asia and Africa, and some served actively during the 90’s (such as during the 1991-99 Yugoslavian war). They formed the backbone of countless armoured forces around the globe from the fifties to the eighties. The basic design was drawn for the first time in 1938 with the A-32, in turn partially derived from the BT-7M, a late evolution of the US-born Christie tank. The T-34/85 came about after it was recognised that there was a need to increase the firepower of the T-34/76 following the Battle of Kursk in 1943. While the hull stayed the same, a new turret was designed and was to be originally fitted with a derivative of the M1939 air defence gun. This gun wasn’t chosen to be produced en masse, that honour went to the ZIS-S-53 which armed the 11,800 tanks produced between 1944 and 1945. The Model The model arrives in a strong box with a separate top sleeve with a nice artist’s representation of the tank and riders on the front. Inside, within a large poly bag, are five sprues and two hull parts of green styrene and, four lengths of tracks, a small sprue of clear styrene, and a smallish decal sheet. On initial inspection the parts are really well moulded, clean, with no sign of flash. There are a number of moulding pips, some of which are on quite fragile looking parts, so care should be taken when removing. The sprue gates attaching some items like are also quite heavy and I can see these parts breaking if not careful. The build begins with the fitting of the engine cover onto the rear decking, and the bow machine gun, armoured tear drop, mantle and ball. The two intake covers are then assembled and also fitted to the rear deck. The two piece bow mounted machine gun is then assembled and slide into the ball of the mounting, being glued such that it is still moveable, whilst there are four plates that are fitted to the underside of the rear decking. The drivers hatch is made up form four parts before being glued into position. Back aft, the rear bulkhead is attached, followed by the radiator cover. Inside the lower hull section the eight suspension boxes are fitted, four per side as are the two driver’s control sticks, whilst the rear mudguards are fitted to the rear. On the outside the driver gearbox covers are fitted, as are the five axles on their torsion beam suspension arms and the idler axles. The drivers are machine gunners seats, each made from six parts are glued in their appropriate positions and the two hull halves joined together. Each of the idler wheels, drive sprockets and road wheels are made from two parts before being fitted to their respective axles. The four towing hooks are then attached, two at the front and two aft. The upper hull is then fitted out with grab handles, stowage beams and a couple of smaller hooks. Each of the two halves of rubber track lengths are joined together and slide of the wheels. While there isn’t really any interior, ICM have allowed for the fact that some modellers like to have the hatches open, to that effect there is some semblance of interior parts. The main gun breech is made up form thirteen parts, and although relatively simple, does look quite effective. On the outside of the turret the mantlet and fixed section of the mantlet cover are fitted, the breech assembly is then glued to the mantlet from the inside and the lower turret, including the turret ring is glued into place. The moving section of the mantlet cover is then attached, along with the machine gun muzzle. The three piece mantlet extension and three piece main gun is then fitted, along with the four piece cupola, gunners hatch, grab handles, ventilator dome, viewing block and top armour plate for the mantlet. There are more stowage bars, periscope sights, lifting eyes and viewing blocks fitted to the turret before the whole assembly si fitted to the upper hull. Final assembly includes the four, four piece fuel drums, each with two cradles, spare track links, stowage boxes and aerial base. There is a four piece folded tarpaulin, (in place of one of the fuel drums), another stowage box, two more track links headlight, horn, two towing cables and a large saw attached before the model can be declares complete. The riders are then assembled. There are four of them, and each is made up from separate legs, upper torso, arms, head and headgear. There are also separate pouches, water bottles, ammunition drums and ammunition pouches. The weapons are also separate with the ammunition drum or magazine to be attached. Three are armed with the PPSh-41 sub-machine gun and one with a German MP-40 sub-machine gun. Decals The decal sheet provides four options for tanks that each served in 1945. All of the tanks are in all over green, each with tank ID numbers and unit markings. The choices are:- A T-34/85, 7th Guards Tank Corps, Germany, Spring 1945 A T-34/85, 7th Guards Mechanised Corps, Germany, Spring 1945 A T-34/85, 4th Guard Tank Army, Germany, Spring 1945 A T-34/85, of an undesignated unit, from the Spring 1945 Conclusion This is another fine kit from ICM. Although not the most complicated of tank kits, it does look the part and would make a nice, relaxing weekend build. The addition of the riders makes for some interesting diorama builds. Review sample courtesy of
-
RKKA Drivers (1943 – 1945) ICM 1:35 ICM have a great selection of figures in their catalogue, the latest set is of is for RKKA Drivers, consisting of two drivers, with eh picture on the front showing one in a truck and one in a staff car. I’m sure each could be posed to fit in most of the vehicles released by ICM or indeed any other manufacturer that needs a driver. Each figure is made up from separate legs/lower torso, upper torso, arms and head; the truck driver also has a separate hat. Conclusion This is another very useful set for the diorama builders where it’s good to have the vehicles built actually being driven. Review sample courtesy of
-
Cartridges and Shells 1:35 Master The latest releases from Master Models in their series of cannon shells and cartridges have recently arrived at BMs London offices. Trouble is they are seriously small and very difficult to photograph now that my macro lens has given up the ghost. There are loads of uses in dioramas or vignettes for both the empty cartridge cases and loaded cases, not sure so much with the separate shells, unless you glue them to the cases. [GM-35-018] – This set contains 15 German 2cm ammunition (cal. 20x138B) for Flak 30/38, KwK 30/38 - shells and 5pcs each of 3 types of projectiles [GM-35-019] – As above, but includes 25 German 2cm ammunition (cal. 20x138B) for Flak 30/38, KwK 30/38 - empty shells [GM-35-021] – This set includes 25 cartridges for the Browning .50 calibre heavy machine gun. [GM-35-020] – As above, but includes 25 empty cartridges, great for being strewn around the floor of a M3 half track of the turret of a tank. Conclusion Here we have some really useful and well produced items. Very handy for your dioramas. Review sample courtesy of Piotr at
-
My last work: Merkava Mk. IIID (Hobby Boss) 1/35 tank Regards
-
German Schnellboot S-38 Eduard 1:35 It was great to see the release by Italeri of the 1:35 S-38 Schnellboot, adding to their impressive array of 1:35 scale MTB’s. The kit itself is very nice, but there is always room for improvement, and Eduard have a lot of experience in giving us modellers the sort of detail sets that will help do this. The three sets reviewed here are perfect for the task in hand, although I’m sure there is a lot more that can be added to the model, and not just in etched brass. 53212 – Schnellboot: Comes in a zip lock bag with a large sheet of etched brass and a small pre-painted sheet of etched steel. The brass sheet contains many new and replacement parts for the torpedo tubes both internally and externally, a new door and other fittings for the bow mounted 20mm cannon, plus a host of deck fittings such as gratings, hatch fittings and 48 stanchion plates. There are also new foot plates, brackets for the boot hook, skylight surrounds, ventilator grilles, plus foot pedals, sights and other fittings for the 40mm Bofors. Within the wheelhouse there are new fittings for the ships wheel, compass rose and surrounds for the two binnacles, and grille for the aldis lamp. All the dials and instrumentation are replaced with the well printed items on the etched steel sheet. For those modellers who wish to build a pre-war version with the 20mm cannon on the stern, then there are parts include for this weapon too. 53213 – Flag: This set is very simple in that it just contains are large pre-printed German flag. The flag comes complete with eyes top and bottom for you to add your favourite rigging line. If you don’t like to build your models with the swastika then you might not like to use this on your model. 53214 – Hatches: Also comes in a zip lock bag with one sheet of etched brass and a pre-cut acetate sheet. The sheet contains complete replacements for all the deck hatches. Each hatch is made of the hatch surrounds, the hatch itself with an acetate backing representing the glass, hinges, handles, clasps, and outside cover. Conclusion As mentioned above, the kit out of the box will make a nice model, but if you want something more, then these sets will certainly go toward making a model with more finesse and improved detail. Some modellers may want to go further, but for those with a limited budget you can’t go far wrong with these sets. Rieview courtesy of
-
Soviet T-34/85 ICM 1:35 History The T-34 was and remains a legend. It is not only the most produced tank of the WWII-era, with 84,000 built (compared to the 48,966 Shermans of all versions) but also one of the longest-serving tanks ever built. Many are still stored in depots in Asia and Africa, and some served actively during the 90’s (such as during the 1991-99 Yugoslavian war). They formed the backbone of countless armoured forces around the globe from the fifties to the eighties. The basic design was drawn for the first time in 1938 with the A-32, in turn partially derived from the BT-7M, a late evolution of the US-born Christie tank. The T-34/85 came about after it was recognised that there was a need to increase the firepower of the T-34/76 following the Battle of Kursk in 1943. While the hull stayed the same, a new turret was designed and was to be originally fitted with a derivative of the M1939 air defence gun. This gun wasn’t chosen to be produced en masse, that honour went to the ZIS-S-53 which armed the 11,800 tanks produced between 1944 and 1945. The Model The model arrives in a strong box with a separate top sleeve with a nice artist’s representation of the tank and riders on the front. Inside, within a large poly bag, are five sprues and two hull parts of green styrene and, four lengths of tracks, a small sprue of clear styrene, and a smallish decal sheet. On initial inspection the parts are really well moulded, clean, with no sign of flash. There are a number of moulding pips, some of which are on quite fragile looking parts, so care should be taken when removing. The sprue gates attaching some items like are also quite heavy and I can see these parts breaking if not careful. The build begins with the fitting of the engine cover onto the rear decking, and the bow machine gun, armoured tear drop, mantle and ball. The two intake covers are then assembled and also fitted to the rear deck. The two piece bow mounted machine gun is then assembled and slide into the ball of the mounting, being glued such that it is still moveable, whilst there are four plates that are fitted to the underside of the rear decking. The drivers hatch is made up form four parts before being glued into position. Back aft, the rear bulkhead is attached, followed by the radiator cover. Inside the lower hull section the eight suspension boxes are fitted, four per side as are the two driver’s control sticks, whilst the rear mudguards are fitted to the rear. On the outside the driver gearbox covers are fitted, as are the five axles on their torsion beam suspension arms and the idler axles. The drivers are machine gunners seats, each made from six parts are glued in their appropriate positions and the two hull halves joined together. Each of the idler wheels, drive sprockets and road wheels are made from two parts before being fitted to their respective axles. The four towing hooks are then attached, two at the front and two aft. The upper hull is then fitted out with grab handles, stowage beams and a couple of smaller hooks. Each of the two halves of rubber track lengths are joined together and slide of the wheels. While there isn’t really any interior, ICM have allowed for the fact that some modellers like to have the hatches open, to that effect there is some semblance of interior parts. The main gun breech is made up form thirteen parts, and although relatively simple, does look quite effective. On the outside of the turret the mantlet and fixed section of the mantlet cover are fitted, the breech assembly is then glued to the mantlet from the inside and the lower turret, including the turret ring is glued into place. The moving section of the mantlet cover is then attached, along with the machine gun muzzle. The three piece mantlet extension and three piece main gun is then fitted, along with the four piece cupola, gunners hatch, grab handles, ventilator dome, viewing block and top armour plate for the mantlet. There are more stowage bars, periscope sights, lifting eyes and viewing blocks fitted to the turret before the whole assembly si fitted to the upper hull. Final assembly includes the four, four piece fuel drums, each with two cradles, spare track links, stowage boxes and aerial base. There is a four piece folded tarpaulin, (in place of one of the fuel drums), another stowage box, two more track links headlight, horn, two towing cables and a large saw attached before the model can be declares complete. Decals The decal sheet provides four options for tanks that each served in 1945. All of the tanks are in all over green, each with tank ID numbers and unit markings. The choices are:- A T-34/85, 7th Guards Tank Corps, Germany, Spring 1945 A T-34/85, 7th Guards Mechanised Corps, Germany, Spring 1945 A T-34/85, 4th Guard Tank Army, Germany, Spring 1945 A T-34/85, of an undesignated unit, from the Spring 1945 Conclusion This is another fine kit from ICM. Although not the most complicated of tank kits, it does look the part and would make a nice, relaxing weekend build. Review sample courtesy of
-
KHD A3000 Light Truck ICM 1:35 From 1940 onwards the German army, by standardizing and simplifying the numerous types of trucks, tried to improve the procurement of spare parts and facilitate repairs. The result was the standard 3 ton truck, which all German manufacturers now used as a basis for construction. This was also the basis on which the motor manufacturer Klöckner Humboldt Deutz AG, (KHD) of Cologne produced the A3000. Various bodies and sets of equipment were available, including a half track, “maultier”. A typical recognition feature was the oval radiator grille and one-piece windscreen. In total about 5960 examples were built between 1940 and 1944. The 4 wheel drive A3000 came to be used on all fronts in the Second World War and was indispensable for supplying the troops with goods of all kinds. The Model The model arrives in a strong box with a separate top sleeve with a nice artist’s representation of the vehicle on the front. Inside, within a large poly bag, are three sprues of light brown styrene and, in a separate poly bag, one clear sprue. On initial inspection the parts are really well moulded, clean, with no sign of flash. There are a number of moulding pips, some of which are on quite fragile looking parts, so care should be taken when removing. The sprue gates attaching items like the cover rails are also quite heavy and I can see these parts breaking if not careful. The original kit was released in 2015, this one includes new parts, but not having the original, I couldn’t tell you what they were. The build starts with the nicely detailed engine with the block and gearbox halves glued together followed by the addition of the rocker covers, starter motor, alternator, front engine mounts, cooling fan, air filter, and other sundry items. The instructions then move on to the complicated transfer box, with its input and output shafts and cross member frame that fits onto the chassis rails with the addition of four other cross members and rear chassis end piece, to which the towing eye, cover and pin are added, along with the front mudguards and engine are attached. The front and rear leaf springs are pre moulded to the chassis rails, the front and rear axles and transfer box are then fitted. Turning the rails over the engine can now be fitted plus the exhaust system, which comprises of four parts, and looks particularly fragile so it may be an idea to build in situ rather than as a separate assembly the instructions call for. The two driveshafts are then be added, as are the radiator/front chassis end piece. The steering rack assembly is built up using the four parts provided and, if the modeller chooses can be built up so that the front wheels are posable, although this may make it rather fragile, particularly the rear tie rod. After fitting the various brackets and supports as well as the front bumper, it’s onto the wheels, these come as single piece tyres plus inner and outer hubs. There are seven provided, singles for the front, doubles for the rear and a spare which fits on the chassis behind the cab and under the bed, along with the four piece fuel tank. The building of the cab begins with filing off the ejection pins marks on the underside of the floor, before fitting the pedals, steering column, steering wheel and handbrake handle. The seat support and cushion is fitted to the floor, whilst the windscreen, instrument panel, (with decal instruments), are fitted to the roof/front part of the cab. Onto the rear panel of the cab the seat back and rear screen are attached. The next assembly for the cab is the bonnet, which is made up of left and right hand parts, bonnet and radiator grille. The completed bonnet cannot easily be made to be posed either open, which is a shame. To finish off the foot plates are attached along with the doors, which are made of the external panels, door cards, clear parts, and door handles. Last details are the wing mirrors, lights, wipers; grab handles, spade, triangular roof marker, jerry can and its support bracket. The last assembly is the truck bed, with the bed itself being fitted with the side, rear, and front plank sections. On the underside, four lateral strengthening beams, plus the two wheel arches are fitted with their attachment struts. The kit comes complete with four tilt rails that attach to the outsides of the truck bed sides. To complete the build the windscreen wipers, wing mirrors, grab handles, headlamps, and width markers are glued into their respective positions. Decals Apart from the instruments mentioned above, the small decal sheet gives the modeller two options. The decals are nicely printed, clear and in good register with a slightly matt finish. The options:- KHD A3000, Ukraine, Summer 1942, in Panzer Grey overall KHD A3000, Italy, Summer 1944, in Dark Yellow Conclusion This is another superb truck kit from ICM. The details straight from the box are rather good, and there is plenty of scope to add extra detail, particularly to the engine and the very empty cargo bed. Once built and weathered this truck will make a nice component to a multi-vehicle diorama, or on its own with a bit of imagination and some figures, one or two of which would have been nice to have been included in the kit. There doesn’t appear to be anything that would trouble anyone other than complete beginners, so I can quite happily recommend this nice and quite interesting truck. Review sample courtesy of
-
Hi to all,My main hobby is mount tanks 1/35. On each kit there are several leftover pieces. One day I imagined mount something with those pieces and this is the result. https://www.youtube.com/watch?v=mS_XDiluZs4