Search the Community
Showing results for tags '1/72'.
-
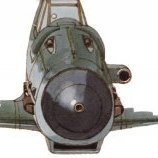
Can I introduce my latest finished item, not my usual genre but it's been sat there under the desk for the last few years so I thought I'd just limp my way through it. Revell, 1/72, Sikorsky MH-53J Pave Low III, 21st Special Operations Sqn, RAF Mildenhall, 2004. Lost my mojo with it as I was trying to complete on days off from work, it just wasn't great! Painted with Humbrol and Revell enamels and finished with the Humbrol Satin Cote. I'm not sure if it's the grey colour that's not quite right or the shade of the decals as they are virtually invisible. Looking at pictures of the real one, think the decals needed to be nearer to black than grey. Anyway... here it is. Back to the normal next, Hunters F6 and FR10, Sycamore HR14 and Canberra T17.
-
As I finish off the Meteor I'm going to be researching ready for the next kit, this lovely Revell Canberra in 1/72, before I do another Meteor. The big 3 sqn tail markings look great. Has anyone built this kit, any issues I need to consider?
- 8 replies
-
- 3
-

-
- 1/72
- Canberra B(I)8
- (and 1 more)
-
Good Afternoon, Sometimes you pick an aircraft that you want to model because the markings are interesting, or because there is a interesting bit of history behind it, or you really like the aircraft itself. In this case, I chose this build because of the absolutely ridiculous weapons load that was applied to this aircraft for testing purposes. Normally the A-10 is not cleared to fly with drop tanks and any weapons, but the fine folks at Eglin Air Force Base did some testing in 2013 to clear the aircraft for just that. See the press release here: https://www.eglin.af.mil/News/Article/814477/40th-fts-expands-a-10-fuel-limitations-in-combat/ This picture is what inspired me to do the build: 130814-F-OC707-052 by J Hooper, on Flickr This particular aircraft, being a test bird, has some differences when compared to a normal A-10C, but they are not too significant. For this build I used the Hasegawa A-10C kit, not because it is the best in the scale, but more so because I happened to have one in the stash. Pros: Good shape, reasonable fit in some parts, extra sprue with C model specific parts (the only kit to do so in 1/72) Cons: Raised panel lines, oversimplified details, poor fit in some other parts. Before construction, I rescribed the entire kit, my first time ever doing so. Rather than go nuts and try to correct any misplaced panel lines, I simply copied those that were already on the kit. I wanted to do some detailing with the kit, but didn't want to go crazy and spend too much time on it.
- 22 replies
-
- 10
-
-
Hi Everybody, this is my second lockdown build and another Russian jet. A very enjoyable build which went together well with, the exception of the undercarriage doors, I suppose with the wheels down all they have to do is represent the doors. Build them in the closed position and they are not even close. Built straight out of the box and painted with Tamiya acrylics. I would be the first to admit this is not one of my better builds, so comments and criticisms are welcome. Thanks for looking, stay safe everyone.
-
Finish no7 for the year is Airfix's BAE Harrier GR9 built OOB as ZD433 circa 2010. This was done in tandem with Hasegawa's AV8B+2 as a comparison build as there was only 10 years between the respective release date 2001 for the AV8B and 2011 for the GR9 but the results are pretty similar. Painted with Tamiya acrylics thinned with Mr colour levelling thinners which helps the finish no end, decals printed by Cartograph but some would not stick without Microsol blue. I haven't used a panel line wash this time as they are fairly deep and didn't need highlighting, same with weathering most of the pictures of ZD433 show it well kept. As usual all comment welcome. Wip below
- 15 replies
-
- 26
-
-
Good evening! There was a bit of a work in progress thread for this build a while ago. The build has been done with it for a quite a while, but I worked on some photography this afternoon. I've got to work on depth of focus and few other things on the photography, but this was my first time shooting models in a light box. It's already much better than trying to do it on kitchen counter, but I've still got some learning to do. The air data probe is just press fit on the aircraft now. That way I can remove it if necessary and it doesn't get broken off. The wingtip pitot is complete, but not installed at this time for the same reason. On to the photos! P1030509 by J Hooper, on Flickr P1030512 by J Hooper, on Flickr P1030513 by J Hooper, on Flickr P1030515 by J Hooper, on Flickr Cheers, and I hope you enjoyed! Hoops
-
Hello Here are three 1/72 Viggen I have just finished. First the AJ-37 from Special Hobby in that particular Swedish camouflage in the 1980s Next the SK-37 trainer either from Special Hobby and in overall natural metal finish. Last the JA-37 JaktViggen in the late overall grey dress but with high visibility numbers. This one is from the Tarangus box, but same manufacturer. Finally the three of them which will be published in Tamiya Model Magazine French edition . Patrick
-
 Hello, Latest addition to my "done and dusted" list: PZL P.11c. Arma Hobby expert kit, painted with Vallejo Model Air, decals from spare box. Model represents one of the interned Polish airplanes that were pressed into service (Aeronautica Regala Romana – Romanian Royal Air Force) alongside locally produced P.11f, used at the beginning of the eastern campaign (summer 1941) and latter transfered to training duties. Comments are welcomed.
 -
Hey all! Today I have a question about the FW-44 in Brazilian service. After finishing my Model 256, I've decided it needs a friend to share the skies with, and I've settled on Kora's cute little FW-44. The problem is that I can only find one photo of the type - a museum piece. I trust that Kora got their info right, but they have made mistakes before, so I wondered if anyone might know where I could find more photos of the type, and specifically of Brazilian examples. Any help would be greatly appreciated. Thanks, and Stay Healthy, Tweener
-
 Hi Folks, 2nd build in this GB. While I wait for seat belts to arrive for the prototype (I have some here somewhere , but damned if I know where!) I'll make a start on this 1/72 Czech Master Resin F Mk 22/24. I'm going to model F Mk 24 VN318 when it was with the Hong Kong Auxiliary Air Force at Kai Tak, as it appeared for the HKAAF's final Spitfire flypast in April 1955; Alfred Price's 'The Spitfire Story' says that 'the Mark 24, was in its initial form externally no different from the Mark 22... Late production Spitfire 24s were distinguished by the fitting of the shorter-barrel Mk V Hispano cannon. Fifty-four Spitfire 24s were built by Supermarine, and a further 27 were converted from Mark 22s...' As you can see, VN318 had the long-barrel cannons. AFAIK the Mk.24 had a re-positioned access hatch behind the cockpit on the starboard side. The hatch on the CMR kit is further back where the Mk.22's hatch was (according to the Mk.1 profile). So I'm going to have to fill and re-scribe the hatch. No problem unless the the hatch really was back there on VN318, being an early Mk.24? Any Spitfire experts out there who can help? Possibly Graham, Troy, or Peter M? @Troy Smith @Graham Boak @Magpie22. Apologies in advance chaps for asking if this isn't your thing, but I would hate to re-scribe it now and then get told later when its painted that I got it wrong - and apologies to any other Spitfire experts I've overlooked! Anyway, back to the kit... Looks really nice. Lots of fine detail and the decals look really nice. I made a start on this kit many years ago but lost interest when I came up against the bright yellow canopy and the fuselage to wing fit problems. I've now got a Falcon vacform canopy and I'll see if I can fix the fit. Any thoughts, suggestions or tips gratefully received! Cheers,
 -
 Bf-109G-14 | 1/72 | Hasegawa Hptm. Erich Hartmann, Pilot | 4./ JG52, Csór, Hungary, October 1944 I finished this on 5/17/2020. It is one of a two-in-one Hasagawa "Finnish Aces" kit my wife gave me for Christmas. The two Finnish planes looked so much alike that I decided to make one Erich Hartmann's "White 1". I've wanted to do one of his black tulip aircraft for quite a while because my dad built Jo-Han's interpretation of Erich Hartmann's "Double Chevron" and it hung on my ceiling throughout my childhood. In fact, it was the only German fighter on my ceiling, so to me it was synonymous with "German fighter". I was able to find some after market decals, but my biggest hurdle was figuring out how to paint the mottling on the side because there are so many interpretations out there! In the end I found the instructions to Eduard's kit with "White 1" in it and followed those. From Eduard's instructions: "Erich Hartmann, the most successful fighter plane pilot of all time, first joined the 7. Staffel of JG 52 on October 10th, 1942. He remained with JG 52 until the end of World War Two; in fact he became the commander of its I. Gruppe. The total count of his shot down aircraft was 352. For his exceptional success he was awarded the Knight's Cross of the Iron Cross with Oak Leaves, Swords and Diamonds. After WWII he was transferred to the POW camp in the Ural mountains of the Soviet Union and was not released until 1955. The following year he joined the ranks of the West German Luftwaffe. He became commander of JG 71, the first fighter plane Luftwaffe squadron equipped with jet-powered fighter aircraft. He retired in 1970 and died on Sept. 20th 1993. Standard camouflage of Hartmann's "white 1" Luftwaffe fighter plane was complemented by a black tulip with white outline situated at the nose of the aircraft; this was at the time of his command of 4. Staffel. On the left side, underneath the cockpit, there was a heart with Hartmann's wife's name written over it. The yellow bottom parts of the wing tip and the yellow stripe around the back part of the fuselage marked the aircraft serving on the Eastern Front. " The Kit was terrific! Very little seam work was needed, in fact the seam work was not because of Kit issues, but my own Ham-handedness gluing it together. The only issues with the kit were a sunken area on the bottom behind the wing piece that needed to be filled and the canopy, which didn't fit really well. There was no detail on the cockpit sidewalls, nor in the wheel wells. I added my own detail in the wheel wells, but it didn't turn out quite the way I wanted, so that was disappointing. Eduard showed the mottles to be randomly shaped, and I wanted to avoid the appearance of "dots" -- I tried, but didn't quite achieve it, so that was a little disappointing too (but I was able to do it on this model's sister build here: https://www.britmodeller.com/forums/index.php?/topic/235075176-bf-109g-6-172-hasegawa-hemmo-leino/ ) This build is the first, and last time I've used Peddinghaus decals. They were absolutely terrible. The white was off register with the other colors, they were terribly thick and would not settle down with my strongest solvent and ultimately left terrible wrinkles just behind the propeller spinner that I had to cut out and paint black instead. They had a strange rubbery texture and were strangely pixelated like they were printed on a dot-matrix printer. Worst of all, the white was translucent so that the mottles under the white one were clearly visible. In the end I only used the Tulip and heart decals and had to raid my stash to find the right decals for the rest of the aircraft. I had to mask and paint the white "1" -- thank goodness it wasn't an "8" or something like that!! The spiral on the spinner was so terrible I had to paint it instead, which was extremely difficult. No WIP for this build. Finishing: Seam filling with Super Glue Paint; Mr. Surfacer Black 1500 primer > Mr. Color RLM 74/75/76 > Mr. Color RLM 70 (Propeller) > Hataka RLM 04 Decals: Peddinghaus Erich Hartmann I couldn't find good pictures of White 1, so I did minimum weathering. Masking for the white "1": A comparison of the terrible spiral decal and my hand-painted version: Thanks for looking! Comments, questions and constructive criticism welcomed!
 -
Bf-109G-6 | 1/72 | Hasegawa Ylikersantti (Staff Sgt.) Hemmo Leino | 1/HLeLv 34, Kymi, Finland, June 1944 Finished this one on 5/31/2020. It is one of a two-in-one Hasagawa "Finnish Aces" kit my wife gave me for Christmas. The G-14 in the kit became Erich Hartmann's "White 1" (https://www.britmodeller.com/forums/index.php?/topic/235075175-bf-109g-14-172-hasegawa-erich-hartmann-white-1/) From the Eduard instructions: "Hemmo Kulervo Leino was born at Helsinki on April 4th, 1921. He received flying training in 1939-41 at was posted on September 16th, 1941 to LLv 10 and on November 1st, 1941 further to LLv 30 flying with Fokker D.XXI. Leino was promoted to kersantti on March 6th, 1942 and transferred on August 1st, 1942 to LeLv 14, equipped with French MS.406. He was posted on April 19th, 1943 to LeLv 34. After the war Leino served in LeR 3 resigning from duty on May 15th, 1945. His civil occupation was an airline captain. During the war he flew 251 missions and shot down 11 enemy aircraft. The Finnish Bf 109G-6 painted in standard camouflage schemes of German Luftwaffe, accompanied by yellow elements, mark the aircraft from the Eastern Front; these aircraft bore national insignia on the upper surfaces of the wings 100 cm in diameter. On all G-6s the circle under the Finnish swastika was painted in RLM 65. From June 1944, HLeLv 34 aircraft bore painting of an eagle fledgling on the rudder. The left side image of the units badge is unknown, so we offer both variants." The Kit was terrific! Very little seam work was needed, in fact the seam work was not because of Kit issues, but my own Ham-handedness gluing it together. The only issues with the kit were a sunken area on the bottom behind the wing piece that needed to be filled and the canopy, which didn't fit really well. I trimmed it so it fit better, but not perfect and really couldn't do much more without removing some framing along the bottom. There was no detail on the cockpit sidewalls, nor in the wheel wells. I added my own detail in the wheel wells, but it didn't turn out quite the way I wanted, so that was disappointing. I was unhappy that the mottling on my Erich Hartmann build was still a little too "dotty", so I experimented with my airbrush a bit. The mottle shown in the Eduard instructions has distinct shapes and doesn't have a lot of overspray. I took my Iwata HP CS airbrush and removed the front most nozzle, which appears to be more of a needle guard, so I could get the opening just a couple millimeters from the surface. I thinned my paint more than usual and turned the compressor down to around 5 - 7 psi. It took some practice, but I was able to achieve it. I used after market masks to get the sawtooth pattern on the wings. No RFI for this build. Finishing: Seam filling with Super Glue Paint; Mr. Surfacer Black 1500 primer > Mr. Color RLM 74/75/76 > Mr. Color RLM 70 (Propeller) > Hataka RLM 04 Decals: Kit decals There are a couple of pictures of Hemmo Leino's MT-423, but not high enough quality to see the wear an weathering. I added some dust to the tires because the pictures showed it parked in a grassy airfield, and added a little mud splatter too. I found after I put the decals on, that I messed up the paint scheme in two ways. The one I could fix was the color around the canopy, which took some luck and skill to fix without messing up decals and keeping the demarcation between the green and blue correct. The second one I couldn't fix and was caused by Hasagawa's instructions being a little misleading. I'm not entirely sure they were correct anyway, so it may be doubly screwed up! I'm not going to point out where it is though.... Also, I am almost always a stickler for matching my source photos exactly, but the source photo for this aircraft showed the entire side covered in soot from the exhaust so that even the roundel was difficult to make out. After my hard work on the mottling, I couldn't bring myself to cover it up. Thanks for looking! Questions, comments and constructive criticism welcomed!
-
Joining with this Revell 1/72 Corsair, bought on a railtour to Penzance, on Mazey Day 2018 for £7. Those decals are for this aircraft - I want a less usual RN FAA 3-tone aircraft. XtraDecal X72142 Yanks with Roundels part 3. Here are the parts. and instructions Perusal of parts and instructions make me think that this kit is a beaut!
- 33 replies
-
- 12
-
-
 Hi all, Being encouraged by the recent kit release and a new-found generous local contact I have decided to kick-off a WIP of the above kit, setting this post as my placeholder. I had previously built a model of the subject (see below) but now, with the seemingly more accurate kit, I intend a second attempt. Over the next few days I'll set out some images of the sprues etc, although they are fairly well known now (I think). As I described in the above RFI, the machine was used as part of Operation Danto '88. This time round I have better evidence of the weapons load configuration and will make the most of what's available in the kit, and by drawing in other items from the aftermarket scene that are applicable. There isnt much yet but I think there is what I need. I haven't yet seen a build thread for this kit on BM (only an RFI) so it will be a voyage of discovery for me. The SMB2 is one of my all time favourite jets of the time. I have two more on the shelf ready to go at some point as French machines! Making use of the variety of underwing tanks etc that come with the kit. I'll be back soon with more ..... Martin
 -
Hi all, How about this? One of the earliest Night Fighters courtesy of Airfix's 1/72 scale model - To be built OOB but as I'm a glutton for punishment it'll be rigged whilst we're at it. Kind regards IanJ
-
Just noticed a new release of the AZ de Havilland Hornet F.3. Apparently not the Special Hobby reboxed. According to Hannants My question is which release has lugs for wings/tailplane? I want to depict hornets flown by Flight Lieutenant R. A. Harvey, and a Flight Lieutenant R. A. Harvey 41-Squadron,
-
Back when I was young and they were talkin... sorry, wrong thread Through my teens, my dad worked in a ship repair yard. He would often bring home interesting bits and bobs. One day he brought home a magazine I'd never seen or heard of before; Born in Battle - an English language mag produced in Israel. This very issue in fact: I was aware of Israel and the seemingly endless state of war that seemed to be going on (Yom Kippur and Entebbe both made a big impression when they were on the news), but hadn't made anything Middle Eastern at that point. That magazine changed all that. The IDF/AF was the new cool and I had a modelling theme that would last through the next 15 years at least. What to build though? I went into Newcastle, and climbed the stairs to the kit department of The Model Shop (on Blenheim Street, and if your going to be amodel shop, that's the address to have). I asked the bloke behind the counter for advice and came away with the Heller kit of the Ouragan. My first Israeli aircraft, my first kit from the very exotic (at the time) Heller, and my first solo purchase from a shop I spent a LOT of time in over the years that followed. There were many more Israeli aircraft over time (and a few Arab ones too, almost all Matchbox and Airfix MiGs) Forty years later, it's time for another go. The box has changed a little since that first time, although the picture is still the same Inside the fold up lid and ahhhhh, such memories There are three sprues rattling around in there which seems a lot for the modest parts count, but Heller have made good use of the space... Now THIS is a decal sheet A French line jet, Patrouille de France, Israeli and Indian air forces. I may need more than one of these. Let building commence. Andy
- 36 replies
-
- 10
-
-
Good Morning! I'm building the very nice Special Hobby Mirage F.1CR in 1/72, marked as one of the aircraft the visited Red Flag in 1990. The pictures that I've been able to find have a practice bomb dispenser on the centerline pylon. Photo Here: Also seen on this build in 1/48: Since I don't speak French and Armee de l'aire is not really my realm of expertise, can somebody point me the right direction as to what the dispenser is called, or where I can find some better images of it? I'll just scratch build it, but I need a bit more info that I can get out of those few distant photos. Cheers and thanks! Hoops
-
 Good Morning, Attached are the first few photos of my next work in progress, this is a bit of kit bash between these two kits and both are being built parallel. 20200105_134423 by J Hooper, on Flickr The fist subject will be a new F-15SA (Saudi Advanced), still being flown by Boeing for flight test and integration purposes. Inspiration for this build can be seen in the link below: https://www.thedrive.com/the-war-zone/21755/f-15sa-bristles-with-a-dozen-aim-120s-missiles-during-star-wars-canyon-run The second subject will be a Israeli Defense Force F-15D, it will be one of the aircraft seen recently at Waddington, but with a different load out: Flickr Image (not mine!) The Great Wall Hobby kit is a Strike Eagle out of the box, where as the Hasegawa kit is really an F-15D with some extra parts thrown in. The Hasegawa kit is still, good, but it shows it's lineage, and there are still some steps that need to be taken to make it an accurate Strike Eagle. For that reason I will take advantage of the kit's individual qualities, to make the best out of both.
 -
Here's a quick build, bit of stash busting and refresher while I wait for decals for something quite a bit bigger. AZ Models 1/72 Bf 109G-14 Wr.Nu.462919 "Weisse 7". I find the blotted out insignia and no frills scheme (no colourful ID or unit markings at all) to be quite menacing in its monotone. Erla mottling is quite hard to execute in this scale though, at least my wife likes it and calls it my "leopard print plane". Anyway, for a "quick and dirty" project I'm fairly pleased with the outcome, any tips are welcome 🙂 I would also like some colour feedback please. For some time my standard RLM 74/75/76 schemes have been done using Xtracrylix. But recently I have been questioning the amount of effort I put into getting good results brush painting them, and whether their RLM 74 looks too green. Now, without opening the usual can of worms on this, I wanted to use more generic paints and see how a standard scheme aircraft would look with more neutral greys, as these colours were often perceived especially from a distance. Final picture for comparison (both "White 7" by coincidence) is with a Tamiya G-6 finished in Xtracrylix. For this build, the main colours used are: RLM 74 - Humbrol 32 RLM 75 - Humbrol 27 RLM 76 - Revell Aqua 76 (a pleasant coincidence) Thank's for taking a look!
-
For the 'In the year that you were born' GB I started (but didn't finish in time) a Sea Vixen FAW2 of Simon's Sircus that displayed through 1968. At the end of the display season, Simon's Sircus displayed with the Phoenix Five, 5 Buccaneers from 809 Naval Air Squadron. For this build I plan to use Airfix's new Buccaneer to build an aircraft from the Phoenix Five to display alongside the now completed Sea Vixen. Decals will come from Model Alliance's Royal Navy Aerobatic Display Teams sheet. Made a start on the cockpit tub, using the Eduard etch.
-
Hi, One of my favourite airplane ever - Boeing 247. I do not know why? - simply I like her. I had a very long "decission process" - which markings should I do? Airpalne designed for civil use, but some of them were impossed into US Army as C-73, two were used in China, few were used in RCAF and single of RCAF came to RAF where served as a test bed for new constructions of airborne radars. This was DZ203 . There is a very nice book by Bob Shaw which describes whole story of DZ203 with all details. I read it a year ago. However I disagree with one interpretation of Author - I do not belive that from bottom she was yellow. There was year ago a discussion on this topic on BM WWII forum. There are opinions from past (1960.?) in which was said, that from bottom there was sky. For me also photos support concept of not-yellow bottom. A lack of serial on bottom sides of wings votes form me for sky underside. During her serving in UK airplane was at least once repainted during serious repair, when original engines were replaced by whole sets from Harvard - with cowling and two blades propellers in 1944. Anyway - I made her in initial markings (1942) for which a lot of photos are available. Comments and criticism welcome Regards Jerzy-Wojtek Edit - the link for colour discussion: http://www.britmodeller.com/forums/index.php?/topic/234935600-boeing-247d-colour-question/page-2#entry1972972
- 17 replies
-
- 12
-
-
- Boeing 247
- 1/72
- (and 1 more)
-
 The story starts at the Peterborough model show with this one. Ah, what memories, those were the days when we had real model shows to visit! I'm sure those times will return! I was rummaging through a box of old Matchbox kits & was spotted by a venerable member of the Mirage SIG handling the Mirage IIIB. The decision was made there & then, especially when the Mirage SIG leader is there next to me! So a random peice of artwork was chosen from his French Air Force bible full of profiles, "i'll build that one!" This is a Matchbox kit in 1/72. Rescibed a few but not all panel lines, some existing panel lines were OK. No cockpit present, so boxed up something with side consoles. The underside rear fairing was non existent so I used one of the kit options from the Heller kit & added an arrestor hook. The Heller kit thankfully has plenty of options which allowed me to build both this & the 5BA. Also thanks to Special Hobby for providing multiple options in their F1 kit. For the instrument displays employed artistic licence & scavenged some consoles from Special Hobby Mirage F1 kits along with the Mk.IV ejection seats. The tanks were from the Heller kit I used for the Belgian black anniversary 5BA kit. I think they're strengthening rods that appear under the cockpit, I added them with brass tube. As a couple of pitot tubes extend from the both of them I flattened the tubing & added wire to them to represent the pitot's. Also added blade aerials from plastic sheet & some old left over PE aerials from old kits. I added some extra scrap plastic to the undercarriage legs to represent a bit more detail & some extra details to the undercarriage bay doors. Paints; Ammo Mig - upper colours & Vallejo Metal Colour Aluminium undersides. All the decals were taken from the Model Art sheet 72-067 & used some color reference photos from the Osprey Aerospace book "Mirage! Dassault's Mach 2 Warriors". Squadron marking references I worked from, were EC 1/13 at Colmar under the assumption that the roundels & upper wing markings would be similar, & the decal sheet had everything I needed. Looking at the photos in the book, the paint on the fuel tanks had peeled off great deal & there was a fair bit of weathering. Really look forward to a new tool 1/72 Mirage IIIB which I believe is on the way, so I can use the rest of the decals from the sheet. Markings are for Dassault Mirage IIIB No.217 2-FT EC 02/02 at Côte-d'Or Dijon-Longvic Air Force Base 1983 So some of the older Matchbox kits are worth a go, especially if they are the only option. In hindsight I could have found a correct length & shaped nose cone from somewhere as the kit profile does look a little too short. A note of warning to anyone planning to build this kit, the jet intakes are way too thick & don't taper in at the front, so they had to be sanded & shaped so that the intake lips are nice & thin. Thanks for looking & have fun with the older kits! Martin
- 21 replies
-
- 40
-
-
- Mirage IIIB
- matchbox
- (and 1 more)
-
 Hello All, My next project is a Privateer. I'm using the Revell re-pop of the Matchbox kit. It's for a friend whose dad flew in one for the US Coastguard back in the 40s/50s, so there will be some light conversion to remove the armament. This will be a wheels-down desktop model (gonna need a bigger desk...), so I'm hoping to keep it simple and avoid AMS. For this post I'll kick off with the box, followed by the parts: Thanks for looking, Adrian
 -
Stormovik, Shturmovik or Sturmovik? Ive come across three different spellings on the www. Stalin, In a telegram to the directors of one of the troubled Sturmovik Il-2 plants ‘Our Red Army now needs Il-2 aircraft like the air it breathes, like the bread it eats.’ Over the course of the war, a total of between 31,000 and about 36,000 Il-2s were produced. The Il-2 was anything but advanced in its mixed wood-and-metal construction, which was relatively easy to manufacture in significant numbers using relatively unskilled workers. But for an aircraft, it was an amazing achievement. Among the Shturmovik’s most important assets were its strength and robustness in combat. The forward fuselage section — protecting the aircraft’s fuel system, radiators and crew station — was built entirely of armor plate. Thus, the Il-2 could, and often did, absorb extraordinary battle damage and survive to fight another day. The Build, Airfix series 2 kits. Having recently completed four of the latest Airfix had to offer in the 1/72 spitfire range I thought I would dig around in my stash and find my next challenge. So out came two Airfix Illyushin Stormovich (Series 2) kits. Finished as a post war Polish Air Force Aircraft. Poor fit between fuselage half’s and wing upper and lower sections required plenty of filling and scrapping, when attaching the wings to the fuselage the wings were too thin I could either align the tops or the bottoms with the fuselage join line and do my best on the opposite side, I went with aligning the top surfaces best I could and profiled the underside best I could, Undercarriage doors are simple profiled pieces with little detail or instructions how to locate. I struggled throughout the build and on more than one occasion I thought of stopping and putting them to one side, however as I progressed things looked better and in the end I’m pleased with the results. (but I wont build another!) Airfix box 'Stormovik'?
- 17 replies
-
- 11
-


.thumb.jpg.3d6eff3e2f6cc042679bca864bcb2b1a.jpg)