
Search the Community
Showing results for tags '1/72'.
-
Hello everyone Here is my first post in the RFI gallery on this forum. It's Academy PBY-5A Catalina in 1/72 scale. A fine model, not too accurate though . Still, It's my favorite of the flying boats, and I always wanted one on the shelf. Now i find that one is not enough The colors are my mix, using the Mk 1. eyeball to determine the right shade from the available pictures, taking into account the scorching pacific sun. It represents one of the early airframes, so I wanted to give the impression that she was in theatre a long time. Thanks for looking
- 32 replies
-
- 73
-

-
 I started this with all good intentions during the Float Planes GB last year but could not get into the groove to go on with it. I have now progress it and can start to see the finish line in sight. The scheme it will be finished in. I started by opening up the windows behind the main doors with templates supplied in the kit The interior went together without fuss And the rear modified windows were filler with Testors Clear cement. They have a brownish tinge after drying which is a bit disappointing The prop was next, the kit has a twin blade prop supplied but this aircraft has a Harzell three blade prop, so I dug a donor out of the spares and modified it as best I could and the almost finished product The float struts were next, the sets needed modifying by added an extra one one the 2 mains and the forward ones also needed rejigging (no pictures yet) I added some weing in the forward fuselage just in case ( even though it sits on long floats and buttoned it up It is headed to the paintshop to paint the roof and floats next
 -
 new version of Natter: http://www.modelforum.cz/viewtopic.php?f=598&t=93941#p1737724 http://www.hauler.cz/cs-cz/e-shop/1-72-plastikove-stavebnice-28/bachem-natter-22-23-1135#!prettyPhoto
 -
Hi everybody, Five weeks ago I started building a P2V-7 Neptune.While it had been om my project list since 1989 (when I bought the Hasegawa kits and the Falcon"glass" and P2V-5 conversion) it became reality now because of a chat with a fellow modeller here in Britmodeller. This chap was interested in, among other things, Argentine Navy markings for the grey/white P2V-7 neptunes... Since I had the same hankering I decided that I was going to crib together a decal sheet (a part of the project since the beginning since there are NO decal sheets for this subject) and share! However... the more I looked at pictures of the original the clearer it was that the Neptunes bought in 1977 had been painted in different fonts than the standard used in other aircraft. I ended up drawing an entire sheet from scratch, including the stencils in Spanish. Sorry for the intrusive watermarking. Some of my earlier work was plagiarized wholesale and sold without so much as a by your leave... Not contented with that I was publicly vilified by the ripoff artists for protesting the theft. He'll be doing 2-P-111 and I'll be doing 2-P-112 So we'll both end up with unique models No risk of getting to an exhibition/competition just to find out that there's at least one chap with exactly same model as your latest pride and joy! So now to the plastic! Hasegawas kit is 45 years old but fully buildable - it has better fit than any number of modern kits I could mention. It needs detailing though... and it has two errors that become very visible once pointed out (quoting Thommy Thomason - USN Aviation researcher and modeller extraordinaire). Nosewheel well is NOT centered and it is broader than the kit parts - however the nose geat itself is aligned with the fuselage centerline. https://tailhooktopics.blogspot.no/2014/02/hasagawa-p2v-neptune-kit.html So I widened the opening and added a 0.9 cm plastic strip on the port side to adjust the well opening So I went on to measuring and cutting the first bulkhead (back wall in the observer's compartment The pieces for the new wheel well Using part of the original wheel well was an easy way to keep the landing gear leg centered as per the original. Here's the wheel well getting "squared" Since the roof of the new wheel well is going to be the cockpit module floor I sanded the resin part very thin and then I glued plastic sheet to the bottom - making the glueing of the wheel well much simpler. I hate cyanoacrylate glue. The measuring wheel well notes: And here's the finished wheel well & observer compartment before detailing The big opening is the entry to the aircraft; the crawlway is visible just beyond. The grey plastic is what's left of the original part. Here's a view of the three modules together and the way I used to get them to stay in place: A view of the whell wel in place before detailing and being glued to its place (it is NOT glued in this photo)... ...and the observer's compartment After some light detailing: And the view from the front Finally this is what the "Works" looks like! Cheers, Moggy
- 49 replies
-
- 23
-
-

-
- Naval aviation
- 1/72
- (and 1 more)
-
Hello I have finished the 1/72 Zvezda Sukhoï Su-57 kit. I have chosen No 511 prototype as it has likely operated form Russian bases in Syria and I have found a couple of pictures of her. The build is easy as with every new aircraft kits form Zvezda. On the other hand there is nothing for the pixelated camouflage except a wrong scheme on the instruction sheet. So I used my Silhouette Portrait to make masks and get a better camouflage scheme. Both colors came from the Tamiya Lacquer Paint range and how I saw them on the available pictures.. Patrick
- 23 replies
-
- 45
-
-
Hi there I am calling this one done. The model portray’s Miss Lace sometime between the time when the port wing was replaced and the accident when the rudder and elevators were replaced. The yellow tail and blue wing chevron was painted by the end of January 1945. It had a major service after mission 41 when the Cheyanne tail was fitted. At this time the rudder and elevators were silver painted at this time. The weathering from the engines was lightly done with Tamiya Smoke. There is a build thread over on the WIP section. Here are the pictures. Regards Toby
- 17 replies
-
- 47
-
-
-
 So it seems resistance is useless or is it more a case of i have no will power? Either way i'm in. Here are my entries to the GB Macci's 202 & 205 all in one box with 3 examples of Ace pilots for each type. I will be doing one with smoke rings - gulp! - and one with blotches. I have had this kit in the stash for some time now, and this GB seems the perfect opportunity to build it/them. TFL, Cheers Greg
- 37 replies
-
- 18
-
-
To paraphrase a certain UK TV Quiz Show, "I have started so I might as well finish". Having posted the intro for my F-100F Wild Weasel, here is the follow-up build. I am hoping to use some elderly but as yet unopened tins of Xtracolour enamel on 3 kits simultaneously as it might make more sense, but we will see. After the events described in the intro to my F-100F build, it soon became apparent that although the concept worked, the Hun was too slow to work effectively with the supporting F-105D Thuds. It was therefore decided to convert the F-105F 2 seater as a replacement. Like the F-100F this had been built as a trainer but retaining limited combat capability, but now 7 of them were initially given the same AN/APR25 or 26 scanning system and IL-133 as previously fitted to the Hun, under a program known as Wild Weasel III, WW I having been the F-100F and WW II an experimental fit to a pair of F-105D. Technically, this resulted in the EF-105F though it was seldom called that it seems. A further 6 were given extra electronics including an AE-100 terminal homing system. 5 planes with 8 crews were sent to the Thai AF base at Korat in May 1966, and after a period of working up they went operational at the start of June. Unlike the F-100F which could only mark the target with rockets, the F-105F could carry bombs and Shrike ARM as well together with its built in Vulcan cannon, and speed wise was a match for the F-105D that followed it in. From July 1966 they replaced the F-100F and numbers steadily increased. Various improvements were made to the electronic fit, including underwing jamming pods but these reduced the armament and therefore were not considered ideal. Also the AGM -45A Shrike was not a particularly good weapon as it had short range, and the enemy soon learned to turn off their radar when attacked, which caused the missile to lose lock. Even when it did hit, the small warhead did minimal damage except to the radar dish which could quickly be replaced. Modifications were therefore made to allow the carriage of the much larger AGM-78A “Standard” missile. This had longer range, a bigger warhead, and limited ability to remember the target location even when the radar was switched off. More during the build on how the F-105F became the ultimate F-105G. Cheers Pete
-
 Found this box while rummaging through the big box-o-boxes on the attic. It was awhile ago I built a Mustang, so it was about time. The kit has options for two USAAF and one RAF machine in desert livery. Since I was hoping to build a desert Kittyhawk I opted for an American plane here. Obligatory sprue shots: Quite some cleaning will be needed and detail is often a bit rough. The wheels are horrible (mouldibg gone bad or bad moulds?) but fortunately the box also contains a set of nice resin, including wheels: Unfortunately the resin cockpit is a tad doffocult to assemble, no obvious location marks and the instructions only have an exploded view. I assembled the plastic parts to get an idea of what goes where. The photo doesn’t gove enough credit to the details: especially the radios/ gear behind the seat are wonderful. I might have to find an open vac-form canopy to display this. I only have B/D canopies though. That is how far I’ve gotten. Also considering acquiring some aftermarket guns and exhausts (they are crude), but we’ll see how happy I am with the model at that point - that is, whether it deserves them or not.
 -
Hey Folks, Started another build (my fourth simultaneous). Sorry for no pictures of the cockpit, was too involved with the others. If I do anything special to a cockpit during a build, I promise pictures. I picked the kit up on Amazon when the price lowered. It was described as 'new'. When it arrived, every single bag inside was opened. Fortunately, everything was o.k. It was a lot of work trying to keep all the details on the fuselage in front of the canopy. Kudos to all who have built a corsair. It is something to consider before building one, which I wasn't aware of. I don't think I should have taken on the challenge yet, my scribing skills are poor. Plus, this is the first time I have used my new red putty and the whole thing looked a mess. I thought it was going to end up on the shelf of doom, until I put a coat of white primer on. Not too shabby looking after the primer. Actually I'm really happy with it so far and the build will proceed!
-
Hello everyone, Here's the lovely kit by Hasegawa. One of the early twin engine night fighters. I didn't the install the gondola it's much prettier without it. I did check references to see if this was a version and luckily it was. It's always difficult to get details to pop without it looking unrealistic. I spent more time with this in mind than I care to remember. But as always a really nice kit to build. Please excuse the poor photo's. Comments and thoughts always welcome.
-
 Hi, here goes another bird in 1/72. This time the beautiful Mosquito. Not the best kit from Tamiya, in particular the fit at the back of the engines with the wings and the connection between wings and fuselage, but at the end it looks OK. I've spent sometime with the paint job and trying to do some subtle weathering. At the end I've enjoined the built so much that decided to get the amazing 1/32 scale version from Tamiya that I'm planning to build in the near future. Cheers, Jorge
- 31 replies
-
- 61
-
-
The Supermarine Spitfire requires no introduction. In my opinion, together with the Messerschmitt Bf 109 and the Mitsubishi A6M "Zero", is probably the most famous and recognisable plane of WW2, and certainly the most beloved one. I'm presenting the Mk. IXe variant. The Kit from Eduard is fantastic with great fit and detail for the scale probably one of the best I've done and I totally recommend it!. As you can see in some photos the canopy is broken on the starboard but I have already contacted Eduard and they've organised a replacement which is on its way. I'll take that opportunity to replace the antena which looks a bit out of scale. PL124, No. 312 Squadron RAF, B-10 Airfield Plumetôt, France, June 1944 Czechoslovak pilots flew the Spitfire Mk.IXe for the first time during the Normandy landings. Czechoslovak RAF squadrons were re-armed with low-altitude Merlin 66 Spitfires because these had underwing bomb racks and were more suitable for operations over the Normandy beachhead. The first unit to get the new Spitfires within No. 134 Wing was No. 312 Squadron, which received the aircraft on June 11th, 1944. The E-type wing Spitfires served with the wing till July 3rd, 1944 when the F and HF.IXc machines arrived and the LF Mk.IXe were passed on to other units. Photos of PL124 show that the quick identification black & white bands were not fully painted on the fuselage. The black stripes are missing. Note the dark, probably blue, rudder tip.
- 23 replies
-
- 57
-
-
Hi all, hope it's ok to join in with this that I have just pulled from the loft. Will build straight from the box but use a set of Hi Decals that I must've purchased along the way. I quite like the look of this egg beater, I assume the west equivalent was the Wessex? Cheers 20200630_191826 by bryn robinson, on Flickr 20200630_191908 by bryn robinson, on Flickr 20200630_191917 by bryn robinson, on Flickr
-
(510x640)-Copy(95x120).thumb.jpg.33073138e01aa81779639a845926753e.jpg) Legend* has it that in 1944 a small group of daring men flew a specialised version of the Mk.IX prepared for operations in the High North of Canada. These Spitfires were sent there to patrol the Arctic area, in search of U-boats hiding out or supplying weather stations for the Kriegsmarine. Painted white, with extra oil heaters, electric cabin heating and numerous other measures to help deal with the extreme cold, these aircraft became known as Arctic Patrol/Fighters: APR.IX. Very little documentation exists, mostly for reasons of security. Spitfire APR.IX, serial MK914 as flown during the spring of 1944. The cowling was replaced after the electric heater failed and burned a hole in the original one. *) Yes of course it's a bit of fun, the sharp-eyed among you will undoubtedly make the link due to the code letters and serial. This build was inspired by being bored, and done over a week's time after reading this well-written and very thorougly prepared backstory. Code letters and serials courtesy of leftover Kitsworld and XtraDecal sheets, painted in VMA white & Azure blue (spinner).
Legend* has it that in 1944 a small group of daring men flew a specialised version of the Mk.IX prepared for operations in the High North of Canada. These Spitfires were sent there to patrol the Arctic area, in search of U-boats hiding out or supplying weather stations for the Kriegsmarine. Painted white, with extra oil heaters, electric cabin heating and numerous other measures to help deal with the extreme cold, these aircraft became known as Arctic Patrol/Fighters: APR.IX. Very little documentation exists, mostly for reasons of security. Spitfire APR.IX, serial MK914 as flown during the spring of 1944. The cowling was replaced after the electric heater failed and burned a hole in the original one. *) Yes of course it's a bit of fun, the sharp-eyed among you will undoubtedly make the link due to the code letters and serial. This build was inspired by being bored, and done over a week's time after reading this well-written and very thorougly prepared backstory. Code letters and serials courtesy of leftover Kitsworld and XtraDecal sheets, painted in VMA white & Azure blue (spinner).- 17 replies
-
- 43
-
-

-
 I have LOADS of subjects for this GB, don't know where to start. I think I'll start, hopefully, with an easy one, Airfix's Wellington Mk 1 in 37 Sqn markings, part of a detachment to Greece in March 1941. Using the Plastic Planet Club's decals, don't know yet which one but they're both in Dark Green/Dark Earth over Black. Should be straightforward. Already decided to use Airfix's method of not using all the interior parts, I'm firmly in the 'if you can't see it, it's not going in' club. I have the GR.VIII boxing as well which has markings for a 'Desert Scheme' one as well.... and a Trumpeter Mk X with Xtradecals for Desert ones also.... mmm. I have kits to do the Maryland and a Blenheim Mk 1 from this sheet as well, we'll see how it goes. Davey.
- 50 replies
-
- 12
-
-
Great little Tamiya kit with excellent fit but without much surface detail, so I've added the rivets. Cheers, Jorge
- 13 replies
-
- 31
-
-
It appears that Roden are to release the B type bus as the pigeon loft version kit no. 737. Markings for B2125 (1918) & B2132 (1916). Link to images...... https://shop.1-72depot.com/miniatures/1-72/vehicles-1-72/roden/roden-737-type-b-bus-pigeon-loft/
-
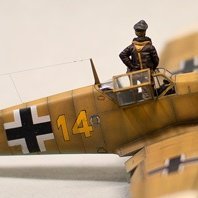
 Bf-109E-3 | Hasegawa | 1/72 Lt. Waldemar Wubke, Germany, 9/JG54 Finished this on 9/27/2020. This was a pretty straightforward build of the early 90's Hasegawa Bf-109E-3. I chose Waldemar Wubke's aircraft because I love the impromptu camouflage stripes applied at the unit level. Other units at that time had "X's and other different schemes to break up the light blue on the sides of the aircraft. The kit was pretty basic, so even taking my time the build was only about one week. The decals didn't look very sharp, so I only used the stencils and the "11". The rest of the decals came from the spares. Once on the aircraft the decals actually looked better, so I probably could've used them all. This kit was not as detailed or easy to put together as the Tamiya one I did a couple of months ago, but it was still a fairly stress-free build. In terms of external detail, it looks about the same as the Tamiya. The only frustrating part was the landing gears: the holes for the gears were oversized and they weren't keyed, so you could rotate the gear and get it misaligned (which is what ended up happening). Also, the wheel wells were enclosed, but still didn't have detail in them. Since this was early war, I did a minimum of weathering on the paint and a minimum of wear on the aircraft. I wanted the exhaust to be lighter colored (assuming the engine wasn't as worn) so I used Tamiya smoke. It turned out OK, but I'm not a real fan of the smoke paint . Paints: Decanted Mr. Surfacer 1500 Black > Hataka RLM 02/71/65 > Mr. Color GX113 dull coat Decals: A mix of different kits > stencils and numbers are kit decals Aftermarket: Eduard steel seat belts > SBS wheels Thanks for looking! Questions, comments and constructive criticism always welcomed.
 -
This is my first build on the current MTO GB. Built OOB with decals by Plastic Planet Club decals. Vallejo ModelAir paints airbrushed throughout. 'Klear' gloss coat with 'Galeria' matt varnish airbrushed on. A stress free build like all of the new tool Airfix I have done lately, I left out most of the internals as you can't see much through the glazing. I resisted doing much in the way of weathering as usual with my models. The decals were very thin and worked well, I only broke one of the fuselage roundels due to my cack-handedness! Comments and criticism welcome. Davey.
-
I had a whole stack prepared, but I’ve mislaid them on the attic. At least I found this one, the Arma Hobby Hurricane Mk. I which has gotten so much praise. The box shows a No 303 squadron plane, which I well may end up building. The other option is from No 1 Squadron RCAF, which also may be eligible. Correction: V6605 of No 1 is definitely eligible; it flew during the whole Battle, both while borrowed to 303rd and again while in Canadian hands whoclaimed two EA, one Me-110 on Oct 5th and one Dornier on Sep 15th. It later crashed in September 1941, killing pilot Edward Locke during training. Edit: I am building the Canadian AC. I also dug up some gunsights, not sure yet if they are appropriate, but I certainly hope so because they been collecting plenty of dust till now.
- 28 replies
-
- 16
-
-
Harrier GR3, XZ967 D “Donatello” 1473 Flight, Belize 1993. Built for the Helicopter, Autogyro and STOVL group build. Airfix 1/72, Freightdog resin tail fin, Pavla jet nozzles, CMK seat, Master pitot and AOA sensor, Brengun PE boarding ladder, decals from Xtradecal set X72186. My first attempt at airbrushing a disruptive camouflage scheme using blue tack worms. True to form I picked a nice easy subject, wrap around and with a complex area around the jet nozzles! I was attracted to this aircraft as Donatello was my daughter’s favourite Teenage Mutant Ninja Turtle, and here he is on the tail: Thanks for looking. AW
- 12 replies
-
- 47
-
-
Hello Everyone, The build is a MIG29SMT built into an Indian Air Force MIG29UPG taking off on a Wet Runway with Glowing Afterburners. The kit used is a Trumpeter MIG29SMT in 1/72 size. Most of the work done was on making the Flame look realistic enough. The flame is Clear Resin and is lit by using 2 White LEDs housed in the exhaust cans. The model is painted using the bare basic techniques of preshading and light coats of grey color to make this an IAF grey machine. Paints used were acrylics. This was a first trial run to make the Afterburner Flames, so I hope this becomes a step in producing more of such models. Do Enjoy the Build. . . Cheers . . . . 🙂
- 19 replies
-
- 55
-
-
-
Hello Everyone. . . A Mig-29SMT from trumpeter in 1/72 scale. I had built this model a while back. Now I decided to put this on a base, thus the Snow Diorama. This was my first time doing a diorama, its a small one where I just had to build a Base and merely modifying the MIG I built. The modifications are : 1. Missile covers done by Paper. For the R27s and the RVVs, the paper was rolled into a cone and superglued to the missile. Thereafter it was sanded to the desired shape. For the R73s a small square was cut and just pushed on the Nose of the missile giving the shape of a cover. This looked descent enough to pass by in this scale. These were painted red finally. 2. The Engine intake cover, Upper intake cover and the engine exhaust covers are all done by this plastic sheet. I used a ball pen to get the required embossed effect on these covers. For the upper intakes the walk area was marked by using tamiya masking tape. 3. The pitot cover was done using paper again and the string was a sewing thread. 4. Wheel chocks were taken from the Zvezda Kit. All the weapons, chocks, covers are detachable and are just press fit to the aircraft. For the snow I used Cotton and Baking Soda. I hope You guys Like it. Do lemme know for all your suggestions and opinions so I improve in the Future. For the video, the initial bit is the making of the base. You can JUMP to 05:30 for the Aircraft assembly. Enjoy and Cheers . . . . 😉
- 18 replies
-
- 61
-
-
-
Oh, what the heck! Whilst I wait for some decs to dry for another GB I might as well set up my 2nd build. Years ago I built the Hasegawa F-100D and F-105D, but I have always fancied a Wild Weasel version and now I have a pair of Trumpeter kits released a few years back. As this was perhaps the first true Weasel, then I will deal with it first, with my usual tedious informative background story on the F-100 aka the "Hun" - presumably an abbreviation for hundred? The shooting down of Gary Powers' U2 over Russia in 1960 by a SA-2 Guideline AA missile came as a major shock to the Americans. Even so, when batteries of SA-2 were spotted in North Vietnam in early 1965, the American advisers felt that the Russians were simply keeping their client state happy, and would never authorise their actual use against the Americans, or so the Osprey Combat Aircraft book on the F-100 relates – unfortunately the advisors were wrong! On July 24th 1965 “Leopard” flight of 4 F-4C were on a Combat Air Patrol over the North when their accompanying RB-66C spotted a missile launch and tried to warn them, but for some reason they had switched their radios from the Guard frequency. One of the Phantoms was shot down and the other 3 badly damaged – the air war over Vietnam had just become a lot more dangerous. On July 27th the Americans tried to take their revenge by sending 48 F-105 (aka Thuds) out on operation “Spring High” to attack 2 SAM sites their Recce aircraft had spotted. However, when they arrived they found that the missiles had been moved and flak traps set up – it cost 5 Thuds! Clearly something had to be done. As a first “emergency” step they decided to convert a batch of 2 seat F-100F in what was known as “Modification 1778”, later code named Operation Mongoose, but later changed to Wild Weasel. This involved removing the Doppler navigation equipment and a few other boxes and installing what was then called Vector IV, later AN/APR 25 warning receivers and an IR-133 panoramic receiver and the first four aircraft including the one I am modelling were converted in 10 days. Others followed including a later batch wired for Shrike ARM, but the early ones had to make do with LAU-3 pods containing 2.75”target marking rockets and their built in 20mm cannon, reduced from 4 to 2. The idea was for them to find the SAM radar and mark it for a follow-up strike by Thuds. The F-100F did not have space onboard for jammers, unlike the F-105G I will also be modelling, but could carry them under the wings at the expense of offensive armament and they also interfered with the onboard scanners, so were seldom used although Trumpeter appear to have included them in the kit instead of LAU-3!. More on that during the build. Info from various Osprey books on the F-100 in Vietnam and the duel with the SA-2 missiles. More once the build starts. Pete


Wedge-TailedEaglePortraitRaptorDomains.thumb.jpg.41a306d3445a68f0f2df773e01776ea6.jpg)