Search the Community
Showing results for tags '1/6'.
Found 23 results
-
I’m probably going to scratch some 1/28 airplanes as my Fokker DR1 is lookin awfully lonesome but I thought I’d start the ball rolling with two Daleks. Yes I actually went and bought the plans from projectDalek ( I wonder if they’re evil plans, hmmm) An Emperor and a drone both in 1/6 scale… More to follow
-

Honda Monkey Bike 2000 Anniversary Edition
Derek A posted a topic in Ready For Inspection - Vehicles
A truly fun build, Tamiya at their best!- 5 replies
-
- 10
-

-
- Honda
- Monkey Bike
- (and 1 more)
-
.thumb.jpeg.fcf185ed9c8c199cd9714bb7d9816b09.jpeg) Hi. This is my Red Special, the guittar of Brian May, by Queen. I realy a fan of the Queen since 12 or 13 years age (I'm 48 today). The body and arm was build with balsa wood, the strings with sewing thread, and bottons, shield and other parts was scratch with plastics, paper and wire. Built under Queen's songs, to inspirate me.
Hi. This is my Red Special, the guittar of Brian May, by Queen. I realy a fan of the Queen since 12 or 13 years age (I'm 48 today). The body and arm was build with balsa wood, the strings with sewing thread, and bottons, shield and other parts was scratch with plastics, paper and wire. Built under Queen's songs, to inspirate me.- 4 replies
-
- 12
-
-
- 1/6
- Brian May Guittar
- (and 1 more)
-
Hi folks, I've been messing around not doing much recently - we had our club compo and the requisite rush to get something finished, then the model railway show, and then the PS4 came out. Plus Micky talked me into doing the couch to 5K running thing (4.9K as of today ) which has been taking up some of my spare time. Anyway... I popped into my local model shop the other day for no particular reason and came out with a couple of vinyl figure kits (half price!). I bought a Halcyon Judge Anderson off eBay earlier this year and was hoping to try something a little less precious as my first vinyl kit. I ended up with "Iria" and "Sara" - both by Elfin. It took quite a bit of searching to discover that Iria is from the Japanese sci-fi movie "Zeiram" and is a re-cast of a Takeya Takayuki sculpt which was produced as both resin and vinyl kits at the end of the '90s. I wasn't able to discover the provenance of Sara - she's the chainmail-clad (unclad?) barbarian lady built by Kallisiti in the big scale group build last year. So she might not be a recast. So I'm on questionable moral ground, but since I bought old stock I doubt I'm doing Elfin any favours and not building it or throwing it away on a point of principle seems dumb. I hope no-one is offended by this. With that out of the way, I trimmed the vinyl parts with a scalpel after heating them in hot water. A bit scary to start with and I did manage to draw some blood, but it's quite fun once you get into the swing of it. Fit seemed pretty good, but not perfect - I reshaped a few parts, again with heat, to get better connections. So far I've built up her legs with a thin brass rod running up each one, and packed the ankles and a small area above the knees with Miliput to locate the wire and allow it to support the vinyl. I was a bit wary of the "fill with plaster" method plus I don't have any plaster on hand. I used Araldite to stick things together, and held them with masking tape while the glue went off. Seems OK so far! The smaller joins like the rear hair part to the head were done with thick superglue. I'm thinking that I'd like to build Iria as a Fremen - maybe Chani, maybe someone else like Harah? I think the suit is close enough to a stillsuit that it would work as-is with the right paint job, and the connection would be made by some suitable scratchbuilt accessories - nose tube, maybe a maker hook, or Gurney Halleck's pistol which is seriously cool. I do need to decide which head to use though - the kit has two heads, one built into Iria's cloak, and one to use without: I think the high forehead of the cloaked head is better, but the cloak is a bit too big. I do like that it disguises the rather coquettish pose which seems to be intended to balance the ridiculous gun she comes with as well as provide some additional curviness. I think maybe cutting out the front panel of the cloak would be the best of both worlds? Be interested to hear what people thing. Also, should I add blue LEDs behind the eyes for that inner glow, or just paint them? The brass rods would make excellent wiring Cheers, Will
-
thanks for the helpful response. I got photo uploaded using imgur
-
Hi guys, been hard at it this last week burning the midnight oil to get this glam rocker done. I left the front mudguard in the packaging until I needed it and was amazing to find that it was a real metal item that had been chromed, I think it was done to keep the front forks straight. I noticed that the front brake caliper was missing the metal pipe that ran from the caliper to the brake hose, I made this from a piece of silver solder which was easily bent into shape to go round the back of the fork leg and I added the brake bleed nipple as I felt at this scale these items needed to be added. Also I have included pictures of the building instructions to show how intricate Tamiya made this kit. I hope you enjoy this blast down the 70's bike era.
- 32 replies
-
- 19
-
-
I bought this kit from a model shop in Beijing about 6 years ago, but never had the courage to build it. However after cutting my teeth on the last two Tamiya bike builds I thought I would crack on with it, I plan to paint it in the candy gold colour. I found the engine side covers were in a chrome finish, but they should be a polished alloy, so I have buffed them with a Flory polishing stick and I will give them an oil wash to dull them down a touch. I should crack on with the build with this 70's glam rocker over the weekend.
-
I've been looking for this kit for 2 years. Finally got an unstarted kit off eBay a few months back. My plan was to paint it in the alternative colour that was daytona orange, all freehand airbrushed and the red pin stripes to be masked and airbrushed on. Am I up to the challenge? Well, let's find out. First problem was Tamiya had cocked up the tank badge location, the tank badges should sit in a recessed circle just like the tail unit, well that was soon modified and I got the paintwork underway. More to come.
- 21 replies
-
- 10
-
-

-
 Info on Mister Bones: http://starwars.wikia.com/wiki/Mister_Bones So after purchasing the ATM kit the Madmonk put on to the Mister Bones character from the Star Wars Aftermath books, so the plan is to make this guy from the ATM kit, should be fun. This is about the best representation of him that i can find and what i will be working from.
 -
I've always liked the large scale kits and this is a beauty! Very satisfying to build, but hey, it's Tamiya!
-
Hi There! I would like to post up this build, done by my Wife Lisa,this is Her third Tamiya 'Big Bike', and the first one on which She has done all the work Herself (incuding Airbrushing), with just a little sideline 'chirping in' from Me, Paint used were Tamiya acrylics and de-canted Halfords cans for the coulour and lacquer:- ...and Her two other buils, a Honda Monkey Bike and a Harley Lowboy:- ......She's now got Her eye on My Pocher Alfa Spider......... Thanks for looking in! Cheers, Pete and Lisa P.S. Pete was very patient and sometimes a little frustrated but a brilliant tutor!! Lisa x
-
Hi all After a few drinks on Sunday I ordered an old AMT 1/6 battle droid and STAP kit, it was under £20 so its not to bad. After thinking about it for a bit I quit like the idea of the battle droid on my desk at work, the STAP will go in the kit bash box.To display the droid he needs a blaster though and I dont think he comes with one, so my question is, Is there a 1/6 blaster that would work or a 1/6 scale real world gun that I could mod? I really dont want to scratch build one ( im not anywhere near that good) Thanks for any help. Brian PS. I have seen the sideshow blaster on ebay and that out of the question at that price.
-
 Hi all, well I have given these bad boys a winter service and they are in hibernation until the spring. "Let the good times roll" LOL! Having completed all three of these builds, I thought it would be cool to see them all together, enjoy the photos.
 -
Hi all, this is the final reveal of the 1/6 Tamiya Honda CB1100R. I found that it was easier to bolt the bike onto the checker plate base that I had made for the Honda CX500 Turbo as it was a fiddle to work on without a center stand. I hope you all enjoy the pictures of this classic 80's muscle bike.
-
This is the final reveal of the 1982 Honda CX500 Turbo complete with its own bike show stand. I used some actual aluminium checker plate from an RC car model shop and I mounted it onto a wooden pallet which I picked up from my local Hobbycraft for a few pounds. I then wired up the lighting rig and the sign boards and powered it with a 9 volt power supply. This was a great kit to build, I had a real blast! I hope you enjoy the ride. Also if you want to see my work in progress of this build click the link below.
- 22 replies
-
- 6
-
-
- Honda CX500 Turbo
- 1/6
- (and 1 more)
-
With the conclusion of the Honda CX500 Turbo build, I thought I would see if I could cram in another Tamiya bike. It will probably be a few weeks before I do much with the kit, but I will post some work in progress whenever I get the time to work on it. I have a second lighting kit which I may fit to the bike but nothing is set in stone as of yet. I've been meaning to build this kit for some time, so I think now would be a good enough excuse. So lets get cracking!
-
I picked this vinyl kit up very cheap off eBay, it had slight damage to the right hand foot plate on the wing, but it was an easy fix. I decided to try fixing a clear acrylic rod to the model. I used my heat gun to bend it and covered it in melted hot glue to add strength and give the impression of a smoke trail, then I added flickering LED's to bring it to life. I need to get a Spiderman figure to do battle with LOL.
-
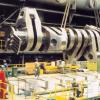
The Honda CX500 Turbo was the world's first mass production turbocharged motorcycle and the world's first electronic fuel injected bike to be put into mass production. It was superseded in the first year of production by the CX650 Turbo, this only stayed in production for a further 12 months. It was the era of corporate flexing of technological muscles in an effort to outsell their competitors. All of the Japanese bike manufacturers dabbled in turbo technology but it was ultimately a dead end but it made good marketing. Continuing with the build on this bike, I decided that this kit was showing its age, the plated parts looked dated, I stripped the cylinder heads, rear swing arm, clutch cover and oil filter housing with Oven Pride cleaning gel. I primed them with Mr Surfacer 1000 grey primer, I then sprayed them with Vallejo Duraluminium and Vallejo Chrome that worked more like aluminium. The frame and other black parts I painted with automotive base coat black acrylic. Then I used a 2K clear coat for gloss finishes and a 2K matt for satin finishes, like on the engine parts etc.
-
This was my first vinyl kit, I picked it up last year off eBay for a very cheap price as there was a few parts missing. It was based on the Predator 2 figure however I decided I wanted to build it as a classic Predator from the first movie so I scratched built the shoulder plasma cannon from old aircraft bits and beefed up his spear. I also added some old number 11 scalpel blades that I made into his arm blades and then I added some LED and SMD lighting into his laser sight helmet unit and his left forearm electronic panel. I then made a small swamp like diorama out of some foliage that I picked up off eBay and made the roots and tree branches out of hot glue gun sticks and melted hot glue strands to make the root system and the final coat of outdoor varnish to give it a wet look. It was an interesting build, I primed the vinyl with grey Stynylrez which covered the vinyl really well. I then used various Vallejo paints to give the effect. The trickiest job was hand painting all of the netting on the body suit. I hope you enjoy all of the pictures!
-
Hi folks, I've been a bit low on mojo lately - nothing done this last month owing to an upcoming move - so this GB is well-timed to hopefully help me do something about it! I saw Moon in the cinema when it came out - a great low-budget British sci-fi film with perhaps the best Kubrickian set design since, well, 2001. One of the key characters is a "robotic "assist" called Gerty - sort of a mobile, non-psychotic HAL - voiced by Kevin Spacey. Gerty (and most of the rest of the film) was designed by Gavin Rothery and the full-size prop was built by Steve Howarth. Steve also made a 1/6 version to cast and offer as a kit, and when I found out it existed I had to get one. http://www.modelermagic.com/?p=60917 A hundred quid (plus P&P) later and I had a box jam-packed with heavy resin. So not a cheap kit, but for what it is (a short run garage kit) it's really good value - lots of big, nicely-cast resin, pre-wired PCBs with LEDs for lighting the screen and worklights, metal pipes, transparencies for the screen, decals, post-it notes, etc. etc. The tricky bit is that Gerty runs through Sarang moonbase in a ceiling track system, so there's no way to stand him up. I'll either need to build a gibbet to suspend him from, or more likely a chunk of the base. I did some sketches for the latter and worked out sizes, and it's going to be, well, huge! Still, that makes more space for wacky ideas like OLED screens, audio, servos, etc. etc. Not sure how many (if any) of these will actually happen but you never know - the GB time is quite long and there's scope to do some cool stuff. If only we weren't moving in the middle of it! Cheers, Will
-
Hi all, I've always liked the old .303 - we had one down the gun club, and at 25 yards you could make one ragged hole in the target with five rounds. I even bought some vintage ammo, dug out of a container sealed in 1951, which was green all over with verdigris. Still went bang most satisfactorily though... After my long winded Attacker, I fancied something quick to follow up. I went to the stash and dug out the Dragon 1/6 Lee Enfield No4 rifle, as I'd recently bought a Lifecolor Guns and Weapons paint set and was keen to try it out. In the end, all I used was the dark wood colour for the stock, as all the metallics looked like shiny silver to me, and that's not what I was going for on this build. The wood effect was done with oils, the metallic parts are Tamiya NATO Black given a rub over to bring up the sheen. Hope you like it. I was quite pleased with how the wood grain turned out: The bolt does actually work, but it'll only scratch the paint if I do, so I'll leave it cocked and loaded: It comes with a couple of magazines and loads of spare ammo clips. I just did two: Now, what's next...? Dean
-
Never thought this would happen, as Tamiya seem to have been happy to re-release their back catalogue of big bikes, but HLJ have pictures of what they claim is a new-tool 1/6 Fat Boy: http://www.hlj.com/product/tam16041 OK, so it's another Harley and there are a lot of those from several manufacturers already (including Tamiya) but still, FWIW I built one of the older 1/6 scale kits and it was great - didn't exactly fall together though, so the thought of building one with modern Tamiya engineering is prettty compelling. I think I know what I want for Christmas I hope this means they're planning to make some others - the new one is 16041 and that leaves a gap in the numbering I think? Will PS: Apologies if this has been posted elsewhere, but I didn't spot it.
-
Hi folks, A bit late to the party because I wanted to be sure my Swedish GB entry got done (amazingly, it did!) but I really want to build this in company: I'm totally clueless about bikes, both model and real, but I figure I can ask questions if I get stuck. It helps that nice Mr. Tamiya explains what all the parts are, so I can say "I need to strip the paint off the cylinder head" or whatever rather than refer to it as "that bit with the fins". So far I've mostly cleaned up one of the frame halves - it took about an hour of scraping because the mould wasn't perfectly aligned, I still need to do the other and round it off with sandpaper again. I think I'll maybe add a bit of putty to the welds since they seem to be a bit cleaner than pics of the real one I found. Oh, and does anyone know if the thicker tube on the lower front of the frames is just that - tube - or if it's castings? I don't want to remove the mould line if it represents a real one. Exciting stuff. I can't wait to open the "cool bag" with all the rods and springs and things in it Will