Search the Community
Showing results for tags '1/48th'.
-
Just wandering through the forum and came across this GB, what a great idea Seems like an ideal time to finish off the lightning I started in the Trainers GB which failed at the end due to a missing part 🙄 I've got a Peugot 206 WRC to finish, then the Lightning should be a good project over Christmas to finish off Just got to remember where I put it safe now 🤔 Shouldn't be too hard as it's not small Ian
-
I didn't expect to finish this one, this side of New Year. It's the hopefully soon to be re-issued 1/48th Javelin. I had bought it when it first came out but put it to one side as it was just too big. Then last year I built a couple of F-102s, an F-101 and an F-106 so what was I scared of? Well the length is fine but it still has an enormous wing span. I normally use the pound coin to show how small my 1/144th stuff is but it seemed appropriate. It went together like a dream and all I added were some belts and a pair of Master pitots. Well worth the money IMHO. I also used a set of markings for a 5 Squadron machine from Xtradecals. Still not sure I'll build another due to the size and anyway there are sooooo many Hunters I want to build. Thanks for looking.
- 21 replies
-
- 55
-

-

-
- Xtradecals
- Airfi
- (and 1 more)
-
This is a bit special for me, the kit is a gift from my 13 year old son for Fathers Day. He dragged his mother off to our LHS and chose and paid for it himself. Mum suggested cheaper kits but he said that "he knew what Dad likes" It is the current Airfix kit with added seat belts and decals from the stash. It represents one of 485 Squadrons non presentation marked machines as I had no tiny letters suitable. Most of the early machines were so marked and were Dark Green/Dark Earth so this is a bit of a compromise on my part. He's never been interested in modelling, unlike his big sister, but recently he's built VW Beetle and has another Tamiya vehicle to build. Thanks for looking
-
This was part of a branch group build amongst a small bunch of friends. I've already built one of these kits as a fighter and after issues with the canopy I came up with the idea that attaching the glasswork to the fuselage halves before assembling the fuselage would be the best way forward. As it stands of the three kits in the branch build, one id in the bin one languishes on the shelf of doom but mine is finished. I wanted to build a bomber for which the parts are already in the kit. I've always prefered the short nose Blenheim since being bought one by my uncle at the 1964 Finningley Air Show. A fabulous end to a fabulous day for a young lad. The Frog kit has a different scale to the Airfix ones I had built ( See the Frog Squad Group Build elsewhere for loads of memory joggers). It came with little tubes of matt paint so different from the Humbrol gloss I has used before. My memory says the decals were for a early machine with the large yellow outer rings to the roundels So I was set. I used the Xtradecal sheet to make a 139 Squadron machine soon after delivery. I found a photo of the very machine in 'Bombing Colours by Michael J F Bowyer, a suitable retro reference for a pseudo nostalgic build. Thanks for looking
- 28 replies
-
- 43
-
-
-
Hello Phantom Phans. This WIP is for the forthcoming Brigade Models conversion set for Academys F-4B into the prototype F4H-1. I have obtained from Kevin a pre production test shot of the mouldings as seen at SMW this year. This does not include canopies or decals as they are not ready yet. Availability of the set should be March next year. Kevin has agreed to add a second seat so later small radome aircraft can be built. Any changes for this will be up to the modeller, as the main purpose here is for a first flight aircraft. Also, there are no instructions (I suspect I may be writing them now). Onto what you will get. This first picture shows what you get. This first pic shows the parts, except for canopy, decals, and the pitot probe, which I do have. This pic shows where to cut on the wings (for the perforated airbrakes) and the fuselage. Close up of the wing where the airbrake goes. Note that either the wing can be cut, or alternatively, the resin part could be used as a master to drill your own holes in the wing. Here is a close up of the fuselage cut point. And the cut made. Another part that needs cutting is the forward under fuselage (part F40) The resin intakes and the kit trunking is being joined. Some fettling may be required for a perfect fit. Airbrakes being sorted. Airbrakes fitted. Note that the gap is my fault, not the kits (my cutting skills still need work). First look at the front fuselage. The black parts are kit parts. They mate to the resin perfectly. That is all for this introductory part. Ted
- 42 replies
-
- 19
-
-
- 1/48th
- Conversion
- (and 1 more)
-
I know that this kit has been hammered online and in print but here is my Airfix Spitfire XIV. I had no short shot parts, no flash no damage canopies, it fitted really well, the fuselage fuel tank clicked into place and the only filler was a touch along the wing roots. Just lucky I guess. I used a very old Aeromaster sheet for the decals and Eye Of the Phoenix by Geoffrey J Thomas for reference. Thank you for looking.
-
I spent most of late 2014 and 2015 building and painting for the IPMS Scale Model World Battle of Britain, display, so much so that to paraphrase Sir Steve Redgrave, 'if I even start using Dark Green/Dark Earth/Sky, shoot me'. Three things changed that, the upcoming 2020 Anniversary display, buying and reading the Battle of Britain Archive series from Red Kite and the fabulous Fundekkals sheet for the early Spitfire. Realising my stash was BoB free, I bought an Airfix Spitfire Ia and a Tamiya one at a knockdown price. I planned to build both in parallel but the real world go the way as it tends to do. Compared to the Airfix kit it is up to £15.00 more expensive here in the UK ( though I picked mine up for a mere £4 more) I wondered if it was worth it. In the end, I will now speak heresy, it a nice kit, not perfect and a little quirky. I expect to get hammered for this view. let me explain. The fit is fabulous, I used absolutely no filler anywhere, it is probably the nicest kit I have ever built in that respect. The way the undercarriage is moulded and the covering panels mean the undercarriage legs with be at the right angle and a lot stronger than the fiddly way Airfix did theirs. On the downside there is no back or head armour provided, both essential for the BoB markings provided. It is also a shame that no two bladed propeller is offered, the rest of the options to make a mid production Mk I are there but not a two blader for the very early machines. The flying surfaces unmodified are not able to be posed in anything other than straight, unlike the Airfix one where they can be easily animated with no modification. Also, the way the cockpit inserts (which fit beautifully) mean that the canopy can only be pose fully open or fully closed. By moulding the radio aerial with a lump of the fuselage, you cannot add this vulnerable sticking out piece of plastic without having to remove and lengthening it, not very modeller friendly. Finally the way the front armour is a separate piece from the windscreen is trial to fit and in my case my hamfisted modelling allowed paint to seep under it. I much prefer the Airfix way of providing two different windscreens. I feel like I am damning it with faint praise and using it as an excuse for my shortcomings, I really enjoyed building it but for the price in the UK........ Here she is with the Airfix one I built a month or so ago. The Fundekkels markings are brilliant and the instruction PDF is a goldmine of information. There are still half a dozen more never been seen in decal form Mk Ia s I want to build on the sheet, The choice of which kit to buy is still the balance. Thanks for looking
- 1 reply
-
- 12
-
-
- 1/48th
- 64 Squadron
- (and 1 more)
-
I've been so wrapped up in wargamming recently I've not built a plane for a couple of months, so I went back to an old favourite, the Revell F-86D. I've done a shed load of these kits and am finally getting to the end of my stckpile which were mainly bought when ModelZone went bust or from second hand vendors at Telford. The decal are an old SuperScale sheet for the 5th FIS after they changed tail colours from Blue to Yellow in 1956. I think to be completely accurate there should be markings on the tanks but they aren't on the sheet and two photos show two different applications. As always thanks for looking
- 13 replies
-
- 29
-
-
 This kit was built alongside the Eduard 1/48 Fw190A-5/U12 (see my earlier post in RFI). Again it was virtually an oob build, all I added was the excellent Brassin resin cockpit and some detail to the wheel wells. The wheel wells lack detail at the front so I added some, using the Eduard P/E set (intended for the old tool 190s) as a template for these missing details. The kit was again finished using the AK True Colours Luftwaffe paints, these actually supply 3 variations of RLM76 of which I used 'variation 2' a later war shade! This kit was from the Reichsverteidigung combo which unlike the A-5 kit has gloss decals which went on perfectly! The machine I chose to build was that flown by Ofw. Karl Rusack of 5./JG.300, Lobnitz Jan.1945. This machine had the standard 74/75/76 scheme over which a meandering spray of green was applied possibly as ground concealment. Some sources say this may have been RLM71 but I chose the AK green variation of RLM81 (83 ??!!!) :- Now where are those other 5 early 190s!!!!!!!!!!! Cheers Andy
 -
I picked this old kit up at Croppers in Bridlington a couple of months ago, its always well worth a look if you are in the area. I wanted to do something a bit different to an overall Gloss Sea Blue machine as I have done both a -5 Panther and a -9 Cougar so far this year. so the alternative markings provided fitted the bill. I found some photos online of the machine in the decals, 126275 of VU-1 based at China Lake in the late 1950s but these images showed a different tail colour when -75 was used for ejection seat trials so I went with that. The camera windows were plated over, which give it a much sleeker look that the standard photo nose. I'm been trouble with Flickr inserting very small images and losing definition when I enlarge them. I seem to have resolved now., Thanks for looking.
-
Meteor F8 , WK803, 56 squadron RAF Waterbeach 1953 for the NATO v Warsaw pact 50s GB Built from the Airfix 1/48th kit, painted in Tamiya AS12 with decals sourced from a Classic airframes kit and a light Flory wash to finish off. Some fit issues with the intakes and especially nose, but on the whole a nice kit I would recommend Would have been kept clean as it was used on the Queens coronation flypast. Need to sort out a proper setting to take decent pics. rather than phone pics at some point Thanks for looking, any feedback or tips welcome Ian
-
 Right gents Time to throw my hat into the ring with an Airfix meteor F8 that I bought at a LMS in Aberystwyth last September, I blame the wife as she left me unsupervised for 5 minutes while she was looking in a gift shop 🤣 I only went in to get a jar of paint, when will she ever learn 😉 Can't decide whether to build it as the box art with the yellow tail or try and modify some decals for a 56 squadron bird to go with the Hunter from the 60's build 🤔 Anyway, here's the obligatory box and runner shots to prove I haven't started it Looks a nice well detailed kit, so will probably be OOB except for PE cockpit as I hate painting dials etc
 -
Wow I hadn’t thought this GB would come around so quick! I have way too many GB’s on the go at once but this was one I really wanted to join. This is one of my all time favourite aircraft……even if Tom Cruise “flew” one! I’ve only ever build older 1/72ndscale Airfix versions and have always wanted to build a big beastie to be part of a “Swing Wing” collection. I was super lucky in finding this one, Nup it's been replaced full of goodies and even white metal/rubber wheels, though these will be replaced. ….which some nice person happened to have included the Aires Cockpit set.. and so has this.. and Quickboost wheels all for a price quite a bit cheaper than some of the other Hasegawa F-14’s on evilBay. the wheels stay Plus as my usual I wanted to build something different so I acquired an Avionix’s F-14D Bombcat conversion set. ...and not using this either Plus some Super Scale decals for a VF-31 CAG aircraft. Yeah still using this I won’t be able to start on her straight away, but once I get a couple of the other builds out of the way…….
-
Finally calling this finished. Airfix's new Hunter, backdated to an early F6 without the wing dogtooth. XG292 'R' of 14 squadron, based at Ahlhorn, Germany, April 1958. Model is based on a lovely pic of 4 new F6s breaking to land in Lindsay & Kipp's RAF Hunters in Germany book. Extra detail added to the cockpit and the UC doors which are bizarrely blank, plus the ligh ton the back of the fin bullet has been added too, and the fuel jettison pipe at the lower rear. Other than that - this is a top notch kit that fits well and looks brilliant. Painted with Gunze & Tamiya acrylics in the the little known "bloody big fingerprint on the wing" scheme Final finish is Tamiya semi-gloss varnish to try and give a scale gloss sheen. The decals come mainly from the Freightdog F4 sheet - as this has the correct style squadron bars for the early style markings this F6 carried. Roundels and stencilling from the kit, serials from spares. I took the liberty of using the Freightdog german language ejection triangles and hood release too - these were used on F4s and I could see no reason why the F6 wouldn't have carried them too ( famous last words). All comments welcome as ever - and thanks for looking. Hope you like her. Jonners
- 22 replies
-
- 54
-
-
-
I was able to pick this kit up second hand at Bolton in the Bridges of Toko Ri boxing I'd been searching out for a while. Sadly it turned out the decals were unusable even with a lot of TLC and some Microscale decal fluid. So I had to source some Microscale alternatives and repaint the completed airframe. It is a simple kit with no pitfalls and is an enjoyable build. Unlike the Kittyhawk F9F Cougar that is now on my bench. Thanks for looking.
-
This is my latest completion, the new Airfix Hunter. I rally enjoyed building it and had no real issues, I thinned the wing saddle a bit to get a better fit, and opened up all the holes in the undercarriage bay as they were a bit tight but really no dramas. I used the Xtradecal sheet to build a machine from 12 Squadron whilst the Buccaneers were grounded after the tragedy at Red Flag. I took photos of this machine at an air show but I can't find them at the moment used a small pjhoto in 'Dick' Wards Hunter book as my main guide. Thanks for looking Oh I have a complete windscreen and canopy if anyone needs one. PM me.
-
Sorry if I have fooled you into thinking this is a full build, it isn't my intention. What I wanted to do was show my progress and point out any areas that I have had problems with. I am no expert on the type so any accuracy issues are beyond the scope of this as well. Anyway, here is my progress to date: I'd rather not have had to assemble the undercarriage at this stage but I can see no way to add it after building the airframe. The firewall and spars are integral to the undercarriage and unless you make ships in bottle I can see no way of adding it later. You can probably see that there is very little filler, just a little around the wing roots and none on the fuselage or tail planes. A little more filler around the turret opening. The first real issue is the flaps, which are clearly designed to be assembled open. There is some nice detail ,on the inner faces and the instructions do tell you to cut off this detail. However I had to reduce the inner flaps to wafter thickness to make them fit. It is a shame alternative parts aren't provided. Not perfect but it will do. A little more filler around the Bombay is visible in this photo. AS you can see the general fit is impressive. I have to say that the package is comprehensive, I believe all the parts necessary to build a bomber are in the box as are tropical filters. I was so looking forward to this kit coming out and I am not disappointed, I'll probably buy at least another one. More updates after Christmas I hope.
- 27 replies
-
- 11
-
-
- Airfix
- 25 Squadron
- (and 1 more)
-
My last finished kit for 2018, which as been a very productive year. I' keep thinking I've finished all my Classic Airframes kits in the stash then find another. This is almost straight from the box but I did use Barracuda Intake which fitted perfectly. They were the only parts that did. Thanks for looking.
-
Just finished this in time for the sunshine to reach this part of the world which enable me to take some outdoor photos for the first time this year It is an old boxing of the Monogram F-102 which is still a good kit but tricky to put together. The kit decals were well past their sell by date, which is the risk you take when you buy 2nd(3rd, 4th, 5th??) hand. Shame as the kit scheme was very attractive. Basically out of the box with the fuselage lights opened up and new lens put in. I used and old Repliscale sheet to produce a machine of the 431st FIS based in Zaragosa, Spain in the early 1960s. I changed the serials and Buzz numbers to portray a picture in one of my references. As always thanks for looking
-
Due to a streaming cold, I've had a bit of modelling time I didn't expect so I made faster progress on the excellent GWH T33a I picked up at Southwell show. Pretty much out of the box just some aftermarket seatbelts. I used a series of Gunze Sanyo metallic paints for the first time but the flash has washed them out. I finished her as a machine of the 9th FBS based at Komaki AFB, Japan in 1955, using an option on Caracal sheet CD48123, which perform magnificently as always. I found a picture of the aircraft online and was surprised to see a lack of the visible stencilling I associate with USAF aircraft of this era. Thanks for looking.
-
I've been building some kits from th Stash recently as a change from my usual fare. I bought two Special Hobby Seafires about 6 years ago, I built the Mark III and it fought me all the way. So the Mk II languished in the stash moving slowly further down the build pile. I've recently sold a lot of kits that I'll never build but this one still appealed so I gave it a go. The build was not as bad as I remembered but still needed a lot of sanding and filling. I got the airframe complete, as a LIIC then found that the decals and scheme were at best dubious. The other schemes were more likely to be correct but I was committed to a clipped winged six stack machine.machine After drawing a blank for after market decals I found a thread from a few years ago that gave me a possible solution, but even so it is probably a What If rather than a model of a real machine. Anyway here she is. Thanks for looking
-
 Avro Anson I 206 Squadron, Coastal Command, 1939 This is the Classic Airframes kit of the early version of the Anson with the longer sloping windscreen. The kit is a pretty straightforward build with no vices. The model was painted with a combination of Mr Paint, Mr Color and Tamiya paints then finished with a layer of Testor's Dullcote. The national markings were applied using Montex masks but the codes and serials came from the kit decals. More details of the build can be found here: Thanks for dropping by, Howard.
- 35 replies
-
- 63
-
-
-
- Anson
- Classic Airframes
- (and 1 more)
-
I thought I would share my latest project with you all: I built the late version of this back in 2011 and really enjoyed it. At the time, I received some help from @galgos who has also built a couple of these. Here are the contents of that flimsy box, first the plastic bits: ...and some quite nice resin: ...and finally some etch and a nicely printed decal sheet: Not the biggest parts count for a model of this size. First job was to cut the fuselage halves off the sprues and clean up for a bit of test fitting. Being short run there are quite a few of these to deal with: I also cleaned up the resin side walls and test fitted with the floor: I have decided to bond these separately into the fuselage halves as I did with my previous build to ensure they align correctly. Here they are in situ and a trial run with the clear parts looks promising: More to follow shortly 🙂
-
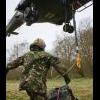
Another one of my New Zealand vehicles. This is the tiny Tamiya 1/48th kit. Basically straight from the box with a little help from the spares box for the.30 cal Thanks for looking.
-
You wait for ages then three come along... First Tony O'Toole showed his beautiful French Suez machine, then Camper1 followed it with his excellent USAF ANG machine and bringing up the rear is my 15th TRS machine. It is the old Heller kit that I picked up in a bargain box at the modellers paradise that is Halifax Modellers World. I think it dates from the early 1980s and is a really simple kit unlike the recent Tan models one. The Tan Models kit is great but it costs five times as much as this old warrior. I used the lovely Caracal decals to create a machine of the 15th TRS 67th TRW based out of Kadena AFB in 1957. Though designed for the Tan kit, they fit the Heller kit without any modification. The Heller kit has really weak connection points for the undercarriage and my normal method of drilling and pinning wasn't possible as the wing top is very thin. After the Kittyhawk F-101C this was a refreshing change and sometimes simple is best. Thanks for looking.
- 11 replies
-
- 24
-
-