Search the Community
Showing results for tags '1/48'.
-
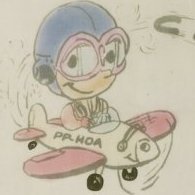
I thought I would share with everyone my latest build, Italieri's 1/48 scale Ju 87D-5. This kit is not without its problems, and to fix all of them is probably beyond my skill level, so I chose fix some and as long as it looked like a Stuka I would not worry about the rest. It was also an excuse to add a few extras that I had been wanting to do such as exposing the engine, gun bays and undercarriage using some of the aftermarket bits I had been hording for a while. The engine turned out to be a bit more effort than I expected, this was a modified Aries unit with the kit oil cooler shortened to suit. Firewall and engine bearers were from another set and were modified and detailed to get the engine to sit level and closer to the firewall. With every build there is always one cock-up and this was no exception. After taking care to paint the internal and external frames on the canopy properly I managed to miss this on the front sliding section and paint them all as external. Oh well, it's an excuse to build another and try to get it right next time! The model was finished with Vallejo paints and weathered with a clay wash and oils. This is something I need mode practice with as I don't think the oils came out too well but, every model is a learning experience! The cluster bomb on the centre line came with the kit but the wing mounted gun pods were from the Italieri weapons set. I'm not sure how accurate this load-out would be but I have been wanting to use the gun pods on a Stuka for ages and this was the time. Enough waffle, here are the pictures. I hope you enjoy and feel free to comment/criticise.
-
I remember seeing the Air Atlantique C-47s at Duxford and around during the 80s. I think there were decals in 1/48 - any idea if they are still available anywhere? I have had a google and drawn a blank so any suggestions welcomed
-
Hi All, here I am again with another themed build thread, this time featuring Republic's Mighty Jug. This will be another departure for me as the only P-47 I've ever built was Airfix's 1/72 scale 1970s-or-80s effort, which was finished in SEAC colours. These builds will be resolutely 1/48 scale, as are all my builds at the moment, and I'll be aiming to use the most up-to-date kits on the market at the time I begin each. As with my other themed build threads, I'm not aiming to build one of everything, just those that, for whatever reason, happen take my eye. The P-47 is still very much a closed book for me, but I've got a number of older publications to leaf through and a couple of other likely reference sources on my radar. However, I would be very grateful to the Thunderbolt experts out there for pointers toward good books on the subject! As I'm already building the Dora Wings Seversky P-35, albeit in its S-2 racing configuration (link here if you're interested), it seems rude to not include the Thunderbolt's ancestors such the P-43 Lancer in this project; I've got a bit of a soft spot for the Lancer, and Dora Wings' kit is already safely in my stash! There are also the prototypes such as the XP-47H, another personal favourite, which are more than likely to make an appearance. So, among those victims already selected are a 5th ERS P-47D Razorback, 395th FS P-47D Razorback "Miss Second Front", 56th FG P-47B (but not Hub Zemke's!), a.n.other RAF aircraft in SEAC colours..... Here we go: Republic P-47B Thunderbolt, 56th Fighter Group, Long Island, 1942 Cheers for now, Mark
-
Another 1/48 Tamiya P-47D. The only other P-47 I have built was Hobby Boss’s 1/48 Easy Assembly Kit for the 2016 P-47 STGB. I used the Xtradecals “Yanks with Roundels” sheet to build a SEAC aircraft from 134 Squadron. I will be using the same sheet to build a NMF aircraft from 258 Squadron. This one was chosen as it is the only NMF fished aircraft that doesn’t have a tail fillet. The one in the photo below. Don’t expect quick progress with this one, I have 4 other GB builds underway. I have the week after Telford booked off work, my current plan it’s to build this in that week, assuming I don’t find some wonder kit at Telford that jumps to the top of the build pile.
- 14 replies
-
- 12
-

-
Hi, Here's my P-47M. So far, I've only painted the prop. That must have happened when I was spraypainting other props and used up what was in the airbrsuh on this one. Dottie Dee II was in light and dark blue with NMF undersides and leading edges of the wings and horizontal stabs. This has not really been a productive year in modelling for me, so I'm hoping to do better with this one. Cheers, Stefan.
- 24 replies
-
- 12
-
-
This one will be built as a F-47D used by Yugoslav air force after WWII. Decals from Lift here for Yugoslav Bolts will be used. Which of the options, I havent decided yet. Yugoslavia had 150 Thunderbolts in use - acquired 125 F-47 from USA through MDAP and 25 directly purchased from France.
- 32 replies
-
- 15
-
-
Hi, after years of lurking I thought it's high time I posted an RFI here. And there is also a WIP: A few years ago I found some images of RCAF Vampires and thought: it's time to start my Classic Airframes kit. Shortly after @hendie started his build, where he beat the Classic Airframes kit into submission, and I changed my mind 😊. I thought then perhaps Airfix was scanning a Vampire in preparation for a kit, and sure enough they were. So this is the lovely Airfix Vampire. Anyone want a Classic Airframes one? Here are some details: Kit: Airfix Vampire Mk 3 - A06107, 2021 Paints: Alclad - Duraluminum, Steel Gunze - Burnt Iron Model Master - Aircraft Interior Black, British Interior Gray Green, British Middlestone, Chrome Silver (enamel) Tamiya - Nato Black, Rubber Black, Flat White, Red (lacquer), Fine Grey Primer (spray can) Vallejo - Spitfire Seat Red (home brewed) Johnson’s Future Aftermarket: none Scratch built: DF Loop from aluminum tubing Nose compartment for DF loop, lined with .005” Evergreen sheet. IMG_3769 by Wlad Franco-Valias, on Flickr IMG_3770 by Wlad Franco-Valias, on Flickr IMG_3771 by Wlad Franco-Valias, on Flickr IMG_3772 by Wlad Franco-Valias, on Flickr IMG_3773 by Wlad Franco-Valias, on Flickr IMG_3775 by Wlad Franco-Valias, on Flickr IMG_3776 by Wlad Franco-Valias, on Flickr IMG_3777 by Wlad Franco-Valias, on Flickr IMG_3778 by Wlad Franco-Valias, on Flickr Cheers, Wlad
-
I got this kit for Christmas 2021, yet I had to clear the assembly line before starting it. So here's the progress from December 2022 to April 2023, when I finished the kit. Yes, this WIP is about a finished kit. I thought members may find the build interesting. First, RCAF Vampires had a window on the nose which took me a while to figure out why. It's for a direction finder antenna (DF loop). Canada is a large country after all. So, top of mind for me was how to replicate this window and the DF loop. Test fitting and marking the nose window for the DF loop. IMG_3233 by Wlad Franco-Valias, on Flickr Nose window cut. This was refined a little later for symmetry. IMG_3236 by Wlad Franco-Valias, on Flickr With that out of the way, I could focus on the rest of the build. Jet intake trunks are in. It’s easy to get the boom halves misaligned, like I did. The minor misalignment had to be sanded down. IMG_3269 by Wlad Franco-Valias, on Flickr
-
This kit was an impulse buy. You see, there used to be a store owner here in Calgary who went by the name of Uncle Rick. Evil man, he was. Any time I went to his store, I ended up coming home with way more than I went there to get 😁. Back in 2002, I went there looking for a bubble top P-47D which, to my surprise, he did not have. I came home with this P-40N, a T-33, and a few other things I really wasn’t after. Upon opening the rather large box, I realized I got a curate’s egg of a kit. Looks rotten, yet parts of it are excellent. The mold was misaligned during manufacture, resulting in every single part having flash on it. I started this kit twice, and got tired of: remove from sprue, sand or scrape the flash off, correct as needed, rinse and repeat. I considered giving it away, yet something about it kept calling me back whenever I had extra paint in the airbrush cup I didn’t want to waste. It sat in the stash until now, when I decided it’s time to put it out of its (or my) misery. This build is a test to see how good I can make this kit look. I know the decals I have in mind will let it down at the end, yet let’s see what I learn in the process. Here's a general view of some parts of the kit. Notice some parts are painted already at the “beginning” of this build. Also the plentiful flash present, with the larger pieces laid out for scale. The panel lines are fine though, hence the curate’s egg mention before. IMG_3714 by Wlad Franco-Valias, on Flickr The worst impact of the mold misalignment. I thought about cutting the tail with a razor saw and then gluing it at the appropriate place. Then I also thought all this work could introduce more misalignment, so it’s going to stay this way. I’ll blend in the misalignment by sanding. IMG_3715 by Wlad Franco-Valias, on Flickr More to come soon. Cheers, Wlad
-
DYNAVECTOR GANNET photos updated & wheel chocs
CJP posted a topic in Ready for Inspection - Aircraft
I have finally completed this Dynavector Fairey Gannet AS1 - I wanted to get it done before AIRFIX released their 1/48 Gannet which I believe is due the end of October this year. The subject of the model is a Fairey Gannet WN456/884 NW based at Nowra NSW with 724 Squadron - according to the ADF SERIALS website this aircraft ditched off HMAS Melbourne on 23/03/1965. This is my second Dynavector vacform & again I found it surprisingly easy & enjoyable to build once all of the parts were cut out. The build involved a lot of scratch building but it was quite rewarding to do this - I put a lot of detail work into the cockpit and wing folds as shown on the WIP link https://www.britmodeller.com/forums/index.php?/topic/235122800-dynavector-gannet-as1/ The wing fold detail used the airfoil sections of the Airwaves etch filed to fit inside the wing opening but I did not use much else on the etch and scratch built the rest of the details. I used Airscale bevels and instrument decals for cockpit detailing & Eduard seat belt harnesses. Material mainly used were various profiles of Evergreen strip, sheet & Albion Alloys slide fit tubing. Home printed the lettering & codes on the Experts Choice clear decal sheet. 1/72 XTRADECAL sheet x72260 for the Australian kangaroo roundels which had some sizes suitable for 1/48 scale, otherwise my search for RAN Gannet decals proved fruitless. Paints were some very old XTRACRYLIC EDSG/SKY which still sprayed nicely & some other acrylics including Tamiya. Final coat was Testors clear dullcoat. References I used were - https://www.britmodeller.com/forums/index.php?/topic/234910632-fairey-gannet-xa334-royal-australian-navy/ https://www.thunder-and-lightnings.co.uk/gannet/walkaround.php https://www.net-maquettes.com/pictures/gannet-as-4-walkaround/ https://www.ulsteraviationsociety.org/fairey-gannet-ecm6-as4 Two new Gannet photos on updated base - the fuzzy patch near the rear cockpit is where a kit decal came off & has since been rectified. Below are some photos of the Breguet Alize and Fairey Gannet as requested by Massimo. Thanks for looking - now waiting to see the Airfix Gannet release! CJP -
- 6 replies
-
- 29
-
-

-
- trumpter
- Mi-4 Hound
- (and 1 more)
-
Hi all Been working on this rebooting of the old Heller/Smer L4 cub kit. The Sabre Kit offers a J3 Cub and provides the correct side windows for the J3. This is a model of a Flitfire which were called as they were used to help raise money for the RAF Benevolent fund in 1941. The model built here is NC23413(Texas). Built OOB apart from masking tape seatbelts and the wing struts were made from brass rod as the kit ones were both quite bowed, wheels had new covers punched from plasticard. Pushrod tubes added to the engine undersides from brass rod. The model was built to represent the plane after restoration in around 2019. With th addition ofcthe Whip aerial and the upper red beacon. The model has been brush painted using Humbrol Enamels. I did enjoy putting this one together. Thanks for looking in and thanks for the support and encouragement along the way too. Chris
- 7 replies
-
- 23
-
-
- 1/48
- Sabre Kits
- (and 1 more)
-
 My third and final entry Airfix's 1/48 Supermarine Spitfire Vb in desert mode. And since the decals are sketchy at best I have a set of Vb decals from Techmod. Let the fun begin!
 -
Here the 2nd of 3 oldies I hope to finish for this GB. Otakis P-40E Warhawk in British North African livery. Another simple kit(I hope)I may not need to add many extras to fill this kit out, but we shall see. I do know I'll have to raid my decals spares once more to get it where I hope to finally end with . Even came with a little tube of glue, that's hard as a rock. I am going to add the sharks teeth to the nose.
-
An Oldie- Monogram 1/48 Hawker Hurricane Mk.IIC SAAF
LorenSharp posted a topic in I feel deserted GB
Something a little ancient from the depths of my stash that deserves to see the light of day. Monogram's 1/48 Hawker Hurricane. Since this kit lets you build any one of 7! versions(box says 5, but there are 2 more as well that you can do). I think for this outing a MKCII in SAAF livery might be out of the ordinary for me, but it is a simple little build . I'll probably make an addition here or there just because this kit was originally more toy than model and as such some detail that's normal today (cockpits and Gear wells) were almost unknown way back then. I think I first built one of these back when Johnson was in the White House, Lyndon not Andrew. I'm not THAT old. I just feel like it. So lets see whats I gots wit dis. The kit decals are definitely old so I'm using Aeromaster for the national insignia and whatever I can scrounge from y decal spares to supplement. -
A late entry. That’s not unusual for me. My mother said I was late for my birth and have been arriving late ever since. And yes, I did clear it with moderator that aircraft of the Royal Australian Navy Fleet Air Arm are eligible for this Group Build. We need a few kangaroos amongst all those aircraft carrying targets. RAN FAA The RAN first acquired an interest in naval aviation just prior to World War I. In May 1913 naval strategist, Commander Walter Thring, RAN, advocated for the acquisition of ‘water-planes’, and the following year the First Naval Member, Rear Admiral Sir William Creswell, RAN, recommended that the 1914-1915 estimates allow for the establishment of an Australian Naval Air Service. Without British support, which the RNAS was unable to provide, the proposal went no further. The RAN’s interest in aviation grew more over the course of the war. Naval aviation found a champion in the form of Captain John Dumaresq, RN, HMAS Sydney’s Australian-born Royal Navy Captain. Dumaresq was at the forefront of the campaign to develop an embarked aviation capability in the Empire’s cruisers. In 1920, a deployment of an Avro 504 floatplane aboard HMAS Australia and HMAS Melbourne was attempted. This proved to be unsuccessful as the aircraft were not built to withstand the rigours of handling on a naval ship. Undeterred, in April 1921, the Australian Government announced its intention to acquire 12 Fairey IIID seaplanes for service with the RAN, a number that was later reduced to six due to financial constraints. The six aircraft arrived in Australia in late 1921 but were placed under the operational control of the RAAF. The RAN had not given up its ambition to establish an air arm and, on 16 June 1925, the following order was promulgated: "The Naval board have decided to establish a Fleet Air Arm of the Royal Australian Navy, based, as far as practicable, on the scheme adopted in the Royal Navy." Two new County Class cruisers, HMA Ships Australia and Canberra , were to be constructed to the tonnage limits of the Washington Treaty, and both would be able to launch aircraft from a catapult. It was further suggested that the RAN might take up a merchant vessel modified as a seaplane carrier. However there was major inter-service rivalry with the Air Board interpreting the order as establishing a FAA on the British model, i.e. within the RAAF and under RAAF control, whereas the Naval Board interpreted it as establishing the new branch within the RAN. Ministerial approval for the establishment of a FAA in the RAN was given in January 1925. Then on 10 June 1925, six days before the order establishing an FAA was promulgated, the Governor-General, Sir Henry Forster, while opening Federal Parliament, announced the Government’s intention construct a seaplane carrier at Cockatoo Island Dockyard. However, wrangling between the Naval and Air boards over control of the FAA continued. The final result was that the RAN FAA was disestablished at a meeting of the Federal Cabinet on 18 January 1928. It was not until twenty years later, after World War II, that the RAN was finally able to establish a Fleet Air Arm in 1948. It’s initial equipment was motley collection of ex RAAF used for training purposes. The first operational aircraft were Hawker Sea Furies and Fairey Firefly aircraft which were embarked on HMAS Sydney in March 1949 and she then sailed to Australia. My model will represent one of those Firefly aircraft, albeit as a target tug, some ten or so years later. IN THE BEGINNING: There was the PP Aerokit, AK001, Fairey Firefly FR4/5 purchased circa 1994. This was a ground breaking kit for its time and very detailed for a ‘cottage industry’ product. It was multimedia having the fuselage and wings vac moulded, some 40 odd metal parts, 90 odd etched parts, and 20 resin parts. As can be seen in photo below, I did start the kit, cutting out the vac formed parts and doing a little work on the cockpit. Then, for reasons I no longer recall, (I think moving from one country to another may have had something to do with it), it was relegated to the shelf of doom. THEN CAME: What I thought was a great bargain at a ‘Swap and Smell’. It was the, then relatively new, Grand Phoenix Firefly MK.1 kit. I bought with the intention of cross-kitting. I could replace the vac-formed parts of the PP kit with the injection moulded parts of the GP kit. The engine could be replaced with one cut from the PP kit and the latter would also provide the radiators and clipped wingtips. Seemed like a great idea until I realised that the GP kit was missing one fuselage half. Oh, s..t! I’d been dudded! So the project went even further to the back of the shelf of doom. FINALLY, INSPIRATION!! BM started a group build “Here Comes the Fleet Air Arm”. I consulted with our esteemed moderator and it was ruled that the RAN FAA also qualified. So, out from the dusty recesses of the shelf of doom, my Firefly kits saw the sunshine again. Yes, I could have gone out and bought a newer kit, but I had these two, and I do call myself a modeller, although same may dispute that. Anyway, I like a challenge, so here goes. The build will be a Royal Australian Navy Fleet Air Arm Fairey Firefly T.T.6. I have yet to decide which particular A/C.
- 29 replies
-
- 5
-
-
- RAN
- Firefly TT
- (and 1 more)
-
Hi gents, it's my pleasure to share with you my latest work, Gallery models' UH-34 D Sea Horse in 1/48:
- 15 replies
-
- 48
-
-
-
- 1/48
- Marine aviation
- (and 1 more)
-
 Hi all, this build has been a long time in the making. I had intended for it to be a relatively quick and stress-free build but it ended up being a slog at times and sat unfinished for a while. The kit is the 1/48 Tamiya Mk.X and was a breeze to put together, it's a great kit. The decals are the Avalon IAF Beaufighter set and caused me some issues, they were quite thin and the Star of David in the centre of the roundel ended up semi-transparent so the paint job can be seen underneath. Furthermore I can't actually verify that any of the Israeli Beaufighters actually wore RAF day colours but the option was there and I had the Ammo paint set on hand so went for it. The decals combined with a few silly mistakes on my end like using the wrong tail and ballsing up the camouflage scheme in places meant it sat in a box for a while untouched but I decided to just use it as weathering practice and managed to get it looking somewhat presentable so here it is: Thanks for looking in!
- 4 replies
-
- 25
-
-
-
- Tamiya
- Beaufighter
- (and 1 more)
-
 Hi, I seem to recall that someone here on BM produced those modified wingtank photoflash thingies for RAF Phantom FGR.2's. I am aware of the Aircraft in Miniature product, but I wanted to try here first. Does somebody know who it was? Thanks in advance, Pete
 -
I have just finished a small Admiralty Steam Drifter (completed photos to follow), so its back to the RAF, and another stalwart from the early war period. I could build yet another Beaufighter, but the Wellington attracts as a good subject, with a kit in 1/48 that needs a tiny bit of work. The kit is, of course, Trumpeter’s 1/48 scale Wellington IC, first released in about 2006, and my chief reference, apart from what I will be able to find online, is the the very nice 4 plus monograph on the Wellington. I don’t promise a fast result with this build, as there are a number of things about the kit which need to be sorted out, and I will have some other things on the go while it is being built. But there is space on the workbench right at the moment, so I will try to get the difficult bits done before other projects intrude.
- 72 replies
-
- 4
-
-
- Wellington
- Trumpeter
- (and 1 more)
-
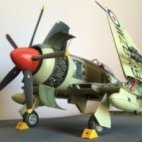
Hi all. Here's my latest completion, their VERY nice 1/48th Tamiya P-48F Lightning. The model represents White 33 from the USAAF serving with the 39th Fighter Squadron, 35th Fighter Group, 5th Airforce while operating in Port Moresby during 1944. The scheme is one of the options supplied in the box. I created paint masks for the insignia and White 33 on the nose and tail so I could paint them. I would liked to have made them for the shark mouths on the cowls but time was against me as I had to have it completed by last weekend (19/ 20 August) for our state competition. The stencils are from the kit. The embellishments are by way of a 3D Look panel, resin superchargers and etch seatbelts; all from Eduard. The wheels and tires are from DEF models. The top surface is rivetted so I could get some of the nice wear and tear around the rivet heads can be seen on P-38's and the colours are various darkened and lightened shades of OD/NG from Tamiya and Gunze acrylics. All of it over a silver base. I wet sanded the areas around the canopy to get the worn away silver look. I had applied hairspray but I wasn't getting the results I wanted so tried the wet sanding method. The final weathering once markings was applied was with a variety of oils and washes applied in small amounts but gradually layered to achieve the worn OD look. The underside received a similar treatment. The antennae wire is elastic thread. I'm really happy with the final result. I'd recommend getting yourself one, if only to enjoy the wonderful engineering and fit of the kit. Cheers, Mick
- 27 replies
-
- 78
-
-
-
Hi All, having recently embarked upon a themed build of the Messerschmitt Bf109 and its Hispano-built offspring in Spanish skies, I thought I'd kick off another similar project. This time, though, it'll be a major departure for me in that it will feature only civil aircraft, to whit, racers. My plan is to build a representative collection of Golden Era racers, such as competed in the Bendix, Thompson, King's Cup, MacRobertson, Schneider etc air races. The subjects will only be ones that particularly appeal to me so there will ultimately be an eclectic mix, I'm sure! The occasional post-WWII ex-military example may well creep in, too - who can resist a much-modified-Mustang? This is likely to be another long-drawn-out trial-by-waffle that I dip into occasionally, and I'll build only one of these birds at a time. My intention is to edit this first post with links to the introductory post of each build as it begins so its easier to "jump" to a specific build. That's assuming anyone's still with me and interested enough to want to, of course I've already got a couple of the old Hawk/Testors 1/48 racers in my stash, namely the Travel Air Mystery Ship and the Laird Solution, but my first subject will be: Seversky S-2 Buckle up - it's gonna be a bumpy ride! Cheers, Mark
-
 Completing my trio of P-40's for the GB, and last in line alphabetically, comes the K. This is another internet purchase that came as a bag of bits mostly still attached to their sprues, except for the main parts, instructions and a set of decals that look about as reliable as anything that comes out of Putin's mouth. The bag of bits; I thought this came as an E but should have read what is on the bag more clearly, E/K/M from the same kit? Now the front of the E/K/M and N are pretty much the same at the front of the fuselage being all Allison powered variants, but the rear of the fuselage is a different matter, the F/L/M and N all have a stretched rear fuselage. What I have in the bag is a stretched fuselage so that leaves it being an M as the canopy on an N is different and the F/L are Merlin powered so the front of their fuselage is different. There are however the parts for the tail of a K and all that is required to turn an M into a K is the correct tail and a little bit of surgery. AMT got the most of their moulds by giving you different parts to add to the kits and also requiring a bit of surgery in some cases. A result of this is a slight mismatch where the tail joins the fuselage which can be tricky to clean up and keep the details depending on how bad your kit is (they vary from being a good match to an awful one) mine isn't brilliant but thats okay as I'm chopping it off anyway, this is the rear fuselage as it comes; And here it is after surgery with the replacement K tail complete with the fin fillet usually associated with the variant, though they didn't all have this distinctive feature, the P-40 family can be a tricky subject! The parts actually fit quite well and a bit of sprue goo will sort things out nicely. Now onto the markings and the reason for the movie related title. In December 1942 the squadrons of the 57th FG began painting their unit badges on the noses of their aircraft and the badge for the 64th FS was a scorpion so a lot of their aircraft began to look like the one in the profile below; That picture actually illustrates the difference in length of the rear fuselage between the E/K and the F/L/M/N. This is a different camo scheme from my other P-40's which appeals too me greatly, a bit of variety is a good thing. I have some decals for this aircraft by Superscale but they are way off on the size of the numbers and some other details too so I will have to look into sorting that out. So that completes my P-40 triumvirate, all that remains now id to actually build them! Thanks for looking in and as usual all comments and criticisms are gratefully received. Craig. 🇺🇦
- 113 replies
-
- 22
-
-
My LMS ordered in a Dora Wings 1/48 Seversky J9 for me, which I was able to collect yesterday. So far, so good! Got it home, opened the box, admired the plastic - it really is a lovely kit. But unfortunately, closer inspection revealed that Sprue A (fuselage and cowling) is mis-packed - it's actually the one for the P-35 kit, not the J9/P-35A kit. The cowl guns are in troughs, not blisters. A bit annoying as I wanted to do the J9, but it's perfectly buildable and I'm really not bleating. In considering my options, I thought about getting some AM decals for a USAAC P-35. But then I came across the S-2 owned and raced by Frank Fuller. So my question is: what are the differences between the P-35 and the S-2? As far as I know, apart from military equipment obviously, the differences between the P-35 and the S-2 are primarily no dihedral in the outer wings and a lower canopy. I read somewhere that the IP is entirely different as well. Are there any other differences that I should be aware of before I embark on sprue-cutting? I would be looking to model the aircraft in its #77 guise, painted (metallic?) green, i.e. 1938-39 Bendix Trophy races. I know there have been a few builds here on BM, notably the late-lamented Moa with a superb 1/72 Rareplanes vac, and a couple of Williams Bros 1/32 builds (Chris @bigbadbadge - did you build yours?). There are a few photos on t'interweb, but I've not yet found any definitive information. Any thoughts or suggestions are welcomed! All the best, Mark
- 4 replies
-
- 1
-
-
- Dora Wings
- 1/48
- (and 1 more)
-
Welcome to my Italieri HS 126B finished as a machine from 3. (H) 13 involved in the Balkans Campaign in 1941. The kit , I believe, is the ICM moulding and is not without a few faults. These being some vague location issues, brittle plastic (could be my ham fistedness as I snapped a couple of the struts) and the appalling fit of the top deck behind the engine. On the plus side the detail is more than enough, with plenty of build options. The only details I felt the need to add was a set of seatbelts, gunsight and altering the angle of the tail wheel. Paints were my usual Vallejo ModelAir, weathered with a combination of clay wash, oils and a final overspray of Tamiya XF-57 Buff to blend everything in and make it look a bit faded and dusty. I was surprised at the size of the thing as I was building it, bigger than a Ju-87, but quite good looking in it's own way. As ever, tips and criticism are welcome, how else do we improve? Thanks for looking.