Search the Community
Showing results for tags '1/48'.
-
I know, I know…….I am getting into this ‘let’s start another build….’ when I have (last count) 6 in progress models in various stages. I was taken aback last week when I moved my stash to clean the floor. I have amassed a lot of kits since restarted in 2022. So, finding the reason to reduce the boxes. I have decided to tackle this fat, unglamorous plane in a big box. Here’s my modest stash in a small apartment. I think it’s an old age thing. I am attracted to planes with props now and I have been building these since coming back; Lancaster, Skyvan, Twin otter, Atlantic and now Greyhound. In the stash are Mosquito, Storch, Anson, An-2, Skyraider, B25 and the 1/24 Spitfire……all props. This is my first 1/48 scale plane since coming back. I shall do my most enjoyable part of detailing the cabin a bit and possibly put in some carrier crews showing what’s cod.
-
 I'm pleased to present my most recent build, the 1/48 Hasegawa A-4F, wearing the colorful test livery of BuNo 154175, assigned to the Naval Air Test Center at NAS Patuxent River, circa July 1969 (reference photo). Decals come from the Caracal Models' A-4E/F Skyhawk sheet, and a handful of aftermarket rounds out the presentation. The build itself was mostly pleasant. The Hasegawa A-4 tooling as been around for almost twenty-five years, so it's strengths and weaknesses are well-defined at this point. I opted not to fix the step at the back of the slat wells; any scratch repair job on my part would have been far more noticeable than a subtle geometry error you have to know to look for. The only really iffy issues for me were with the engine intakes and the rear fuselage air brakes. The intakes are a bit of a mini-model in their own right; I had to paint, assemble, and mask them prior to fairing them into the fuselage. Because my reference aircraft didn't have the stiffening plate, I was able to remove it, which let me line up the intake to the fuselage without much bother -- otherwise, the two halves of the stiffening plate weren't going to match up no matter how much I sanded or prayed. It's an adage that if a part can be opened, the kit maker probably expects you're going to pose it open, and the air brakes are no different here. It took some (mostly) judicious sanding to get them basically flush with the surrounding fuselage area. Full marks for any kit maker that includes a bespoke closed part for anything that can be opened! The aftermarket for this one includes an engine exhaust plug from Phase Hangar Resin; intake FOD covers from Quickboost; and most notably, brand new Aero 1D 300-gallon drop tanks from Flying Leatherneck. The kit drop tanks are frightfully basic, lacking any detail whatsoever. These tanks have detail to spare, particularly with the characteristic fuel-filler cap towards the left front of the tanks. I fumbled a bit with the tank assembly, thinking the joins where the nose and fin attach were meant to have a visible seam; they were most decidedly not, and much filling, sanding, and swearing ensued, but the final result isn't too bad. They required a bit of surgery to fit on the kit pylons, but nothing too radical, and they don't affect the center of gravity sufficiently to turn a properly-weighted Hasegawa A-4 into a tail-sitter. (I did manage to drop one and snap off the fin, alas, after painting, so the starboard tank has a slightly cracked fin.) I tried to use a LP Models crew ladder, but I just couldn't get the mounting rod to match up with the matching hole I drilled before I bought it. Shame, because it's very nice. The ladder on the ground in some of the pictures is the LP version; the mounted ladder is from the kit. The figures are from the very nice ICM US Pilots and Ground Personnel (Vietnam War) set, and the base is a pre-made Zoukei-Mura model, which remains the best $20 I've ever spent in the hobby. Decals went down like a dream, just as you'd expect from Caracal and Cartograf. The only iffy decal issue arose when it came time to place the US insignia over the wing vortex generators on the port wing, the bane of any US Navy or Marine Skyhawk build. I erred on the side of caution and hoped that prodigious applications of MicroSol would get the decal to conform, but I needed to have been more aggressive with actually pressing down on the decal during the initial application, I think, as it's not a "painted on" look, with slight bumpy contours visible between the strakes. To their credit, the Cartograf/Caracal decals held up to the MicroSol, only tearing when I tried to force the issue (literally). A tiny piece of white decal from a spare on the sheet covered most of my sins, but it's the one weak point with the decals on the build, all due to the user. Paints are a mixture of Mr. Paint and Mr. Color lacquers, laid down over black and pink Mr. Finishing Surfacer 1500. The red landing gear bay door outlines were applied with a red paint pen. I went for a black-basing technique on the light gull grey uppers and white lowers, and I opted against a glossy finish. I really wanted a worn-down aircraft in this one, so I used an off-white instead of an insignia white and put down a final dull coat using Winsor & Newton Galeria Matt. Indeed, it's a heavily weathered bird, probably not to everyone's taste, but I wanted to work on my weathering skills. I went for an overall uniformity of grub, using a warm grey oil wash. Though I'm sure no crew chief would let his or her aircraft out of the hangar quite so scuffed up, I'm envisioning the end of a series of grueling test flights in the frankly oppressive summer humidity of southern Maryland, as well as claiming a bit of artistic license. This particular airframe went through so many changes of scheme that I wager it was repainted as often as it was scrubbed down. On the whole, this was an enjoyable project, one that really stretched my skills. Thanks for reading and for taking a look.
 -
Hi to all. A few weeks ago I finished this kit, AMK's MiG-31BM. I Painted the entire kit with AK real Color RC336 MiG-25/31 grey. The dielecrtic panels of rhe nose cone , front fuselage and vertical fins with dark grey from Tamiya's acrylic, XF-24. I decided to use the kit's decals. I hope you like it. Best regards, Pablo
-
Hi folks,third and final build for this GB is an early version of the Wildcat in a late 30's yellow wings scheme fits in nicely with the other two builds. picked up for a tenner today.
-
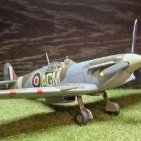
 Morning folk's,built for the Mustang GB I thought as Lou IV is being built exactly as it should be by others taking part mine would be based on a restored Warbird in the colours we'd really like to think she was in,all brush painted and the rear cockpit removed for the second seat for the paying passengers! Many thanks for looking in.
 -
Hi all! One aspect of modern warfare I find fascinating is Electronic Warfare. Now I don't have the first clue how any of it works but I do know you'll have to train people to conduct and counter EW. And that's where this specialised Skyhawk comes in! Four TA-4Fs were converted to EA-4Fs and fitted with electronic equipment for fleet training. These were operated by VAQ-33 'Firebirds', who would simulate electronic threats during fleet training. The kit will be Hasegawa's TA-4J in 1/48, with Caracal decals for the VAQ-33 Skyhawk. There's a handful of photos of these Skyhawks floating around, including on of this specific EA-4F at NAS Norfolk in 1975, courtesy of AirHistory.net. Big fan of Hasegawa and the A-4 is one of my favourite aircraft so this should be a fun build. Thanks for looking in!
-

1/48 Academy A-10C Thunderbolt - "Hoosier Hog"
eng posted a topic in Ready for Inspection - Aircraft
Its been a while since I last posted anything here, but have just finished Academy's lovely new-tool 1/48 A-10C Thunderbolt, and thought I'd share some photo's. Kit: Academy 1/48 A-10C Thunderbolt "75th FS Flying Tigers" - Kit no.12348 Additions: Phase Hangar Resin corrected inlet/fan, some Tamiya tape seatbelts and a JDAM pinched from a Tamiya F-14D kit Paints: Mr Hobby, Tamiya and Vallejo Decals: TwoBob's "Hoosier Hogs" sheet for main markings and kit decals (which are excellent!) Weathering: Flory Models Grime wash, Windsor and Newton oils, and Daler Rowney pastels, graphite pencil Will I build another one? Absolutely, I loved this kit, went together incredibly well and the detail is superb. Personally I think this is an absolute steal for the retail price. All comments, good and bad, more than welcome. Enjoy, Eng- 13 replies
-
- 50
-

-

-
 This is a fabulous kit by Airfix, very little filler needed and slots together really well. This particular Javelin was originally built as an FAW.7, and subsequently converted to FAW.9 standard before being one of the first pair of the latest version to be delivered to 25 squadron in December 1959. XH768 went on to serve with 11 Sqn after 25 disbanded and this airframe is now preserved in Italy (marked as XH707), having had a recent restoration: https://www.museoaviazione.com/en/gloster-javelin-faw-mk9-restoration-2021/ All comments and discussion welcome as always …
- 14 replies
-
- 35
-
-
-
This is my latest build, the 1/48 Sea King from Airfix. It took quite a while for this kit to arrive in Oz but it was worth the wait. It lives up to all the hype. The detail is very crisp and the fit is good. There are 4 versions to choose from and there is a bit of cutting, sanding and filling required to build the original HAS.1. This is understandable because the other 3 versions are very similar externally so there will be far fewer changes required in building those. The kit went together quite well. I only had 2 problems. The first was a missing piece from one of the Observer’s consoles. I think it may have been loose in one of the plastic bags when I threw them out, so my own fault. I scratch built a replacement which can’t be seen anyway. The other was a poorly moulded brace for the winch housing. I still managed to use it and it can hardly be noticed. It was built OOB except for poles and wires for the crew doors, home made seat belts and lambs wool seat covers. Painting was done with Tamiya acrylics and Vallejo Metal Colors. The main colour called for RAF Blue-Grey. I bought 2 brands of Blue-Grey, neither of which was any good. One was a pastel baby blue and the other was almost black. So, I made a custom mix of XF-18 Medium Blue and XF-17 Sea Blue in a 5:1 ratio. It was weathered with Dark Dirt wash and Abteilung Smoke for exhaust staining. The base is a piece of plywood painted as a section of HMS Eagle 1960's style on one side and 1950's on the other side. Cheers
- 13 replies
-
- 46
-
-
Hi all! I've recently sold a few model kits I wasn't going to build so I though I'd reinvest in a kit I've had my eye on for a while now. Picked up Meng's F-4E and the Isracast conversion set to build a Kurnass, as well as the Isradecal Kurnass set and some Quinta Studios 3D cockpit decals. I also have Hasegawa's US aircraft weaponry set which includes early GBUs and targeting pods. This is my first look at a Meng kit and just looking over the sprues it looks absolutely brilliant! I've heard good things about this kit and I've never had an issue with Quinta or Isradecal parts in the past so I'm very much looking forward to this build. I'm going to take things slow and hopefully do this kit justice. As far as the scheme is concerned I have a few potential options. I own the Double Ugly IDF Phantom books so have a great source of reference images. My options are: -201 Squadron Kurnass 2000 with 4 x GBU-12s and a Pave Spike targeting pod. -119 Squadron Kurnass with 2 x AGM-62 Walleye guided bombs and datalink pod. -119 Squadron Kurnass with 4 x GBU-10 guided bombs and a Pave Spike targeting pod. Source: Double Ugly Israeli Phantoms I'm still undecided, the Kurnass 2000 would require extra work as I'd have to scratch build a few small parts but the heavily worn underside looks like a great challenge to replicate. Thanks for looking in- looking forward to this!
- 1 reply
-
- 4
-
-
- Meng
- F-4E Phantom
- (and 1 more)
-
 Hello all, here is my latest completed model. It is the Special Hobby Firefly converted to a U Mk.9 target drone. This aircraft was built as an FR Mk.5 in 1950 and converted to a drone at Ringway in 1955. It ended its days at Hal Far in August 1960, crashing on landing after escaping being shot down by a Royal Navy destroyer! The base kit is the SH Firefly Mk.V “foreign service” boxing. I scratch built the various drone addons including the wingtip pods which were made from Su-27 ECM pods! The rear cockpit was rebuilt based on plans provided by @CJP to whom I am extremely grateful. The paints used were mostly Mr Hobby, the decals came from the spares box and the final finish was VMS’ excellent satin varnish. There are a few inaccuracies, mainly the fonts for the various code numbers and letters aren’t 100%. The elevators are the wrong early style provided in the kit, but the time I found out it was too late to make the change without serious rework. The wingtip pods need a few more details adding but this will come in due time as I get round to it. As it stands it makes a different addition to the shelf and certainly stands out amongst its contemporaries! Chris
 -
 I've got a few F-104s in the stash...so this is a fine excuse to build one. Hasegawa's venerable 1/48 Starfighter kit repackaged by Eduard with some extra goodies and decals for several operators. A small bit of additional AM will be acquired (some bits already sitting in the cart awaiting payday), likely surrounding engine can, bang seat, pylons & weapons. Not planning anything extravagant, but it wouldn't be the first time things got out of hand. Parts are washed and patiently waiting the start. Realistically it'll be Sunday before I can even look at it...and there is currently a 1/72 Tomcat on the bench vying for space (never mind the F-4EJ Kai & Mig-25 that need to find their way back ). I'm not personally a fan of the special meet markings, so the red & white accents will likely be left off representing a typical line jet.
- 2 replies
-
- 13
-
-
- Canada
- CF-104 Starfighter
- (and 1 more)
-
Just bought myself a Tamiya 1/48 Firefly and would like to do it as a Guards Armoured Division tank. Anyone know how to get hold of after-market decals in 1/48? Printing my own seems the only option. TIA.
-
My 2nd contribution to this GB is a real Boom Boom, the North American X-15-2 research plane. This will keep me occupied while the filler is drying on the Vatour! Most if not all will know this plane and its exploits so no need for more info here. Suffice to say only 3 X-15s were Built with the 2nd being involved in a landing accident early in the program. This plane was rebuilt 28" longer for more fuel capacity and the kit is of this longer plane meaning only #2 can be built from the box. Number 2 was the record breaking plane so the preferred subject. I bought this kit a while ago and think it will fit well here as a Baby Boomer. The kit looks fairly basic although there is a lot of superbly detailed resin. Since the plane dropped its lower fin on landing to reveal a flimsy undercarriage I'll build it in flight. This will avoid most of the resin which is a shame. The actual record of the fastest manned aircraft at Mach 6.7 was made with the plane in a while ablative coating which was designed to melt off the plane as part of the cooling process. I quite like the appeal but think I'll stick to a more traditional black scheme expecially with the very excellent looking decal sheet. Colin
- 14 replies
-
- 14
-
-
Following a couple of quiet months, these GBs seem to be coming around quickly now, at least from my perspective. See how this one goes. Back when a flag against our names was a strong hint as to which country we should build, Portugal was selected for me. OK, they are now decorative, maybe a gentle hint ... but my choice was made in earlier times. Portugal Now, I know little about Portugal or its armed forces, but I took a look to see what I could find. After rejecting ground forces as (nearly) impossible to model, two aircraft stood out as possible in 1/48. An F-86 and an F-16A. Already overcommitted on GBs, and with Denis's F-86 GB due to follow soon, I settled on the F-16A. OK, what is needed for a Portuguese F-16A? An F-16A kit, and some appropriate AM stuff, a selection from Model Maker Decals, and a 3d printed ADF tail from 3D-Chute Expert and a 'pit from Quinta Studio. Actually, the AM stuff isn't essential for a Portuguese build from the Kinetic kit. The ADF tail isn't shown in Kinetic's instructions, but the necessary plastic is in the box, the key detail is shown here alongside the 3d printed tail. The difference is subtle, but I feel the 3D printed part is better.
-
 While we all know the VK45.02 (P) that begot the engineering abomination that was the Ferdinand/Elefant the story of the Henschel move from the boxy Tiger I to the sleek and malevolent Tiger II has been little studied, although there have been many discussions and electrons have suffered in their uncounted billions because of it. I have been researching this vehicle since this GB got scheduled and I've listed most of the better sites/pages to avoid unnecessary suffering among the BM Massive. You are welcome - this is my act of random kindness for today. So; Listing of Tank Museum articles - some are very good indeed and they all have decent and useful photographs. Those concerning the real story of Tiger 131 are most interesting. Withinamnesia summary and armour supposition - From 2016 a good summary of what was known at the time and a decent stab at the new armour layout which resembles the first, short lived, iteration of the design conceived on 15-16 April 1942. The hull mg position was to be a 'parallel' design to that of the Panther AusfD pending development of a better mount for the thicker plate used. Stunning Swiss Museum Restoration The photo coverage of the restoration alone makes this site worthwhile but there is much more there. An 'interesting' WoT discussion and Another one and a slightly better blog post Starts well but well.... WWII Forum post with info regarding upgunning the Tiger I Axis History Discussion on upgunning the Tiger I Warthunder Discussion on upgunning the Tiger I - if you think you know something a look through these may help you understand Finally a Mythological Blueprint emerges... nearly Andrew Hills (author of a very good book on the Tanks of TOG although I gave him a hard time about the drawing reproduction in it) sums up the current state of play. The linked video is worth a watch as well. So finally starting from (some of) this And guided by and the Tank Encyclopedia article linked above I'm going to aim at the VK 45.02(H) if the design had been frozen, well as near as any WW2 tank design was frozen, in October 1942 allowing deliveries to start April/May 1943 running the assembly line onto the new vehicle as Tiger I production was adjusted to allow the new vehicle to start ASAP. With the VK 45.03 design really starting around 12 October 1942 and first acceptance in January 1944 I feel this is reasonable. With the VK 45.02 design being less of a stretch it could have been with combat units far quicker than the six months the VK 45.03/ Tiger II took to master. As a new project when Speer became Reich Minister of Armaments and War Production on 8 February 1942 it is possible that production could have started a little sooner if he saw this as a reputation establishing project - I think he would certainly have done so. So I'll start with a Skybow Tiger I early and a Tamiya Tiger II turret but first I'll do a bit of digging to see who might have got them, with the VK 45.01(P) originally earmarked for Rommel in N. Africa I fancy doing the desert scheme as used in the southern front of Russia on other types. Your opinions, engagement and questions are always welcome so no need to be shy.
- 14 replies
-
- 10
-
-
- VK 45.02(H)
- slightly what-if
- (and 1 more)
-
Hi all, I recently noticed that the paintwork on my Airfix Sea Vixen from a few years ago was starting to craze and fade somewhat. As I have fond memories of building the kit and it’s not exactly easy to get hold of a replacement I decided to give it a refresh. MRP provided the paints, the EDSG being a much better match, and the decals came from a variety of sources. The stencils mainly came from print scale, probably the most traumatic three day decalling odyssey I ever hope to endure! Thin and extremely “grippy”! I used VMS satin varnish for the final finish which I have to say is absolutely lovely stuff - very very smooth! In the process of gluing the last few bits back on I managed to crack the windscreen, fortunately I too cracked and bought another kit along with the FAW.1 conversion from Alleycat which includes a new windscreen. The spare kit one will eventually find its way onto this model. Hope you like the model ! I think she needs a Phantom and a Buccaneer for company…. First the original: And now the 2024 refresh:
-
On signing up, my original plan was an Airfix 1/48 Hunter in Dutch markings. On looking at the original sign up list, I saw that drew the Romanian flag. Knowing knext to nothing about the Romanian armed forces, but being that my sister-in-law’s brother’s wife is Romanian, this got me thinking, so I went off to do some research and some shopping followed. Romania became a member on the 29th March 2004. Having a look on Scalemates I came across the 1/48 Wolfpack MiG-21 LanceR with schemes from 2007 and 2009. Result. The Mig 21 officially was retired from the Romanian Airforce on the 15th May 2023 The Wolfpack LanceR is based on the Academy plastic with added resin from Wolfpack. Don’t know much about the Academy plastic, having only built Eduard MiG-21s to date. So what do you get in the box? Academy Plastic Lots of nice resin.
-
Hi, I am giving up Ebay, I am glad that I stashed all I wanted in 2020, because that site is unusable now. The prices in shipping are a joke, as everyone is trying to avoid Ebay fees. 50 USD for shipping? Yeah right. I would rather print one. I was looking at a Eduard 1/48 DFW T.28 Floh, this guy: but it is just not worth it. For the joke, I checked if someone have it as a model, and here it is: So, I downloaded the pieces, and used a Ultimaker 2+ Connect printer I have access to. Happy with my first piece, but I realised that the orientation was not the best. Back to the printer, and this time printing it on a way that the fuselage curves are one in the xy-axis, not in the z-axis which will always be "pixelated" Much better now. Also, since the Floh pictures I see do not have exhaust pipes, I decided to print two "port" pieces, one mirrored so I can do my own exhaust holes. The rest of the pieces were mashed together on a single session. I am not sure if I will use the 3D printed struts, but at least they are useful for measurements. The wing was also an experiment, to see how the rib indents would print out. Yeah, it looks terrible. Printing the wings with the leading edge down. They look thin, strong and retain the airfoil curve. The only con is that they do not have the rib indentations, but that is not a big deal. Adding a tail for the second prototype using sprue sheet. This is going to be a quick kit only to test the 3D printing capabilities. So far I am enjoying a lot, this kit looks doable in an acceptable way, although I will skip most of the cockpit details. Plastic is harder and more annoying to work with (and probably glue), but that also comes with the benefits of thinner pieces.
- 3 replies
-
- 2
-
-
- 3D printed
- floh
- (and 1 more)
-
This Phantom was originally built for the US Navy as 153795 and served in Vietnam with VF-154 ‘Pukin Dogs’ on USS Constellation before later serving with the Marines. Following the UK’s decision to purchase 15 Phantoms for the RAF to fill the gap left by 23 Sqn deploying to the Falklands, the aircraft entered service with the RAF’s reformed 74 Sqn at Wattisham, Suffolk in October 1984 as ZE354. Along with its squadron mates, this Phantom was soon adorned with the unit’s famous black fin and served until mid-1991 when the Tigers took on surplus Phantom FGR2s until disbanding in 1992. This is the 1/48 Academy kit, and it was not without its issues, particularly the fit of the intake sections to the side of the fuselage. The nose section also required filler underneath, but although due to age it compares unfavourably to new-tool Airfix (understandably!), with some care it’s a reasonable build. I particularly like the breakdown of the tail section as it makes painting much simpler. WIP here: I used the Eduard cockpit detail set to enhance the instrument panels, and made my own canopy mirrors. Markings are from the Xtradecal ‘History of 74 Sqn’ set, plus a few stencils, etc from the spares box. I’m still looking for the crew names for the canopy rails. Paint is all rattle cans, with Mr Color 11 for the fuselage and outer wings, Tamiya AS-16 for the underside and TS-81 for the inner upper wing surfaces, plus Halfords satin black for the fin. All comments and discussion welcome! …
- 12 replies
-
- 52
-
-
-
Hi All, We have a wee while to go so I'll share this gem from the bottom of the stash which will be my contribution to the Group Build. I bought it 2nd hand but suspect its been through a few sets of hands on its way to me. The box was part opened on one end but I opened the sealed plastic bag this morning. There are no dates in the kit but it has HAWK scribed into the stbd fuselage half in the usual rough manner. Scalemates lists it as released by Hawk in 1946 and this Testors boxing is from 2009. The moulds are ancient but my kit is not too old. I'm it will fit perfactly! I'll run this as a second build for now while finising a few entries in the 'Baby Boomers' Remember the A3 double sided instructions? Colin
- 23 replies
-
- 17
-
-
 Hi All, after a lot of indecision, I've finally settled on what was my originally-intended subject, that of 44-72199/G4*A flown by Capt Charles Edward Weaver of the 362nd Fighter Squadron out of Leiston. This particular aircraft has a very striking reclining nude for its nose art, although strangely there's no actual name. I had set out to model this aircraft a few years back with Airfix's 1/72 offering and KitsWorld decals, but as so often happens with me and products from Margate, it died a death. So here I am again! This time the kit is Eduard's 1/48 Weekend boxing, which has Chuck Weaver's mount (fnaar!) as one of its provided schemes. This will be a mostly-OOB build (provisos as below), and as such I'll be relying on Eduard's researches for colours and fixtures/fittings. Having said that, I'm not entirely convinced by the reproduction of the voluptuous lady and so I may well fork out for Pyn-Up's set which appears to be much nicer (although check out her shoes!). The KitsWorld set is available in 1/48, too, but also seems slightly "off" with herself's ribcage resembling a toastrack. Anyway, to the pics (as if we don't know what it looks like!): Box art: Instructions: Very useful, looking at all those tiny pieces! My subject: Kit-supplied tiny PE fret and decals, plus a couple of bits of AM: Sprues: Transparencies: I'm slightly disturbed that all three canopies have detached from their feeds.....which is which??? I've assembled the seat, but as it's just a seat, I'll save pics of it till there's something else to show as well Cheers, Mark
 -
 Lets see how this goes........ The kit does not have the side camera window... i am wondering if i'm brave enough to drill a hole and give it a go ..... Anyway started ... with a few other things... lights under the wing. painted silver apart from the centre. Filled that with ""Looks like Glass" ..seems to look like a bulb a drop of "Looks like Glass" on the front. Part II soon......
- 25 replies
-
- 17
-
-
- De Havilland Mosquito
- Tamiya
- (and 1 more)
-
Hi folk's should be enought time to do another 1/48 build for this GB so instead of the common sense route of Tamiya's offering's I'll head back to Happy childhood days and Airfix's at the time much lauded release.KK have a dozen in stock so not sure which boxing will arrive if the decals are unusable AM will be bought.
- 44 replies
-
- 17
-
-
This Kit has been such a pleasure to make .... 5th model now... think i'm getting the idea. 🤓 BUILD DIARY