Search the Community
Showing results for tags '1/35'.
-
 I've been somewhat remiss with my group builds this year, with none competed. Hope this will break my duck "This" is a Somua S35, captured and taken into German service. The example I plan to build here will be one used for anti-partisan operations in Yugoslavia. My base kit will be the Tamiya example (is there another?) supplemented by DEF Model resin & PE components to try and improve on Tamiya's offering and add German specific modifications. (Actually it is three DEF model sets in one boxing) The box tops... The sprue shots And the after market stuff ... The DEF AM stuff MTO / Yugoslav theatre decal options: And, my reference source
- 9 replies
-
- 9
-

-
- Yugoslavia
- Tamiya
- (and 1 more)
-
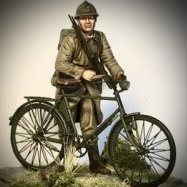
Right chaps, I'm a bit stalled on the 43, so much scratch building that i feel that I need to do build something a bit less challenging. I've selected this little beauty, one that my very good friend bought me a few years ago, Longshanks, so take a bow fella I know you've been waiting to see this get done. After my holiday to Normandy I'm a bit inspired to build something that would fit in with the trip. Next to no AM will be hurt in this build but I'll do some light scratch work just to work things in my own way. I built a Sherman back in 2016 and really enjoyed the build so this will be a second WW2 build for me. A Small amount of AM, nothing too serious (At this point), Its more so for the crew. Shall probably make a start over the weekend, Panic ye not, I'll be back on the 43 after this but I feel I need something a bit straight forward for a week or so. Regards Dan
- 755 replies
-
- 17
-
-

-

-
In keeping with the modern Russian theme here is a 9A53 Tornado S MLRS in Russian Green. Not too thrilled with the color but a nice enough kit.
-
 Here is the beast, mostly complete but still needs the Accurate Armor tie downs. chain tighteners, etc.
 -
Here is something a little different, in Syrian colors for a change.
-
One of the new Takom "Blitz" series, a nice little guy.
- 12 replies
-
- 15
-
-
German recovery Panther. Full interior but most is hidden of course. Started this on Friday and finished it following Wednesday so with only a 6 day build might have missed a few spots. Yes, some long days involved. .
-
So this will be my new project thread...what i would like from you guys is input on which one you would like me to do next. Pick one and drop a comment and it will be done...... Have a great day my friends. Steve
-
Hi All, Here's the ancient Tamiya kit which is pretty cheap but as is often the case it's not that cheap when you've had to add gun barrels and PE Kit which i did. It probably also needs resin wheels and aftermarket tracks but then its not a cheap kit anymore... The ammo trailer was good value though with 2 in the kit for about £10. Everybody builds this with the sides down so i thought I'd show it in transit rather than fighting. Easy to build with a couple of screws and metal axles to add to the fun. Usual C&C welcome Cheers David
-
Everything else is heading to decals & weathering so time to start he next kit. Going with the Hobby Boss M4 HST (most likely in straight OD). It may eventually have something to tow (thinking a captured 88mm AA unit). Usual box art/sprue shot to start
-
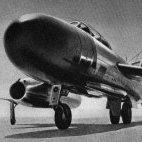
 On the night of 26/27 July, with the eighteen jeeps, each carrying 3 or 4 British or French commandos, navigating the desert without headlights and trying to keep formation. The weather was ideal with a full moon and no clouds. As the raiders approached the airfield, the lights lining the runway switched on, causing a degree of panic among the commandos who feared they had been detected but the lights had been turned on for a Luftwaffe bomber to land. Stirling fired a green flare and ordered the jeeps forward onto the airfield in 'V' formation. The SAS stormed the airfield, using their K guns, loaded with tracer ammunition, to fire on the parked German aircraft which included Ju 87 Stuka dive bombers, Ju 52 cargo aircraft and Bf 109's fighters. German troops replied with machine-guns and anti-aircraft weapons, disabling one jeep. Lance Bombardier John Robson, a 21-year-old SAS soldier, was manning a machine-gun when he was shot and killed, making him the only Allied casualty of the assault. The raiders used most of their ammunition and manoeuvred to escape after a last sweep for undamaged aircraft. Members of the group leapt from their jeeps to place bombs in the engines of a parked bomber before withdrawing. The raiders had destroyed or damaged around forty Luftwaffe aircraft, though the SAS claimed twenty-five as it was customary to under-report Axis losses. https://m.youtube.com/watch?v=_ZBJ97CEc1s With a mixture of 1/32 and 1/35, I'm going to recreate a snapshot of the raid using Tamiya's 1/35 SAS jeeps, Trumperters 1/32 Stuka and figures from Dragon and Masterbox. I'm going to pop it all in a lightbox with some Woodland scenic LEDs and hopefully some sound. The kits: Trumperter Ju 87 Tamiya jeeps Figures
- 119 replies
-
- 25
-
-
- Stuka
- sidi haneish airfield
- (and 1 more)
-
Hi All, This time something nit as old as WWII, hope you like it.
-
Case VAI Tractor Thunder Models 1/35 I've had this little Case tractor sitting on the shelf, built up and in primer, for a couple of years, but I've never seemed to find the time to get it finished. I've currently got a short gap between bigger projects, so I thought it was high time I got it out of the box and done. Another reason for the long delay in getting it done was that I wasn't sure what to do with it. I'd originally primed it in rust with the view to finishing it as rusted out wreck, but when it came to it I decided to go for a heavily worn but still working machine finished in the original Case orangey red, albeit with a heavy dose of chipping. The kit itself is very nice, with some lovely detailing. Some of the parts, such as the steering linkage, are a little fragile but everything goes together very easily. The only additions are a bit of wiring on the engine. As well as the original Thunder release, the kit's now been re-boxed by Airfix. (for the observant out there, yes, I did put one of the rear tyres on backwards) Thanks for looking Andy
-
This old beastie, I think we all know her & she needs little introduction on here, dare I say a Tamiya classic. M48 1 by phil da greek, on Flickr M48 2 by phil da greek, on Flickr This is the beginning of what will almost certainly be my most ambitious modelling project in my 40 odd years of sticking plastic together. Having been in uniform all my life I retired last year at the grand old age of 52 and am now working through the stash and the list of ideas (in between all that other stuff that life throws at us). The build is inspired by Kyoichi Sawada's iconic black and white photograph showing Lt. R. Horner USMC and his platoon sheltering behind a Patton on Tran Cao Van Street in Hue on the 1st February 1968. If I can find a display box the right size then there will be two M48s and a number of figures, probably Bravo 6 as they fit the bill. This won't be a recreation of that photo but something close, as also seen in the movie "Full Metal Jacket". On with it then, being Tamiya it goes together pretty well, there are a few odd gaps that need filling with white plastic card here and there which I believe has to do with the plan for Tamiya to motorize everything. A couple of pics............. M48 3 by phil da greek, on Flickr Straight out of the box, nice and clean with a few seams to clean up and refine. M48 5 by phil da greek, on Flickr Some undercarriage detail and some white card filling in gaps that would allow the daylight to shine through. Once painted and weathered you'll never know. M48 4 by phil da greek, on Flickr Bottom detail is complete, the wheels are being prepared seperately as that's how I like it. She's going to be brush painted, prepped in matt black and then overall is going to be Humbrol 155 with an appropriate dirt on top. It's not going to be fast but you are welcome to jump in with any thoughts........................................
- 31 replies
-
- 10
-
-
The venerable Tamiya SAS Land Rover from what feels like a 100 years ago. I'm sure we've all built it at least once, I found this about a third done sat in it's box on the shelf a couple of weeks ago so decided to get her built. Mainly Tamiya, with some Accurate Armour and who knows what out of my armour spares box. Brush painted with a custom mix of Humbrol enamels, Winsor & Newton matt varnish and weathered with Humbrol enamels again. The plan was a well used version on a tea break with some sort of figure studying the map, but that chap appears to have gone off on other things. She was fun to build, I look how she looks and all four wheels touch the ground at the same time! Rover 3 by phil da greek, on Flickr Rover 7 by phil da greek, on Flickr Rover 1 by phil da greek, on Flickr Rover 2 by phil da greek, on Flickr Rover 5 by phil da greek, on Flickr Rover 4 by phil da greek, on Flickr Rover 6 by phil da greek, on Flickr Thanks for looking in! Phil.
- 12 replies
-
- 36
-
-
-
Yep, you've read that right, my latest completion is a MiniArt Tiran 5! Originally I bought MiniArt's Tiran 4 Late Type non-interior kit to build as the vehicle featured on the box top - full late mods, 100mm gun and spider web wheels. Normally I like to build according to at least one photograph but unfortunately I couldn't find any images of a tank in SLA service in that specific configuration so I was a bit stuck. Just before lockdown came into force here in the UK I decided to bite the proverbial bullet and buy a MiniArt T-55 and cross kit the two to produce a SLA Tiran 5, which I do have plenty of images of thanks to Samir Kassis' "Tiran in Lebanese Wars" book. I settled on 37027, which is the non-interior version of the T-55 Model 1963 kit. Thanks to Kassis' book as well as "Tiran Wrecks" by Michael Maas and Adam O'Brian I had enough references to produce a reasonably accurate rendition of such a vehicle. All in all the cross-kitting exercise was fairly simple - it's basically the T-55 kit's hull, turret and running gear married to the Tiran 4 kit's running boards and Tiran specific parts with a little modification and scratchbuilding. The running boards do need some alteration as they don't quite fit straight away - the exhaust is very slightly further back on the T-55 kit and material needs to be removed at the front where they meet and wrap around the upper glacis. I nearly made a boo-boo on the turret: I remembered to reverse the commander's cupola but I forgot to do the same for the loader's hatch! Luckily I caught it before the glue had hardened! I did spend some time during the construction phase pondering what shade of blue to paint it and settled on Humbrol 248 RLM 78 as it looked near-enough to what I was looking for. As is normal for me the whole model was painted using a brush although as usual for Humbrol's latest paint standards the RLM 78 was a bit thick. Rather ironically I completed the model just after the explosion in Beirut last week. As always, comments and criticism welcome! Mike.🇱🇧
- 21 replies
-
- 21
-
-
My most recently finished model is Dragon's Panzer Ib in 1/35. While this was in a smart-kit boxing, it wasn't as "smart" as some of Dragon's other releases of the last 20 years or so. Detail is very good, but not great, and fit was a bit problematic in spots. I wanted to try out a few new weathering techniques on this model, one of them being wet pigment application, and the other a sort of different spin on oil-dot filtering. The wet pigment experiments were not successful. Something about the pigments I used (Vallejo) was not allowing them to form feathered edges. Instead they came to abrupt edges where the pigment would stick, and the rest would just dust off. This is especially visible on the sprockets. I used heavy washes of light ochre and light tan colored oils to fix the mess. I actually like the effect, but I need to learn how to control it more. The topside weathering was done with dots of Naples yellow, tan, sky blue and olive colored oil dots, scrubbed into the finish with a brush dampened in thinner. Unlike my normal approach to this, I did each color one at a time. I also added a few paint chips, most of which you can't see under the dusty look left by the oils. I'm pleased with how this turned out, and I learned a lot that I'm looking to apply on my next project. Most importantly - neatness counts when you're making your tank look dirty. You can't just slap dust and mud on any which way.
-
1/35th Tamiya T55a in Syrian colours from the Yom Kippur War. Pretty much oob wit a bit of light ( I hope ) weathering.
-
Hi all, my first plastic kit for a while and built OOB. Not any specific example but various photos referenced for ideas. A little bit of history. i built loads of kits as a kid and progressed onto Tamiya F1 cars but in all that time never even considered weathering as an option. After giving up the hobby, lately ive found myself getting into modelling model railways and after making a few kits (brass) started to dabble with weathering but with mixed results. Anyway whilst doing research into weathering techniques I found myself on this site and was inspired by the projects that i was seeing completed. So much so i thought i'll make a tank and try out the many techniques i have seen on here and on youtube. Overall I'm very pleased with the result albeit with a few mistakes that I've since seen. ie the silvering on one of the decals. As I've said this is not a model of any particular example but just a canvas to practice on. In some ways the best bit of the hobby is that it has inspired me into taking an interest in WW2 armour. The next project will be a Matilda as I had an uncle who died fighting alongside a Matilda in north Africa (Operation Battleaxe for those that know about these things). I can feel a little diorama homage coming on.
-
Hi all, this is going to be my next build. In the large box you find the upper hull as one piece, four big sprues grey styrene, one clear sprue, a small photo etch fret and a small decal sheet. The parts are nicely moulded, no obvious flash or ejection marks. I intend to build a Typhoon K of Russian Military Police in Syria because the colourful stripes will break the green overall scheme. I bougt the decal sheet from Echelon Fine Details, which has also parts for the blue flasher included. The decal sheet also includes decals for a GAZ Tiger, which is great, so I can build another one ´! That's all for now, I hope to show some progress soon. Thanks for looking!
- 42 replies
-
- 10
-
-
Finished - basic base as I didn’t want to overwhelm the figure
-
Hi everybody, I have finished my GAZ Tiger recently, a very nice kit from Zvezda. It was a joy to build, with a very good fit of the parts. Colours from AK interactive, slight weathering with pin/panelline wash, a bit of oil wash, drybrushing and pigments. Build log: Now on to the pics. Thanks for looking! Have a nice day Nick
-
A while back I picked up a couple of figures from Nuts Planet's Trigger line of 1/35 post apocalypse figures, and I've just recently got around to painting up the first of them. The figure's simply named Shield by Nuts Planet, and it's a very nice sculpt (by Joo Heum Yoon) with really fine detailing. There's even individual teeth on the open ends of the zipper on the jacket. The only addition I made (apart from the base) was the metal mesh in the opening in the riot shield. The base is a generic 50mm figure base, covered with texture paste and broken plaster for the cracked concrete slabs. The toxic ooze is Vallejo Still Water resin mixed with a little bright green acrylic. Thanks for looking Andy
-
Having finished the T34 and almost completed the T55a I’m enjoying large scale armour so I’ve decided to start on my M3, as with the previous it will be largely oob but I’m going to do a Caunter scheme as I think it’s a wonderful looking camouflage. The kit has rubber band and link and length tracksThe rubber band tracks are quite good and could be stuck down to get realistic sag so I’m not entirely convinced that the individual tracks are all that much better, but I decided to use them. So I’ve started on the individual tracks, talk about fiddly, but I shall just chip away at them.
-
After many years, I had this funny twinge. Eyes twiching, involuntary spasms & visions of mud, loads of weathering & tank tracks. So it all came to a head when I sent the scouts out to hunt me down a Tamiya 1/35 Leopard 2A6 at the Peterborough show. While I was doing the usual normal stuff like looking for appropriate 1/72 things with wings on Stuart found me the cure for my secret craving. A nice Tamiya 1/35 Leopard 2A6 for £25.00! Thankfully the previous owner had stashed away some photo etch & a replacement aluminium barrell. Now I do like tanky things but to me these Leopard 2A6's are how a tank should look, much like a Ford Granada Mk.II looks like a real car! Every car after 1985 just looked wrong. It was great fun to build, no proplems going together whatsoever & the moulding on the barrell halves were so good it looked as good if not better than the relacement gun barrell. For the paints I used Ammo Mig paints & for the weathering I used some washes & pigments from Ammo. I also added some wire to represent chains for the flare discharger caps & added some broom bristles for the whip arials. Like I say this is basically my first tank in about 40 years, so when it came to tackling the rubber tracks which came with the kit I wasn't sure if I should prime them first then paint & give them the wash treatment. I actually attacked them first with the Ammo Mig Tracks Wash first which dried into the rubber & gave it the base colour. I then went at them with Mig "Earth" then left that to partially dry & added some pigment to them. I finally sprayed an acrylic matt on the tracks to seal them in. Well it worked & looked fine to me! Weathering of the superstructure & the turret I used some panel line washes & some oil spot filtering. I'm not sure if I did too much or too little to be honest, but it didn't look too bad through the lens of the camera. Got a few more wingy projects to go through & at some point I will have to make a nice diorama base for it, later... Thanks for looking, now I've got to decide on another similar subject. I like modern heavy tracked vehicles & was looking at possibly doing the Ariete which does look similar to the Leopard. Martin
- 5 replies
-
- 21
-
-
- First ever tank build
- Leopard 2A6
- (and 1 more)