
Search the Community
Showing results for tags '1/24'.
-
This is my model of the iconic Austin Mini Cooper S. The Tamiya 1/24 scale kit is truly an oldie and has long ago been discontinued. Inside the kit there was the marking 1983. I was able to order mine on the net. The quality and the fit of the parts was good but not of the current Tamiya level. To emphasize the British origin of the car I asked my friend to print the Union Jack decal for the roof. I sprayed the red areas with Tamiya TS-8 Italian red. Inside the car I painted the seats and other parts with Humbrol and Vallejo colours and the floor was covered with dark red flock. The widow frames and other chrome coloured areas I modelled from Bare-Metal foil. In the engine compartment I added some wiring to make it look a bit busier. One snafu, of course happened during the construction. There was a nice metal transfer of the brand "Austin Cooper S" to be attached to the trunk. Well, in about forty years the glue had weakened so much that the letters didn't stick to the surface. When trying to detach the transfers from the tape I managed to ruin the "Austin". As I was to succeed with the 1 mm sized "S" it suddenly skyrocketed to outer space and was sucked in to the black hole of lost parts. So the Cooper one was the only transfer that I managed to get out and it sits now on the trunk. It's not correct but what can you do!
-
To run alongside the Miniart tram build (and give me a break from the intensity) I’ve started this 1955 Paris police car (99 parts compared to 810 in the tram😳) Ive made a start with the engine So far I’ve added a few additional details to the kit offering - it’s almost ready for some paint before adding the final kit parts and a bit more detailing ive also made a start on the bodywork by cleaning the shell up and rectifying the the glaring error with the rear window (way to small on the kit for the police version) Think I’ll finish the engine then back to the tram for a bit
-
Junkers Ju 87R-2 of 4./StG 2, Libya, circa March 1941. Like other early arrivals in North Africa she wears the European 70/71 splinter scheme. The white spinner tip is reportedly a Staffel-within-Gruppe recognition aid. Soon after the start of their desert service 4. Staffel replaced their original four-leaf clover badge with the more appropriate emblem of a Luftwaffe eagle superimposed over the Afrika Korps palm tree and swastika, carried on the starboard side of the cowling only.
- 10 replies
-
- 29
-

-
I am on a bit of a 1/24 trip at the moment, but this one is out of my comfort zone because it's made of plastic! So I'm prepared for things being a bit clunky and soft, but I have MANY resin delights in the stash, so we'll see how long it takes before I'm missing the smell of polyester. Anyway I had wanted to do an R10 for a while, and though Le Mans Miniatures does a really beauty in resin, it doesn't have an engine and I kind of wanted to have that option. The Revell kit hasn't been out that long, and in fact is due a reissue sometime, but for now these kits are going for daft money. Luckily enough, I followed a few on TheBay and spotted one in France which looked like it had been started and maybe missing a few bits. So it cost £20-ish but seems to be complete and with only the parts cut off the sprues and nothing glued or painted. Result. Here is the box and the bits: So it's more 'Tamiya' than 'MFH', but I think it will build OK. The decals look like Cartograf and include some nice CFRP elements too. The car is a 2006 Le Mans car, which is a fairly plain scheme (all photos mine unless stated): The 2007/2008 scheme is better - this is the Le Mans winner: The plan is to do an ALMS car however, and thankfully the Studio 27 decal sheet is still available: But the Studio 27 sheet gives you the impression that you just add decals to the Revell Le Mans car to make an ALMS version. Sadly it's not so. The ALMS cars featured dive planes and prominent wheel arch louvres (photo below via Audi Sport), so they will need to be included in the build. There is a resin conversion set out there, but it's long OOP and one store in Singapore still shows it in stock despite them confirming they have none! Anyway, those bits will need to be made (circled below) More in a bit. I think I'll be doing Tom Kristensen's 2007 Sebring car, because it's TK's car after all!
-
Being a London fan I just couldn’t resist the 1/24 scale Revell kit of the London double decker or AEC Routemaster. The model depicts the longer RML type of the bus with an additional small window in the centre of the bus. That increased the capacity of the bus by eight seats. This kit is perhaps the biggest construction project I've so far embarked upon. The fit of the parts and decals were very good but it took a suprisingly long time to finish the double decker due to the big number of parts and the multiple sub-assemblies inside the bus (the chassis, the engine, the bodywork, the driver's compartment, the the lower floor, the stairs, the upper floor, the multiple seats, the windows, etc). In the assembly I only had to follow the good old elephant eating technique or "bite by bite" 🙂 I painted the red parts of the bus with Tamiya Italian red TS-8 and used Humbrol and Vallejo colours for the other parts. To the last picture I added the 1/24 scale Revell London taxi but I must honestly say that the quality of that kit was quite poor. In addition, according to some comments on the net the size of the model is actually 1/22! Anyway, that picture shows the two most famous vehicles of my favourite city.
- 30 replies
-
- 34
-
-
Heller 1/24 Renault TN6C2 I’d wanted to build this kit since seeing it in Beatties Birmingham when i was 13 and 40 years later I picked it up as my get me back into modelling project however not long after I got distracted and it was consigned to the shelf of doom where it sat for 5 months before being sent to the floor by the cat ☹️ - it then spent the next 15 months in bits ……waiting. I took pity in March and resurrected it and finally finished it this weekend - it’s not a competition winner more of a “3 footer” but I’m happy with it now it’s done
-

Renault Turbo 5 Gr. 4/Gr.B Tour de Course
Vesa Jussila posted a topic in Work In Progress - Vehicles
I have managed to buy some poor kits lately. And one of those is Heller Turbo 5 rally car. Somehow I have liked always this small car. One of these was also in Finland and was at one stage driven by Jarmo Kytölehto. Of course this was not best tool in Finland forest stages. Originally car was done for Group 4, but was transferred to Group B when this became major class in rallying. During season 1982 factory called these Gr.4 cars even there was Gr.B homologation existing. 400 cars were built in Dieppe factory to meet original homologation need. More cars were later built and for this kind of homologation special car was quite common. Factory was competing in selected events and there was never full commitment for full series. Car was able win some races anyhow. 1 49ème Rallye Automobile de Monte-Carlo1981 Jean Ragnotti Jean-Marc Andrié Renault 5 Turbo 2 26éme Tour de Corse1982 Jean Ragnotti Jean-Marc Andrié Renault 5 Turbo 3 29ème Tour De Corse1985 Jean Ragnotti Jean-Marc Andrié Renault R5 Maxi Turbo 4 20º Rallye de Portugal Vinho do Porto1986 Joaquim Moutinho Edgar Fortes Renault 5 Turbo Of course last win was after factory cars were withdrawn after accident and this was private car. So I will build car presenting -82 Tour de Course winner. This project will take a time because there will be some work related issues that need time. In Tour de Course factory prepared four cars and these had 1397cc engine that produced 265hp and car weighted only 915kg. So it was very handy for this kind of event. Also Tour de Course was first event where factory participated in world championship level that year. And competition from other manufactures was also serious. Factory teams were from Audi, Lancia and Opel. Also fast private Porsches were in entry list as well BMW M1. Also Ferrari 308's were there and these were surprisingly fast. Route was 1600km and 27 special stages. So this was real rallying in those days. Moulding of the parts is quite ok no flash and little mould seams. But parts are mix of something from rally car and civil version and there is no full roll cage. Dash just don't look right so this must be rebuilt too. Also doors are opening ones, but what is inside of the doors doesen't look realistic. So these will need some work. In this period door panels were still in place so what is inside the doors is really not accurate. And most of parts in under bonnet is also missing. Like parts for steering and brakes. Also radiator in front is missing. Detail level of suspension is nicely said rude. And these need to be rebuilt. I just haven't managed find good photos so far. Mainly what is needed are new dampers and springs. Also new drive shafts are needed. Those just don't exist in this kit. Seats are clearly meant for civil car and I need to find some replacement and fill holes in floor. Basic parts for Engine are somehow usable. In photos it's clearly visible heat shield between engine and exhaust/turbo installation, but this so much out of scale. But this is hobby and making these corrections is part of this. I am happy that I have at least starting point for this build. I want get also get Maxi version to my collection, but need to search some of those resin kits. And those cost some serious money. -
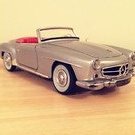
This is my model of the legendary gull wing Mercedes-Benz 300SL from the 1950's. I built the beauty a couple of months ago from an excellent Tamiya 1/24 scale kit. It's probably the best kit I have ever encountered during my 30 years of serious fine scale modelling. The fit of the parts was excellent and the detailling excellent. I can fully recommend the kit to any colleague interested in this legendary sports car.
- 11 replies
-
- 19
-
-

-
This one was finished in the recent 'KUTA XIII' GB but I've only just got around to posting an RFI... The latter stages of the build are here if you want to see it coming together. Work on this model began years ago, long before I joined BM, so the early stages were not recorded. You won't miss much, as it was built to a very basic standard! Normally I would ask for critique on a model, but not this time! This one is full of silly mistakes and areas that could have been built better. Even my recent work, which really should have been to a higher standard, was frequently jinxed by problems. Eventually I lost interest and just wanted to get it finished - my mojo was gone... It is a large beast - the following photos were taken on a standard 18" patio slab and it filled that entirely! Hope you like it and please do not be too harsh with your comments! 😁
- 22 replies
-
- 44
-
-
-
It’s been a little while since I posted a build. It’s very easy to get distracted by life in general, but always nice to open a box & start a new build. I quite fancied building a very early car & this fits the bill: lots of parts. Nothing in the way of a main body shell and white rubber tires. I think it will be hard to stay away from painting it all black
-
Resurrection time...... I had coveted this since first seeing it in Beatties Birmingham when I was 13 - 40 years later I brought one on eBay as my get back into modelling project spent 2 months building then got distracted and shelved it - 5 months later and the cat decided he didn’t like it on the shelf so sent it to the floor ☹️ - it’s sat there now for 15 more months dejected and unloved - it’s time has come though and it’s now back on the workbench first job was to repair the cat damage which got me back to this Over the last couple of weeks I’ve now finished the passenger compartment interior and cab added the wheels etc and started getting it ready for paint hopefully I’ll finish it this time
-
Normally when I put up a WIP thread I start with a fully painted body because I actually started the car yonks before. This year, I decided to go through the body as it's done. And with warm weather last weekend I was able to get an quick layer of primer on this one, not to mention priming the chassis. The kit is Hasegawa's Jaguar XJS which was done a couple of years ago to an extremely high standard by Matt Bacon. I hope I can even halfway to that, although I don't feel I can face wiring up that V12. Initial impression of the kit is that it looks very detailed and hopefully high quality, although not without its flaws. And those flaws seem to be mainly in the manfacure - for example I can see flash on the chrome grille and the body has needed a bit of work. This is how it started (apart from a little bit of sanding before I thought to take the picture). Mould lines are quite pronounced, and I have no idea whose idea it was to run them down the crease between the rear wing and the flying buttresses - almost the perfect place to make them difficult to sand off. It also looks as though this is a kit which at some point in its life was the touring car version with various holes plugged up - the ones in the scuttle and boot are especially obvious. So after a quick sand of the worst seam lines I gave it a coat of white primer to help with identifying the areas which needed work, then filled the low parts, wiped the filler with a piece of card so it was lower, then left it for a week. Over the weekend I set about, scribing, filling where the tool slipped, sanding back, removing the seams and high points and ended up with this: Quite a scabby looking body, but I think I have it pretty much sorted. Ready for priming now anyway. And that leads me onto my first question... As the first picture shows, for some reason Hasegawa have chosen to mould it in a dark red. And going over it with that white primer has confirmed my suspicions that this is a colour which is going to bleed through if I don't stop it. Given that I'm not doing this as a red car, my question is "I've heard that silver paint can stop bleed though. Is this correct? And if so would a light metallic gray do the same job?" It'll be a long time before this gets finished (there's an SSR taking priority at the moment, and midway through I expect I'll be stopping the build for the Mustang Group Build), but with warmer weather I hope I can get some progress painting it for now. Apologies if this post looks as though I'm not impressed by the kit - I am but the body moulding is the most disappointing part of it so I can (hopefully) get the bad news out of the way at the start. Thanks for looking,
-
 These were kits that I didn't realise existed this time last year. They are also the first kits I have started and finished this year, less than four weeks from first post to final photos. Over the summer I was quite excited when I found the Abarth kit on eBay from a European seller at quite a reasonable price. As an aside it seems European sellers are quite often cheaper than British ones, sometimes enough to cancel out the more expensive postage costs. It wasn't until December or January that I saw a standard 500 kit come up on eBay (with a slightly silly buy-it-now price and I think it's still for sale with no price drop). The 500 kit I bought was a bit cheaper but did have a lot of parts off the sprues and although it was a bit of a gamble the seller was correct that it was complete. Building the two kits together helped provide a useful reference as many of the parts are identical so I could find the 500 part by comparing it to the equivalent from the Abarth kit. I've been fond of Fiat 500s ever since I knew what one was, my first car was the 500's boxy replacement, a Fiat 126 which was a lot of fun even if not as cute as the older model. Small Fiats also conjure up memories of holidays to Rome, where there are plenty of 500s in daily use in various states of repair. Anyway, I'm sure you want some pretty pictures. The body is Fiat Capri Blue, from a Halfords aerosol. I'm not sure if it's authentic for a 500, but it's a nice shade although it looks a bit lighter in photos. I wanted a dark blue to set of the bits of chrome and to contrast/compliment the red interior. Interior is Ford Rosso Red and Halfords Appliance White where it isn't body colour. I'm so glad I took the trouble to pick out the white piping on the seats. I was a little surprised to see that this was a feature on the 500. Engine bay. There isn't much in here but I've enhanced it with plug wires, pipes for the fuel lines and wire clips for the air cleaner. Underside, I added a little rust wash on the suspension and exhaust, more to tone down the colours than to make them look actually rusty. And on to the Abarth Body colour for this is Ford Dove Grey, again from Halfords spray can. I'm not sure if it's right although it looks quite close to the FIAT Abarth script on the decals. The instructions just suggested "light grey" without specifying a Tamiya product to reproduce the correct colour. With some kits Tamiya will either list a colour from its range or tell you which paint to mix in the correct proportions to get the "right" shade. The flared wheel arches glue to the standard 500 shell and are the most difficult part of the build. It took a bit of light filling to get them neatly fitted. I also wonder if I should have cut away the standard arches a bit underneath as the tyres barely have room to steer. The body side decals are a bit of a nightmare, they are in two parts, split at the trailing edge of the door, but really need to be in three pieces, I think. Plenty of setting solution was needed to get them to cling to the curves of the body. There are a few metal transfers on the Abarth and the only one that gave any trouble was the silver shield behind the scorpion badge on the engine cover. The Abarth dashboard is more detailed than the standard 500, it's a different moulding and there are more dials (each a separate decal and very fiddly) plus some rather lovely decals in front of the passenger seat. For some reason the engine cover doesn't want to open very far, which makes a bit of a nonsense of the wiring and plumbing I did. Maybe I should have gone for the classic Abarth "boot open" look after all? Over head view. Underside, showing the finned sump and twin exhaust as well as the "Carlos Fandango-style" tyres. The 500 in the garage. You can fit two 500s in a single garage. I would definitely class the standard 500 as one of the best kits I've assembled. It goes together so well that you never fight it and all your effort goes into getting a good finish and adding details. In fact I would go as far as to say that the 500 deserves to be regarded as a classic kit. In fact I've tracked down another 500 to build, probably with a right-hand drive conversion. RHD isn't a kit option (pity) but shouldn't be too hard to do. It would be a perfect kit for anyone who wants an introduction to building car kits. Here, if you are interested, is the build thread. Thanks for following along and all the encouragement.
- 12 replies
-
- 20
-
-
-
So her is my first WIP post, this will be the 3rd model i have built and the 1st 1/24th, the first two were 1/20th F1 cars. I thought this would be a nice change and a bit of a challenge with the photoetch parts i have started the engine and gearbox and also tried some of the photoetch parts while waiting for things to dry. More to come this weekend im sure
-
Hello all, Finally got this over the line before the end of 2020, but I have only just uploaded the pictures. Here we go: Painted with Zero Paints Mica Red. 'Chrome' details picked out with the wonderful Molotow Chrome pen. An enjoyable build of an iconic motor. There are a few minor issues that I hope to address in future builds. Also, I need a proper photo background to make my images pop! Due to inadequate lighting, I had to use a wide aperture, resulting in a shallow depth of field. I'll call it 'artistic' Thanks for looking. Cheers, Alan.
-
Hi everyone I just wanted to share my thoughts and progress using the Cricut Explorer Air 2. I received my Cricut last Wednesday, my wife brought it for me for my 50th birthday (thank you Leanne). Now I'm a bit of a luddite when it comes to technology and I'm incredibly lazy I just want things to work with out any messing around but to my surprise the Cricut is very easy to use and I think the masks that you can make are as good as any commercially produced items. I started by looking for any additional software that you might need to use for designing and producing masks, the Cricut software is ok but almost every user I could find recommended using Adobe illustrator so I duly subscribed to Adobe (£19 pcm) down loaded the software and had a play. I started by producing a series of RAF roundels circa 1939 - 45, I found several references online that gave the size of each roundel type in inches so I found an online conversion tool and converted these measurement's to cm and drew them in illustrator to 1/48 scale. I then sent the image to the Cricut software and cut my first mask a Type A.1 roundel in 1/48 scale. I used some white vinyl which has proved to be very hard to remove because its too tacky and it lifted the paint. I had another go, this time creating a mask for a 56 in, 28 in, 21 in upper wing roundel again in 1/48 and sprayed that (see both roundels below) Not too bad I think I could be onto something here? I then decided to create some templates for RAF fonts circa 1939 - 45 again a search of the internet threw up some examples so using these a place to start I produced my own set of fonts again in illustrator.. ..for my next test I scaled my drawings to 1/32 and created some more masks this time using Frisk film as the masking medium and this time sprayed my 1/32 Fly Hurricane paint mule again applying a Type A.1 fuselage roundel and code letters.. I think with a little more practice the Cricut will prove its worth enabling me to produce any set of codes, markings, camouflage, wheel and canopy masks. I think the Cricut is a great bit of kit, not cheap (my wife paid £260 for mine) but I'm the kind of person that will spend a small fortune on after market masks so I think that for my it will cost effective in the long run plus its quite enjoyable researching and making the masking templates. Cheers all Iain
-
Time for the next project, and one with a bit of an overblown name. With that sort of name you'd expect some hugely overpowered convertible, maybe some sort of uprated Corvette. What you actually get with the Chevy SSR is a retro-styled convertible pick-up. This will be my first commercial vehicle (in the very loosest sense of the word) but don't expect me to do a weathered example - as with the rest of my display it will look qutie clean unless I make a real pig's ear of it. So, on with progress to date. I should say that so far it's just been spraying which I did over summer and just got finished before winter set in. Still need to polish it up, and there are some bits, such as the deck lid, where there is some very noticeable orange peel. First up, the easy bit - the wheels. Started out like this in the box: A dunk in bleach, then spray with Silver Leaf paint from the XJ220 and they ended up looking like this: The chassis was sprayed satin black (no pics yet, but not that exciting) and also the interior tub. This was a bit of a pain as I had to do a bit of masking to separate the black fabric and a big T-shape of body-coloured paint. There's a bit which I managed to mask on both sprayings, but it's only little and bit of purple should hide it. First up, masking the body-colour area so I can spray the interior: Then I forgot to take a picture with the black paint on before masking for the body-colour area: And the 'finished' article just needing a bit of tidying up. With all the paint layers, and two weeks between layers, this one piece took me 10 weeks to get sprayed - not one to leave until the end of summer. So what about the body. First impressions are that it's heavy. I decided to go for purple here, there's not many cars which suit purple so I'm hoping this one does work. Onto that body, and it didn't really have any sink marks, but there were a few minor mould lines which were easily dealt with. There's also a big mould line around the back as you can see from the photo... That took a bit of sanding, but after priming, sanding again and more priming I had something presentable. I went with white primer as I didn't want the colour to end up too dark on this one. On with the colour coat (Tamiya Purple TS-24) and I'm reasonably happy with the colour, but it just felt a little flat. Nothing for it, order some Pearlescent Clear to give it that little bit of sparkle. EDIT: Missed the pic with it in solid purple: Not sure that photo does it justice, but I only gave it a light layer of the Pearl - I don't want something which is over-the-top, just enough to add some interest. After that it was on with the final clear coat to give me something to work with when I polish it. This weekend will mark the start of working on it properly, although I must admit that with all those curves I'm not looking forward to the polishing 😬 Thanks for looking.
-
Having started back in the first lockdown (if you call spraying starting), I've reached the end of building Tamiya's Jag XJ220. The kit might well date back almost 30 years (to 1993), but it's a good detailed kit which (mostly!) goes together very well. There were a few issues towards the end, but I can't guarantee that they are the fault of Tamiya rather than the fault of the builder. If anyone is looking for an XJ220, this one is well worth getting, although they do seem to have gone up massively in price since I got this one. Onto the model, and decided to go with the usual silver as below. I know it's the usual colour, but I do think it's a colour which suits the XJ220. If anyone wants to see how this came together, here's the build thread: That should give a bit more detail of how it came together, but for this thread I'll jump straight into the photos. A word of warning though - the camera appears to have been particularly merciless tonight. First of all, the engine bay which being under a glass cover is on display. I know Matt has done excellent work on his Jag a few years ago and did lots of detailing in the engine bay, but only added a few of the more noticeable bits - to be specific the throttle cable conduit and some braided cables (which is still more than I've done on any other engines). I struggled to get a decent shot, so this is the best pic I have of it: Similar story with the interior, with reflections posing a particular problem. And don't ask where that dust comes from - I honestly couldn't see it when I took the photo and still can't see it now - makes me think that my camera must have an 'add dust' function... One good thing about having so much glass is that I can show quite a bit of that detail with a 'top-down' shot. Shame about the reflections With those done, time for picture overload with a walk around the car: And to finish up, the obligatory shot where I was messing around trying different things with the camera...
- 21 replies
-
- 33
-
-
-
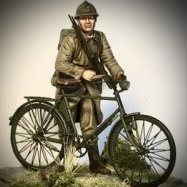
 Now i have a special. It ist a model in 1/24 from the series „Ghost in the Shell“. Concrete from the serie „Ghost in The Shell: S.A.C. 2nd GIG“. It isto long and to mutch to elaborate on that here, and my english is not good enought for this. But you can all infos found in the WWW. This model is from Wave and i had lucky to got it for a good preis. The man is Batou, a verry important person at the series. He is wearing a Combat uniform. The Roboter is a „Tank“, but with higher KI, it's a Uchikoma. It can walk, drive, jump.... and also a human can in the box at the backside ride along respectively command. It have in the arms guns and one cannon. So, I can many more say, but let it go. The model is movable and was verry easy to build. Colours are from MRP. The figure is coloured with a brush and Colours from Valejo Model Color.
- 3 replies
-
- 18
-
-
- 1/24
- Ghost in the Shell
- (and 1 more)
-
Hello everybody, Here the Citroën Fourgon Type H, "Guiness" (Heller, 1/24). It took me three months to built it (but working only a cupole of hours in the weekeend.. The model is fun, and improves a lot with the Motobitz decals. Apart from some fit issues, I only have a little complaint about the Heller instruction manual; in my opinon is no good. I hope you like it, and also I'm looking forward for your comments.... And that's all fellows. My best wishes for coming 2021! You can watch the WIP in this link:
- 7 replies
-
- 15
-
-
- Citröen
- Fourgon Type H
- (and 1 more)
-
Just finished this one eventually after having it half built on the shelf for months concentrating on the other WW2 diorama, Very happy with the end result though Fujimi garage accessories, and Aoshima 1/24 scale MGB
-
I originally started this build way back when in the Nordic GB, in a time before lockdown! Original thread here. One of three unfinished GBs this year I'm hoping to get finished (alongside the ongoing ones and Interceptor GB I want to start!) I've slowly been making progress mistakes since, and here are a few pics, it's been a bit of a pig getting together. Underside all built up - I did unfortunately snap one of the suspension components (anti-roll bar?). Interior is mainly built up. The kit came with some (very thin) plastic material to use for the seatbelts but I just couldn't get along with it (kept tearing whilst cutting with a knife) and was somewhat translucent when I finally managed to get a strip. The aftermarket kit came with some ribbon but I couldn't get along with that either (and it was too short to match up to the guide sizes in the instructions). In the end I made up some belts out of my staple - a bit of kitchen tin foil, lined each side with masking tape, sliced to size and painted up (white primer over the yellow tape, then a coat of red). The nice thing about the foil method is when bent it does tend to hold it's shape. The kit supplied PE was a bit thin, but I had an aftermarket kit so used those parts instead (original buckles getting a second life in my Renault 5 build), unfortunately when looking back at the zoomed in photos I can see some of my trimming on the buckle ends could have been better! The aftermarket PE also didn't neatly fit onto the mounting points on the belt ends on the roll cage so they're slightly offset. The upper shell also decided to be a complete pain. The forming moulds seemed to have been slightly misaligned leaving some rather nasty seam lines along the bonnet which I cleaned up, however I'm worried the bits around the light fittings might give me some grief later on. They obviously reused the moulds from another version of the kit and blanked out the bonnet vents but left some raise lines around where they were. I smoothed it out but it was still kind of visible when the the undercoat then white coats went on but hopefully less noticeable in the decals are added. My other woes were compounded by me trying to take a 'shortcut' and use a rattle can for the blue and going a bit heavy. I've sanded off the worst of the lumpy bits and will need to give it another coat - though planning on doing that with the airbrush this time! The bleeds aren't too much of an issue - I need to mask up and paint the black roof rails / window surrounds and there's some multi-coloured diagonal strip decals that cover across the door lines. I just hope they line up well! I also noticed (after painting) that the wing mirrors have some rather nasty injection pin marks in them, I'm never sure why but I seem to find this a common issue with car kits which I really can't understand! Anyhow let's hope the rest of the build goes a bit better!
-
I started this one a few years ago, after picking it up from a Debenham's sale for about £30. Here's the obligatory box top shot: Progress stalled for some reason - I think I was getting fed up with all the filling and sanding! Here's the current state of play: It's a big beast - I think it's a Series 18 kit... I'm not sure if Airfix produced anything bigger than this one? Despite the size, the build standard is not as high as it could be (my techniques have improved quite a bit in the past two years!) I will try to improve the model over the next three months wherever possible, to get it looking more respectable.👍
- 37 replies
-
- 15
-
-
 Hi all calling this all finished, the base is a cake board cut down slightly and covered in cork sheet, the dead trees are from an aquatic eBay store that's been painted with 502 oils and the sandy earth was a layer of war gaming sand and Flory pigments, all held in place with Hataka orange top semi matt clear lacquer. The interceptor car is an out of the box build, painted in Mr Hobby Color dark iron 214. This colour gave the car a nice flat sun bleached effect. I had a lot of fun building this diorama, I hope you like the final reveal guys.
- 12 replies
-
- 15
-
.thumb.jpg.d3635a7ef6507d35f372dd09671fe96f.jpg)

.thumb.jpg.cfc129272ffec824439b15e6013d5952.jpg)


_opt.thumb.jpg.be9c1e22e34c329b51268dfacc8614e0.jpg)

