Search the Community
Showing results for tags '1/24'.
-
My just completed car kit, a diversion from the usual aircraft with the challenge of a gloss finish. No clear coat, just polishing. Quite nice details and definitely recommend it. Only the side windows cut out as a deviation from the instructions. My knowledge of Porsches and the 911 was pretty much zero before this build.
-
Should finish my current GB in the next couple of days, so I've made my choice to join in with this GB and thought I'd add my placemarker. Tamiya Subaru Impreza from the 2005 Monte Carlo rally. I've built other Tamiya Imprezas and hoping that this version will go together just as easily. Will be oob as I've not got much time left.
-
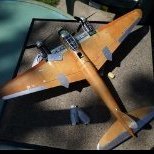
Evening folks, With the summer holidays here, there's been some welcome additional modelling time and this was finished off over the weekend. I was given this by my dad who had in turn been given it by an old family friend - I think it is an original issue, and if not it's a very early issue of this classic kit from Airfix: I just wanted to build this more or less as it comes and enjoy it. However, I couldn't let the gaping hollow wheel bays pass so made some simple mods by adding plastic card sidewalls and some Evergreen stiffeners to at least make them sort of passable: Other than that, I used some Eduard belts for the pilot's seat, Barracuda wheels as the kit's had dried out and cracked when I tried to apply them to the hubs, and some aftermarket decals from Techmod to represent Von Werra's machine who crash-landed not far from me in Marden, Kent - and became 'the one that got away'. Although old and basic by modern standards, this kit is a joy and went together pretty well. Surface detail is sublime and the super-detailer could really have a field day if they were so inclined. I really enjoyed it as nostalgic build from days gone by and that's what it's all about! Evolution: here is the 109E alongside the G-model: like the Spitfire the basic airframe had huge potential to evolve and did so as the war progressed: Paints were all Xtracolor enamels with some weathering using Mig-Ammo pastels. A really enjoyable build - don't overlook these oldies as they scrub up really well! All the best, Tom
- 39 replies
-
- 84
-

-

-
Built the Kinetic 1/24 P-47D finally, back in 2021. Thought at the time, I'd also add a bit of Mastebox 1/24 'Pin-Up' Theme to go with it. Not sure my Pin-Up girl is quite 'Pin-Up' though? My First attempt on Female figure painting and it's not as easy i'd thought it might be. Not sure her lipstick is too convincing. P-47D needed a lot of mods to get the Main Gear alignment to be correct. Kinetic Model if built OOB would have massive toe-in which looks very wrong. I did use aftermarket resin tires and metal barrels for the 8 x .50 MGs
-
Hello all, I've not produced anything in this part of the forum before so feel a bit like a trespasser. As a first step in fulfilling a long-standing desire to produce my own version of a Gemini space capsule, I'm posting this placeholder to ensure that this is the next subject I do after my current Wasp build over in the aircraft section. That way there's no backing out.... 😁 The spacecraft in question will be the Gemini X mission flown by John Young & Michael Collins, July 18-21, 1966. As well as photography, the build will be based upon use of the following research materials: Carrying the Fire: Michael Collins, W.H.Allen 1970 Forever Young: A Life of Adventure in Air and Space: John Young & James Hansen, Univ. Press of Florida 2012 Gemini X Mission Report NASA 1966 Gemini X Notebook: Michael Collins 1966 Gemini Familiarization Manual Vols. 1-3 SEDR 300 NASA 1965 Transcript, Gemini X Voice Communications (Air-to-Ground, Ground-to-Air and On-Board) NASA 1966 Gemini X Mission Highlights NASA 1966 Project Gemini: Technology & Operations NASA SP-4002 1969 Gemini X Technical Debriefing Vols. 1-2 NASA 1966 On the Shoulders of Titans NASA SP-4002 1969 NASA SP-4203 1977 Gemini Operations Handbook: Spacecraft 10 Vols. 1-3 SEDR 300 NASA 1966 Gemini Technical Memorandum NASA 1966 Gemini X Final Flight Plan NASA 1966 Summary of Gemini Extravehicular Actvity NASA 1966 Interim Report, Manned Spaceflight Experiments, Gemini X NASA 1967 Of particular value in this reasearch and from which many of the above are drawn has been The Michael Collins Papers collection held at Virginia Tech. Michael Collins Papers, Ms1989-029, Special Collections, Virginia Polytechnic Institute and State University, Blacksburg, Va. More in due course.... Tony
- 3 replies
-
- 10
-
-
- gemini space capsule
- 3D printed
- (and 1 more)
-
I have earlier posted about my VW Beetle build in the Diorama section, but as suggested by another member I'll show it here as well. Or rather, I'll post one teaser picture here and then a link to the original diorama thread. Please click the link below to watch more pictures in the diorama thread.
-
This is actually the first 38(t) I’ve built a 1/24 Scratchbuilt Hetzer. I’ll be reusing the masters I made for the running gear on this build to make a 1/24 38(t) I’m also going to build either or both a Grille and a Marder. Now to go figure the best way to cast 24 sets of road wheels …
- 10 replies
-
- 7
-
-
- 1/24
- Scratchbuilt
- (and 1 more)
-
Hi all! For this build I'm going large with Trumpeters 1/24 Fw 190D-9. I'd been umm-ing and ahh-ing about getting this kit then I saw one on display at the model show last weekend and it looked fantastic fully built and like I said in my K-4 post I'm very much into my late-war german aircraft at the minute. Upon opening the box I immediately realised I'm going to struggle to find somewhere to display this when I'm done, its some size- though it doesn't look any more complicated than my 32nd scale kits which is nice. I have the Red Fox Studio instrumental panels on the way and some Montex paint masks as I don't want to risk decals silvering on something this size, the scheme is 'Brown 10' of 7./JG26 flown by Waldemar Radener- I was able to find some useful drawings by Arkadiusz Wróbel. And some artwork I found on twitter posted by The Aviation Art of this Dora. Excited to start- thanks for looking in!
- 50 replies
-
- 12
-
-
Time to unveil the next car which will be getting some paint on it this summer. But this one is going to be a bit more of a challenge than the others... If we go way back in time to Christmas 1988, 12 year old me received this kit as a present. At that time I didn't have such useful stuff as paint, and I think this may have been the first time I used cement rather than UHU (I thought it was UHU, but judging by the strip down performance it seemed as though some parts had been cemented - damned if I can remember after all this time though). Anyway, as is usual at that age I leapt straight into it whenever I was allowed space on the kitchen table, and set about gluing bits together. No paint meant the whole thing was yellow, but never mind, I could make up for that by using all the decals for both the #7 and #8 cars - that'll make up for the lack of paint right? 🤣 Anyay, after 10+ years sitting on a shelf, and another 20+ sitting in a box it was looking a bit sorry for itself. First job was stripping it down which I always find quite a depressing part of the job - it almost feels like you're destroying it rather than rebuilding it. And this one didn't all want to come apart easily; there are some parts where the plastic preferred to break rather than the glue come unstuck so I'm just hoping I can get those repaired something like ok. And then there are a few pieces gone missing over the years, but as far as I can tell there's no more than 5 missing parts, none are clear and all should be capable of being replaced. So time to go ahead. And, after attacking it with vinegar, IPA, the freezer, hot water (accidentlly too hot for half of the engine block but I'm hoping I can salvage that) and the ultrasonic bath I ended up with a load of pieces: Not that really does look depressing doesn't it, seeing a model housed in some margarine containers. It gets worse if you look close-up and see the broken bits too. But no point dwelling on that, it won't fix itself so better get started. First bit to try and get ready for paint is the chassis. I've brushed some acetone over the bits of glue on the surface which oftened it to aid removal - I avoided using that during the strip down as I was worried about melting the plastic rather than the glue, but it looks as though I would have been better using that than all the other things I did. So with the glue softened, careful scraping with a #17 blade and som esanding has left it almost in a position to spray the primer and see how bad it looks. Just two problems - firstly I'm still spraying the Micra and Pontiac... And the second problem goes all the way back to 1988 when I didn't have sprue snippers and instead used the kitchen scissors. And when I removed the chassis from the sprue it looks as though my aim was off and I took a chunk out of the side of the chassis. I decided it would be better to try and fix than now rather than leave it, so first step was to put some plastic card in there to give a base: Once that was set I applied some spare sprue dissolved in acetone (well I say dissolved, it has actually turned into a gloop) as I wanted something a bit stronger in there than thinner. But I got it applied and sanded back, only to discover that I hadn't quite got it built up enough. But as I had got enough strength into the repair I was able to add filler today... at which point I realised I hadn't got a pic of the repair. But hopefully you don't need a photo to imagine it all straighted out. So that's the start of my scary Porsche restoration challenge, expect it to be slow and painful but hopefully you get the picture. Thanks to all who drop in to look at it.
- 68 replies
-
- 12
-
-
- 1/24
- Restoration
- (and 1 more)
-
Hi I don't normally do build diaries but I just wanted to see what you guys think. Here is just a little insight into a WIP I'm looking at doing soon, I’ve wanted to build the Defender from the tv series Death in Paradise for some time so I brought the Revell Land Rover to look at doing after my next project. But last week our JRT passed away very suddenly, so I needed something to destroy and something to keep my mind from wondering, so I dug this out and a 1/24 metal version I had (hence the destruction). So heres some photo of what I’ve done over the weekend to try and convert a Land Rover into a Defender, please leave feedback good or bad was to what you think. Kit I'm going to use The donner kit that I took apart.
-
I am by no means a good modeller of figures , but now and then I like to try to paint a figure. Here's my latest atempt: Feline Female ( Catwoman) I was inspired by The Golden Age Catwoman of the 40'es. The figure is a slight conversion of the Masterbox 1/24 Francoise figure. I made the 'mask' of Greenstuff and painted it with acrylics. Cheers Hans J
-
[First of all I'm afraid this one is a little picture heavy - 23 pics - so if you have a slow internet or don't like lots of photos of averagely built models you may want to skip this one! But I did enjoy a bit of a photoshoot with it last night, even if it did take the best part of two hours to get done.] It's taken a while to get here, nearly 6 months, but I've finally got this one finished. I've yet to see a badly built version of Tamiya's 300SL, and having built this I can see why - it's a very detailed kit with few flaws, even though some of the tolerances are a bit tight. But there's nothing in there that's wrong, so very little I can blame Tamiya for the issues as opposed to myself. If you're in the market for a 1/24 Gullwing you can't go far wrong with this one. Unlike some of the superbly built versions I've seen on here mine is very close to being as you get it from the box, the only additions being embossing powder to represent the carpet and Bare Metal Foil where there wasn't kit chrome (e.g. window surrounds, door handles etc.). The only bit about the kit which was annoying were the bumpers which had a prominent mould line at the ends, especially annoying for a chome part so I ended up sanding that down then covering the bumpers in Bare Metal Foil. Anyway, enough about the build, if you want to see the whole thing it's here: So onto the photos. First of all, a snap of what you're missing when the model is complete - Tamiya have you build the entire spaceframe chassis which looks complicated but actually assembles very nicely. It's all hidden though unless you leave the undertray clear (I didn't) so let's move onto a trip around the car: And back to the beginning with a more stylistic shot Of course, the most striking feature of the real car is the Gullwing doors, and the kit accommodates this by allowing you to pose them in the open of closed positions. You've seen them closed, now for the open pose: Unfortunately, in the latter parts of assembly some of the embossing powder came lose and static clung to the rear window. It's barely noticeable until the camera decides to cruelly highlight it Of course, one of the benefits of having opening gullwing doors (and bonnet) is that you can get a half-decent shot of the interior. Can't get any closer - the camera was tucked under the doors for these shots. There's also quite a nice engine under the bonnet. This is what you end up with out of the box, other people have made a more complete job by adding additional wiring etc, but that's just not for me. And finally, onto the arty shots. First of all I decided to try my hand at a 'real-world' style shot. I wasn't going to bother putting this one up as I think it's fair to say I need to work on getting the backgrounds right, not to mention it was late and I didn't check that the camera had focussed on the front of the car rather than the windscreen so it's actually a bit of a rubbish shot. But we all have to start somewhere and hopefully it gives the idea of what I was aiming for. (in fact, the more I look at this, the worse it becomes So onto some better shots. First up the 'angles' And to round things off the 'reflections' I think this one is my favourite. Thanks to everyone who has waded through all of these, and apologies to all who lost the will to live, but I did enjoy both building and photographing this one so I hope and least some of you enjoy the pics too. And especial thanks to all who liked, commented and encouraged through the build.
-
The backstory .. 21+ years ago, I acquired the Airfix 1/24th Hurricane Mk 1, which I began with so much enthusiasm and grand plans. So much for that, and due to various reasons, it was put in the loft, where it laid quietly waiting for the build that never came until late 2021 when I decided to pick up the modelling tools again. I wasn't sure if the kit had survived a house move 10 years ago, but it had. I wasn't sure how well it would go together, but the trials and tribulations can be found in the work in progress Here I've now decided that I'm calling this finished, but before the pictures .... There are some areas that I'm not entirely happy with, such as the tailplanes due to the fit and my rusty skills The decals are the originals that came with the kit and there is some silvering on the fuselage ones, despite using decal softener and fixer The tail fin red/white/blue are painted on rather than use the decal Weathering is a mix of oils and pastels and I wanted to attempt to give it a look to represent constant sorties and the toll it would take on the airframe So onto the main event ...... Thank you for taking the time to look and your comments/feedback are welcomed. Keith 😁
- 14 replies
-
- 35
-
-
-
So I'll be joining the GB with this oldie from Tamiya... Unfortunately I paid slightly more than the original purchase price from Beatties on a popular online auction site (that's inflation for you). I've no idea when this particular plastic was minted but given Beatties shut up shop in 2001 I think, so I guess before then. The moulds go back to 1979 but this is the more 'recent' 1980 version (motorised). I won't be including the motor, batteries or wheel guide as I have no intention of trashing my paintwork against the nearest skirting board! The decals seem to have had a hard time of it, though I've got a replacement set, but I'm not sure it includes all of them, or parts need painting with it? In terms of plastic, there's nothing that looks too taxing (other than the paint work}... Hopefully it'll build up well, it's an interesting looking Le Mans car!
-
Now I know we've got another one of these started here recently, and that is the first one I've seen built, but in the spirit of public transport where nothing arrives for ages and then two come at once it's time to make a start on my Nissan March (or Micra as we call it in the UK). The recent warm weekend has told me that I need to have something else to paint as there's only one more set of spraying to do on the Alpine, so better start prepping the next one. But first, why a Micra. Well, my first car was a K10 Micra, in fact I think it was probably in the first shipload judging by the way it was badged as a Datsun rather than a Nissan. He she is, freshly washed in all her glory: Now ideally I would have been building one of these, but I couldn't see any evidence of a kit for one. So that left me with a choice of two from Fujimi, a K11 which (to my eyes at least) looks a bit out of proportion from the box art, or this K12 which will be the second of my 'models which share a name and not much else with cars I've owned' series. It's my first Fujimi kit and quite a simple kit so once I get started it should only be a matter of 3 or so months I predict. It's that getting to the start of assembly which will take the time... Looking at the kit, the body shape appears to me to be pretty good. Instead, what really narks me is the massive seam line which runs across the front of the bonnet just above the badge to make sanding it just that little but more tricky. Not to mention that there appears to be some roughness to the plastic around the badge too On a more positive note though , I've looked over the body and as far as I can tell there are very few sink marks, just a small depression next to the seam line on each of the rear corners, and more annoyingly one right around the badge on the bonnet. I've stuck some masking tape over the badge and added some filler to either side of the badge, but I will not get rid of the depression completely. At that point I left the filler to harden properly. And about 10 seconds later I realised I haven't rinsed the parts yet to remove any release agent. Ah well, something to remember after I've sanded the seam lines and filler. And that's my start on this. Thanks for looking.
-
Just finished this monster. Lots of fun with files, wire cutters, knives, and even a metal saw. Really impressed with this kit. Thanks for looking!
-
By mid-1942 the Focke-Wulf Fw 190 was becoming a formidable challenge to the early marks of Supermarine Spitfire. Rolls Royce engineers were already developing a variant of the Merlin, incorporating a two-stage supercharger. Supermarine themselves were developing an improved airframe for the Spitfire, which would incorporate the Merlin 60 and 70 series engines. This new airframe was the Mk.IX variant and formed the base for the Griffon engine. The C Type wing was also known as the universal wing. The undercarriage was redesigned, making it more stable, and the blisters removed from the upper wing. The Mk.IX was usually armed with two 20mm Hispano cannons and four .303in (7.7mm) Browning Machine Guns. This kit was developed by Airfix as a successor to the 1970 Superkit of the Mk.1a, which itself had extra runners added in 2001 to produce the Mk.Vb.
- 20 replies
-
- 54
-
-
-
As usual, I just cannot stay focus on one build and have to start another. Working on the SeaKing in the GB now and decided to start this year’s 2nd build, a 1/24 Nissan March. It’s not going to be any March but one that will resemble my wife’s previous car. This is going to be a big project for my skill level to build this March. Looks like I need to learn to draw the rims for 3D printing and possibly draw the front grill and body kit. Well, I shall start the build as I go along….. Change to this…
-
 Seeing as this GB is now running till the end of the month and I haven't got anything else GB wise till middle of Feb I thought I'd throw another quick oob into the ring. I started last week but I've only just got round to posting, so here we go. Tamiya 2001 Subaru Impreza from 2001 probably going to be in Richard Burns markings. TS50 spray can and Tamiya hairy stick acrylics for the rest. Should just about be able to get this over the finish line and add it into the gallery before the end
 -
Like in 2021 I forgot all about the yearbooks until now. Unlike 2021, I remembered it in time, so here's my builds from 2022. As the title suggests, I achieved my average of 3 builds for the year. None of them are terrible, but equally none will trouble some of the (very modest) creative geniuses who reside in the vehicle section. 2022 got off to a good start though, with a Jag XJ-S almost completed. It only took a few days to finish this one, so I got off to a flying start completing Hasegawa's excellent Jag kit: By Easter I had gone to the brown side and completed another piece of British automotive engineering, this time Aoshima's MGB. The rubber bumper cars were about the only ones on the road when I was young, so I had to go with that. And being a '70s car I felt I had to go with the most '70s colour imagineable. The wheels were a real sanity test - I ended up spreading them over 4 weekends to avoid going cross-eyed. And then things slowed down... a lot. Revell's VW van goes together surprisingly well for a multi-part body, but the paint scheme took quite a while as the green and orange needed different colour primers, not just colour coats. It's also not the simplest kit around, so this one took me until October to complete. As I'm only halfway through the next kit, there is a possibility already that 2023 may be below average. But I hope you all like 2022's offerings
- 10 replies
-
- 20
-
-
Kit Number 24364... https://www.spotmodel.com/product_info.php?products_id=57827 Oh, yes.... I'll be having one of those... best, M.
-
 This forerunner of the modern car will be my second choice for the GB and hopefully Mrs Benz and her sons will make an appearance too, though I must warn you that my figure painting skills are not that good but we will how they turn out. Here are the box and content shots. by John L, on Flickr by John L, on Flickr by John L, on Flickr by John L, on Flickr
- 42 replies
-
- 12
-
-
Happy to reveal my first finished model and share my excitement with you. Accidentally saw this beatiful kit on a flea market and decided that it will be a nice starting point in my new hobby. My lack of skill made this kit less beautiful than it was when i first saw it in the box but at least i tried not to ruin it completely Here are some photos made in process: I know control stick is glued backwards here. Already fixed it 😀 And here is a finished model: And finally it is on my shelf. First but not last Lessons learned: More putty and sandpaper. I thought paint will cover all this small gaps and imperfections but no. Next time if i see something wrong when the model is primed i should definitely fix it. My brush and airbrush skills suck so much. Should practice more before making next model. Less is more when it comes to weathering. I see Emil like a workhorse and like it more weathered with scratches dirt stains etc and was afraid to make such a big plane too boring but saw here so many clean nice models so should try it next. And I don’t know if it is just me but i like to see Emils and Hurricanes really dirty working machines and some Spitfires or Mustangs associate more with polished clean sport cars. I can’t really see the cockpit. Made this fuel and oxygen pipes or hydraulics near rudder control but cant see it at all. Do you paint cockpits lighter or are there any other tricks? Or do you make this details knowing that they will be buried there and not visible at all? At least it was fun to make them and to know they are there. Anyway even with all the flaws and my poor skills I just love it and enjoyed the process. So that’s all I will be grateful for your critique and advices.
- 25 replies
-
- 43
-
-
Hello, here is my representation of a JG26 5th Staffel Bf109E - using the Airfix 1/24 109 kit. Along the way I made modifications to the cockpit, wheel wells, and flaps but it goes together well and I think has pretty good proportions for such an old model. I've used custom decals since there are no after market sets for the markings I wanted to represent - and critiquing my own work I'd say that for starters, the canopy cable needs to look taught and secondly the gunsight clear part is too thick. For some reason Airfix don't supply this as a clear part and I didn't spend long enough making a suitable replacement. Anyway, here it is: Build thread can be found here: Thanks for looking.
- 12 replies
-
- 37
-
-
-
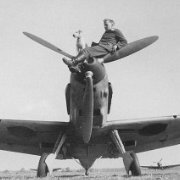
Hi Everyone Following on from the excellent little 1/48 P-51D from Redshift Aug 28, I thought I would post a similar themed model from the distant past. My Dad made it back in 1969 just before Airfix released their brilliant 1/24 MK Ia and it's been collecting dust pretty much since then. As the you might have guessed this is a hand carved 1/24 scale wooden Spitfire made from Jelutong, which is like Balsa but more dense and thus easier to carve. Judging by the condition of the model it's also a very stable wood because it’s been in a loft space with the cold and hot extremes all these years. The canopy is from a single piece of acrylic. Modelling back in the 60’s was very much a case of getting some plans (in this case Model Allied Plans) and making it from scratch for some model makers at least. Who would have thought we’d be blessed with the kits available these days. For many years it was finished in just varnish and it looked amazing, but at some point it was decided to hand paint it as a 611 Sqn Spitfire from 1943. About the same time the wheels were also replaced for the Airfix ones. There’s couple of cracks here and there but she’s fine other than that. My part in all this is that I’ve got the photography gear and the Britmodeller account but Dad will be delighted to see it online after all these years. Keep it in the family so to speak, hope you enjoy it. Kind regards Trace


(250x229).thumb.jpg.48a57772b41ed148fdc8d15e3c202763.jpg)