
Search the Community
Showing results for tags '1/24'.
-
I started this one a few years ago, after picking it up from a Debenham's sale for about £30. Here's the obligatory box top shot: Progress stalled for some reason - I think I was getting fed up with all the filling and sanding! Here's the current state of play: It's a big beast - I think it's a Series 18 kit... I'm not sure if Airfix produced anything bigger than this one? Despite the size, the build standard is not as high as it could be (my techniques have improved quite a bit in the past two years!) I will try to improve the model over the next three months wherever possible, to get it looking more respectable.👍
- 37 replies
-
- 15
-

-
So, seeing as the lockdown and social isolation continues, i thought i would grab another box down off the shelf to occupy my evenings. As the titla and tags suggest it is the Subaru Impreza Sports Wagon WRX in 1/24 from Hasegawa. A nice little curbside kit that should go together well. The mouldings lok crisp with minimal cleanup looking to be required. There are a few parts in the box not required as it looks like some Impreza sprues with the Wagon stuff added on top, so the kit bash spares box continues to grow. Included are some window masks for the clear parts which is a welcome touch. This should be another fairly quick build i hope sue to the time avaialble, but i'm still undecided on colours. Any suggestions are welcomed of course. The carpet is likely to be getting flocked in a charcoal/anthracite, but the rest is currently up for the vote. Maybe even some homemade decals are an option (Possibly) Here is the box art and the first load of parts enjoying a coat of primer. Thanks for looking, Coops
-
Build number one ready to go, a Renault Vivastella (1981) - brought this off eBay last year as part of a “bogof” package - this was brand new the freeby was a Heller Citroen Trefle that had been started badly and had warped runners. Hoping it turns out as well as the Trefle
- 54 replies
-
- 14
-
-
So her is my first WIP post, this will be the 3rd model i have built and the 1st 1/24th, the first two were 1/20th F1 cars. I thought this would be a nice change and a bit of a challenge with the photoetch parts i have started the engine and gearbox and also tried some of the photoetch parts while waiting for things to dry. More to come this weekend im sure
-
Hello all, Finally got this over the line before the end of 2020, but I have only just uploaded the pictures. Here we go: Painted with Zero Paints Mica Red. 'Chrome' details picked out with the wonderful Molotow Chrome pen. An enjoyable build of an iconic motor. There are a few minor issues that I hope to address in future builds. Also, I need a proper photo background to make my images pop! Due to inadequate lighting, I had to use a wide aperture, resulting in a shallow depth of field. I'll call it 'artistic' Thanks for looking. Cheers, Alan.
-
Hi everyone I just wanted to share my thoughts and progress using the Cricut Explorer Air 2. I received my Cricut last Wednesday, my wife brought it for me for my 50th birthday (thank you Leanne). Now I'm a bit of a luddite when it comes to technology and I'm incredibly lazy I just want things to work with out any messing around but to my surprise the Cricut is very easy to use and I think the masks that you can make are as good as any commercially produced items. I started by looking for any additional software that you might need to use for designing and producing masks, the Cricut software is ok but almost every user I could find recommended using Adobe illustrator so I duly subscribed to Adobe (£19 pcm) down loaded the software and had a play. I started by producing a series of RAF roundels circa 1939 - 45, I found several references online that gave the size of each roundel type in inches so I found an online conversion tool and converted these measurement's to cm and drew them in illustrator to 1/48 scale. I then sent the image to the Cricut software and cut my first mask a Type A.1 roundel in 1/48 scale. I used some white vinyl which has proved to be very hard to remove because its too tacky and it lifted the paint. I had another go, this time creating a mask for a 56 in, 28 in, 21 in upper wing roundel again in 1/48 and sprayed that (see both roundels below) Not too bad I think I could be onto something here? I then decided to create some templates for RAF fonts circa 1939 - 45 again a search of the internet threw up some examples so using these a place to start I produced my own set of fonts again in illustrator.. ..for my next test I scaled my drawings to 1/32 and created some more masks this time using Frisk film as the masking medium and this time sprayed my 1/32 Fly Hurricane paint mule again applying a Type A.1 fuselage roundel and code letters.. I think with a little more practice the Cricut will prove its worth enabling me to produce any set of codes, markings, camouflage, wheel and canopy masks. I think the Cricut is a great bit of kit, not cheap (my wife paid £260 for mine) but I'm the kind of person that will spend a small fortune on after market masks so I think that for my it will cost effective in the long run plus its quite enjoyable researching and making the masking templates. Cheers all Iain
-
Hi All, I must be a sucker for punishment. Yet another model that I have decided to finish along with all the others. This one has for no reason that I can work out, been sitting on the back-shelf for an enormously long time. I had built the engine, transmission & exhaust and had sprayed all the body parts in their final colour, then I put it away and forgot about it. This is the Revell 'Premium' range of 1/24th kits. There weren't many models in this series, This, a BMW 850 a Mercedes 560 C, coupe and cabriolet. I has many more parts than your usual Revell kit, and has a reputation for being difficult to build, almost to the point of being un-buildable! That currently, has not been my experience. The engine and transmission (No piccies unfortunately. I had assembled the engine and transmission into the floor-pan before I realised I had no pictures) went together well, as did the exhaust system. A bit over-the-top in the parts count department, but engineered well enough. I decided that mine would be black, so I sprayed it with Halfords' grey primer followed by a Halfords' Black (Not sure which one - there is more than one shade!) So, this is where we are now: The somewhat crumpled box. Looks impressive. The body: There are some minor imperfections that will polish out. I use Halfords' polishing compound. It's a old can, and appears to be quite different from the newer Halfords polishing compound. Sorry about the blurry rear-end, but I was using shutter priority on the camera in order to use flash, and it must have selected a very wide aperture, hence the shallow depth of field. The wheels: Now, this is one area where Revell could improve upon. The tyres are that Vinyl stuff. It has a few failings: It appears to be 'oily' to the touch It doesn't look very much like rubber (too shiny) It can melt polystyrene, so you have to ensure the wheel is painted where the tyre touches it. It seems to age badly and become brittle. All but one of the tyres has split right across the tyre. I resolved it by using CA glue in the gap to hold the tyre together. I then filled the remains of the gap with High-tack PVA glue. That has the advantage that it dries clear, so appears to part of the tyre, and it also dries quite flexible, similar to the original vinyl (event when brittle). It is quite difficult to see the splits now, so the repair appears to have worked. This is where the new stuff starts: The rear suspension went in first. There are over twenty parts to make up the rear suspension, even more when you add the brakes and springs! Seems a bit like overkill. Still for all that, it assembled well and it all fitted. I highlighted all the pipe-work by dry-brushing aluminium on to the raised pipes. It needed a bit of clean-up later but nothing serious. The exhaust system is also another example of a complicated break-down of parts. There are nine parts here. Fortunately it all went together well, like this: It all fitted well. No major gaps, just a smear of filler before the back-box on one of he pipes. The headers event connected to the manifolds. I was impressed. Another view of the rear suspension with the axles attached: Again, quite complex, but it all fitted well. This is one of the from suspension parts. Again the fit was well engineered, and it fitted well. This biggest difficulty was ensuring no glue got onto the revolving axle part. That's the bit in the bottom right corner. So, this is where we are at present: All suspension parts added, including anti-roll bars etc. The exhaust looked a bit too shiny, so I used a mix of Humbrol matt black and gloss brown, highly diluted in white spirit to "grubby" it up a bit. The white spirit doesn't attack the acrylic already there. It has stalled here due to a major cock-up on my part. The right suspension part at the front didn't want to stay in place. I thought perhaps that the strut needed to be pressed harder into the wish-bone, so I pushed a bit harder. Not a good idea. I managed to snap off the wish-bone and nearly lost it to the laminate monster (The carpet monster's close cousin). I was not impressed (understatement of the decade). After locating the broken part, I used epoxy glue to fix it back in place. The end result is a bit more flexible than I would like, but it doesn't appear to be going anywhere. The problem still remains that the strut keeps falling out. No better (or worse) than before. I think that the only solution will be to glue the strut in place and lose the ability to have functional steering. Having said that, apart from posing it off centre, I never do anything else with it, so it's not a huge loss. I'll just set it slightly off centre anyway. More soon, I hope. Thanks for looking, Alan.
- 33 replies
-
- 12
-
-
After a week away, today I got a start on the next project. Well, I say a start, but I've done the spraying of the body coloured bits and some of the bigger satin black parts over summer so technically I started this way back when we were all locked down. Although the kit is getting on a bit now, first impressions are that it's a good, well engineered and detailed kit (actually first impression is that the car is massive, which at least is realistic) with quite a bit to keep me occupied, despite being close to 30 years old now. I've only seen these cars in the flesh in two colours, dark metallic green which looked ok, and cliche silver which I felt really suited the car. So cliche silver it is, chosen not just beause I think the colour suits the car but also because the nearest I have in the display cabinet to silver is the light titanium Honda S600. For what I presume are manufacturing reasons, the side panels are separate to the main body, so first job is to assemble the body before I do anything else. Fortunately, Tamiya have used a good bit of design here and have used the side body moulding to help hide the join between the sides and the body with the sides having a tab which fits behind that moulding - once assembled it looks to me as though it's worked pretty well. I forgot to take a picture of it in primer or in colour, so onto the body with the clear coat on. The instructions call for aluminium paint, but instead I chose to go with Tamiya's Silver Leaf. This looks stunning without clear, but does dull down a bit with the clear (TS-13). I also discovered that it's not the easiest paint to use - when I clear coated it, the clear coat brought out finger prints on the silver leaf which weren't visible before I cleared it (this is the most obvious example). (EDIT: Just found a pic of it in Silver Leaf without the clear coat) Well I wasn't having that, so the body got a second coat of Silver Leaf then clear and me being very careful not to touch the paint anywhere which will be silver on the end product. Much better now - no fingerprints After that, it was time to do the panel lines, this time using Humbrol Dark Grey wash, which isn't as dark as the photo makes it look. As usual, I did the time-honoured technique of blocking off anywhere I didn't want the wash to go with blu-tak pushed in with a cocktail stick. Once that had dried, it was time to remove the blu-tak, then run over the panel lines with a cotton bud dipped in IPA to give a smoother finish - much better once that had been done. That's pretty much where the body sits now, it's in the middle of polishing up to get a decent shine but this gives the idea. As for today, just before going away I got the two sides of the engine glued together and some aluminium paint on the belt assemblies and engine cover. Today I added aluminium paint to the engine block, mixed up the dull metallic brown and added some first details to the parts. As with most parts which need detail painting, this isn't a particularly quick process so this is where I am now, most parts still being a work in progress. The XJ200 lettering has been picked out in silver, but it doesn't stand out very much against the flat aluminium background. Thanks for looking.
- 55 replies
-
- 14
-
-
 Now i have a special. It ist a model in 1/24 from the series „Ghost in the Shell“. Concrete from the serie „Ghost in The Shell: S.A.C. 2nd GIG“. It isto long and to mutch to elaborate on that here, and my english is not good enought for this. But you can all infos found in the WWW. This model is from Wave and i had lucky to got it for a good preis. The man is Batou, a verry important person at the series. He is wearing a Combat uniform. The Roboter is a „Tank“, but with higher KI, it's a Uchikoma. It can walk, drive, jump.... and also a human can in the box at the backside ride along respectively command. It have in the arms guns and one cannon. So, I can many more say, but let it go. The model is movable and was verry easy to build. Colours are from MRP. The figure is coloured with a brush and Colours from Valejo Model Color.
- 3 replies
-
- 18
-
-
- 1/24
- Ghost in the Shell
- (and 1 more)
-
Hello fellows, Let me show my WIP - The Citroën Fourgon Type H 1/24 from Heller. I was hooked with this model, after seeing the awesome work made by MBdesignart in Britmodeller, and his choice as a Guiness Van. So, I decided to make the same subjet...I grab the model in a store in Barcelona (24 Euros), and ordered the decals to Motobitz. In few days the decals arrived at home... Let's start with some pics. Your comments will be appreciate!
-
I originally started this build way back when in the Nordic GB, in a time before lockdown! Original thread here. One of three unfinished GBs this year I'm hoping to get finished (alongside the ongoing ones and Interceptor GB I want to start!) I've slowly been making progress mistakes since, and here are a few pics, it's been a bit of a pig getting together. Underside all built up - I did unfortunately snap one of the suspension components (anti-roll bar?). Interior is mainly built up. The kit came with some (very thin) plastic material to use for the seatbelts but I just couldn't get along with it (kept tearing whilst cutting with a knife) and was somewhat translucent when I finally managed to get a strip. The aftermarket kit came with some ribbon but I couldn't get along with that either (and it was too short to match up to the guide sizes in the instructions). In the end I made up some belts out of my staple - a bit of kitchen tin foil, lined each side with masking tape, sliced to size and painted up (white primer over the yellow tape, then a coat of red). The nice thing about the foil method is when bent it does tend to hold it's shape. The kit supplied PE was a bit thin, but I had an aftermarket kit so used those parts instead (original buckles getting a second life in my Renault 5 build), unfortunately when looking back at the zoomed in photos I can see some of my trimming on the buckle ends could have been better! The aftermarket PE also didn't neatly fit onto the mounting points on the belt ends on the roll cage so they're slightly offset. The upper shell also decided to be a complete pain. The forming moulds seemed to have been slightly misaligned leaving some rather nasty seam lines along the bonnet which I cleaned up, however I'm worried the bits around the light fittings might give me some grief later on. They obviously reused the moulds from another version of the kit and blanked out the bonnet vents but left some raise lines around where they were. I smoothed it out but it was still kind of visible when the the undercoat then white coats went on but hopefully less noticeable in the decals are added. My other woes were compounded by me trying to take a 'shortcut' and use a rattle can for the blue and going a bit heavy. I've sanded off the worst of the lumpy bits and will need to give it another coat - though planning on doing that with the airbrush this time! The bleeds aren't too much of an issue - I need to mask up and paint the black roof rails / window surrounds and there's some multi-coloured diagonal strip decals that cover across the door lines. I just hope they line up well! I also noticed (after painting) that the wing mirrors have some rather nasty injection pin marks in them, I'm never sure why but I seem to find this a common issue with car kits which I really can't understand! Anyhow let's hope the rest of the build goes a bit better!
-
Hello everybody, Here the Citroën Fourgon Type H, "Guiness" (Heller, 1/24). It took me three months to built it (but working only a cupole of hours in the weekeend.. The model is fun, and improves a lot with the Motobitz decals. Apart from some fit issues, I only have a little complaint about the Heller instruction manual; in my opinon is no good. I hope you like it, and also I'm looking forward for your comments.... And that's all fellows. My best wishes for coming 2021! You can watch the WIP in this link:
- 7 replies
-
- 15
-
-
- Citröen
- Fourgon Type H
- (and 1 more)
-
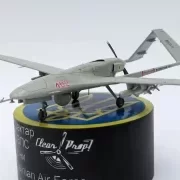
The box arrived at 16:00. First impressions.... 1. A big box packed with a lot of plastic...600 parts they say. 2. VERY fine detailing, moulding flawless, reasonable length runners, even on the smallest of parts. 3. I cannot see any short shot parts. The instructions have you start with the cockpit. I'm still thinking about the best way to do the instruments. Airfix provide separate instrument transfers to apply to the back of a clear panel and then fix the front over. Confusingly they offer 3 instrument panels, R3 and R4, but no where I can see do they link the choice to a model. On the transfer application page there is no mention of the choice, either. So I'm going to start on Page 39, step 150 and build the engine!! Photos to follow...
-
 Hi all calling this all finished, the base is a cake board cut down slightly and covered in cork sheet, the dead trees are from an aquatic eBay store that's been painted with 502 oils and the sandy earth was a layer of war gaming sand and Flory pigments, all held in place with Hataka orange top semi matt clear lacquer. The interceptor car is an out of the box build, painted in Mr Hobby Color dark iron 214. This colour gave the car a nice flat sun bleached effect. I had a lot of fun building this diorama, I hope you like the final reveal guys.
- 12 replies
-
- 15
-
-
Copyright on the instruction dates this release to 1990, its been in my stash since around that time, and its turn has finally come around...I fancied doing something BoB this year, and chose this beastie, however lockdown and I did not get on, progress has been spectacularly slow after the mojo evaporated, only picking up again recently. Overall 2020 is likely to see only two kits come to completion, and one of those was started in 2019. I can only hope that next year is better all round...anyhow, to catch up with the progress since March, we kick off with what all old kits need, a good sound filling of ejection pin marks. I decided I was going to have the cowls off on one side, so opening up the cowl fasteners. To this end I separated the single piece cowls into two, testing fitting also seemed to imply that this would be easier to fettle into the slightly warped front fuselage. I prefer a painted instrument panel, so had a crack at the Airfix two piece offering Cockpit painted with Vallejo Duraluminium with a few drops of grey added to dull it down further Some chipping and weathering Whilst I am not going to super-detail anything, I did decide I would improve a few areas, such as the rear tail light, here being measured up against a piece of sanded clear sprue Prop taking shape And the gun bay, only one of which will be left open There is a bit of warping around the front, and left to its own device the nose tilts forward slightly, meaning the top cowl does not fit without persuasion, and super glue; here the front has been glued, later the rear would be given the same treatment; note I have undercoated the rear with a bit of Humbrol Hull red enamel, which is a good approximation for the dope used on the fabric areas A little view inside the cockpit which has been spruced up with some Eduard belts And all finally together; the front cowl is just tacked on as that will be removeable The aerial and base is being prepared, drilled and pre-fitted with some invisible thread; the fit has been fettled to make it near perfect so it can go in at the end At this point plans started to change; I had planned to add camouflage but in the manner of the original would have been, over bare metal areas and doped fabric; however once this was down and a wash put on to highlight all those raised rivets, I thought it looked really good! Because enthusiasm is still up and down, I have elected to forgo the BoB paint job and finish it "factory fresh", as it would look off the production line before it hit the paint job, or at least how it would in my imagination. This finish looks great in the large scale. There is only one problem: the Vallejo wash seems to soften the Vallejo metallics, making them rather delicate, meaning that in attempting to clean up the wash some damage has been done. Because of this I am going to mask up properly and tidy up both the metallic and the fabric areas. Washes will then be kept to a minimum, and having chosen this scheme it means I get to short-cut and head straight to final assembly - no weathering, no varnishing, no decals! That will wrap up what has been a long slog, and enable me to get on to something a bit smaller and less daunting, and hopefully a bit quicker!
-
This won't be a long build since I've done a bit already. Unfortunately I didn't take too many photos up to now because I was busy enjoying the build. So anyway, I introduce Le Mans Miniatures' 1/24 Mazda MXR-01 from the 1992 Le Mans 24 Hours. The MXR-01 was Mazda's attempt to repeat its 1991 LM win, and on the face of it the omens were good: Mazda got Tom Walkinshaw Racing to pair a modified ASTEC-built XJR-14 tub with a Judd 3.5-litre V10, which the Japanese company re-named the Mazda MV10. So in reality the Mazda was actually a Judd-engined Jaguar. Neverthess, Mazda launched into a twin championship assault, with one car contesting the Japan Sports Prototype Championship and a second supporting the World Sportscar Championship. At Le Mans, four cars were fielded: two T-cars and two further cars for the race itself. No.5 (essentially the JSPC car) raced in the hallowed 'Renown' colours while No.6 (the WSC car) raced in overall pearly-white with Kajima sponsorship. The Renown car sported a high-downforce twin-tier rear wing for the race while the Kajima car featured a very low-drag, low-downforce item. It's the latter version that I'm modelling. Sadly the car at Le Mans retired following an accident but the No.5 completed the race in 4th place. I have a number of Le Mans Miniatures kits in my stash and I like them a great deal. They are beautifully moulded and while the 'Softline' range is kerbside, the 'Goldline' kits have engine and chassis detail. Much is moulded integrally, but being resin, the detail is exquisite. So here are the main parts: There is a bit of clean-up to do, but I think this is why I love resin kits so much: I find the clean-up very ASMR and I love the smell of resin too. The front and rear body sections are wonderfully thin and of necessity have some hefty moulding blocks to remove: more ASMR!! And some other resin bits of loveliness: And lots of lovely photoetch: Two sets of vac parts (why do manufacturers do that?): And a lovely decal sheet. I will post an update tomorrow and then I should be up-to-date.
- 27 replies
-
- 6
-
-
- Mazda MXR-01
- 1/24
- (and 1 more)
-
 Hello All, This is the build I have been looking forwards to this year. It will be of the most flamboyantly liveried Hurricane from my Grandad's squadron, which had an RAF roundel on the spinner and a lightning strike down the side of the fuselage. It appears the squadron rotated several times between Tangmere and Exeter during the Battle of Britain and the clearest photo I have seen comes from Exeter: The photo below is linked from another Britmodeller thread This is the kit I will be using: IMG_20200707_102503_658 by OutcastJoel, on Flickr In addition to the kit which was a rather awesome present from my parents, I have a few extras: -Yahu Instrument Panel. -HGW fabric seatbelts. -Montex Mask for the scheme (and then another mini mask for the canopy because the scheme one was designed for the trumpy kit and so I suspect might have some slight fit issues). -Tamiya pit crew who will be subject to mild surgery to make them into RAF ground crew. I also have this scheme in 1/72 so may do an Arma Hobbies version of this same aircraft as a pick me up if this turns into too much of a slog. Mostly though, I am just excited to get the Friday and get started on my biggest build to date!
- 40 replies
-
- 15
-
-
Didn't take long (by my standards at least) to get this one completed. As suggested by the restoration tag, this one is a restoration of a build first done about 30 years ago back when I was barely a teenager. The kit itself is a snap together (Snap-Loc in Tamiyaspeak), and I understand is based on a radio-controlled model. That would certainly explain the way that it only has about 20 pieces excluding the motor, and half of those are in the wheels and axles! So not a challenge then, perfect for a younger builder building up kits quickly. The real thing ran in this livery at Le Mans in 1986, where it came 7th and won its class. Not that difficult to win its class when it was in the Experimental Class and so the only entrant It came back next year in the Rothmans livery and caught fire. For the build, this was done as a straight out-of-the-box build apart from adding a mesh to the rear to hide the red and blue cables to the motor. Anyway, having bored everyone with the waffle, it's time to bore you all with photos instead... First of all, this was what I started out with. As can be seen, it's showing the full effects of having been on an open shelf near a cornfield for about 10 years ago with dirt and yellowed plastic, not to mention badly applied and degraded decals. Having come across a replacement set of decals from the 2011 rerelease of the kit while in lockdown, I decided this was due a refurbishment. So here's a set of photos from around the car under a variety of lighting conditions. A bit annoying, but I had the side peg holes filled, sanded and smoothed and all was well until they sank a bit with the gloss on. At least they're not black circles as on the original build, but I would much rather they weren't there. The mesh at the rear appears to be doing its job of hiding the battery compartment, motor and cables behind it. Unfortunately reflections stopped me getting a good shot of the interior, but here's a top-down view of the car instead. And finally, here's a couple of shots of it with its road-going cousin which I built 3 years ago. Contrary to what the second picture implies, they do all sit flat - it's the white surface which is a bit uneven and the car does not tripod! Overall verdict? Well if you want a 1/24 Porsche 961 I don't think there's an alternative. There's no getting around that this is a very simple kit, and would take a LOT of work to get a good level of detail on it. But equally, the shape is pretty good, and it's capable of being built up into something which looks good on the shelf. Hope you like it, and thanks for looking.
- 7 replies
-
- 17
-
-
- Restoration
- 1/24
- (and 1 more)
-
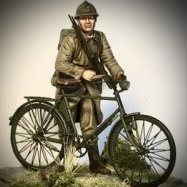
Hi all, I intend to combine all of these kits to produce a diorama featuring some of the main characters and vehicles in Mad Max 2. I will be converting the Wallis Military Gyrocopter into the one seen in the movie, I will be swapping out the engine and using the one from the VW Beetle and I will have to scratch build the twin tail fin assembly. I was lucky to find the resin figures for sale on eBay, they were the last of a limited number produced, no idea by who, but they are nicely cast and look pretty accurate. To complement the figures I bought the kit with the dog, as I wanted to have Max's dog in the diorama. The Beetle will be used in a future build no doubt. It should make an interesting diorama I think with all of these vehicles and figures combined into it. Today I jumped into the build of the Gyrocopter engine conversion, my research found that the engine was from a VW Beetle, the Little Nellie and military version show a flat four 2 stroke engine, I cut the gearbox casing off the Beetle engine and using the mounting points from the 2 stroke kit engine. I found it fairly easy to produce a convincing fitment. However I did have to turn the cylinder barrels and heads around because they lay in a tray and I had to leave that part off to give a more accurate look. I got lucky with the exhaust pipes, they were made up from a spare car exhaust I had in my spares box. For the twin tail fins I used some parts for mounting the Little Nellie weapon pylons and traced around the original rudder to get accurate looking tail fins. I don't think they were used as rudders, just stabilisers, so I fitted them to the made up cross bracing, I also made a small jockey wheel just under the rear frame centre rail. I have limited frame grabs of the movie Gyrocopter, so I am only going for a fair representation of it. That's all for now folks.
-
Hello everyone, This is my entry into the GB; Airfix's big ole' Hurricane: Just a few little extras. A test fit of the kit showed some warping of the major components, hopefully not too bad so as to hinder the build. Cheers, Mark.
- 35 replies
-
- 17
-
-
After the detailed (and it must be said enjoyable) build which was the Fiesta, time for something a little simpler. Or a lot simpler to be exact - as I understand it Tamiya's Porsche 961 started life as a radio-controlled car before becoming this snap-fit model. Probably simpler that I would buy nowadays, but this one left the shop and was originally built by my younger self somewhere in the very early '90s or possibly very late '80s. The car itself is the one which ran at Le Mans in (if memory serves correctly) 1986, and has one of the simplest racing liveries you're likely to come across on a modern racing car. So it's another restoration job which I can just relax with before going onto the next new-build. If I'm honest, I wasn't planning to do this one just yet, but I came across a set of decals in Switzerland on ebay during the depths of lockdown and that gave me the impetus to get it started. This is what I started with: As you can see, it's a bit grubby and the decals are past their best (actually, the decals are much worse than the photo implies). So, into some water and the ultrasonic bath went the body, and before long the old decals were removed. Of course, that revealed just how much the plastic has yellowed where it was exposed to the sun when I displayed it all those years ago. One thing which gives away it's R/C heritage is that the windows are firmly attached to the body in the factory, so I've had to mask them over to (hopefully!) avoid overspray. Running a scalpel around the edge of the windows allowed me to shape the window masks, fingers crossed I didn't dig into the plastic. Having cleaned up the mould lines and fitted the clips to the inside of the body (not sure why they needed to have separate clips to connect to the chassis, but I presume it was for added robusteness when used as an R/C car), it got a layer of Halfords White primer. This time around, I tried putting the panel wash on after the primer rather than the colour coat: The panel lines don't look as obvious after the colour coat (Halfords Nissan Arctic White) is added, but I don't feel that they're as consistent this way. It's not that they look bad, more that I prefer the look when the panel lines have gone on after the colour. Obviously, it's not just the body which needs painting, so does the chassis. And this one has the potential to be a pain since it's black on the underside and white on top. First of all I painted the chassis Halfords Satin Black, then masked off the underside ready for the white. Having sprayed that, I was pleased to see that there wasn't much in the way of overspray, and nothing of any importance. And then I noticed I'd completely missed a strip on the front left wheel well Yesterday, that white was sanded off and had the first brush coat applied (not bothering about spraying as it's not going to be noticeable when finished, just need to get near). So that's where I got in the pre-build preparation for this one. Going to be quite simple, and relatively quick one for me, but hope someone likes it.
- 26 replies
-
- 13
-
-
- Restoration
- 1/24
- (and 1 more)
-
Time to present my latest completion - Belkits Fiesta S2000. This one is their second kit, and there are indications that they are still finding their way a bit. One such example would be that many of the pegs are semi-circular which is very good for locating parts correctly, but a couple of the pegs are the wrong way around. Overall though, this is a very good kit with just a few bits which need trimming, but it's got a very good level of detail, 'proper' seatbelts, photoetch and lots and lots of decals. In fact, this would be close to being one of the best kits I've done if it wasn't for the niggles and anything related to paper- the instructions are based of CAD 3D line drawings and are really not clear in places (and the order for installing the rollcage in particular is questionable), and the decals are monstrouly thick for the curves they have to go around, albeit nicely opaque. If you want to build a Fiesta kit, I'd definitely go for this one as it builds up to a very nice result, just make sure you go in with your eyes open and try to plan ahead. This build, as is standard for me, is out of the box with the only extra bit being that I cut up the photo-etch fret to create the wing mirror glass. If you haven't seen the build thread, it's linked below. And now for the bit everyone wants to see - the photos. First up, a tour around the car from various heights and with various levels of lighting experimentation: Close-up pics weren't completely successful, but here goes anyway. First up, I tried to get a pic of the roof showing the aerials (which make it awkward to pick up) - also has the added benefit of showing the mirrors: I tried to get a close-up of the wheel, which unfortunately just seems to highlight the issues I had with the front wing and doesn't show the suspension (which was a lot of work) at all This one was meant to be the shot of the mirrors, but instead ended up being just a view along the side of the car: And finally, I tried to get a shot of the interior. This is one of the most complex parts of the build, and isn't too easy to see when it's completed unless you look closely, and if very tricky to photograph, so I've included an in-progress shot too. Hope you like it. Thanks for looking.
- 14 replies
-
- 12
-
-
With the Challenger completed, it's time to move onto the next project. First in the set of "cars which share a name-and-not-much-else with cars I've owned", this will be Belkits' Fiesta S2000, which I believe is only the second kit they made. Of course, after I bought this Belkits released their newer Fiesta with the Aston-style grille which would have been much nearer mine, but this will be close enough - after all being a rally car it's never going to be the same as a 1-litre supermini. Unlike @pau10wen's excellent ongoing project, this is going to be pretty much out of the box so I hope you won't try to compare the two too much - I'm not sure mine will withstand that comparison! The first set of pictures are going to seem a bit repetitive as I've only really got the paint on the body so far, so apologies for the plethora of white Fiesta bodies coming up. I had to have a couple of goes at cleaing up the body, as the first application of primer highlighted some bits of seam that I hadn't got sanded right down, plus some other sharp edges. But once that was done, the white plastic had a nice coating of white Halfords primer. After that, it was out with the Appliance White having sanded the body down with 2000grit sandpaper. What with the chassis also being white, and trying to get a good covering inside as well as out not to mention all the other body parts which also needed painting, I near enough used a whole 300ml can on just this car. And the picture barely looks any different. With the paint dried, yesterday I ran some dark grey wash into the panel lines to bring them out a bit using blu-tak as a dam where I didn't want it to run. Hopefully this is as bad as the body will look. And then today I got some 4000 grit Micromesh sheet onto those panel lines to get rid of the overwash. While it's cleaned up the edges quite nicely, unfortunately to my eyes it's also made the panel lines look a bit too dark. I think tomorrow I'll give them a run over with some white gloss paint to dial down the darkness a bit. What with cleaning up the body and washing two lines ont he boot which I missed, I haven't really got started on construction yet. But my feeling is that it will be worth getting the body done first (including decalling) so that the clearcoat gets time to dry, Thanks for looking, even if it has just been white Fiesta after white Fiesta to start this thread.
-
 The vehicle is an exceptionally well-engineered kit. However, it is not perfect and I struggled in a couple of places. Page on my web site: Doing the Samba
 -
Hi all, been a little quiet recently. This is the finished model for the last comp I entered. I sadly had to enter it unfinished due to a missed deadline, but here it is in its full finished state. The kit built well, and the over fender kit wasn't too much extra effort. The wheels are also not the OOB wheels and the whole thing has been lowered. Enjoy and thanks for looking, Coops


_opt.thumb.jpg.be9c1e22e34c329b51268dfacc8614e0.jpg)


.thumb.jpg.cfc129272ffec824439b15e6013d5952.jpg)
