

Kallisti
-
Posts
5,121 -
Joined
-
Last visited
-
Days Won
1
5 Followers


Recent Profile Visitors
13,617 profile views


Kallisti's Achievements
")
Completely Obsessed Member (6/9)
10k
Reputation
-
 The Fireflash kit is a good one - I built it quite a few years back as it appeared in the other episode it starred in Operation Crashdive where it sank to the bottom of the ocean and TB4 had to cut the tail off If I can find the box, I may still have the elevator cars in there which you can have, but there has been 2 house moves since I built this, so I can't guarantee anything
 -
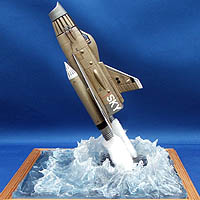
Blimey well this was a challenge! Its the only TB that I didn't have before, basically because in my mind its the least interesting one - it just just sits in orbit and bleeps! I picked up the AIP boxing of the old Aoshima kit a while back as a bargain - thank goodness, I'd have been really upset if this had been full price! I started it earlier in they year but put it to one side as I hated it so much. The kit is really poor - it is badly moulded, badly fitting and has a load of "toy" like features that include an electric motor to make the antenna rotate and the whole vehicle to rotate around the support! The worst part of it though is the corrugated tube around the middle! It comes as two parts spilt horizontally with a very poor joint down the middle that is impossible to clean up well due to the plethora of corrugations! On the original studio model I believe this was a corrugated automotive vent pipe. Anyway I did the best I could of it but I think I can safely say this is the worst kit I've ever built! The most enjoyable part of it was painting the stand
- 8 replies
-
- 16
-

-

-
I picked up this fun kit when it came out a while back and decided to build it. Its ostensibly a cick-together kit and comes with a choice of decals or stickers, but I built is a 'proper' model with glue and all that!!! I chose to display it "all out" so the machines gun are deployed at the front, oil sprays at the rear, bullet-proof shield is up and inside the car the central console is open to show all the buttons and switches. The gear knob even has the top flipped back to show the ejector seat button! The number plates revolve to display 3 different registrations and the wheel hub "scythes" are deployed. It was only after completing it that I realised these are going to make this model a bugger to transport to shows I painted it with Tamiya Chrome Silver X-11 which I think captures the finish quite well. I used the chromed parts as is - the sprue gate placement is well designed so all the attachments are hidden! I gave the solid chrome grille a back wash to try to represent the holes within the grille, Great fun and I heartily recommend it!
- 10 replies
-
- 30
-
-
ICM RAF Pilots in Tropical Uniforms (48080) 1:48
Kallisti replied to Mike's topic in Aftermarket (updates/conversions)
Maybe because only three of them are Pilot chappies, the other two are obviously oiks! and NONE of them are drinking tea! -
Burrell traction engine.1/76 white metal.
Kallisti replied to Farmer matt's topic in Work In Progress - Vehicles
Great to see this back! -
Catwoman would be better
-
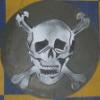
This is a funny little kit from Moebius and you can see how 'little' from the picture with the Tamiya paint jar. Sadly its not the 1:18 scale kit with Alicia Silverstone's Catwoman riding it in a very provocative fashion! Well you'll just have to accept the model itself The box is compact, mainly because there isn't much to go inside it... The main problem with this model is its almost ALL BLACk! (cue the artist from the Fast Show...) So I had to be creative with some metallic colours and weathering to bring out the complex design of the bike. and to get an idea of the actual size of the model... A fun little kit to build, not easy as the instructions often don't give entirely precise placement instructions!
- 4 replies
-
- 11
-
-
1:24 3D print kit UFO Moonbase Interceptor
Kallisti replied to Kallisti's topic in Ready for Inspection - SF & RealSpace
Haha, I've already got a Bandai Interceptor so that two down, just need to be creative with my forced perspective -
End of 2023 I bought a kit from the 3D printing maestro in Canada, Alain Rivard, the same bloke who printed me the 1:48 Babylon 5 Starfury from a couple years back However this is a beautifully printed 3D kit. I did have to replace the cockpit rear wall as even thought it has some beautifully designed and printed detail, it was very very far from screen accurate. The decals were printed from an image I found on the SHADO FB page that turns out was created by John Watson for his Bandai build. I scaled it up, removed some of the unnecessary red bands as I'd painted them already and was able to printed them successfully on the 3rd attempt Here are the pics Bloody silly design to put a thick metal frame in front of the pilots view! This is how the kit arrived so this is sort of a 'sprue shot' This is what the cockpit looked like before I modified it by cutting off the rear wall and scratch building a replacement which ended up looking like this Most of which you can't see inside the cockpit This was the image used to print the decals
- 11 replies
-
- 29
-
-
-
1:24 SHADO Interceptor, 3D print from Alain Rivard
Kallisti replied to Kallisti's topic in Work In Progress - SF & RealSpace
Its finished!!! The satin varnish went on this morning and when the masking all came off earlier this evening I decided it did not need any extra weathering. The panel lines are deep enough that they don't need any further highlighting and the white paint has enough natural variations due to handling and various tonal differences that have come out after the varnish that I don't think it needs any more weathering!- 54 replies
-
- 21
-
-
1:24 SHADO Interceptor, 3D print from Alain Rivard
Kallisti replied to Kallisti's topic in Work In Progress - SF & RealSpace
I'm actually using my old Bandai model as a template for some of this build PM replied So the task today was to mask the silver parts and canopy ready for varnish, and here it is all wrapped up... Varnish tomorrow, its too damn cold to go down to the shed this evening!!!- 54 replies
-
- 13
-
-
1:24 SHADO Interceptor, 3D print from Alain Rivard
Kallisti replied to Kallisti's topic in Work In Progress - SF & RealSpace
Finally, after wasting 3 sheets of decal film on bad prints and bad ink sealing, on the 4th attempt I got some usable decals. This time I used a gloss spray varnish I've had in the shed for years which did the trick of sealing the decals with no ink runs! Previous attempts with liquid decal film and Klear were failures. The only problem with these is the gloss varnish makes them a tiny bit thicker. However, now that they've been applied and Micro Sol'd its not too bad. Today I brush painted a Klear coat over all the decals and most of the white area. Only the main silver areas remain un-Klear'd/ The next step once the Klear has fully dried will be to yet again mask all the silver bits and the canopy to be able to spray satin vanish over the rest. Thats likely a job for tomorrow. The decals have really brought it to life! Once the satin varnish is on, I'll apply some light weathering I think to just dirty it up a little. but not too much.- 54 replies
-
- 23
-
-
In that case I'm glad I didn't waste my time
-
In between my major build over the Christmas holiday I decided to build something else and having had this in the stash for most of the year I decided it was time to do something non-sciFi for a change, so The Airfix (ex Academy) M3 Stuart 'Honey' was the result: The kit comes with an interior but I didn't fancy getting that complicated with it so built just the externals out of the box. It was a fun little build and I used the rubber tracks rather than mess about with the individual tracks, this was supposed to be a bit of fun, not heavy duty modelling, I've got enough of that going on in the main build that still isn't finished! (see link in sig). Its all painted in Tamiya acrylics. I used a set of Mig Ammo paints I'd got some time back for the Caunter scheme to mix up a batch of paint for the sand and silver grey that matched the Mig Ammo paints. The weathering is basic, I didn't go to town over it.
- 9 replies
-
- 29
-
-
-
1:24 SHADO Interceptor, 3D print from Alain Rivard
Kallisti replied to Kallisti's topic in Work In Progress - SF & RealSpace
Yes, sadly I won't be able to reproduce the decals in white for obvious reasons. In the latest progress, the cockpit canopy has been attached. The 0.25mm clear acrylic sheet arrived eventually and was a doddle to heat shape to fit the canopy and some very careful application of Rocket Odourless CY along the edges sealed it into place nicely Now its just the decals left. Sadly my first attempt was a failure as I didn't seal the decals well enough and the ink ran as soon as they touched the water so I'm now waiting for a another package of clear decal film to arrive as I only had the one sheet left which I've ruined. Hopefully that will turn up in the next day or so and I can hopefully complete this model this week!- 54 replies
-
- 16
-
-

