


Jabberwocky
-
Posts
288 -
Joined
-
Last visited
-
Days Won
1


Jabberwocky's Achievements
")
Established Member (3/9)
247
Reputation
-

Oh my! What have I done!?!
Jabberwocky replied to Nocoolname's topic in General Maritime modelling chat
It's quite daunting isn't it? Especially when the instructions begin with the torpedoes whose parts are on sprue Z, and there are six sprues called Z. Can I recommend this to you as reference material? http://www.uboataces.com/u995.shtml It's a DVD containing pictures, videos and sounds of the U995 at the museum in Laboe. I've collected various books to refer to but a lot of useful information can be found for free here: http://www.uboatarchive.net/index.html and makes fascinating reading. I have to admit I was disappointed with the Anatomy of the Ship book on the type VIIc, as the drawings are so small in order to fit three or four to a page that they are not as helpful as I'd hoped. I also had the intention of using red lighting after watching Das Boot, but there's a line in a US Navy report of U570 which was captured by the Royal Navy which states: "Additional fixtures for low level illumination, either blue or red, are not provided for dark adaptation of the ship's personnel. Use is made, however, of tight-fitting red lens goggles." There was a flasher circuit on the engine room lighting however, to signal to the crew that the diesels were to be turned off and readied for diving. This suggests to me that the U505, captured by the USN and now residing in the museum in Chicago, had red and blue lights fitted by the USN for trials and assessment in keeping with their own operating procedures, and this lighting was faithfully copied by the production crew of Das Boot when they measured it up for building their film set. Be aware also that the U995 in Laboe was in the possession of the British and Norwegian navies before it made its way back to Germany, so will also display some non-standard fittings. Some things I have noticed so far: Torpedoes - Trumpeter have reproduced the training round displayed on U995 which has a front end designed to be grappled with a boathook, rather than the four "fingers" which acted to trigger the firing pistol on G7a torpedoes. Fire extinguishers - Trumpeter have reproduced the modern extinguishers visible in the U995 museum exhibit. The reports on uboatarchive.net detail the equipment that was actually carried as five 6Kg hand extinguishers, one foam and four CO2, one in each compartment excluding the torpedo rooms and conning tower, with the foam type in the engine room. Torpedo tubes - Trumpeter don't seem to have provided any bow caps for the tubes. Bit of an oversight there. There are pictures on the DVD I mentioned above of a torpedo tube on display at Laboe, so I might try scratch-building something to represent this useful safety feature. I hope this helps. I'm not trying to pretend I'm any kind of expert, because I'm not, there are more knowledgeable people on here than me, but like you I want to get the most out of this kit and I've been busy with scouring reference material for a while now. It's a subject you can really immerse yourself in if you'll forgive the pun. Fortunately the kit is built from several sub-assemblies. Oh dear, sorry, time I went. I need to find or create some convincing 1/48 gingham bedding material that's so prominent in wartime U boat pictures. Best regards, Paul -
Nice work. The New Ware set makes a huge difference to the original kit, and the Space In Miniature book is worth its weight in gold. I was going to suggest the method I used to dish the antennas, which was lightly tapping them with a small ball pein hammer into the concave bottom of an aerosol can, but it looks as though you've found an equally effective way. It's chunky metal compared with some, and can take a fair bit of punishment. I'll look forward to the next instalment. Regards, Paul
-
Resin Fireball XL5 - maybe a 'kit'...?
Jabberwocky replied to roymattblack's topic in Science Fiction Discussion
Excellent! I look forward to watching this develop. I have been in awe of your car builds for some time so this should be special. Fireball was probably the first Gerry Anderson show to capture me with its magic many moons ago. David Sissons has a large scratch-built XL5 http://davidsissonmodels.co.uk/xl5.htm that I've seen displayed at the Smallspace show in Hanslope: http://www.hamex.co.uk/ I built the 8" Comet Miniatures version a few years ago but scaling up from that might not be too accurate. Regards, Paul -
A belated Happy New Year to you Paul, and may it be a healthy and prosperous one. The shiny new airbrush arrived this morning; many thanks for fantastic service once again. I hope to see you in Hanslope at the end of the month. Best wishes, Paul
- 1 reply
-
- 1
-

-
Roy, If you're still looking, Creative Models have it on special offer at 33% discount at the moment, making it £27.99. http://www.creativemodels.co.uk/heller_116_citroen_ds_19-p-3637.html
-
I picked up these two at Bruntingthorpe earlier this year: Out of the Blue and Out of the Blue 2. they are of a similar format to Lightning Boys but cover many aircraft types, including many Cold War-related episodes. Basically a collection of dits with the proceeds going to the Royal Air Force Benevolent Fund and Help For Heroes, what's not to like? Recommended reading if you come across a copy.
-
Best 1/350 Submarine sailors?
Jabberwocky replied to Woodstock74's topic in Work in Progress - Maritime
I agree with the comments above that PE figures are too two-dimensional. I used PE naval figures in the scene below, and even though I coated the figures liberally with PVA glue in an attempt to pad them out a bit, from the side they still look like a cunning Admiralty ploy to use cardboard cut-out crew to make the Navy look bigger than it actually is. -
1:200 Revell North Cormorant Oil Rig
Jabberwocky replied to Kallisti's topic in Work in Progress - Maritime
" ...already used 6 packets of 3, only got 2 left"... You little devil, you. (Well, all the cormorant/shag jokes have already been done in another thread). Where's the cotton wool going? how about a teased-out tuft, (oo-er missus), with a flickering yellow led inside as a gas plume? -
Kinetic 1/48 Sea Harrier FRS1
Jabberwocky replied to Jabberwocky's topic in Ready for Inspection - Aircraft
Hi Dave, It's not "shake and bake" and needs some careful treatment. There are two or three excellent WIPs of the FA2 on here, which is basically an identical build, and they should show you the areas to be careful of. I found that not gluing the cockpit, nosewheel and intake assembly until the front of the fuselage had been joined helped to reduce gaps around this area. I kept them floating until the fuselage was set as there's loads of room for fine adjustment with your fingers through the hole in the top where the wings go. The curve of the wing doesn't quite match the fuselage and the fitment of the tail elevators is a bit vague. Lots of dry fitting will pay off in the end. Best of luck with your build, and please show us pictures. We can't have too many Harriers. They were one of my favourite aircraft at airshows. I take my hat off to the engineers who designed it and the skills of the pilots who flew it. cheers, Paul -
Minicraft 1/16 Jaguar SS100
Jabberwocky replied to activexp's topic in Ready For Inspection - Vehicles
I can sympathise with the vague fitting issues after building the Bandai Bugatti, but you've made a lovely job of a beautiful car. I wish there were more large-scale kits of classic British cars; it's not as though there's a limited choice of subject. The view through the windscreen over that gorgeous bonnet just makes me want to jump in and go for a spin. that's a nice shot! Thanks for showing this, Paul -
While most documentaries and books about the Gerry Anderson shows quite rightly praise the stunning visual effects, does anyone remember seeing anything about where the sound effects came from? I ask because while at Bruntingthorpe the other week for the Cold War Jets day, as the Canberra cruised across in front of me, I suddenly had an image of palm trees swinging away to the side. I closed my eyes and almost convinced myself that Thunderbird 2 was taxying by. I suppose the easiest way to acquire aircraft engine sounds would have been to trot up the road to Heathrow with a tape recorder, but I can't recall the origin of the sound effects ever being mentioned, and my curiosity has been piqued now. Cheers, Paul
-
Kinetic 1/48 Sea Harrier FRS1
Jabberwocky replied to Jabberwocky's topic in Ready for Inspection - Aircraft
Thanks for the kind comments guys. I'll fix the pitot issue when I get a mo' Cheers, Paul -
Bandai 1/16 Bugatti Royale de Ville coupe
Jabberwocky replied to Jabberwocky's topic in Ready For Inspection - Vehicles
Thanks for the kind comments guys. Cheers, Paul -
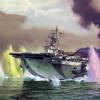
One of my favourite aircraft and colour schemes. I was looking forward to the Kinetic release and experienced the same issues that other builders on here encountered, so I shan't repeat them here, but I'm fairly happy with the end result. It's a fairly clean build, and OOB except for a Tamiya tape harness. The base came from Coastal Kits ebay outlet. I think it needs some figures to liven it up, but although the deck tractor was included with the kit, the figures were not. Oh well, that's something to think about for the future. All references came from the interweb, many of the photos being monochrome, so any mistakes are my own. It made me happy anyway. Cheers, Paul
- 17 replies
-
- 31
-
-
Surely one of the most barking mad vehicles ever produced. I don't build vehicles as a rule, just sit in awe and wonderment at the Pocher builders on here, but I couldn't resist this when it came up on ebay at a reasonable price. Very often the door pillars on these are snapped if the box is crushed due to their fragility, but luckily this kit was all intact. I rushed it a bit to get it ready for Automodellismo, but I did manage to add some detail under the bonnet in the way of plugs, leads and some linkages to the carburettors that show up prominently in photographs of one of the real monsters. The age of the kit was shown by the instructions' recommendation to use toenail clippers to separate the parts from the sprues. I was tempted to ask the advice of my fellow modellers as to the favoured type of toenail clippers in use, but knowing the sort of answers I'd have had from some of you, (you know who you are), common sense prevailed. The plastic rejects all adhesives known to man, so bits fall off every time it's moved. I thought I'd take some pictures before it self-destructs completely. I hope you enjoy them. Cheers, Paul