

Simon
-
Posts
1,233 -
Joined
-
Last visited
-
Days Won
3
Content Type
Events
Profiles
Forums
Media Demo
Everything posted by Simon
-
Co-incidentally I saw one this afternoon while I was out, heading in the opposite direction. I could smell two-stroke oil for the next half mile or so!
-
This one from the Flight archive, labelled as a Hart Trainer is currently on Ebay: https://www.ebay.co.uk/itm/204243857946 Not the clearest of photos, though...
-
Thanks Joachim. The Martinet isn't a glamorous aircraft by any stretch of the imagination, but it does have a certain charm about it. As you say, it played an important part in the training of Air Gunners. I've been doing some research into 4 A.G.S. at Morpeth, and so far I've found 51 Air Gunners who trained there who received either the D.F.C. or the D.F.M., or indeed both. One of the more well-known is Wallace McIntosh, who was awarded the D.F.C. twice as well as the D.F.M. Over 4,000 trainee Air Gunners went through 4 A.G.S. at Morpeth during the war. Sadly a fair number of them didn't survive to see V.E. Day. Regards Simon
-
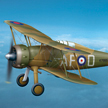
For some reason the photos in my first post look a bit dark (I used my rather ancient 2007 Panasonic FZ8), so here are a few more, taken with my more up-to-date Sony DSC-H400:
-
A bit of an understatement! Worth all the hard work in the end though.
-
Thank you everyone for the kind words. As I mentioned in my post, this one got relegated back to the stash very quickly. I'd not done a 'short run' kit before and it was bit daunting, but now I've got some experience under my belt it seemed a good time to come back to it. I've been collecting references for it over the years, mostly to do with the towing gear and the cockpit. The Museum of Berkshire Aviation has some useful (if small) photos of their Martinet restoration on their website. One consequence was that it took some finding tucked away in the stash. I kept opening boxes full of unbuilt kits, and thinking "am I actually ever going to build these?" to which the answer was usually "no." So the stash underwent a serious and pretty ruthless cull, and some 140 kits went off to Kingkit, who were very helpful and gave me what I considered a good price. So the stash is now about 20% of what it was, and the loft is considerably emptier, much to the pleasure of my other half! Cheers Simon
-
Hello everyone It's been a while since I've posted on here, for various reasons, but here's my Pavla 1/72 Martinet all done and dusted. It's been a long, frustrating build, but it's finally ready. I started this some 14 or so years ago(!), and got so fed up with it (I think mainly due to my lack of experience back then ) that it very quickly got consigned back to the stash in the loft. After a very unsuccessful build of another kit (no names, no pack drill...), I girded my loins and decided to rescue the Martinet from obscurity and ignominy. I've done it as HP131 '21' of No. 4 Air Gunners School at R.A.F. Morpeth in 1942. It was written off on December 24th 1943 when it lost its prop and crash-landed at what was then Stannington Mental Hospital, a mile or so south east of the airfield. The pilot, 1346912 Sgt. David Anderson and the T.T.O. (Target Towing Operator) 1477294 Aircraftman Thomas Welsh escaped with a few cuts and bruises. I've amended and added a few things to the kit, which makes a good basis for a Martinet, but I think needs some updates. 1. The kit cockpit is pretty much all wrong. I used the kit's instrument panel, joystick and throttle boxes, but made a new seat for the pilot, and a new fold-up seat for the T.T.O. In between them is a sort of shelf, on which sits the Type B Winch, which needed scratch-building. Behind the pilot is a roll bar, with a plate with a headrest, which I also scratch-built. 2. The kit engine is good, but I took off the cooling gills from the kit's cowling and replaced them with open ones taken from a spare set from the recent Airfix Blenheim. 3. The kit's prop rotates the wrong way? Looking at it from the front I'm sure it should rotate clockwise, not anti-clockwise, so I cut down and reprofiled some blades from a spare prop from an Airfix Mitchell, and made a new hub from plastic rod. 4. Cut out the wingtip lights and replaced them with clear sprue. 5. The vac-form canopy (my first go at one ever...) needed quite a bit of blending in to the fuselage, so I thought I'd add a thin panel of plastic card to cover up the unsightly joint. The real aircraft has a cockpit 'pod' that looks a bit like that anyway. 6. The propeller arm for the winch is too short, and the resin prop too spindly with wrongly-shaped blades, so I made a new arm from sprue, and a new prop from plastic strip with better shaped blades. 7. The kit's cable guide under the fuselage isn't right - should have two arms, so that was scratch-built. 8. The kit undercarriage, both main and tail, aren't quite correct. The rear arms of the main gear should be longer, the main legs don't have the scissor links and the rear one has a distinctive kink. 9. I added towing cable anti-fouling wires to the horizontal tail, as well as an anti-foul guard to the tailwheel. The aerial wire, like the tail wires, is 0.1mm Albion Alloys Nickel Silver rod. That's about it, so here are the pics: There are a few 'Work in Prgress' photos on the Martinet album on Flickr showing the cockpit and few other bits, if anyone's interested: https://www.flickr.com/photos/wwrsimon/albums/72177720306773989/with/52750795557/ It's not perfect by any means, but it looks a lot like a Martinet, which will do for me. Cheers Simon
-

Academy/Minicraft 1:72 B-24J Liberator Dragon & His Tail
Simon replied to PatG's topic in Aircraft WWII
I did one a few years back, and it needs some work on the interior as well the turrets which are too small and were replaced with Hasegawa ones. I also replaced the engines. WIP here: Cheers Simon -
Three 1/72 RAF pilots and ground crew, resin (3D printed?) sets on Etsy
Simon replied to Pete57's topic in The Rumourmonger
Nice figures, but £26.65 delivery is a bit eye-watering... Plus £8.62 tax, so it goes from £16.44 to £51.71. Simon -
Preliminary inquiry - correction for Academy Catalina.
Simon replied to Admiral Puff's topic in Aircraft WWII
I'm in - one set for me please... Simon -
Depending on what you're looking for, you could try the RAF Commands Forum as well: http://www.rafcommands.com/forum/forumdisplay.php?1-General-Category Simon
-
Hello again I'm back for what will hopefully be the last update before the Phantom is done and dusted. Still issues to sort out, but it's been one of those builds... I had a heck of a problem getting the cockpit glazing to fit. The cockpit aperture seemed to be a bit too narrow, so after a lot of scraping, sanding and general faffing on I got it to sit just about right. The cockpit glazing was masked and painted, and then severely clamped in place: I put Blue Tack under the clamps to prevent any damage to the transparencies, but got some minor chips on the paint. I did this about four times until it finally settled in place. So the canopy was remasked an touched up: The joint isn't perfect, but I'm pretty happy it's actually on! I used a piece of tape to replace the Eduard mask for the starboard middle frame - dunno where they got the odd shape they had? So, on to all the fiddly bits. Here's the front undercarriage in place: The Eduard etch works really well, but I replaced the blade aerial on the front door with a slightly bigger one made from plastic card. The wheels are from Eduard too. The mainwheels and doors have also been added: And then finally for the undersides all the ordnance - Skyflashes, Sidewinders and the gun pod. Missiles are Eduard and the gun pod from Air-Graphics Models: And lastly, I added a rear view mirror for the rear seater, as well as a scratch-build periscope: I've also added an angle of attack sensor (that's what it is, isn't it?) on the port side of the nose: I assume R.A.F. Phantoms just had them on the port side? So the Phantom's just about all done. I'm just finishing off the weathering, and I've done a base of AM2 matting in Photoshop for it to sit on: I'll get the finishing touches done, then post it in R.F.I. soon... Simon
-
Great pics, thanks for the link. I think a slice off the top to make it parallel with the bottom should be okay.
-
So, nearly a couple of months later...and the replacement part arrived last week. I've been away from my work bench, so only managed to check it today, and it's straight, which is nice! Just as well, as i'd tried to 'gently presuade' the warped canopy into shape. It was all going fine, and nearly there, when I heard the inevitable crack... Oddly enough the replacement has a very fine scratch along the length, in exactly the same place as the warped one. Mould issue, I'd think, but it's not too visible. Anyway, I had a bit of a time trying to get the canopy to sit tight, with some fairly serious fettling of the fuselage cockpit sides, the cockpit coaming and the canopy itself. It sits just about right, but will need to be held (carefully!) in place when gluing. I've also masked the canopy with the Eduard mask set, and have a question about the small window between the pilot and navigator. This is the Eduard mask in place: That's not right, is it? Looks nowt like this one: https://www.canstockphoto.com/f4-canopy-0166154.html Anyway, progress at last! Simon
-
I wouldn't hold your breath about getting a replacement from Airfix. I'm still waiting for a replacement canopy for my 1/72 Phantom that I requested on November 18th last year...
-
A quick update: absolutely nothing to report. Still waiting for my replacement canopy, which apparently was posted out to me on November 25th on a Royal Mail 48 hours delivery. I've just e-mailed them for the sixth time chasing this up, so I may be toddling off to the 'Wanted' section on here ere long... Simon
-
Having had several similar issues with my Airfix Phantom FGR2, I can sympathise. Airfix quality control strikes again... As Scott suggested, get an e-mail off to the Spares Department - they'll need proof of purchase and the code on the sticker on the back of the box. Simon
-
Alan Sprue G has the extended nosewheel: http://www.ipmsdeutschland.de/FirstLook/Airfix/Airfix_MDD_Phantom_FG1_72/Air_A06019_Phantom_FG1.html (second row of sprue photos, third from left). All Phantoms have the tailhook, even the R.A.F. ones - it's on the row under that, extreme right hand photo. Obviously you'd need some RN decs, though... Simon
-
Airfix 1/72 Blenheim IV - a second time around
Simon replied to Simon's topic in Work in Progress - Aircraft
Thanks - it did nearly get the better of me at times. I've struggled with a few of the 'new' Airfix kits. Not sure if it's me, or that slightly odd plastic they seem to use which seems to defy sanding! I'm currently working my way through their Phantom FGR.2, and it's not been a 'shake and bake' by any means, although quite a lot of it was down to me... Simon -
Glad to hear it's not just me! The weird thin steps on some of the edges really mess up the fit of quite a few parts. I had the same problem with the two Airfix Mitchells I did before the Phantom. I guess it's a moulding issue, as opposed to an issue with the mould itself? I'm still trying to get a replacement canopy from them. I gave them the kit code for the FGR.2 box (A06017), as well as the original FG.1 kit (A06016), and they have no spares for either. So I gave them the code for the current FG.1 boxing (A06019) which they apparently have in stock so we'll see if they come up trumps...after all don't they all have the same clear parts?
-
Thank you for all the kind words everyone - very much appreciated. I'm still awaiting news of a replacement canopy from the Airfix Spares Dept, but I've been cracking on with some of the odds and ends. I made the executive decison to have the Phantom with 'everything down' so slats, flaps, ailerons, airbrakes and auxiliary doors which I think may not be 100% accurate, but I thought I'd just go for it. First up, I've made some actuators for the lower auxiliary engine doors, which have also had their Eduard etch bits added: And in place: I've made some actuators for the airbrakes as well, which Airfix didn't supply: So here's all the lower bits in place, all open and/or lowered: Wing tanks test fitted to make sure the mainwheel doors don't foul them: I've done a bit more weathering to the undersides as well. Meanwhile, I've added the fin aerials from the Quickboost RWR set, which are a vast improvemnt of the rather clunky (and short-shot) bits that were originally there: I've also taken the opportunity to do the missile load for XV415 which is the usual R.A.F. Phantom load from that period of four Skyflashes and four Sidewinders, using Eduard's Brassin AIM-7E set for the Skyflashes and their AIM-9L set: They're quite fiddly, and the Eduard decals take about three seconds to loosen from the backing paper, so beware! I've got the gun pod too, and that's just about ready. I've also done some weathering to the uppersurfaces, which I'm pretty happy with. It's a fine line between not enough and too much... As with the undersides, it's done with watercolour brush pens of various greys, which can be blended or removed with a slightly damp cloth or brush as required, then sealed with a coat of varnish. So, I think all the various bits and bobs are pretty much ready, I'm just waiting for a canopy that actually fits...which would be nice. More soon... Simon
-
Easy to check - if the sprues aren't straight, be afraid... The ones on mine had very noticeable warpage going on: I was quite surprised that the clear sprue was also a bit curved as well... Good luck with your Phantom @TallBlondJohn Simon
-
Hello again Back with another update, and another moan about Airfix quality control... First up, all the decals are now on. Took several days of application! Note that XV415 had the dual language rescue stencils in English and German. The decals went down really well, and I used Daco decal setting solotion which really does the trick. I only lost about three stencils, which isn't too bad...! I've started doing some of the weathering and general grubbifying - here's the undersides: And the Eduard bits added to the nosewheel bay: I've also added some chaff and flare dispensers to the rears of the Sidewinder pylons: I'd already done the stencils before I remembered to add them though... And so, I thought I'd check the fit of the canopy - I'm going to use the 'closed' version. And...it's not good. Starboard side - okay-ish, needs some fine tuning to fit: Port side - not okay-ish, with a large gap at the rear end: I laid the canopy on a flat surface, and it seems to be warped. Here's a photo showing that when the two rear edges and the front right [edit - front left] sit flat on the mat, and the front right sits off the surface: And when the two front sides lie flat, the rear left hand sits up: I checked the clear sprue, and it does seem a bit out of square so the canopy does seem to be twisted. So, off to the Airfix Spares Department once again we go... More soon Simon
-
Slight thread hijack (apologies ) but I'm doing the Airfix Phantom FGR.2 in the later 3-tone grey scheme. The instructions call for the main body of the SUU-23A to be Light Aircraft Grey, and the front end and cannon barrels to be gun metal. From photos, it looks more like the front end and barrels too(?) were painted black - which is correct? Ta Simon
-
Another quick update... First up, I've painted the wingtip lights. Here's the starboard one: and I've painted and weathered the natural metal rear fuselage sections: They're done with a base coat of Revell's Steel Aqua acrylic, then weathered using some grey watercolour pens and then silver and black watercolour pencils, with a quick spray of smoke black paint. I've also added the 'smiley face' handhold on the rear of the brake chute housing: There's a formation light to go just above, hence the hole. And then, deep breath, and on to the decalling. Stencils, more stencils, and then for a change some more stencils. I've done all the ones of the bottom of the fuselage and wings - 79 of them I think so far Some of them are just ridiculously small (like the small white crosses pictured above which are less than 1mm) and I think Airfix could have combined some of them on a single carrier film, TBH. I've only lost one, which I think is pretty good going! I've never had to use a magnifying glass when applying decals before...🔍 So, I'll get them sealed with a coat of varnish, I think, then on to the upper surface stencils next, and maybe a lie down in a dark room for a while after that... More soon... Simon


