

halcyonjet
-
Posts
428 -
Joined
-
Last visited
Content Type
Events
Profiles
Forums
Media Demo
Everything posted by halcyonjet
-
An Italian Soviet in Greece for the summer
halcyonjet replied to halcyonjet's topic in Southern Europe GB
For such a small kit, it has caused me a lot of grief. I've had problems with the white paint -it took a few attempts to get it right, and the grey especially. The first grey was perfect colour wise, but just wouldn't dry. The second grey should have been the same colour but dried much too dark, and the third was about right. Started applying the decals, but I've been called away from home and won't be back until the 19th. Anyway, here is the current state but I will resume on my return. Dave -
1/72 - Embraer EMB/ERJ 145 by Amodel - released
halcyonjet replied to Homebee's topic in The Rumourmonger
RVHP produced resin kits of the Emb-145 and the shorter 135 in 1/72 a few years back. I think they look stunning with their tartan tails and red engines. Dave -
An Italian Soviet in Greece for the summer
halcyonjet replied to halcyonjet's topic in Southern Europe GB
The kit includes a basic cockpit (although not much will be seen when completed) and an 'S duct' for the centre engine, which were put in place before the fuselage halves were joined. Wings, tailplane and clear cockpit cover have been fitted, with only a tad of filler needed to fully blend the windshield in. Dave -
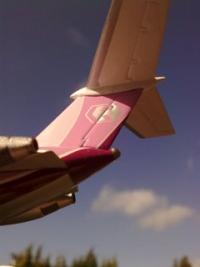
The new 1/144 scale Zvezda kit of the little Yak-40 tri-jet is my chosen build for this G.B., however i will be using the decals from the AZ kit which included Olympic Airways with it. A book I'm currently reading, Olympic Airways A History by Graham M. Simons, provides some background to the plane. In 1972 Olympic leased a pair of Yaks from Aertirrena of Italy for evaluation as a possible replacement for their recently retired Dakotas, but an order was not forthcoming. Here is the kit (with the extra decals).. Dave
-
Not half as much as me! Thanks Pat Dave
-
It is the same kit that was fairly recently released by Eastern Express (of Russia) but tooled in Ukraine. The DC-8 was to have been the same, but for obvious reasons didn't make it back over the border. I have an EE Trident 1 kit waiting to be started, and it looks great (especially compared to the Airfix kit) Dave
-
Finally finished! Have I enjoyed building it? On the whole -yes, but it has been stressful at times. One thing I have realised is the benefit of more modern paints such as clear red and orange for the lights. Anyway, having spent 44 years waiting in the attic, it can have its moment in the sun before the inevitable packing away into a shoebox and into storage. Thanks for all the encouragement along the way Dave
-
Big In Japan Gallery
halcyonjet replied to Enzo the Magnificent's topic in Big In Japan - Classic Japanese Kits GB
Done, and just as my camera dies having waited for a thunderstorm to pass over to get outside to photograph it- 40 replies
-
- 14
-

-
Thanks Cliff!
-
The last day push to get it over the line... It has become a battle of willpower with the kit seemingly determined to remain a few individual parts. The doors for instance -the hinge has a small lip that connects it to the body shell. I tried various model cements and superglue before Gorilla glue seems to have worked. Similar problems with the boot lid and the windscreen have slowed progress, but now I just need to join the bodyshell and the floor pan (trapping the front suspension in between), then add the bumpers, lights and wheels. Dave
-
A quick update with how it looks just before I left for a couple of weeks in Kefalonia. I had hoped to be finished , but things never quite go according to plan -the dashboard took several goes and some reinforcement adding (imagine butt joining thin plastic card and hoping it will keep in place) before becoming secure. Just the steering wheel, seats and the delicate gear stick and handbrake to complete the interior and then ready for the final push on my return. Dave
-
The interior is all painted and starting to be installed, just trying to get a good photo. Quite pleased with how a small water tank has turned out -painted with Off White and then the bottom half Smoke Blue. Dave
-
Hi Ray, really enjoying this build as I've always been fascinated by the Skymaster. Back in 1980, I was working at my local airport and we used to get regular visits by a German one (the owner had an old Rolls Royce car that was kept in our hangar). Anyway, your kit triggered off something that reminded me that I might have one in the stash. After much searching I came across a small box that contained what looks the very same kit, only mine was produced by a company called Eidai. Best of all, it had a companion that is perfect for this G.B.! regards Dave
-
It's proving to be a bit of a pain in the erm.... backside at times, as the kit can be lacking in locating pins and has some awkward butt joints. However, there can be great satisfaction in overcoming those problems. The kit included lengths of tubing for hoses, and thin wire for spark plug leads. Sadly, age had caught up with them and they had become too brittle to use. A rummage through the drawer full of old electrical leads yielded some alternatives (or aftermarket upgrades if you like!). Anyway, the engine and gearbox are now fitted to the chassis, and after a marathon session, so is the rear suspension.. I waited until the others had gone to bed before starting the suspension so as not to be disturbed. It comes with metal lower suspension arms, wheelhub/upright and a spring for the shock absorber. Trying to get everything in place, plus the driveshafts from gearbox to the hubs took me an hour and a half, having started at midnight. I thought it would be a 5 minute job! Just as well I was alone with all the cussing going on. Note the heat shielding made from a blister pack of prescription tablets. Dave
-
Does anyone remember the Vickers Viscount?
halcyonjet replied to AndrewCJ50's topic in Ready for Inspection - Aircraft
I 💓 Viscounts, and yours is a real beauty! Dave -
Thanks Pat. For reference, I recently recorded an old episode of Car S.O.S. that featured an X1/9. However, tit was one of the last produced and here was very little that was the same as the kit, which is of a very early example. The restored car looked absolutely mint by the time the lads had finished it, but sadly the owner passed away just before completion. Dave
-
Thanks Adrian, I'm really enjoying the build -even though some parts such as the radiator and centre console have been a pain to join. The instructions are a little vague at times, but it's fun figuring it out! Dave
-
Lovely job! I never got to see a Laker A300 in service, just one in storage at Stansted after the company's demise. Dave
-
Doing some online research into the ten year production life of the Fiat X1/9, it seems that hardly any two photos show the same paint colour . Likewise the interiors, wheels and bumpers, so the model is being done to my personal taste. After a protracted period in the model shop, I settled on a can of Tamiya TS-54 Light metallic blue. Due to the breakdown of the kit -opening doors etc., those parts were sprayed separately, but I'm quite happy with how they have turned out. Dave
-
I should point out that the kit came with optional parts to do it as a 'rally' version - a basic roll cage, bucket seats, spotlights etc. Back in 1979, I was intending to use all of these and started to fit the flared wheel arch extensions, which involved cutting away the original small wheel arches. Having done that to the front ones, I'd proceeded to brush paint the front half of the body yellow, just like the pictures on the side of the box. Revell Paint Remover has done a good job of getting rid of that rough yellow paint, and I've finished fitting all the wheel arches and now given the body a coat of primer. The kit also came with the car's standard 'steel' wheels and skinny tyres, and the optional wider 'alloy' wheels (which are actually metal) and tyres. Dave
-
Hopefully my problems with posting photos are sorted now (my usual host no longer works and an alternative seems to have gone the same way). A small daily amount of work has been going on -such as the radiator shown, although it won't be visible once completed. Dave
-
A bit of the background story to this kit. The year was late 1979, and I had barely started it when I was told that we were going to have to move for work reasons. That started 5 house moves in as many years and somewhere along the line, I thought that this kit had been lost, and I forgot all about it. Then, last Christmas I was in the attic sorting out the decorations when I came across a box that originally contained apples. Underneath a lot of old tat was my Fiat X1/9 -seeing the light of day for the first time in 42 years! I guess it deserves to be bumped up the build queue. Dave
-
Big In Japan - Classic Japanese Kits GB Chat
halcyonjet replied to JOCKNEY's topic in Big In Japan - Classic Japanese Kits GB
Hello Pat, I would love to join in with this GB, especially as I've got a number of Japanese kits from the 70's in the stash and need some motivation to start them. Dave -
1/72 Boeing 737-200 Air Zimbabwe
halcyonjet replied to mitchem's topic in Work in Progress - Aircraft
I think my school taught 'Triggernometry'.... Dave -
Condor New Livery - this should be fun!!
halcyonjet replied to Timo's topic in Modern - 1969 and onwards
Although I'm not yet a fan (it might take time to grow on me), you can certainly see it coming! After the age of the 'billboard titles' and oversized tail logos, it makes a change to have them small and discreet. Dave

