

Barneydhc82
-
Posts
267 -
Joined
-
Last visited
Recent Profile Visitors
1,865 profile views


Barneydhc82's Achievements
")
Established Member (3/9)
109
Reputation
-
Here is the Hasegawa 1:32 Sabre 6 which I built a few years ago and presented to Col George Miller who flew Lead Solo with the Golden Hawks, Leader of the Snowbirds and later Base Commander at Moose Jaw. By the Way, that gold paint is from the original Sheffield Luxor Pale Gold pigment mixed with Model Master Clear Gloss Barney
-
The fellow on the left is F/L Harry Hardy, pilot of Typhoon "Pulverizer IV and myself with 1:8 scale Typhoon...which he signed on the underside of the wing. Barney
-
Here is another model, 1:72 scale Airfix, built for S/L Mel Lee who flew this a/c on 423 Sqn, RCAF . He continued flying after the war until the mid 1970s. I alwys enjoy building for veterans
-
Yes Mike, he flew SN*M confirmed by his WW2 logbook. Barney
-
Here is a model built in 1981 for a retiring friend who flew this aircraft while assigned to 243 Sqn RAF.. The rocking chair and later a fishing rod, tackle box and net told the story behind this 1:32 build.. On Larry`s last day in Pitt Meadows Tower, we made him stay in position right to the last second ...then presented him with the model.It was well worth the effort. Barney
-
John: Your photo is of the PA-28-140 but it was not called a `Cadet`...this was the name used after the -140 line was terminated and the PA-28-151é161 Warrior became the stripped down trainer. I ran a flying school and Piper dealership in the late 1970s. That 1:48 Minicraft kit is as good as you will find. Barney
-
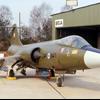
CF-104D Starfighter 1/48 Hasegawa
Barneydhc82 replied to Martian's topic in Work in Progress - Aircraft
There is nothing like a first flight in a Two-Holer! Mine was in Zweibrucken 3 Wing RCAF in the mind 1960's and I can tell you I was hyperventilating even before the canopy was closed. I got about 15 hours altogether in 654 and today she sits derelict in a "museum" here in Langley, BC Canada...really sad to see! This is the same kit with Alclad finish....I'll be keeping a watch for this one of yours Best wishes Barney -
Very nice Tony!. Paul; I don't remember the amount required to shorten the fuselage but Tony looks like he nailed it. One small mod was to add a 4th window to the rear fuselage. Barney
-
Now if you want something really different based on the DC-4/North Star , there is the Canadair C-5. Only one built for 412 Sqn RCAF as the answer to "air Force One". It was a DC-4M/North Star fuselage with DC-6 wings, engines and landing gear and DC-6 horizontal tail. This 1:72 model built from French kit about 30 years ago was brush painted. I removed fuselage plastic from ahead of and behind the wing to shorten the beast as per the book North Star. Barney
-
The F24 tires were 6.50x 10 Barney
-
A bit of background on TG117: In June 1949 it was participating in an airshow in Edmonton, was overstressed and had to be shipped to A>V>Roe , Canada for repairs. Before being returned to the Test Flight at RCAF Namao, TG117 was repainted in the Canadian Dark Grey/Light Grey scheme with Red hi viz panels. The two Greys were similar to but not exact match for EDSG/MSG Barney
-
Rod: My last encounter with the beast was trying to replace the engine oil pressure/oil temp/fuel pressure gauge in the front cockpit. Remove the control column, throw in a couple of cushions, grip wrench between teeth and dive head first into the hell hole followed by a half roll and push up. Now the above procedure was not too bad but when the OAT is 95+F and the sadistic engineer closes the canopy on you it can be very frantic trying to change the gauge as quickly as possible. After that day I never touched a Chipmunk again for 20 years! I joined the RCAF in 1953 and that same Chipmunk showed up on the west coast near Vancouver and I got to fly her one last time in about 2010.. The gear leg fairings on the Chipmunk were like the gear doors and spinner on the Harvard..redundant. Thanks for your comments Rod..greatly appreciated. Regards from the West Coast of Canada Barney
-
The gear does look flimsy but it is the same as all other Chipmunks but without the fairings. In this part of the world the winters are long and nasty so the fairings came off to ease maintenance. After spending nearly 3 years working on the two Chipmunks at WFC, I can not describe the nightmare of working on this type..at least not with any degree of civility. Winter operations were terrible for he aircrew and maintainers alike when temperatures dipped to -30 C which was usually the cut off for flying operations. Barney
-
Rod: Thanks for te comments. As for the canopy, it was incorporated in the first batch purchased by the RCAF and yes, a few of this batch went to RCFCA clubs across Canada. I first saw the Chipmunk in June 1950 when I went to work as an apprentice wrench bender at the Windsor Flying Club. These aircraft were as per 065 although the fin flash and roundels along with the serial were removed and the official RCAF crest was applied to the fuselage yellow band. Chipmunks first went to the Flying Instructors School, RCAF Station Trenton, and Primary Flying School, RCAF Station Centralia. The flying club aircraft were used to provide refresher training to Supplementary Reserve pilots until they were returned to RCAF service in the late 1950s... Over the years I've flown many Chipmunks and when they came up for disposal in 1971 I turned down the option to buy one. They were the nicest flying trainers that I have ever flown but a nightmare to work on...and I have the scars to prove it. Best regards Barney
-
Thanks for the comments JR. When the prototype Chipmunk was test flown, the aircraft had the much the same canopy as the British version but it was soon realized that the "birdcage" canopy was too confining and had too many blind spots because of the framing. The big bubble provides incredible visibility. Barney
