


MarkSH
-
Posts
1,796 -
Joined
-
Last visited
-
Days Won
4
2 Followers


About MarkSH

- Birthday 29/05/1963
Recent Profile Visitors
4,811 profile views


(510x640)-Copy(95x120).thumb.jpg.33073138e01aa81779639a845926753e.jpg)
MarkSH's Achievements
")
Very Obsessed Member (5/9)
6.6k
Reputation
-
Hi all, Lower hull tub assembly further progressed: Cheers, Mark.
-
Evening all, I think the general construction is complete, still a lot of dry fitted bits and bobs and I think I need to add some clasps or brackets near the ends of the tow cable but overall ready for some paint when the Easy Eight is at the same point: Cheers, Mark.
-
Evening all, I have been pleasantly surprised by how easy my Tamiya Sherman early production build has gone together (much easier than my previous experience with Dragon's Panzer IV) so much so that I decided to drag another Sherman out of the stash! With apologies to those already doing a M4A3E8, hopefully the Easy is as easy as the early. I had a look at the rubber band tracks supplied with the kit and found them to be somewhat less convincing than the ones that came with the early production Sherman plus they seem to have a bit of a twist to them. So I have invested in some Friulmodel T-66 white metal tracks (something I wanted to have a go at for some time). As you can see I have made a start on the lower hull assembly I hope to bring this attempt up to the same level as the Early and then do the painting side by side. Cheers, Mark.
-
Afternoon all, A little more assembly progress along with some added detail: All of the hull accoutrements have been added plus I have made a towing cable as they seem quite common in images of the Sherman at war. The cable is made from a pair of 4 lengths 0.2 mm copper wire twisted clockwise and then put together and twisted counter-clockwise, just like rope it should hold itself together. The towing eyes are spares from my Dragon Panzer IV build. Looking at the photo I have just realized that I have forgotten to drill out the muzzle of the hull machine gun. I have added some 0.5 mm copper wire lashing brackets to the turret, just sticking the knapsacks etc. to the side of turret seemed a bit simplistic so I'll try to create some rope effect with a few lengths of Caldercraft rigging from a long stalled HMS Victory build More lashing brackets on the other side of the turret and a general dry fit of turret and gun plus the stowage bits to try and find a pleasing but plausible arrangement. I need assemble the turret top .50 machine gun and to paint the inside of the turret and hull next and then decide on a general painting sequence for the externals. Cheers, Mark.
- 19 replies
-
- 12
-

-
Hello all, Managed to make a start on the Tamiya Sherman, Nice as it is there isn't a lot to the general assembly and it has gone together quite rapidly: I started with the wheelie things as there were some mould seams to clean up. The lower hull is very simple with only a few parts, I have also taken onboard @Mig Eater's comments with regard to the open sponsons and added thin strips to serve as a fixing point for some plastic covers, The upper hull is similarly straight forward; the rear deck plating has been fitted The upper and lower hulls mated and the sponson covers glued in place Wheelie things and rear end details attached. The bits of additional armour have been added That's all so far. Cheers, Mark.
- 19 replies
-
- 12
-
-
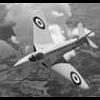
Morning all, A little progress with the main assembly of the Jag: A fair bit of filler has been required to smooth out the rather clunky breakdown of the old Airfix kit, especially around the wing join. I'll be able to see the problem areas when I get some primer on it. As I'm building a GR1, I didn't want to have the over-wing pylons fitted so I scratched some replacement wing fences from plastic card using the kit pylons as a template. I have just started fitting some card to the auxiliary intake slots as I haven't seen many images to support the 'open' look . I've added some detail to the IP coaming, and am going to do something about the blank area behind the seat headbox as I'll be posing the canopy in the open position. More evidence of the filler required to smooth things out on the underside, surprisingly the insert just forward of the exhaust nozzles fitted like a dream despite not looking like it would during dry fitting....I must have done something wrong! I've been trying out Mr White Putty for this build and have to say I really like the way it sands. Slow progress. Cheers, Mark.
-
Morning all, Here with an old kit from Tamiya, originally released in 1981 but updated with new parts in 1995. As most will know I ain't no armour expert, in fact I have only 'successfully' completed a single tank in 1/35 in the shape of a Panzer IV for the STGB a few years ago. My aim here is to produce a quick build, but try to develop the weathering using a process I have employed reasonably successfully with some of my aircraft builds using oil paints, nothing new there. However, I have been watching several talented exponents of the process on YouTube and the effects they have achieved are remarkable and right up my alley, hopefully I can produce something of a similar ilk. The obligatory box contents shot: Cheers, Mark.
- 19 replies
-
- 10
-
-

PK601 - Supermarine Stranraer
MarkSH replied to MarkSH's topic in Matchbox 50th Anniversary Group Build
Morning all, I am finding that this is definitely an odd sequence build....who am I kidding its all bottom about face! In order to apply my usual weathering process i.e. the application of oil paint as a filter, it has to be done before I rig the model otherwise I just won't be able to access certain areas, it will require some careful touching up after the whole lot is assembled but I knew that would be the case anyway. I sprayed the aircraft's code letters and sealed with a satin varnish. Over the satin finish some sponge chipping effects were applied then blobs of various coloured, leached out oil paint were scumbled into the surface and blended to give a uniform faded finish with some variation in colour as well as the addition of some staining in particular the waterline 'tide mark' and exhaust staining it all needs to dry out for a few days before sealing again ready for rigging and final assembly. Cheers, Mark.- 63 replies
-
- 14
-
-
Thanks Craig, I was actually enjoying the kit, so as you say I'll save it for the future and let you know how it turns out. Mark. 🇺🇦
-
Hi all, Apologies to the hosts, but this one is going back in the box and will remain there until I feel more comfortable dealing with all things Russian. I know that the subject of the GB is not the issue but it just doesn't feel right working on it given the news and images coming out of that part of the world. Cheers, Mark 🇺🇦
-
PK601 - Supermarine Stranraer
MarkSH replied to MarkSH's topic in Matchbox 50th Anniversary Group Build
Evening all, It's all going a bit slowly here at home, unfortunately 3 out of 4 in the household are covid+ myself included and I'm feeling pretty lousy with it. I have been doing some painting and fettling but not really keen on mucking about with any solvents etc at the moment. The Stranny has had its base colours brush applied and all sealed in with some Klear. All of the kit decals are non-usable so I am using some Xtradecal roundels and fin flashes, there is a minimal size difference to what was in the kit, but I can live with it and I suspect the Xtradecals are a better representation of the correct sizes any way. The main problem was the aircraft code letters which dissolved into a nasty slimy mess on contact with warm water....great, so I had recreate the BN L letters print and out a few copies as a template for cutting some masks to airbrush the letters. Once the decals and code letters are applied I'll be able to seal them in and do some chipping and weathering. It all sort of fits together and the geometry is pretty good too, getting close to the make or break point with the rigging! Sorry for the glacial progress. Cheers, Mark- 63 replies
-
- 13
-
-
Afternoon all, Here are a couple of in-flight models both were 'failed-to-complete' efforts for fairly recent Group Builds that I have only just found the impetus to finish off. First up, Airfix 1/72 'old tool' Buccaneer in SAAF colours. Completed with Alley Cat resin nose, slipper tanks and bomb bay. Additionally some Nord AS 30 Air to ground missiles printed from my own 3d model. Second, Airfix 1/72 A-4 B Skyhawk posed in the process of deploying two Mk82 retarded bombs. used the kit bomb casing and scratched the drag vanes. ...and a bit of photoshop fun. Thanks for looking. Cheers, Mark.
- 6 replies
-
- 29
-
-
@modelling minion you're absolutely right, fortunately the rear end of the engine is quite nicely detailed but even that is set a ways inside the tail section, I went with a fairly dark iron colour with some red and blue weathering powder for the heat effects.
-
You'll need a borescope to see any of the engine detail!
-
Evening all, Progress on anything is in short supply at the moment, but a little has been accomplished on the Trumpeter MiG. Cockpit tub and aft spine compartment, nose gear bay, avionics bay, main gear wells and engine have all been painted up (mostly) and glued in place. The vertical fin has been assembled and seams sanded. The separate tail sections were glued to their respective fuselage halves. And yes I know I've already fitted the nose gear leg but given my track record with aircraft undercarriage I couldn't bring myself to add another troublesome assembly into the mix, I'll just have to treat it all with kid gloves. A test fit shows that gluing the tail sections in advance, instead of as a complete assembly as the instructions would have you, was the right choice....much less remedial filling and sanding will be required. Despite some opinions that this kit is inaccurate, it's starting to look like what its supposed to look like and honestly, it all fits like a dream, so far no complaints from me but then I'm no Fishbed expert. I painted the avionics bay black, with the "bonnet" on, nothing will be seen so why I dry brushed it is unknown, I even spent a few moments trying to decide what to dry brush it with....I came to my senses very quickly. The same thing applies to the front face of the engine compressor, all quite nicely detailed but utterly superfluous. I test fitted the canopy (not shown) and quite a lot can be seen of the cockpit so very happy with the extra detail I've included. I need to properly paint up the nose cone and intake ring before fitting, then the fuselage halves can be mated. I like this kit. Cheers, Mark.

