

HP42
-
Posts
693 -
Joined
-
Last visited
-
Days Won
1
Content Type
Events
Profiles
Forums
Media Demo
Everything posted by HP42
-
That's incredible! Thanks so much. It'll mean I get the correct load for the model now. Do you know which aircraft is this for perchance?
-
Many thanks Geoffrey, much appreciated. I don't suppose you have the source for this info to hand? What night be a typical load of HE to a target as close as Munster I wonder?
-
Hi all, Quick question. Looking at modelling a 9 Sqn Lancaster. It was attacking the Tirpitz in Sept 44 with a Tallboy. A few weeks later it was attacking Luftwaffe airfields in Muster from medium level. I assume it would have been attacking said fields with general purpose bombs but retaining the enlarged bomb doors? What would be a typical load out for airfield attack? Nothing mentioned in the Sqn operations book. TIA
-
Revell Monogram 1/72 Shuttle Stack
HP42 replied to monkey_1971's topic in Ready for Inspection - SF & RealSpace
Looks fab! That's a huge undertaking that looks the business. Any more piccys? Daft question, are the Revell and Monogram mouldings the same thing? I want to do mine but don't want to buy the decals if they don't fit the Revell as intended. -
You've done a fabulous job with an awful kit! Your hard work has paid off, that's the skill of the modeller in my opinion. It's a convincing result. Would be nice to see Airfix make a new tool for this and the B-24 Liberator on a nearby thread.
-
Korean long-nosed Phantom - 1/72 Hasegawa
HP42 replied to cpoud117's topic in Ready for Inspection - Aircraft
Wow, that's an astoundingly good build. I had to check the scale twice as I was convinced it was a much bigger model. Those canopy details are the business. Remind me, what's the tube protrusion on the port wing for? I did know but now it escapes me. Not a gun camera? -
Tom, I've bought the same kit and have been enjoying your build so far. Any developments in the last 3 years perchance? Your work is a great reference. 🫡
-
Oh that's dreadful news. So sorry to read this. 😢
-
Tribute to my brother ..1:72 scale Mk1a cutaway Spitfire!
HP42 replied to Fozzy's topic in Ready for Inspection - Aircraft
Truly outstanding work, especially so given the scale. A remarkable tribute to your brother as well as your modelling skills. 👍 -
A Restored 1/72 Monogram PHANTOM
HP42 replied to Brigbeale's topic in Ready for Inspection - Aircraft
Oh wow, great save! Really looks the part now. -
Airfix 1/72 Concorde - In hand (Let the fun begin)
HP42 replied to Dean1700's topic in Modern - 1969 and onwards
You may already have seen this, but I built this kit about 4 years ago. It's a challenge but looks stunning when finished. Here's my build thread. -
Got this far. Yep, now'ts happened. I think there was an airship in here somewhere, parked next to the sheep probably... 😉😄
-
Shhh, I haven't got this far yet, don't tell me what happens! 😄
-
Only just happened upon this thread. Great introduction, always like a build with a story. 😀
-
A Group of Gals - Two Revell B-17Gs and a Hasey Friend
HP42 replied to CedB's topic in Work in Progress - Aircraft
Just nipping in a bit late to sit at the back. Great start so far. Love to see a B-17, two already in the cabinet, so delighted to see the stash reduction program producing another one where I don't need to store it. 😁👍 Still got that E3 Sentry for you when you're ready. 😄 -
Finished finally aside the decals. It looks great if you apply the 3ft test. It fought me all the way but the end result is very pleasing indeed. Would love to have a Vostock but I'll never build another Mach 2 kit if this is the quality to expect. How do I post pictures again? The decals are simply a Soviet Flag and a Union Jack, no stencil details at all. It does make me wonder if I could print my own decals and go for Tim Peake's machine. I think most of the differences are not visible at 1:72 scale and I can live with the odd change on lumps and bumps as the kit is very approximate anyway. It has you put these weird red barrel things on the boosters which I think are some form of hydraulic reservoir that is removed before flight anyway.
-
Well it's arrived and I've started it. It's the worst moulding of a plastic kit I have ever seen. It makes Pegasus stuff look good. It's a nightmare of flash, poorly moulded parts and short-shot bits and general crapness. The main sprue trees are rough and what would ordinarily be a straight and smooth rod, they feel like I'm picking up a giant spidercrab's leg. The plastic doesn't like cement much either. I'm having to use cyno on the more stubborn parts. Is it unbuildable? No, but it's a putty queen and much sanding and filling is indeed needed. Fit and finish is blooming awful. Considering this is a recent kit, I don't understand how a mould can be so badly produced. I don't expect modern Airfix levels of accuracy but surely if the mould is produced on modern CNC machinery, surely they would have got it better than this? That said, I'm enjoying the build and it'll look great when it's finished but jeeeze.... 🙄
-
HP42 -A few questions and use of acetone on 3D printing
HP42 replied to HP42's topic in Aircraft Interwar
Thanks Chris. I already have this shot and it looks rather good blown up like this. It makes me think the part that enters the fuselage at the bottom is actually a V shape but seen sideways on. There's an artefact hanging about in the centre of the assembly below the main framework. No idea what that is but it looks like there's a wire coming out of it and going to the fuselage. It wouldn't be a brake line. No idea what it could be. I've got some 1mm brass rod on order. I think I might try soft soldering a frame work and see what happens. Anyone tried this? 🤔 -
HP42 -A few questions and use of acetone on 3D printing
HP42 replied to HP42's topic in Aircraft Interwar
I'm inclined to agree with you. So easy to damage parts otherwise. I just wondered if anyone had tried. -
HP42 -A few questions and use of acetone on 3D printing
HP42 replied to HP42's topic in Aircraft Interwar
Thanks Malc and JWM. Useful points there chaps. Currently I'm refurbishing the Contrail kit but when I master putting photos back on servers I'll take a few piccys of the OMM kit and show you. The attention to detail is excellent and whilst it's not for the faint hearted, it's certainly buildable and well engineered. The packaging is like a Japanese tea ceremony, quite exquisite! -
HP42 -A few questions and use of acetone on 3D printing
HP42 replied to HP42's topic in Aircraft Interwar
Thanks for the links @rossm, that last picture is probably the best. It's still not entirely clear how the tail wheel operates but I think I can work with it. Many thanks. Just need to look at the acetone trick now for sorting out the 3D printing texture! The props are struggling a little with the layered effects, less so the fuselage. -
Only taken me 4 years but I have a Mach 2 Soyuz on order. It's the Helen Sharman edition, Filing and sanding stuff at the ready...😎
-
HP42 -A few questions and use of acetone on 3D printing
HP42 replied to HP42's topic in Aircraft Interwar
Doh! Just realised I put this in the military section not civil. That said, at least one of them had very brief military career, so I'm not entirely wrong...prob'ly... -
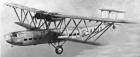
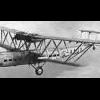
Hi all, Well I wait years to get my all time 'fave' aircraft on the bench and two come along at the same time. I bought a 3D printed kit from One Man Models last year and it's certainly not for the faint-hearted though it's a triumph of the 3D printed artform. Whilst the 'grain' for want of a better word is actually quite fine, it does need some attention. Thankfully the kit came with a test piece (a failed upper wing section) and whilst I've tried various fillers on it, it does look like a heck of a lot of work and I'm not convinced I'll get it looking as it should. I have however seen this technique on the 'tube'. Anyone tried it? A second HP42? A modelling pal of mine gave me the wreckage of a Contrail kit on the basis that he'll never get around to fixing it. I've made a start and it's now back on its main undercarriage though I'm really quite stumped as to how the tail wheel assembly was actually constructed in real life. I'm not convinced the OMM kit is a good reference in this department either! Anyone got a good reference photo of the tail wheel perchance?
-
Handley Page HP42/45, Contrail vacuformed 1/72
HP42 replied to fjaweijfopi4j48's topic in Work in Progress - Aircraft
Just inherited an HP42 in 1:72 for repair. This thread is invaluable!!! Please keep the piccys in place on whatever server they reside upon. Amazing build, far above my standard but it gives me many pointers, not least a source of decals!


