


the other matt
-
Posts
168 -
Joined
-
Last visited

the other matt's Achievements
")
New Member (2/9)
983
Reputation
-

Matt's journey through the stash
the other matt replied to the other matt's topic in Figure Work In Progress
Told you guys this was going to be a slow burner. The astronaut no has her hat, but I dont really have any decent pictures and I've been distracted by Pyramid Head. I've blocked out a few things, but need to put it aside for a while before touching things up. -
Matt's journey through the stash
the other matt replied to the other matt's topic in Figure Work In Progress
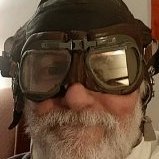
Ah yes Mrs Miggins' flight suit. Much bad language went into the painting of that. It was my first outing with the Kimera base set I bought a few months ago - took a bit of getting used. Seemed expensive at the time, but the colours are so much more vivid and saturated than the mig ammo colours I've got. Also turns out that half the fun is mixing your own colours. Another slow burner from the box of doom. -
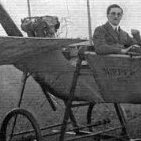
Hi all. This is probably going to be a bit of a slow burning thread as I try to put some colour on what seems to be a mountain of plastic. In my head it seemed to make sense to post everything in one thread as I go along - It may be a good way to track whatever progress I make along the way as a painter, but we'll see about that. This is pilot number 2. She's still a bit rough (please excuse the phrase...). But I think I'm at the point where I need to set her aside for a bit for a break. All acrylics so far. Hard to take pictures of this one for some reason.
- 4 replies
-
- 10
-

-
Thanks all. Very kind of you. @sardaukar, I've got a couple on the bench right now 😂. Im no where near confident enough to wip them, but may post here once (if) they roll off the line.
-
I while back I bought a few figures from a friend with a view to learning some proper painting and having taken a bit of a break from tanks for a couple of months, I fancied going back to the first one I did and pushing a few things on it. I'm calling it done for now though no doubt I'll be back to it at some point. I can already see a few things to improve on. Either way she's now on her own base. Safe to say I'm no figure painter,
- 7 replies
-
- 13
-
-
RIght, after a week or so having my head turned by other projects, I thought it was time to get back into the saddle with this. I've been doing a bit of painting on a Panther that's been hanging around for a good few years. If nothing else I've learned that I prefer I far prefer the old dregs of the lifecolor pots I have to the fancy pants mig colours I seem to have filled the house with. You live and you learn. More on topic though is the T55s turret roof. I have it so this assembly is removable, though it is a tight fit. I think this will probably spend most of its time off turret. Not spending too much on this because whether on or off, you'll basically never see it.
-
Looking forward to this one. It'll be interesting to see how similar to miniarts tractors this is.
- 48 replies
-
- 1
-
-
- 1/35
- mirror models
- (and 1 more)
-
OK. Back on track. Started fiddling with the turret roof. It's nice to be dealing with bits I can see and actually hold. I've found the instructions at this point to be challenging. Here it is with the walls painted and the rear ammo rack in. Gluing it at this point was definitely the way to go as it's ended up in a place no where near where I would have glued it it if had gone onto the turret floor. Small wins. And with the other T55 bits Test fit. Fits without complaint. Thanks for checking in.
- 129 replies
-
- 11
-
-
Don't get me wrong it's a great kit, but it does demand a lot of time ajd a willingness to YOLO away from the instructions every now and then. I know this is a bit duh seeing as we're talking about an interior kit. Despite the throwing of toys out of the pram, I'm still tempted by another one, but I know I'll need a pallet cleanser. Thinking probably something from the figure stash that a seem to have built up out of nowhere. Overall would recommend but as always caveat emptor.
-
I was at the point of buying another one of these kits, but I'm not building another one of these turret interiors. Foe me, hardest bit of the kit so far. I ended up with a fiddly mass of tiny pieces and glue. The way I approached this, for better or worse was to get the kits sub assemblies together then try to get them into the turret. Like this. This assembly has no rigidity and as far as I can tell no real anchor points for the breach guard at the back. Then get the gun in. Ended up here. Again, there's a lot of bad feeling behind these pictures, but we are where we are. It's not square, but then contrary to what Huey tried telling us, it's not always hip to be a square. I'm walking away from this to let it set and then I'll come back and tone a couple of things down a bit. I find it hard painting in sub assemblies I always end up with a load of pieces that look theyve come from different vehicles I have no Idea how the sight goes in so for the time being I'm ignoring it. Looking at it with the lid on, I think we'll be OK.
-
Thanks very much, though this build seems to be 50% fudge and 40% artistic licence. I think its the sheer amount of sprues that's a bit intimidating - quantity has a quality of its own as someone once said. This kit isn't so bad though if you don't mind seam lines. Decent sprue cutters required. Gunny's done. I've gone a bit high contrast - perhaps too much. Here's where a day pushing paint has gotten me. Yes after much deliberation, I've painted a panel white. and now the putty is set, some more bits red and that thing on the bottom which comprises of 20 parts is now black. The underside of the gun will never be seen so its a heady mixture of naked primer an overspray. Some would say its the best bit. The green is quite a bit lighter in the real world, but its August and it's Wales so naturally there is no sky, just cloud.
-
Thanks gents. This is pretty much what you'll see with the lid on - minus a dirty big gun of course. I'm surprised how much of the interior you can see. Started on gunny. Haven't covered myself in glory here. When I built it I put the metal slidy thing in the breach backwards so had to dig it out and reverse it. Also comprehensively snapped what I guess is some sort of stabilising rod. not an issue in itself and fixable with some rod, but Im pretty sure this assembly will attach to the turret roof. Here I see issues cropping up. I also filled a gaping hole in the breach from which Im guessing I've missed something out . I honestly cant see anything on the instructions. I did all of this after getting it all together and painted for some reason. Genius. Received the next project in the post this morning. Total change of scene.
-
Got the bottom of the turret done. I have no idea how the ammo rack in the back of the turret fits so I'll be gluing it to the attachment points on the turret roof. I've tried to distress the white a bit. layer of lifecolor dust first then sponged on ammo white. Some chips on top with lifecolor black/grey. An oil wash pins it together a and all things told am quite happy with this way of doing it. Radios left in aluminium because i like a bit of shiny, though the pictures I have look like they were painted in some sort of hammer finish silver.
- 129 replies
-
- 15
-
-
You were right of course John. Having left them all to set and sat the beast on its wheels they look OK. I'm trying to keep up the momentum with this Pete so it does get done. Don't want this to sit on the shelf unfinished. Would much rather it was finished and on the shelf gathering dust. With that in mind I was working in the lab late last night and ended up doing this. Setting the rollers, checking the sprockets for fit and trying the tracks on. The instructions call out 91 links a side, but for me, that gave far too much sag on both sides so I lost a link on each. Even with this the rollers are both at near enough full extension. That was a hassle and I couldn't really be bothered to do it again so one thing led to another and we ended up here. As part of this I repositioned the fender on the left with a bit of brute force and and super glue. It's sitting a bit straighter now. I didn't even glue in the sprockets as it was a push fit. Nice. And the sag. WIth shoes and socks on, time for the turret methinks.
- 129 replies
-
- 11
-
-
I like that camo very much. This is going to be a very impressive beast.
- 138 replies
-
- 1
-

-
- FRENCH WW1
- CHAR 2 C
- (and 1 more)