-
Posts
238 -
Joined
-
Last visited
Ran's Achievements

Established Member (3/9)
603
Reputation
-
Great looking Horten. What did he use for the wood decal? Ran
-
This past two weeks I managed a lot of bench time - but could not bring myself to sit down and write. I'm now masking with MicroMask and have to take breaks between layers so I might as well update this build log. The fuselage is closed and I'm gluing the outer stuff. Two major takeaways from this build: 1. This chopper is BIG - in 1/72 its almost as long as the 1/48 H-280. 2. Old mold 1/72 kits just suck with poor engineering. This kit has parts that resemble short-runs Want a few examples? Checkout the sponsons - nothing by way of guiding or fixing: Or this strange engineering: The bottom part of the chopper and the floor of the cargo hold are also a strange piece of engineering. The cockpit is simple enough - and I fought the AMS urge quite well. Well, almost, just added a couple of boxes to the rear part. I failed to win against AMS when I noticed the magnitude of grills and exhaust ports. This is the first time for me - I took the DSPIAE electric grinder, armed with a drill, and went to town. The same took in high speed generates enough heat to make it a hot scalpel: The tail was more challenging: The rotor base was glued, but the glue drooled all te stopper piece - I had to cut it and work something else: Fixing inside the fuselage was almost notional, same with engine#3 exhaust, almost no location features: I had to glue the fuselage from the Front to the Back in several steps and then do the same for the bottom part: You can't see the time spent on filing, leveling, filing {repeat} - rrrghrr Cutting those miniature masking parts for the canopy lookednot funnot-fun' so I decided to mask with Micro Mask. Most of the features on the canopy were boldly marked. I hope it will go smoothly. I did put some transparent green on the top windows. That's it for now. Comments are welcomed. Best Ran
-
Ran started following Academy 1-72 B-29A Korean War , Academy 1-72 MH-53E and Eduard 1-48 He-280
-
With the P-51D done and on the shelf, and the He-280 back on the table I scanned the stash and decided a chopper is due. Picked out this one and will try to go for the White JDF Bird. This should be an easy build with a challenging paint job. Stay tuned. Ran
-
I'm a bit ashamed but almost 11 month passed since the last time I touched this kit. A lot of life interfered in between. I also lost contact with the friend who promised to 3D print me the lost landing gear. Fortunately I did asked Italeri and they sent me replacement parts. The kit has been looking back at me from the shelf of doom until I decided to give it the last push. So the landing gear legs where painted Tamiya XF-16 and I slowly started to paint and add the finishing touches. I did that over a course of 3 days, making sure I do not wiffle up the other parts. I decided to skip the radio antenna cable - do not have the stomach do mess around with super glue over NMF. So here she is, a quick photo shoot. I will try to put a more generous one in the RFI forum. All in all - a fun kit. A bit of a mess with the decal numbering. Improving, but still not there, with NMF Comments are welcomed as always. Ran
- 11 replies
-
- 2
-

-
Managed another small step today. The wing strut structure needs to be painted and hence glued first. It's a tricky alignment so I had to use the fuselage parts. One thing that becomes quite easy when building in small steps is letting thing properly dry before going on Ran
-
Thanks @PlasticUtopia, losing things to the carpet monster can be very frustrating. Luckily for me, in this build its something that is hard to notice. Ran
-
The P-400 Double build is done and the kits rest in the model cabinet. I've been thinking about the next build for a while, and picked this one as it seemed easy enough, and could serve as a re-mojo project. When I pulled it from the stash I had second thoughts, as I was not sure if I want another profipack with these darn small PE bits. Turns out this is not the case. Making sure it's not too easy - I came across a post by Doogs at DoogsModels. Doogs is one of my favorite modellers and one of the few I follow. Doogs built a Me-262 with bare-meta, factory scheme. I though the He-280 looks a bit boring and I will try to replicate the scheme Doogs built on thi He-280. Check out his post. The part count and detail level are low, but the quality is Eduard. Ran .
-
Thank you @Corsairfoxfouruncle
-
The pair of P-400 are done, the build report is updated and the box if off the bench. Time for a quick session on the B-29. Today it was the time of some green. I'm testing (for the first time) MRP 131 Interior Green. It turned out to be quick nice to shoot. A bit thin, so several layers were needed. I'm going very easy on myself in this build on cleaning sink marks. This kit has more than a few. The tunnel got Model Master OE 1711 Olive Darb: While I searched for some other files, I found a couple of photos I took when my Dad and I set for the first time on this kit. That's it for today. Ran
-
Done at last ! Spent some time in the last days pushing the P-400 pair through the final stages of adding bits and pieces. Found out I clipped the wrong MLG door - the one I painted dark gray as part of the paint scheme for "the resurrection (B)" and the one I have to put on has the wrong color. AMS dilema once again - should I paint if over or just ignore it and 'who will ever notice?". Guess what happened (again)?? To my defense I can say that the fact that I had a spare decal (double build to the rescue once again) was part of the decision process. I used Tamiya XF-22 RLM Gray, the same as the underside of the left wing. After adding EZ-line antenna cable, removing the masks and gluing what's need to be glues - the pair are DONE. "The Resurrection": "PAT": They are both off to the model cabinet: I spent a long time, any many hours, with these two. Enjoyable most of the time, and a lot of fun learning about the P-39/P-400. This was my 41/42 building project, and it included a couple of 'firsts" 1. First Double Build - a first also in terms of actually buying two kits to build two models 2. First Eduard ProfiPack 3. First very detailed PE fret, including first time rolling up a pe part into a barrel. 4. A complex paint scheme - with panel painting in addition to a camo scheme 5. First time masking a camo scheme with Tamiya mask 6. Several painting mistakes that were corrected with re-painting 7. First time getting the nose weight correctly 8. First time with a BIG stencil sheet. 9. Reinforcing the fuselage sides with plasticard to support better closing of the fuselage Known 'issues' : - I lost the gun sights - Decal silvering on too many of the decals - I over sprayed some light green on parts of the wing - Some little PE parts were lost and never got it to the model itself - Antenna cable too heavy and too crudely attached. That's it for a most enjoyable build. Comments are welcomed as always. Ran
-
@georgeusa Thanks. For the nose art I have the Kits-world KW172072, 'The Outlaw' & 'Celestial Queen' and I still did not completely rule out using the kits decals. Ran
-
Another baby step Ran
-
Thanks @Planebuilder62. I usually do the cockpit internals just for the photos I take before closing the fuselage. But I'll give it a though in hope AMS will not take over again. Ran
-
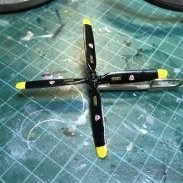
Managed to grab some bench time, between the other builds. Used it for a short masking and paint prep session. Cut some 5mm Tamiya tape into 2.2 mm stips, per the instructions, and then used it to mask the tips of the propellers. 4 engine beast means 16 @#$@#$ blades. Started to think how to cut masks for the wheels - when I remembered I have an Eduard mask for this build just in time. Preping for Black and Zinc Chromate: Big kit, small steps. That's it for today. Ran
-
..... " I'm currently debating if to take out the airbrush and fix it or just leave it alone. My mind says - just leave it alone, my AMS nervous system - well you can guess. We will have to see. " .... Well, can you guess how did that turn out ?? Clue #1 - Clue #2 - note the tails. Clue #3 - Final clue: AMS got the better of me Ran


