


Murray
-
Posts
157 -
Joined
-
Last visited
Murray's Achievements
")
New Member (2/9)
181
Reputation
-
Cheers Chris! It really is, I wasn't aware of it the technical flaws of the kit, still it went to together nicely and I glad you liked it, thanks! Thanks mate! Thanks! Surely the fuselage length can't be that noticeable then, as you said it still builds well quickly so it was still fun. Thanks, in reality they are both that ambiguous 'sky' creamy colour, not sure why they came out a bit pink in those photos I like your strategy of just parking it further away from more accurate spits to solve the problem hahah Thanks everyone!
-
Hey everyone, Recently finished the Revellgawa Spitfire Mk.IX, I used some aftermarket decals to depict a machine based in Normandy in 1944. Also a Eduard photo etch fret to spruce up the the cockpit. The value of this kit OOB, detail, fit, engineering - is spectacular. I would recommend this kit to anyone, of any ability. Without further ado, here it is! And for those interested in the build process, here is the thread and a video I made to show it all a bit clearer: Cheers everyone!
-
I forgot to mention, if you're watching the embedded video, be sure to bump the quality up to 1080p on the settings tab on the embedded link on screen. Also the kit on screen was a practice so not my finest. I hadn't planned on showing it but I figured why not. It might be helpful/entertaining to some. I was practicing for other modern jet trainers. I also forgot to mention the biggest takeaway I found, GLOVES! The amount the marks/dirt/blemishes/stuff/crud that come from clean hands that can mess with a glossy paint scheme is incredible. Cheers Builder, glad you liked it!
-
Been a while since posting on here, finished a couple and started a few since. One that crossed the finish line was the L-39 from Eduard... From this kit (they reboxed the hell out of it) enough waffle, here's some beauty shots... In place of a series of photos of the build, I opted to just make a video of the full build process, owing to Pinterests horrific upload system. Hope you enjoy! (Also more stills at the end of the vid) Cheers!
-
Been a while since I posted, got really lazy when it came to doing the decals but last night I made a start... Started with the roundels on the wings, I tried using the Sky Models roundels for this. I had a really hard time getting them to conform to recesses so I picked them off and then made to start painting them on myself. Annoyingly I ripped up the stencils that denote where you can stand on the wing - so they jumped the queue on decals to be painted on instead. Then came the roundel... And lastly the red and blue... I'll use the Sky decal squadron markings and also probably the roundels on the fuselage as theres not much surface detail there for it to be difficult on. Although having now painted it Im a bit concerned the colours may not match up and it might look odd... Also, in other news, I got the first half of the video finaaaally finished and uploaded:
-
 Nice work!
 -
This is incredible!
-
Thanks man! I just had a neb on your XVI thread. I would agree with what people are saying with regards to Eduard being your best bet. The Revell kit that I built (Hasegawa rebox) has the options for a high backed XVI, although it isn't a bad kit, I think the Eduard kit will be better detailed in the cockpit and also probably surface detail. Good luck with your build and I'll keep an eye out for it!
-
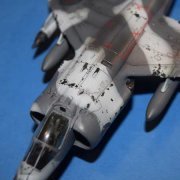
I used some X-2 white (gloss) as I find XF-2 white (matt) comes out of the airbrush practically already dry, it leads to a kinda horrible texture and bad surface finish. The most nerve racking part about this build, making sure I got a whole lot of masking tape cut to the same width. It was at this point I realised I need to challenge myself more, you know, as an adult. Anyhoo, on with the black, I under thin the paint a lot so it doesn't track under the masking tape and ruin everything. I find this technique invaluable, can be seen here in one of my previous efforts, showing how far it can be pushed... Having seen some people, purists/realists and the like, debating panel shading/weather/camo colours etc at length, invasion stripes is also, as I understand a hotly debated topic. Now I know some looked like... Really roughly done, purely functional - rough. But others also looked like... My thought on the matter is this, consider there subject matter, messy invasion striping on a model you can fit on the palm of your hand may seem accidental - subtracting from the overall finished affect. With that in mind, I present a stripy spitfire. ! Any feedback? This thread has been quiet compared to most, is it that Spitfires are a super over saturated subject and no-one cares or is it what I'm posting? Cheers!
-
Thanks man. Both your Spit (awesome kit bashing by the way) and Mustang look awesome!
-
Some post shading to fix the super bright green, using XF-65... Finished result... I am happy with it. Not that about 95% of this paint will ever be seen... The footprint of the invasion stripes... It's gonna be a stripy machine! Does anyone have any pointers for painting invasion stripes?
-
I forgot to mention, if you look at the photo when I just flattened the grey, that gives the best representation of the true colour. The others are too bright
-
Yeh I agree. I was planning to go hard on highlighting the green. Also I find sealing models darkens the tones a tad, plus I weather a lot with washes. Not that much of the paint work matters as this machine is 95% invasion stripe. Thanks man!
-
This was the same XF-82 with a bit of black mixed in... Then I toned it back with more of the base XF-82 \ I can't decide whether or not this colour combo for the machine I'm going for is alright. I think I might highlight the green to give the machine a worn, faded look. Any thoughts? Cheers
-
Since last post, managed to finally get it all buttoned up, the canopy etc and primed. I fixed the joins which were surprisingly bad for a Hasegawa kit. I don't really agree with their mythical position of being one of the God tier modelling companies. I admit, it could have been pilot (modeller) error, but some of the joins were completely misaligned. I used Mr Surfacer 1000 and for some reason it came out gravelly almost in some places. I know it's a filler technically but I thinned it quite heavily. Odd. I polished it back with 2000 grit sanding sponge with some water. And the finished result is above. Also in the mail came some decals... Gonna go for the 602 Sqn markings. I believe its the same markings included in the 1/72nd Eduard Spit. More to follow...
