


ROLY43T
-
Posts
32 -
Joined
-
Last visited
Recent Profile Visitors
377 profile views


ROLY43T's Achievements
")
Newbie (1/9)
15
Reputation
-
It looks like you don't form the bodies all in one piece so I'm guessing you can spring them from the master more easily. Why I cut mine horizontally at the widest point was so there was no undercut and also the master is 1:18 so there's very little material to go over the full depth master. I'll need to keep on experimenting I think. 3D printing the master is a master stroke, pardon the pun, one expense, unlimited bodies.
-
Hmm, though you'd been quite for a while. I've been experimenting lately with VAC forming and I'm in the process of making a buck from balsa as this seems to be an easily workable material. I have cut it in half horizontally so I have a top and bottom section. It seemed to me the only way to release the buck once the plastic had been formed over it. I'm using 0.7mm A4 plastic card by the way. Roy, am I on the right track or way off? How do you form your bodies?
-
Hi Shaun, I've been reading through this post and found it really interesting about how you've sorted out what was obviously a seriously damaged body. I like the way you've included the emotional feelings into the thread, it helps the reader get the reality of the build. It would be good if you described how you go about making altered parts, the shocks for instance. Do you plan to add more detail as you go along? Are you using an airbrush to paint the individual parts? Great work, keep it coming. Roly
-

'Guinness' Citroen H Van Fourgon - conclusion
ROLY43T replied to mbdesignart's topic in Ready For Inspection - Vehicles
Lovely job Mark, you've really done this kit justice. Love the little touch with the headlamp, typically french! Roly -
cardboard Commer Q25 van Mk 2 version
ROLY43T replied to ROLY43T's topic in Work In Progress - Vehicles
Thanks for the kind comments Ian. A picture of this van was in a book I have, it's all about BR's road vehicles through the years. I thought it would make an ideal project using card as it has relatively boxy shape. It's just a random one off, not to be a part of a layout. Roly -
Hi, Here's a few photos of the finished van Here's a link to the work in progress http://www.britmodeller.com/forums/index.php?/topic/235014075-cardboard-commer-q25-van-mk-2-version/ That's it folks see you on the next one. Roly
-
cardboard Commer Q25 van Mk 2 version
ROLY43T replied to ROLY43T's topic in Work In Progress - Vehicles
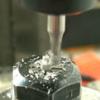
Hi, The next stage was to make the chassis and fit it to the underside, make the four wheels from the parts displayed previously above. The front wheels wouldn't present any problems with fitting because there was enough clearance under the mudguards. The axles were made from cocktail sticks and the plastic tube from a cotton bud, the point of the former fitted nicely inside the latter. I cut the cotton bud to fit inside the chassis and then after careful measurement cut the cocktail stick down, stuck this inside the wheel hub and then pushed this through the holes in the chassis and into the tube. That was fine for the fronts but a different approach was required for the rear axle as this was to incorporate a dummy diff. Here's a photo of the various drive-line parts. These parts are:- 1/ The engine sump 2/ The diff sections 3/ The bell housing 4/ The gearbox 5/ The Gearbox rear extension 6/ The diff sections glued ready for shaping These parts were then sanded to shape using in part my Dremel lathe! and glued together, here's the gearbox with bell housing and extension and diff partly constructed. I then added the front mudguards and steps, seen here with the sump in place These were stuck to the underside, unfortunately because they are an after thought the chassis cross member came in the way so un-prototypical it bisects the drive train, never mind eh? here's the set up complete with wheels, installed and painted You can see in the above shot that the number plates and back lights are in place. The number plates and decals I drew in inkscape scaled and printed them on to decal paper, white for the livery decals and clear for the number plates which were then mounted onto the aluminium top of a creme fraiche carton with the crinkles dressed out then stuck on with gators glue. The rear light lenses are made from 3mm plastic rod rounded and stuck to plasticard discs punched out with a hole punch. The door handles are 1mm brass wire bent 90° in the pliers, filed flat and tapered with a needle file. The fitting of the rear wheels was a bit fiddly, I dropped the wheel into the channel first and then pushed the length of cocktail stick point first through wheel and axle into the tube which had been fitted prior into the diff by the same method, it was all a bit fiddly but came good after some mucking about with it. Once the paint was finished I applied the decals and after a day or two applied a coat of varnish. It was at this stage I hit a problem. The decals applied to the sides stayed ok but on decal on the front of the roof shrivelled up, affected by the solvent in the paint for some reason. same decal sheet, same fixing method, same lacquer, So while the varnish was still soft I tried to remove it, but in doing so cut into the paint which I had to fill and re paint. Masking the sides,rear and front first. I used a rattle can to paint it, to do this I have an old microwave oven turntable which allows access for spraying from all directions, on which I mount the model on two wood blocks. I have a large plastic food container to drop over the top as a dust shield, this normally clears the top of this model by a small margin. This time however, because the wheels were fitted when I put the cover over it just touched the top in one place resulting in a blemish in the paint, seen here. The rattle can is getting near to empty and to put this right would mean filling masking and re- painting, what to do? It's been a while since I started this so I'm looking forward to finishing it and starting something new so might just leave it. I'm posting the photos of the finished project in the finished models category but due to possible copyright issues I've displayed the model on copies of photos of the real van. Thanks for looking Roly -
This is a truly beautiful car and it looks as though the kit does it justice. Is the body shell in cast resin or 3D printed? Roly
-
cardboard Commer Q25 van Mk 2 version
ROLY43T replied to ROLY43T's topic in Work In Progress - Vehicles
sorry I forgot to add the model is based on 1: 24 scale Roly -
I agree absolutely, This thread is now dead, continue watching the new one called Cardboard Commer Q25 van mk2 version. Roly
-
cardboard Commer Q25 van Mk 2 version
ROLY43T replied to ROLY43T's topic in Work In Progress - Vehicles
Thanks for the comments guys, I'm glad the pictures stayed there overnight, fingers crossed, I didn't have the measurements for this van so just took a guess really. I looked at the proportions in the photos that I had and went from there. I guessed the prototype van might be about 17ft, I sort of had a picture in my mind of the Commer 'walk-through' van of which this is the forerunner. I think in reality it might have been slightly longer than this though, as mine looks a bit short. With regard to the primer I used Halfords, red, plastic primer. This definitely made a difference because I didn't prime the back doors and they remained matt despite several coats of maroon, I had to mask them off and prime them, then the maroon came up glossy first coat. Roly -
MODERATORS? CAN YOU PLEASE DELETE THIS POST AS IT'S CORRUPTED PLEASE DON4T POST ANY COMMENTS HERE PLEASE VIEW FUTURE CONTENT ON "MK 2 VERSION" WHICH SHOULD SHOW PHOTOS
-
DUE TO THE PROBLEMS ENCOUNTERED IN THE ORIGINAL POST I'VE RE-POSTED IT HERE Hi, I've been wondering whether to submit this project for some time, as compared with some of the content on Britmodeller that I've seen and the skills in evidence I thought mine might be a bit naff. Now that the project is coming to fruition it's looking (to me) more presentable so I thought, 'in for a penny in for a pound'. As the project is now quite advanced the presentation will be in retrospect. Some time ago I bought a Silhouette portrait profile cutter, at the time I was in to railway modelling and this particular machine was to prove handy for cutting layers to be laminated for coaches for example. I ran into problems when using solvent based plastic cement, particularly distortion caused by stresses occurring in the various layers. It was at this time I started experimenting with the use of cardboard, yes, weetabix and corn flakes boxes! Here's a picture of the machine, it's very similar to a desktop printer except instead of having a print head it has a head that contains a swivelling blade which turns whenever the head moves sideways or back and forth, thereby following whichever design is fed into it by it's software program which is loaded into the computer. I learned how to use Inkscape which is an open source design program. It's quite basic compared with say Adobe Illustrator but is sufficient for my present needs. I did some research online and although there isn't much info on this van there were some photos available, I worked from a couple of these, guessing much of the dimensions, so if it's perfection you're after, turn away now. I set about designing the parts with a view to cutting them from card and sticking them together to make the card more rigid. I'd done tis twice previously to make diesel locomotives, cut five layers at 0.5mm each makes a side 2.5mm thick, when formed into a box they become quite strong. These were then sanded to round the corners and edges, so the whole model became a sort of sculpture. here is both sides of the van formed from 5 layers, the doors were designed to slide which went pear shaped after the model was painted, the brown square on the left is the bulkhead behind the drivers cab. The drivers side window is larger on the inner layers to make a recess for the glazing to sit in to, the glazing was cut from the flat bottom of a croissant container. The base was then attached to one side using an engineers square to keep the angle true.and the bulkhead glued in to place Troy Smith, perdu and arni like this Quote Edit Go to top bhouse Established Member Gold Member 638 387 posts Gender:Male Posted Monday at 04:40 PM · Report post Very offbeat and very inventive. You seem to have mastered Inkscape and made an excellent start on the Commer. I'm looking forward to the next installment. Brian Like this Quote Go to top ROLY43T Newbie Members 11 19 posts Gender:Male Location:France Posted Monday at 04:47 PM · Report post back again, the above photo is of the rear opening this has two staggered layers of roof incorporated so that the join between the similarly built front section laps to add strength to the joins. I added strips across underneath to add support to the joins, seen below. The next shot shows the front mudgaurds, wheel arch boxes, rear doors, etc. While making a model by this process you start to amass a considerable pile of unused parts/ junk, as seen below Here's how it looked after gluing on the front and rear panels, just one section to glue down once the glue's set on the present one. I used an ordinary PVA card glue for the panels and Krystal Clear for the glazing, later on I'll be using a glue I got from the USA called 'Gator's Grip', basically strong PVA. Once done it was given a few coats of Halfords red primer and left to dry thoroughly, very much so as I went back to the UK for 6 weeks! More later folks Pete in Lincs and perdu like this Quote Edit Go to top ROLY43T Newbie Members 11 19 posts Gender:Male Location:France Posted Monday at 05:13 PM · Report post Hi Brian, Thanks for the kind words. Yes I found Inkscape very easy to learn, I'd never before done anything like it so it was a huge but interesting learning curve. Back to the build, When I returned from Wales I gave the whole model a good rub down with 1200 wet 'n dry before spraying it with a locally bought rattle can. It turned out great value paint, I was sceptical to start with but considering it only cost me €3.99 (euros) it has given a nice finish, as good as you can get on cardboard. In the meantime I set about making the chassis, wheels, etc seen below. note the technical plans here In this photo the numbered items are :- 1/ The chassis 2/ A silicon mould for the wheels 3/ The various parts that go to make up a wheel 4/ The painted body The wheel parts make up one tyre, one hub, you can just see a completed hub between 1 & 3. Here's a complete wheel and here's the painted body So now all that remains is to fix the decals, chassis, mudgaurds, wheels etc, so I'll add more as I go now this post is up to date. cheers for now. Roly
-
even I can't see my photos now I'm fed up with this in other forums I can post direct from a file in my computer and don't have to rely on these bug ridden photo sharing websites.
-
I was a bit puzzled why someone couldn't see the pictures and yet someone else could. I've been looking through the FAQ's and it seems it could be due to which server your internet comes through. On Ebay I've entered my postcode here in France and sometimes it changes to somewhere miles away, which was alarming as I thought someone was trying to hack in to my account but I think it's the same thing, depends which server your service is coming through. My service provider is France Telecom ( similar to BT) they're all over France so I guess that's why, it's a net. Roly
