

Lee Chambers
-
Posts
820 -
Joined
-
Last visited
Content Type
Events
Profiles
Forums
Media Demo
Everything posted by Lee Chambers
-

1/32 Boeing F4B-4. ++Finished++
Lee Chambers replied to Jb65rams's topic in Big In Japan - Classic Japanese Kits GB
Excellent result! I have had this kit in my stash for around 10yrs,my sprue plastic is also silver wings with grey fuselage. Decals are in the same condition as yours look, which always stopped me building it, hopefully I can now replace them with a new set. I always have been impressed with the quality of surface detail that has been reproduced for a kit of this era. -
1/32 Mando's next ride
Lee Chambers replied to Lee Chambers's topic in Ready for Inspection - SF & RealSpace
Thanks,much appreciated. -
1/32 Mando's next ride
Lee Chambers replied to Lee Chambers's topic in Ready for Inspection - SF & RealSpace
Thanks, look out for another Mandalorian themed diorama coming very soon.👍 -
1/8 Nagano Honda GL1000 K1 Goldwing 1975
Lee Chambers replied to Lee Chambers's topic in Ready For Inspection - Vehicles
CBX kit was a Japanese company called Yodel. -
1/32 Mando's next ride
Lee Chambers replied to Lee Chambers's topic in Ready for Inspection - SF & RealSpace
Thanks guy's, It was nice to build something unique and was great fun to mash different kits together.- 12 replies
-
- 1
-

-
- Star Wars
- Mandalorian
- (and 1 more)
-
Hi all, after a very enjoyable Greeble / Kitbash build I am calling this done. Who needs a plain old Razor Crest when you can have this ship! Despite his remarks in the video, I think Mando might grow to like this ship and his new speeder bike. Let me know what you think, "This is the way?" Finally, if you want to see the work in progress of this build, click below.
- 12 replies
-
- 15
-
-

-
- Star Wars
- Mandalorian
- (and 1 more)
-
1/32 Mando's next ride
Lee Chambers replied to Lee Chambers's topic in Work In Progress - SF & RealSpace
Hi all, well I finally have found time to post the penultimate update on this kit bash build. These 3D printed figures were found on eBay and took a few weeks to arrive due to printing and post issues. Yes, they do look like jelly babies until the primer is applied. I thought the droids helmet antenna looked out of scale, so I replaced them with some wire. I got all of them painted up this week and positioned into the diorama base, so I hope you enjoy the teaser pictures, as the final reveal will be very soon.- 32 replies
-
- 14
-
-
- Star Wars
- Mandalorian
- (and 1 more)
-
1/32 Mando's next ride
Lee Chambers replied to Lee Chambers's topic in Work In Progress - SF & RealSpace
If Mando can figure a way of part dismantling it, I am sure it could fit. 🤔- 32 replies
-
- 1
-
-
- Star Wars
- Mandalorian
- (and 1 more)
-
1/32 Mando's next ride
Lee Chambers replied to Lee Chambers's topic in Work In Progress - SF & RealSpace
Hi all, whilst waiting for some 3D printed parts to arrive for the base scene, I thought I would scratch build a new speeder bike for Mando. I just stuck together a pile of odd parts and came up with a well armed speeder bike. Do you think Mando would approve? Happy modelling.- 32 replies
-
- 11
-
-
- Star Wars
- Mandalorian
- (and 1 more)
-
1/32 Mando's next ride
Lee Chambers replied to Lee Chambers's topic in Work In Progress - SF & RealSpace
Hi all, here is the final paint scheme for Mando's new ship. I custom mixed some gun metal paint from a VW Beetle colour code from the 70's, this was followed by masking and hand painting the orange stripes, with some acrylic paint which was then scratched and distressed to give a worn-down effect. Then I added a mist coat of AK smoke over the whole ship, this was followed by picking out various panels, the front and rear engine cowls and buffing them over with graphite powder to give a polished black stainless-steel effect. I will be adding the ship to a base so I can add some workshop accessories and a power supply will be hidden in one of these units. Happy modelling.- 32 replies
-
- 15
-
-
- Star Wars
- Mandalorian
- (and 1 more)
-
1/32 Mando's next ride
Lee Chambers replied to Lee Chambers's topic in Work In Progress - SF & RealSpace
Cheers Pete, I still have a final paint scheme to splash on and a base to build to bring it all to life.- 32 replies
-
- 1
-
-
- Star Wars
- Mandalorian
- (and 1 more)
-
1/32 Mando's next ride
Lee Chambers replied to Lee Chambers's topic in Work In Progress - SF & RealSpace
Thanks, it's getting close to the application of the final paint scheme, and a few more greeble parts to finish off the look. -
1/32 Mando's next ride
Lee Chambers replied to Lee Chambers's topic in Work In Progress - SF & RealSpace
Hi all, I have been making good progress on Mando's new ship. I decided to try and make a figure of Mando out of the kit figure parts from the Colonial Raptor kit. The helmet was hand carved into shape using a couple of sharp number 10A scalpel blades, and the figure body had some putty added to the chest area and legs to create the armour. Molotow chrome paint was used to paint the helmet and body armour. The cockpit was scratch built using the parts from the A10 and some aftermarket resin parts. Lighting was then added. Once this was completed the ship was rebuilt and various greeble parts added. I detailed up the rear loading area and fitted some lighting in the ceiling. Still have some tidying up to do and decide on the final colour scheme, but I am happy how it's looking so far. Happy modelling everyone.- 32 replies
-
- 14
-
-
- Star Wars
- Mandalorian
- (and 1 more)
-
1/32 Mando's next ride
Lee Chambers replied to Lee Chambers's topic in Work In Progress - SF & RealSpace
I will be posting more progress later this week, thanks for the great comments guys.- 32 replies
-
- 1
-
-
- Star Wars
- Mandalorian
- (and 1 more)
-
1/32 Mando's next ride
Lee Chambers replied to Lee Chambers's topic in Work In Progress - SF & RealSpace
Hi everyone, this update shows how I added the lighting to the engines. I used 5mm defused orange LED's. They are rated at 9-12v, with wired in resistors. They came with clip in holders, so that was handy to help mount them; I used plastic bottle caps to hold the LED's. To help reflect the light, I painted the inside of the caps with Molotow Chrome paint. The rear engines have a pair of super glue bottle cone shaped caps that had a LED glued into the centre of the cone and another LED fitted behind in the bottle cap and they were epoxied into place. I was able to run the wiring through the flared wing engine mounts and into the upper fuselage. Next will be to build the cockpit details and add some subtle lighting. "This is the way".- 32 replies
-
- 16
-
-
- Star Wars
- Mandalorian
- (and 1 more)
-
1/32 Mando's next ride
Lee Chambers replied to Lee Chambers's topic in Work In Progress - SF & RealSpace
No compliments needed for the interior, it's just the standard Raptor kit parts ,they fit ok, but I don't intent to use much of it.- 32 replies
-
- 1
-
-
- Star Wars
- Mandalorian
- (and 1 more)
-
1/32 Mando's next ride
Lee Chambers replied to Lee Chambers's topic in Work In Progress - SF & RealSpace
Cheers Pete, this is just to show the basic shape of the ship, I will be tidying up the rough edges nearer to the final paint stage, of which I am way off that point at the moment. Next will be to light the engines and then redesign the cockpit to look more organic, rather than latest techno systems.- 32 replies
-
- 1
-
-
- Star Wars
- Mandalorian
- (and 1 more)
-
Manufacturer: Heller and Nagano. Aftermarket: None used. Paints: Molotow chrome, LP-38, LP-3, Mr Color Aqueous 63 and 2K clear. Weathering: Flory Models grey, Flory Models dark dirt wash, 502 oils and AK pigments. Link to build thread: Work In Progress of the Mad Max Jim Goose's MFP Police pursuit bike. Well, here we are guys, pulling a wheelie across the Greeble / kit bash finishing line. This is an iconic movie bike, lots of real-life replicas are around of this bike, body work and fairings are still available from Japan. In fact, the fairing is the same one that was fitted to the Toecutters Kwaka. It's been a challenging project, but I loved the whole process, it will take pride of place in my model bike collection that's for sure. I was not aware until well into the build that the movie bike had rear set race style rider foot pegs and feet controls, so I had to modify the kit parts, only took 30 minutes or so to knock up something that looked convincing. I have plans to use the left-over kit parts in the future for another bike-based kit bash that's of a real-life Honda prototype from the early 70's, but that's for another day. Thanks for all the encouragement during this build, it really helped to keep the mojo on the boil.
-
1/32 Mando's next ride
Lee Chambers replied to Lee Chambers's topic in Work In Progress - SF & RealSpace
Hi all, here is my progress on Mando's future ship. I started with no plans for this project, I simply opened up all the kits and grabbed a part and offered it up to another part and if it looked good it got stuck together! Any gaps that appeared, if possible would be covered by adding another part. The Apache's fuselage was the main starting point, adding the Colonial Raptor to the front followed by the A10's tail section complete with engine nacelles that were slid over the Apache's tail boom. However, this meant the engine nacelles were too low and the fuselage looked too long. This led to me cutting a step behind the Apache's rear engine section which allowed the A10's tail to be raised to give the engine nacelles a more Razor Crest look. Now I could start having some fun adding all of the Greeble details to the ship. Some photo etch was added, however I just wanted to establish the overall look of the ship. The engine details are made up from a combination of kit parts. The clear intake and exhaust cowlings are from a couple of disassembled jars of black pepper, with a twist grinding top to them. I intend to add lighting to the engines, so the clear cowls will enhance the appearance. Also, I will open up an engine cowl to display a resin engine with some scratch-built detailing. The front section of the ship will be taken apart in preparation for adding a fully detailed and lit cockpit; the left cabin door will be left open to allow all of the internal details to be visible. In an effort to improve the looks of the canopy, I added some extra window ribs to give a similar look to the Razor Crest windows. I still have plenty of details to add, the photos hopefully will give you a good idea for how it's going to look. Not sure what colour scheme I will be using on the ship yet, but maybe a black chrome effect with yellow highlights. The last few photos are NOT for the faint hearted! No! I did not accidentally sit on it! LOL! It was time to consider adding the cockpit interior, so taking it apart was the next job to tackle, despite the carnage it came apart fairly easily once the extra thin cement had done its job. The Moebius kit parts fit well enough. But I will not be going with the kit interior, but rather a mixture of all three kit cockpit details to give it more of a Star Wars look to it. "This is the way!" Let me know your thoughts guys.- 32 replies
-
- 16
-
-
- Star Wars
- Mandalorian
- (and 1 more)
-
1/32 Mando's next ride
Lee Chambers replied to Lee Chambers's topic in Work In Progress - SF & RealSpace
Cheers Hans, It will be in 1/32 scale for sure.- 32 replies
-
- 1
-
-
- Star Wars
- Mandalorian
- (and 1 more)
-
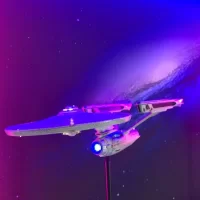
Hi all, I am calling this triple kit bash project Mando's next ride. This will be what you might call a 2nd generation Razor Crest. The main fuselage will be from the Apache air frame, with the Colonial Raptor cockpit grafted to the nose and the A10's Gatling gun attached underneath complete with the A10's nose cone. Skid landing gear will be used from the Raptor, but beefed up with the A10's metal landing legs. The idea is to give a sort of Alien Drop ship style look, but retaining some of the Razor Crest's original design DNA. I might add lighting to this ship if time allows. "This is the way!"
- 32 replies
-
- 11
-
-
- Star Wars
- Mandalorian
- (and 1 more)
-
1/8 Mad Max Jim Goose's MFP Police pursuit bike
Lee Chambers replied to Lee Chambers's topic in Work In Progress - Vehicles
Hi fellow modellers, this is getting very close to the finish line. It's been a problem-solving build that's for sure, but great fun too. The first problems to solve were finding convincing looking parts for scratch building the rear-view car style mirror pod that is bolted to the right lower fairing, as you can see from the pictures with the red dots, I used an intake trumpet that was an option for the carbs. The loud speaker bolted to the left lower fairing was made from the chrome headlamp inserts for the unused twin headlamp fairing, with another intake trumpet cut down and glued on the back off the headlamp shell, and another cut down to form the cone inside the speaker. I used the Honda indicator lenses covered in epoxy to make the blue and chrome police lights. The front mudguard from the Kawasaki twin headlamp kit was unpainted and the correct shape, so I sprayed Molotow chrome on it. The top fairing is now fitted, but is drooping down slightly; this will be corrected when the lower fairing is attached to it. I hand painted the "K" letter on the side panels as well as the MFP on the fairing screen. I cut some MFP letters from carbon decal paper and those were added to the tail unit. The gold police badges came from a 1/24 Mad Max car kit and the Jim Goose logo was found on eBay, which I copied and sized to fit the fairing. The kit came with the 1000 numbers, but no "Z" letters, so I turned a letter "N" on its side to give me a passable "Z" letter. Basically, all I have to do to finish the bike is to attach the lower fairing and add a bit of light weathering and tidy up some chrome and alloy parts, wish me luck. -
1/8 Mad Max Jim Goose's MFP Police pursuit bike
Lee Chambers replied to Lee Chambers's topic in Work In Progress - Vehicles
Hi all. As you can see, I have been busy on this replica bike build. I have built a couple of Kawasaki Z900 and Z1000 bikes in the past, so the engine and chassis went together fairly quickly. The CB950 kit provided the top fairing mounting bracket together with the inner dash panel and screen. Due to the tight fit of those parts, it was easier to leave the screen fitted and it will have to be masked up during the painting process. The lower fairing is detachable by two tiny screws located on each side of the inner top fairing where it meets the lower section. I wanted to try and copy the cut down megaphone exhaust silencers on each side of the bike, the kit pipes were way too big, and lucky for me I have a set of CB750 silencers from a dismantled Airfix kit. I cut about 10mm off the end of each pipe, once cleaned up and painted in Molotow chrome they should look the part. Also, I used the Airfix CB750 tyres, they had Goodyear lettering on them, and none of the other kits had anything on them. The kit seat did not look brilliant, so I found a good replacement from a BMW R100RS. Once it had been cut down slightly it looked much nearer to the movie bike seat. Now that I know the bodywork fits, I can proceed with the paintwork, and... Scratch build a police radio and make it fit into the top fairing. Make brackets for the front indicators that sit under the fairing below the head lamp. Tidy up and paint the exhaust in chrome paint. Happy modelling! -
1/8 Mad Max Jim Goose's MFP Police pursuit bike
Lee Chambers replied to Lee Chambers's topic in Work In Progress - Vehicles
They are expensive kits to get hold of today, I used the Z750 kit as a kit bash with a Heller Z1000A1/2 kit and made a 1976 Z900A4 out of them a few years back. But I always wanted to build a 1/8 Jim Goose MFP bike, I bought the Honda kit last year off a seller in France, paid £70 for it. I got the 1000gg kit from an Ebay seller in the UK, in Feb this year for £58. I intend to use the CB950 kit in another future kit bash with another 1/8 Honda kit in my stash. I am really enjoying this build, but it is a challenge and needs lots of patience and problem solving skills. -
1/8 Mad Max Jim Goose's MFP Police pursuit bike
Lee Chambers replied to Lee Chambers's topic in Work In Progress - Vehicles
Hi all; thought I would tackle the bodywork first, as this bike replica will stand or fall on how close this looks to the movie bike. The kit fairing off the Kawasaki had to have the twin headlamp fairing removed and replaced with the single headlamp from the CB750 Four kit, lots of JB weld epoxy was used numerous times to get a rough shape then sanded back. The lower fairing had areas to be cut and reshaped to mimic the exhaust cut out sections. The seat unit was cut and filler was used with JB weld to get the shape looking more like the movie bike. Overall, I am happy with how the bodywork is looking. Next will be to build up a rolling chassis and see how well everything is going to fit before the bodywork gets the final paintwork done. Happy modelling.