

Stephan
-
Posts
73 -
Joined
-
Last visited
About Stephan

Recent Profile Visitors
773 profile views


Stephan's Achievements
")
New Member (2/9)
76
Reputation
-
AS365N2 / Z-9A Dolphin 1/72 French Marine
Stephan replied to Stephan's topic in Work in Progress - Aircraft
The ready assembled cockpit with cp levers The rotorhead needed a little more attention The rotormast was not designed to be detachable, so I changed that a little. colourcodes were made with 0.4mm masking tape painted on a sheet of glass Happy and relaxing Easter days to everyone Stephan -
That depends on the constructive type of the compressor. Usually Airbrush compressors are oil free to avoid contamination of the paint. My own compressor is from Revell 39674 and its an oil free one like the AS18. The mentioned Revell Omega needs oil. In this video you can see an oil lubricated airbrush compressor, it might be of the same type as the Revell omega. at 1:11 you can see a kind of an oil check window. at 1:30 the refill process itself. https://www.youtube.com/watch?v=Gcp3uVvz5_4 cheers Stephan
-
As I understand it the oil is for lubricating of the crankshaft and not for the piston. You may use usual compressor oil from the DIY market but revell had its own brand as well.
-
AS365N2 / Z-9A Dolphin 1/72 French Marine
Stephan replied to Stephan's topic in Work in Progress - Aircraft
Long range and towel-bar LOC antenna -
Here are two more if you haven't found them already. same bird top-down https://www.airplane-pictures.net/photo/496679/f-btgv-airbus-skylink-boeing-377-super-guppy/ and side view of exhaust http://forums.airshows.co.uk/viewtopic.php?f=10&t=64679
-
CONTINUATION OF MY 1:20 SCALE SCRATCH BUILT B17G (RADIO ROOM)
Stephan replied to Fozzy's topic in Work in Progress - Aircraft
I found this thing here ... maybe you can use the bowl itself it is about 0.5 - 1mm thick. Cheers, Stephan -
Very beautiful builds and the colorful schemes do suit them great. As I saw the C123 I had an instant flashback to "Flying Through Midnight". Cheers, Stephan
-
AS365N2 / Z-9A Dolphin 1/72 French Marine
Stephan replied to Stephan's topic in Work in Progress - Aircraft
Thanks for your kind comments. If it's here on BM feel free to post a link to it. I would be glad to see it. I have heard that modellers use that technique to make canvas so I only added the comb which is in fact the comb of my daughter, so please don't tell or I might get hurt. The next issue is the rotor-star of the rotor-head. It doesn’t look very much like the original. the Bars sanded to a star shape - elements cut off from the backside clear surface - the rotor-star close to its new shape cheers, Stephan -
ICM Seehund 1/72. My first floaty WIP
Stephan replied to John_W's topic in Work in Progress - Maritime
Looks like the Germans had no money left for anti-fouling and now the ship is populated with barnacles. Good luck with the painting I'm sure it will be great, Stephan -
AS365N2 / Z-9A Dolphin 1/72 French Marine
Stephan replied to Stephan's topic in Work in Progress - Aircraft
There are not a lot of pictures of the cabins back area but most of them are showing an orange curtain. Because it was such an attractive colourful spot I wanted that too. I used 2 layers of an usual 4 layer tissue attached to a wire and than saturated with diluted PVA. After drying painted with acrylics and sealed with gloss coat. cheers, Stephan -
AS365N2 / Z-9A Dolphin 1/72 French Marine
Stephan replied to Stephan's topic in Work in Progress - Aircraft
The levers of the overhead console are designed to be folded to give em more depth but if you do so they don't fit any more in the designated slots. The PE belts were a lot to stiff for my taste so I clipped of the buckles and loops and glued them to home made Tesa Krepp (paper based sellotape) belts. I was pretty much surprised that this is the first helicopter kit I build that doesn’t provide a pitch lever... -
Triple AVRO 707 (A,B,C) British fighters&research; 1/72
Stephan replied to Ozzyman69's topic in Work in Progress - Aircraft
You are doing some impressive work here. It's a pleasure to watch how you overcome the pitfalls of that kits. Quite motivating to give a resin kit a try. May you tell us the brand or type of your blue adhesive? All the best for the rest of your build, Stephan -
AS365N2 / Z-9A Dolphin 1/72 French Marine
Stephan replied to Stephan's topic in Work in Progress - Aircraft
The hoist is done. I have made a 3d model of the hoist judging from pictures and a side view. It is not that accurate but for 1/72 its OK. You may download the two parts here: https://www.thingiverse.com/thing:2781861 Material is PLA, Cura settings are "100% infill" "heated bed with adhesion print" "extra fine quality" nozzle was 0.4mm. -
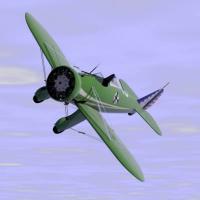
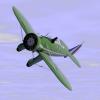
In a kind of a Mojo-rush after finishing my ZIL fuel truck, I decided to make a weekend build of my Z-9A from DreamModel before continuing on my Z-10. Well, we had a nice start with the PE parts which were a pleasure to work with. The back seats are not a part of the etch set Z-9A, they are from a Z-9WA. I had one set in spare so I can use some parts of it. Than cleaning the main body of the parts that would be used for the "WZ" variants and making a dry-fit was joyful as well. Than I did a bit of research and it doomed me that this will not be that easy going as I initially thought. The kit has some inaccuracies that I’m willing to turn a blind eye to, but it has two major downsides. 1. There are none of the 5 to 7 Antennas, what is not a big deal except for the huge long range antenna on the starboard side. 2. What bothers me is the missing hoist on the starboard side. I have found not one single picture of a French Marine Helicopter without a hoist. cheers, Stephan
-
Today I've made myself a "Punch and Die" tool from scrap material. Although I only made it as a test bed, I have to say It works much better than my way described in the post above. It is made with an 8mm aluminium plate and a piece of 4mm plexiglass the centring bolts are Ikea floor bearer for billy (old style). The only problem I discovered is, that it is not easy to drill trough the whole 8mm Plate with drills<1mm so I would use a 4 to 5mm plate next time. Hope it might be helpful for someone.
