


jupy41
-
Posts
14 -
Joined
-
Last visited
Recent Profile Visitors
334 profile views

jupy41's Achievements
")
Newbie (1/9)
63
Reputation
-
Thanks for your answer, hunter. Just another question: What is the reference of the red you used ?
-
Hi, very good job !... congratulations what kind of glue did you use to glue vinyl parts ? Thierry
-
Speeder bike - Pursuit in the forest of endor
jupy41 replied to jupy41's topic in Work In Progress - SF & RealSpace
Good afternoon, everybody I put the speeder aside to start the ground .... I use a thick photo frame costing 5 € . I attached the speeder holder with the glue 21 and sealing powder. I used a piece of vine representing an old strain, and foam board for the base of the ground. A brush with acetone makes it possible to have an irregularity on the ground I finally changed the layout of the strain in the décor, by simply turning it over. I find that its integrates better like that. For the floor, in order: Base painted in matt brown, then textured paint for tamiya floor, followed by brown and black MIG washes .... let dry before adding pigments and foliage. For the nameplate of the diorama, I used a piece of rusty metal The ground is brushed with a hue composed of sienna, naples yellow and titanium white. I put the nameplate in front of the tree trunk And here is the scout on his speeder bike. The vegetable touch is given with chopped parsley and tea leaves (Pineapple and Vanilla, for odor). And here are some pictures outside -
Speeder bike - Pursuit in the forest of endor
jupy41 replied to jupy41's topic in Work In Progress - SF & RealSpace
The straps of cover are made with pieces of plastic-card and photoetched rivets matt black paint and brushing in gun metal, and here is the cover in place and strapped. A little earth on the soles of the boots ... with the paint "soil effect" Tamiya The scout trooper is now installed on his mount, blaster in hand, ready to shoot. I secured the grip between the feet and the pedals with micro-screws After few trials for the blaster shoot, I opted for the following solution: White Styrene wire 0.7 mm , painted with translucent red, then scraped with a blade on the flank, to give a bright impression. See you soon, guys -
Speeder bike - Pursuit in the forest of endor
jupy41 replied to jupy41's topic in Work In Progress - SF & RealSpace
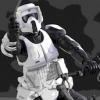
Hi guys, after a good week of holidays in the Alps, I come back on the speeder bike. All elements are assembled ... without glue, thanks to the Bandaï design We can see the 4 straps fixing the cover, made thanks to the capsule of the an excellent Bordeaux wine The handlebars were brushed with gun metal pigment to bring out the metal side. Spring steel replace the plastic part The matt black seat is brushed with a clear pigment to give a used look. I drilled a hole that will fix the scout trooper A profile view, showing the damage sustained during this pursuit in the forest of Endor The triangular logos on the front wings are painted with red color View on the dashboard, patinated with black wash and pigments. See you soon -
Speeder bike - Pursuit in the forest of endor
jupy41 replied to jupy41's topic in Work In Progress - SF & RealSpace
Hi everybody Here is the continuation A casing connects the engine with the stabilizers: For the trooper, I put brown and black washes on the armor, and finally, I make some traces with pigments MIG: The black clothes are brushed with graphite powder to give a "leather aspect". For the texture of the cover, I use tissue paper with wood glue I cover the piece with tissue paper, giving the folds that we want to appear to the reality. When it’s dry, I obtain a tissue appearance, with some voluntary folds ... I can paint a base in Dark yellow XF60 Then I prepare a wash with burnt sienna (oil paint + thinner F) The wash is deposited in all the hollows with a fine brush in order to create zones of shadows Next comes the brushing on the areas of light (mixt of sienna and white titanium) with a dry brush Some pigments will finish the patina later ....To be continued -
Speeder bike - Pursuit in the forest of endor
jupy41 replied to jupy41's topic in Work In Progress - SF & RealSpace
The body of the scout trooper is painted black satin And here is the figure assembled before realizing the patina Motor and stabilizers are brushed with medium gray Second phase of painting for body parts: Alclad Aluminum Then comes the phase of the scuffs. A layer of chipping fluid is passed over the alclad, then a layer of red brown XF64 Tamiya. When it's dry, I brush it with a wet brush at some scuffed places. I continue the patina with MIG pigments. For the engine block, which suffered some damage, I opted for a sponge brushing with silver titanium X32. All mechanical parts are painted using the same method .....To be continued -
Speeder bike - Pursuit in the forest of endor
jupy41 replied to jupy41's topic in Work In Progress - SF & RealSpace
Hi, thanks to all The plastic cable of the gas handles is replaced by a 1 mm spring wire cable from T2M Larger springs will also fit the engine. I place inside the spring, a piece of tin wire to be able to form them as I want The first is in place ... it seems a little too big, so I will replace it with a slightly smaller diameter All the hoses are shaped A small non-molded detail on the crate was corrected by adding two small washers, made with push & die tool. The engine and stabilizers receive a matt black basecoat. Then, I passed a thin layer of dark gray Vallejo 862, as well as on the stabilizers The body is painted in matt black The saddlebags and the bottom of the bust are painted in matt white, then stained with MIG pigments Yes, absolutely See you soon, with the return of the force -
Hi everyone I will try to share with you, the assembly of the speeder bike with scout trooper. I'm sorry, but my English is poor ... so I'll try to explain clearly I had already made the kit from AMT a few years ago, but the bandaï seems to me better proportioned, on the right scale. I pass quickly on the contents of the kit with a picture that summarizes all the parts of the box: The molding is very nice and the assembly could be done without glue, like the gundams It is on the scout trooper that there will be the hardest work. The only advantage (for me) of this mounting option is that you can mount and disassemble the miniature as you want ... easy for testing and mounting. The head will be disassembled to hide the mask before painting: Then I assembled the bust. The joints will make it possible to give a dynamic position to the figurine and which will be specific to each assembly The legs are then assembled on the bust, The knee protectors allow to hide the joints of the knees, but the ankles look like "toy". The arms are assembled, one hand on the handlebars and the other is in blaster shot position On the side of the speeder, I assembled the stabilizers, very well detailed, with a small line of joint that must disappear The speeder is fully assembled to give a definitive look to the figurine I will replace the plastic cover with a more realistic cover. For this I remove the fixing studs On the figurine side, the articulations are blocked with glue, then filled with milliput. They will be smoothed later with "Mister surfacer" The thrust flaps are modified to be in a semi-open position, and different from each side. See you soon, guys
-
Hi everyone My name is thierry and I am 50 years old. I'm from France (center of France, exactly).I am newly registered on the forum, on which I hope to learn a lot. I am modeller for twenty years and my themes are Sci-fi (star wars) and weathered civil cars.
-
Great job, Andy
-
Great buid Bravo
-
Thanks Andy, For the moment, I put the built on my facebook page https://www.facebook.com/media/set/?set=a.992832677436497.1073741841.663604927025942&type=3
- 67 replies
-
- 1
-

-
- Bandai
- Speeder Bike
- (and 1 more)
-
Hi Andy, thank you for this built, very nice job. I build this kit right now, and your built inspires me… I'm going to use a lot of ideas (if you agreed). thierry