


Wolfgang
-
Posts
75 -
Joined
-
Last visited


Wolfgang's Achievements
")
New Member (2/9)
201
Reputation
-
Bf110 G-2/R1 – Eduard 1/72
Wolfgang replied to Giampiero Piva's topic in Ready for Inspection - Aircraft
Wonderfull Bf 110. Your paintbrush skills are unmatched. -
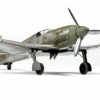
A while ago, I finished the Fw 190 D-15 from IBG. The D-15 version was the last level of develeopment that probably was built. Little is known about this version. IBG offers there paint schemes. Two what if and one oft he presumably only produced plane of this version. According to IBG, the planes was painted in a RLM 81/82/76 scheme with RLM 70 spots. I used Gunze RLM 82/83 (83 as a substitude for the green RLM 81 variant) on top and AK-Real Color RLM 76 late for the lower surfaces. The nmf areas were painted in Alclad Aluminium. All in all it was a nice build but you have to work very exactly.
- 7 replies
-
- 36
-

-
Wonderful Dauntless. And two well deserved awards
-
F-51D "Was that too fast?" Airfix 1/72
Wolfgang replied to rom1's topic in Ready for Inspection - Aircraft
Great work! -
Heinkel He 111 B Legion Condor
Wolfgang replied to Pedro1's topic in Ready for Inspection - Aircraft
I started this one quit a while ago and aproached the same solution for the fuselage. Unfortunaley the finished fuselage felt from the workbench and broke apart. That was the moment wehen i stopped the work. But I know how hard it is to build a roden He 111. You did a great job on this one. thank you for showing. -
1/72 - Focke Wulf Fw.190D-9 Dora by AZmodel - released
Wolfgang replied to Homebee's topic in The Rumourmonger
Is realy RLM 83 a dark blue? Did there pop up more evidence than the one paper that M. Ullmann found? If not, RLM 83 is still a dark green for me, no matter what AK says. -
Airfix 1/72 Fokker E.II Eindecker
Wolfgang replied to Haris Ali's topic in Ready for Inspection - Aircraft
realy awesome -
H&S Ultra = night and day! But how do I keep it clean?
Wolfgang replied to Raven Morpheus's topic in Airbrushes
The Ultra and Evolution are very similar, so here are some hints how to clean. German text, but I think the pictures will help. If you have any questions, just asked. The HS Airbrushes are a little bit prone to clogging especially with water based acrylics (But this is common to a lot of ABs with a diameter of 0.2mm and below). This is due to the shape of the nozzle. So keeping it clean is essential. Never let the paints cure in the AB. The nozzle is made from nickel-silver and a little bit soft. It will probably get damaged if you try to remove a sticked needle. While spraying: Have a brush soaked with a appropriate thinner at hand to clean the needle tip from time to time. -
What makes the Spitfire such a beautiful aircraft?
Wolfgang replied to Nachtwulf's topic in Aircraft WWII
cause its wings remind me of Heinkels and I love Heinkels. -
I bought me a copy of ther MMP.9110, Bf 109 Late versions and crosschecked this with other references and I bought a AZ-Model Bf 109 G-6/AS. To my opinion Duncan is right with his disapointment. It is not enough to sand and putty some acces panels and use decals for new ones. The G-6/AS did not have the chin bulges that the AZ- Kit fuselages have. What you can do is buildings a G-14/AS. These had the bulges. For the G-6/AS you have at least to sand down the bulges and rescribe the area. This is not mentioned in the instructions.
-
It is indeed easy to fix. Just bore a hole in the sidewall of the wheel well and cut out a piece of the wheel well (red area before and green after) but do not cut into rounded area/closure. other side widen the square leg attachment points to the inside an close the original attachment points with a square piece of plastic. Close the lateral opening in the wheel well with piece of plastic. than sand everything flush Top: reworked Revell wing Lower: Original Revell wing
-
I am not realy convinced, regarding the ipmsstockholm walkaround. MW wrote 2 things. First: If you compare this picture with other 109 legs, it seems in the first moment, Martin Waligorski is right. But if you look closer, the legs join the wings/fuselage at the same point like other 109s. The "gaps" look to me more like missing pieces of metal sheet. 109 G-10 from IPMSstockholm Walkaround 109 G-2/4 He also wrote: But even the early 109 E had these two part wheel covers. It was a common feature and not a special design for the G-10 / K-4 Last point: If Martin Waligorski is realy right, this would mean that all other experts did miss this part. Possible, but hard to believe.
-
The main shortcomings of the Revell G-10 are the too wide undercarriage, a too small prop, a not so well shaped canopy. Another minor fault is the shape of the big fuselage bulges. The foward part has a curved row of engraved rivets and is slightly pronounced, which is wrong and based on a missinterpretation from some paintings. In Pre- Fine Molds or AZ-Model times, it was a good idea, to kitbash the Revell G-10 with Hellers K-4 Some years ago, I did a Erla G-10 and a G-6 /AS based on kitbashing the Revell G-10, with the loon fuselage, Academy G-6 wings and some Heller parts. Not realy perfect and German only, but some pictures may be interesting http://www.modellboard.net/index.php?topic=27245.0
-
I use reading lasses with + 2.5 thats enough for the moment (age 54) Another point that is essential, is very good light. I bought me this photo bulp http://www.amazon.co.uk/Andoer%C2%AE-5500K-Studio-Photography-Daylight/dp/B00TAZ7OIM/ref=sr_1_sc_2?ie=UTF8&qid=1452613177&sr=8-2-spell&keywords=photo+bulp which brings an fantastic light to your desktop.
-
As others wrote, It depends on the kind of fuel, the engine settings and the surface and paint of the plane. Especially the fuel and the engine settings can affect the staining considerable. I am running an oldtimer and I can tell you from the exhaust staining If the engines runs in a good mixture. Black stains means more fuel and less oxygen, a rich mixture. The engine will be cooler but the fuel can wash out the oilfilm at the cylinder walls. Deer brown stains means the engine runs in a perfect mode with a well balanced mixture and grey or even whitish stains means the engine runs in a lean mixture. The engine consumes less fuel but more oxygen. the engine temperature rises especially at the heads and valves and can damage the cylinder head.
