

Liney
-
Posts
41 -
Joined
-
Last visited
Content Type
Events
Profiles
Forums
Media Demo
Everything posted by Liney
-
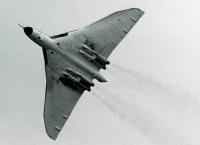
Another snippet of useless info for you..I think the pod would have been removed when 558 went to maritime reconnaissance , 27 squadron I think which would have been about mid 70’s? Please don’t take this as gospel, the ole memory ain’t what it used to be! Anyway, looking good as far as I’m concerned and it’s certainly stretching my memory muscle.
-
As far as I can remember, XH558 did have a TFR pod fitted. Every Vulcan I worked on at Waddington back in the early ‘70s was tasked to be involved in the low level role and was equipped with TFR. However, that isn’t to say that the system worked well…the ‘fairies’ were forever having to change them! Now then, my memories aren’t necessarily accurate after all these years, but I’m fairly certain that TFR pods were fitted to all aircraft….I think! 🙂
-
Great model and lovely finish. The paint scheme is just how I remember working on them at Waddington back in the early 70’s.
-
A grand job! Did you brush-paint the Mr Metal Color and if so how did you find it? Did you use any thinners and if so what?
-
Absolutely brilliant!
-
Really nice looking revetment. We had nothing quite so posh, just great lumps of concrete to park Vulcans on! Oh and short-wheelbase land rovers for transport. Great times!
-
Great job...can't wait to see more. I'm not a Star Wars fan, but I'm seriously tempted with the Bandai kits!
-
I was 16, a first year engineering apprentice at RAF Halton. We stayed up to watch it in the TV room and then walked outside to look up at the moon - such an incredible achievement for human beings.
-
Avro Vulcan B.Mk.2 from GWH 1/144
Liney replied to donalyah00's topic in Work in Progress - Aircraft
Marek, The outlets I'm talking about were in front of the air brakes, I think. I'm trying to remember back to 1971 now so I could be wrong. But I think the outlets were forward of each underwing airbrake, just a bit further back than the rear of the nosewheel bay - in that sort of area. -
Avro Vulcan B.Mk.2 from GWH 1/144
Liney replied to donalyah00's topic in Work in Progress - Aircraft
Hi Marek, Great start to the build...fantastic air brakes! The intake splitter plates were a boundary layer air control (if I've read the posts correctly) and we did indeed call them fences. They helped prevent the boundary layer from creeping into the intakes and disrupting airflow in the intakes themselves. There were two small outlets on the underside of the fuselage, one under each mainplane if my memory serves me correctly, where this boundary layer air was vented. Anyway, we called them boundary layer air fences. You're doing a great job with all that PE, especially in that scale! Even though I spent my whole RAF career working on them, I've never built one for fear of not being able to do the aircraft justice - its not stopped me from reading all the great Vulcan builds on here mind...like Robs and yours. -
Hi Don, I'm so glad you're still working on this as I now get to follow as well!! Great pics, loads of them! Is that a cutting attachment you have on the Stanley Bench vice?
-
That is a really classy paintbrush finish!
-
Some serious modelling...fantastic!! I'm off to MicroArtwork!!
-
Great work rich...simply great! I'd love to build this myself, but in 1/144 scale. You mentioned plans. Could you point me in the right direction to obtain a set? Anyway, keep up the good work and I agree with you about Edgar Mitchell, he's a VERY brave man!
-
The Deluxe Perfect Plastic Putty? I've found exactly the same thing. It works really well, fills smoothly, but every time I've used water when sanding it nearly always 'washes' the filler away. Now I sand it dry and use a barely damp sanding stick for the last smoothing stroke. Saying that I do like the way it works and the fact that its fine.
- 1 reply
-
- 1
-

-
Great...I shall give it a go!
-
Thanks Andy. Did you have any trouble working with it? Is there a specific technique you used to get the end of the EZLine into a drilled hole - Ive been experimenting and I don't find it that easy.
-
Hi Andy. I've got this kit. The EZline I bought came from ModelsRGo and I purchased the Light ( 0.075mm ) stuff. They also do a heavy and I'm wondering what you used? I keep looking at my line and thinking that it looks way too thin. But yours came out well!
-
Hi Justin, I've got a number of Revell WW1 to build so this is great for me! What thickness styrene sheet did you use for the floor and back panel and the instrument panel?
-
Just a quick post testing comment if anybody is interested. It appears that the Galeria varnish range can be removed by their brand of varnish remover - which is Acetic Acid based. And guess what Microset smells of..vinegar! So no wonder I was getting a bloom, the Microset was attacking the varnish. I'll use water to float the decals onto from now on - it's all a learning curve!
-
Thanks davidly. I'll run a few tests on some spare parts over the next few days. But in the three models I've built I have had this matt bloom appear everywhere I've put MicroSet. And its never faded or washed away and has left the decals slightly silvered...enough to make the carrier film noticeable. All good fun - though I'd rather not use the stuff if it continues to thwart my hard work!
-
Thanks Colin. I may just start doing that myself. I dont want to spoil things by continuing to use Set if its doing that to varnish!
-
Hi folks, I'm wondering if anyone has used Galeria Gloss varnish on their models and then Micro Set to fix the decals? I'm really new to this and on my third model I'm noticing that wherever I place Micro Set for the decal, it causes the varnish to 'dull'. This ends up with the decal silvering slightly upon drying out..and it happens on every decal that i've used Micro Set. In fact, wherever the Micro Set runs on the varnish, it causes a dull bloom to appear. This dries as a matt finish even when Ive wiped the micro set away fairly quickly. Is it me, the Micro Set, the varnish? Any help regarding varnishing and setting solutions would be gratefully received. Many Thanks, Steve.
-
Excellent job! I've just returned to modelling after 45 years and have a Vulcan in my stash. I was at Waddington in the early '70's and that is EXACTLY how I remember them. . If you get a chance please PM some info on the crash sites you visit. I live in Penarth and often pop up to the beacons for walking!
-
REQUESTED BY F-32 , this is rediculous
Liney replied to robvulcan's topic in Ready for Inspection - Aircraft
What a fantastic collection you have Rob, brings back great memories. I spent my RAF career at Waddington in the early 70's. I arrived in March 71 straight from Halton, just after XM610 went in. In fact, I have an old Airfix Vulcan (09002) in my stash and I intend to build it as XM610 as a tribute to Flt. Lt. Alcock and his crew - it will be in the same camo as shown on your XH557. Robert was a really nice person who was blighted again when he lost his ac and all the rear crew and crew chiefs over Malta in 1975. Anyway, your collection is great and don't forget that no-one is capable of producing a perfect representation of anything as complex as an aircraft in model form - there always be something not quite right. As long as it looks like what it's supposed to represent and you're happy with the finish then I think that's what really matters...besides, just imagine how awesome your collection would look if displayed all together! Keep up the good work, its an inspiration to us all!
