
Leaderboard


Popular Content
Showing content with the highest reputation on 09/04/18 in all areas
-
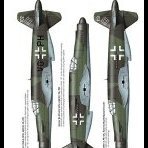
Hi all, Just finished this kit which I thoroughly enjoyed building, it all went together without any real problems and I have to say, although not to everyone's taste, I really like the surface riveting. I added all the missing aerials and added and removed the necessary ducts, filled the incorrect window in the rear fuselage and added the small window under the horizontal stabilizer. Eduard's resin wheel set was added and I replaced the towel rail aerial and the one under the chin with nickel plated Micro tube... much better scale. Painted with Xtracolor enamels and finished with mixture of Alclad gloss and semi sheen cote. Thanks for looking, all C&C welcomed, gazza l49 points
-
Hi all, we've had a long wait for a 1/72nd 'goldfish bowl' Canberra but now S&M, (and soon Micro-Mir) have come in with their renditions. It has several well-documented issues and apart from some errant panel lines, most have been dealt with here, the dimensional errors were beyond the remit of the article, (this one was built for last months issue of Airfix Model World so had to be built to a deadline). Must really thank the two Johns, Adams and Sheehan for their help. John A kindly donated the correct wheels from his Aeroclub range (kits are later style, ie for the B6), detailed Avon starter cartridge 'bullets, (kit has no detail) and replacement Mk2C bang seats and John S for some nose-gear mudguards, (The kit had none), a lovely Modeldecal sheet with the correct yellow/red hatched walkway stripes (kit ones were solid black), a superb camouflage colour reference guide, (kits diagram doesn't make sense and also has you place the walkways over the roundels instead of up to them) and of course the benefit of his extensive knowledge. Unfortunately, according to the two Johns, the overall dimensions aren't quite right, but I'll need to look into that before tackling another. Only one decal choice is offered but luckily it's a relatively well-documented airframe so references were easy to come by and besides there are loads of aftermarket sheets out there. I added quite a few bits and pieces of my own such as canopy heating elements, a lot of internal plumbing, rebuilt Avon intake vanes and compressor faces, nav/anti-collision lights, IFF aerials, UHF blade aerials, wingtip lights made from clear styrene rod, bomb aimers instrumentation and undercarriage hydraulic lines. Anyway, hope you like it. It was a fun kit to put together despite the issues and I plan to build (and correct) a few more. Cheers Melchie23 points
-
Good evening chaps. I’m back from a lovely weekend away here. a birthday treat from my beautiful wife. to watch Jarvis Cocker in a cave in Castleton. pretty awesome!!!! No kids, no dog. I can’t remember the last time we went away, just the two of us. It was lovely. Any way the point is while we were having a cheeky pint or three yesterday afternoon I glanced across and saw this. I can’t get away from it can I. It was at this point that I decided that I wanted to get those bloody windows done on the Lanc before my birthday tomorrow. So having a spare hour or two after getting home today I threw caution to the wind and did this. And to the other side. After a whole bunch of cutting and sanding I got a window shape. i used this to make a tape template. you can just about see it here. I cut out some windows and sanded them to fit. It seems as though Tamiya green top doesn’t fog this type of plastic so running a bit around the edge created a seal. Here’s the other side. a little dusty but I’ll sort that when it’s dry. here are both sides from the inside. nice!! I’m super happy with that. The niggle that was there has now gone. I can move forward happily in the knowledge that I’m actually doing everything I can to make this right. Ok then I need to get some sleep. Back to work tomorrow. I’ll probably not get anything done on the Lanc on Monday but I’m looking forward to the next few steps. Thanks for dropping by and as always. Happy Modelling. Johnny. X22 points
-
Hiya Folks, Well it took longer than usual, but here is my first (of many!) 1/72nd Airfix B-25 Mitchell, which I have finished in the markings of Wing Commander Paul, OC of 98 Sqn based at RAF Dunsfold (now the home of BBC`s Top Gear and ex Hawker/ BAe Harrier and Hawk factory). The broomstick was applied by groundcrew after the OC told them to get the station cleaned up,.... their response being that they were awaiting a delivery of brushes,..... so he told them to get out into the nearby woods and make their own!! The model was brush painted using Tamiya Olive Drab and Aeromaster Neutral Grey with the partialyl scrubbed away D-Day stripes on the upper surfaces were reproduced using white pencil crayon with weak watercolour black stripes,..... the other retained D-Day stripes were decals from Xtradecal. The main decals were from DK Decals, although the additional `Derby Coat of Arms' marking on the right side and the serials for FV914 came from the old Frog decals, the correct taller fin flashes came from a Revell Halifax and the smaller B Type roundel above the wings came from the spares box,...... using photos of the real aircraft before and after D-Day from various sources as reference. From these pics it showed that the rubber de icer boots had been removed and the bare metal areas below overpainted with a slightly darker shade (RAF Dark Green or fresh OD?) which had chipped and peeled quite a bit. Here are some of the pic`s of the real aircraft which were used as reference; fv914 should have broom on nose by Tony OToole, on Flickr 320__0004 by Tony OToole, on Flickr And with that,....here is the model; DSCF2841 by Tony OToole, on Flickr DSCF2840 by Tony OToole, on Flickr DSCF2835 by Tony OToole, on Flickr DSCF2842 by Tony OToole, on Flickr DSCF2834 by Tony OToole, on Flickr DSCF2836 by Tony OToole, on Flickr DSCF2838 by Tony OToole, on Flickr DSCF2831 by Tony OToole, on Flickr DSCF2827 by Tony OToole, on Flickr DSCF2824 by Tony OToole, on Flickr DSCF2822 by Tony OToole, on Flickr DSCF2826 by Tony OToole, on Flickr DSCF2823 by Tony OToole, on Flickr DSCF2845 by Tony OToole, on Flickr Sorry if there were too many pics! Cheers Tony Edit,..... I should add that the nose gun was usually removed from RAF/ Dutch Navy Mitchell`s after D-Day and stowed on the right hand side of the nose, to be fitted if needed, so this is what I`ve done here,..... I read that it was usually a ,303in Browning rather than the larger, heavier .50cal. which would need more than one man to lift! Also,..... the serial would appear to be re painted further back and lower down from the original position behind the rear side windows when D-Day stripes were applied, as they cannot be seen on a photo of this aircraft with stripes applied.17 points
-
Just finished with thanks to Special Hobby for coming through with a new clear sprue after I spilled glue on the original on my bench! Pictured with my Mk V for comparison15 points
-
The Brisfit was first flown in 1916 and entered service with the RFC in April 1917. No. 38 Squadron were the first occupants of Stamford (Wittering) and by July 1917 were flying the F.2B. No 5 Training Station at Easton-on-the-Hill was equipped with them from 1918 to 1919. No. 138 Squadron was formed from newly qualified pilots transferring en bloc from Training Depot Stations, ‘A’ Flight was provided by No. 5 Training Depot Station, Easton-on-the-Hill, ‘B’ Flight from No. 1 Training Depot Station, Wittering (renamed 10-04-18 after the forming of the RAF). Easton and Wittering also supplied pilots for Nos. 130 and 155 Squadrons. The Brisfit continued in RAF service until 1932.14 points
-
This model is my contribution to the current Boeing 737 STGB. Hapag-Lloyd Express aka HLX was a German low-cost airline which was established in 2002 and operated until 2007 when it became part of TUIfly. The airline used the slogan "Fliegen zum Taxipreis" (Fly for the cost of a taxi fare) and their aircraft were painted in an eye-catching livery inspired by the Yellow Cabs in New York. The kit is by DACO. Yellow paint is Humbrol 99 buffed up and coated with Klear and the light grey on the engines and lower fuselage is Xtracolor X371. Contrary to what most decal manufacturers say these areas were NOT white, a mistake commonly made in relation to KLM as well. The wings and tailplanes are painted with Halfords Racking Grey. Livery decals are a mixture of BOA, Drawdecal and Brasil decals. Detail decals came from the kit sheet and windows and landing lights are by Authentic Airliners. The build thread is here for anyone who is interested. Thanks for looking and as always constructive criticism is welcome Dave G14 points
-
Hi fellow modellers, This is my rendition of the beautifull Ki-43 Hayabusa "Oscar", flow by Capt. Shigeo Nango 2° Chutai / 59° Sentai in New Guinea, September 1943. This kit is very special, it was bought last christmas by my girlfriend together with a lovely hasegawa Hien from a collector who had both unopen since the 70s. So i gave it an extra care. The kit itself it was very clean and with soft panel lines wich most where rescribed and fully riveted, The cockpit was fully redone and added neumatic lines in the undercarriage. The markings where all self made, a mix of masking and self made decals. The hinomarus where white based with vallejo cold white and the red was a self made decal, and the red stripes where painted and the white stripes where white decal paper cutted very carefully. Hope you like it.14 points
-
My 1959 vintage Airfix Wellington is now complete. It was a bit of a struggle as one would expect with a moulding that dates from the year after I was born but the biggest let down was the behaviour of the much more modern after market decals. However, it's done and it's a bit different looking being in desert camouflage. The aircraft was operated by 424 Squadron Royal Canadian Air Force and was based in Tunisia. The logo on the nose says "The Terror of Axis Night Life". The crew counted each bombing missions with champagne glasses rather than bomb symbols.13 points
-
The Fairey UltraLight Helicopter was designed to meet an Air Ministry specification in 1954 for a small helicopter for battlefield and possible shipborne use and for training. Westland also produced a design that was never built. Six were ordered and five were apparently built, two were finished as private ventures after government support was withdrawn in 1956 and remarkably both survive in museums. These two machines had new cockpit shapes and one (G-APJJ) is the subject of the kit. The AMP kit is a short run multimedia kit with very small and delicate injection moulded parts, a fret of PE with some items in the insanely tiny category, a small decal sheet and a set of masks. The masks fit reasonably well, but did not like some of the curved surfaces. The instructions give two colour schemes, but the illustrations are a little vague in places with a couple of apparent mistakes. Overall it makes up into a nice model with only a couple of errors. The tailboom as moulded is at an angle relative to the 'fuselage' and it should be more horizontal (although that could be me). Th3 exhaust for the Nimbus engine also appears to be too small in diameter. the finished model is about two inches long excluding rotor and landing skids and is very delicate. The Work In Progress is here: this last picture shows the helicopter posed against a contemporary fighter of the period, in this case it is the Revell Hunter F.6 Thanks for looking and as the Sirius Cybernetic Corporation would say, 'share and enjoy' Martin 'I've just worked out that if I put my left arm in my right ear I can electrocute myself, permanently, - Marvin the Paranoid Android13 points
-
These little fellas are 1/6th scale, made from resin kits from Model Prisoners in the US. I modified them to have articulated legs and working headlights. I think if you click on the photo you should be able to see the other pictures in the same album.11 points
-
#11/2018 Another of my dad´s excursions to the modern world. Hasegawa kit, not one of their best, some fit issues, steps and gaps. Thanks to fellow Britmodeller Gundylunch for selling me the kit last year sadly the decals weren´t really usable anymore so they came from an Eagle Strike sheet. Decals for the canopy detonation cord are from a TwoBobs sheet. Seat is from Quickboost, Snakeeyes from a Hasegawa weapon set, the kit includes only drop tanks and Sidewinders. Camo done with Gunze H307 FS36320 and H337 FS35237. Build thread here DSC_0001 by Reinhard Spreitzhofer, auf Flickr DSC_0009 by Reinhard Spreitzhofer, auf Flickr DSC_0004 by Reinhard Spreitzhofer, auf Flickr DSC_0005 by Reinhard Spreitzhofer, auf Flickr DSC_0006 by Reinhard Spreitzhofer, auf Flickr DSC_0007 by Reinhard Spreitzhofer, auf Flickr DSC_0008 by Reinhard Spreitzhofer, auf Flickr DSC_0009 by Reinhard Spreitzhofer, auf Flickr DSC_0004 by Reinhard Spreitzhofer, auf Flickr DSC_0003 by Reinhard Spreitzhofer, auf Flickr DSC_0004 by Reinhard Spreitzhofer, auf Flickr DSC_0013 by Reinhard Spreitzhofer, auf Flickr DSC_0014 by Reinhard Spreitzhofer, auf Flickr DSC_0015 by Reinhard Spreitzhofer, auf Flickr DSC_0021 by Reinhard Spreitzhofer, auf Flickr DSC_0020 by Reinhard Spreitzhofer, auf Flickr DSC_0003 by Reinhard Spreitzhofer, auf Flickr DSC_0005 by Reinhard Spreitzhofer, auf Flickr DSC_0001 by Reinhard Spreitzhofer, auf Flickr11 points
-
Hi, this is an aircraft that I have always liked the look of and was pleased when Meng brought it out a few years ago. The kit is good and has a lot internal detail that will never be seen (it is there). The detail is good but it does make putting the fuselage halves together interesting and needing a lot of care. I think Meng could have made the canopy a bit easier as there are a lot of small pieces that have to be glued together. I have built it straight out of the box and it has a few mistakes that I would do differently - but I won’t dwell on them. It is complete now so here it is. Andrew.11 points
-
The only difference 2 torpedoes would make to the aircraft's handling is the weight - each weapon roughly equals 30-40 minutes of fuel. [That's assuming you aren't stupid enough to hang them off the rear carriers only - in which case you wouldn't get airborne because the centre of gravity would be out of limits; all that weight at the back would mean you'd run out of control authority. This was not always true - see later about why weight kept on being added in the back; this shows an HAS 1 jettisoning 4 Mk.44 torpedoes at the same time, as part of the acceptance into service trials. Note, incidentally, the totally different weapon carriers; the ones on my cab are Stingray carriers. However, we generally used to fly with a Stingray on one side and a Mk.11 Depth Charge on the other. You'd have to get lucky to do significant damage to a modern submarine with a Mk.11, but as a means of classifying a probable contact it is unrivalled; no submarine captain is going to take absolutely no action when one of those goes off a few yards from his hull... and when he changes speed or course, you know for sure he's a submarine and drop a Stingray on him. Hmmm. Hunter killer pairs. Long, rambling, discursive post coming up. [I've been meaning to do this for months]. Like all warfare disciplines, the history of ASW is a series of technology battles - better submarines sometimes have the upper hand, until better ASW technology overtakes them (or vice versa). Usually the key advances are in detection range vs weapon range. Until the very end of WW2 submarines were really submersibles. Their underwater range was limited, they couldn't go very fast on batteries, and made a LOT of noise (and were also pretty much blind) when snorting. But even then, it was a constantly evolving cycle of improving detection range and/or attack range - things like Hedgehog were systems for throwing depth charges ahead of a ship, for instance, so the frigate/corvette no longer had to risk driving straight over the top of a submarine in order to attack it. Similarly, WW2 aircraft gained the upper hand when centimetric radar was invented - they could now detect a snort mast on radar, and the Germans knew it - so even if all you achieved was to force the U-boat to dive and stay dived, then you'd done your job, since attacking a convoy required visual aiming (or even attacking on the surface, which was a favourite "wolf pack" tactic at night because of the additional speed available). Right at the end of the war the Germans came up with the Type XXI U-Boat, which was really the first proper submarine, in that it was designed from the outset to operate mostly submerged. They were a huge technological advance (batteries, streamlining [so less hull noise], sensors etc). and thus there were lots of teething problems... luckily for us. Only 4 were combat ready by the end of the war, of which only 2 actually went on patrol. Needless to say the victorious Allies all grabbed a few, and the 1950s UK Porpoise, US Tang and Soviet Romeo, Whisky & Zulu classes of diesel-electric boats were all heavily influenced by the Type XXI. [Only 1 survives; the West Germans raised a scuttled one in 1957 and re-commissioned her as Wilhelm Bauer, used as a research boat until 1982 - and now in a museum in Bremerhaven.] To deal with Type XXI-style boats, the ASW people focused on passive sonar; simply listening, as opposed to making a noise and listening for an echo. My father wasn't demobilised until early 1947, and he spent the last 18 months of his career developing sonobuoy tactics from RNAS Maydown in Northern Ireland, flying Barracudas. Where I started flying passive ASW almost 40 years later, the techniques were recognisably the same - but the technology was much better and the targets very different. So the Type-XXI was countered by better passive ASW (sonobuoys from aircraft); though the Type XXI was a massive advance on its predecessors, it was still pretty crude by modern standards. Notably, to get a useful speed meant running on diesels via a schnorkel ("snort") mast, which made a lot of underwater noise... which is where the sonobuoys came in. Yes, they were relatively quiet running on batteries and had much greater range than earlier boats (they could run for 48 hours without charging)... but they could still only do about 5 knots, which meant that outrunning them wasn't hard even for a convoy. 1950s & even 60s tactics were thus not changed much from the war; thoroughly sweep ahead of the convoy / ship (known as "de-lousing") to either force the boats to go deep or to move out of the way... because then they won't be able to get into position to attack without using diesels & thus making lots of noise, and if they make noise you find and sink them. I have done an exercise with an Egyptian Romeo class boat (essentially a wartime U-boat), and you could hear it clanking away from many, many miles away. Hunter killer pairs? The two main sensors to find & track these sorts of boat are a good radar and sonar - sonobuoys only for fixed-wing, and both sonobuoys and active sonar for rotary-wing. 1950s versions of these sensors were really heavy (valve technology etc) and/or big - so were airborne weapons - and early helicopters were not very powerful, to put it mildly. Even some fixed wing struggled with carrying everything - hence things like the immediate post-War Grumman AF2 Guardian; one carried the sensors (the AF2-S Hunter) and its twin (the AF2-W Killer) the weapons. The Gannet was at least big enough to carry both - requiring 2 gas turbines, 3 crew and a huge bomb bay. Back to helicopters, though - everyone (Russians too, though the rest of this doesn't discuss their ASW aircraft) was trying to work towards an "airborne frigate"; a fully autonomous single aircraft that could find, track, localise and attack a submarine without the need for a surface ship to be anywhere near (and thus vulnerable). But knowing what you wanted to build and actually building it are two very different things. The Whirlwind HAS7 was the first RN helicopter specifically designed for ASW, but it wasn't powerful enough to carry a sonar and a weapon at the same time, so used a similar hunter-killer pair concept to the Grumman Guardian. It wasn't simply a matter of power-to-weight, either; the Whirly was active sonar only (sonobuoys were strictly for fixed-wing at this stage). "Hot & high" conditions could make it very marginal maintaining a hover at all, but (assuming normal North Atlantic conditions) that was seldom the issue. The problem was that a helicopter sonar is a heavy lump on the end of a long thin wire, so the aircraft must be really stable in the hover - if not, the sonar isn't vertical and the maths of calculating ranges and bearings rapidly becomes impossible since the sensor is at a weird angle. Hovering visually over the sea with any degree of precision is really hard - and of course it is impossible by night, simply because the pilot can see absolutely nothing at all. So the Whirlwind was strictly day only, and very demanding on the pilot even then. The Whirly was a start, but a very long way from being an "airborne frigate". Next up, the Wessex. Gas turbine engines, so better power-to-weight; the Napier Gazelle of the HAS1 was over a quarter of a ton lighter than the Wright Cyclone of the S-58 on which the Wessex was based. Better still, the Wessex had a good Doppler system and a revolutionary (for its day) Automatic Flight Control System (AFCS) which meant that the aircraft could hover over the sea by itself. In the Wessex HAS 1 it was only simplex (which must have made the pilots very twitchy indeed), but by the HAS 3 it was duplex and pretty reliable - essentially the same system was used for the Seaking. Better yet, the HAS 3 had a radar - at last the dream of autonomous operations away from the ship get closer. But. Still under-powered. Still single engine (not great when night hovering, to be honest...). And in particular still poor endurance when carrying a 4-man crew, full sensors and weapons. It was because of this endurance issue that the RN developed HIFR (helicopter in-flight refuelling - pronounced "Haifa") - a Wessex could take fuel from a ship without a flight deck (or without forcing a flight-deck ship to alter course), and since they typically operated as part of an ASW "screen" (i.e. alongside frigates, still de-lousing ahead of a convoy and/or "high value unit"), this helped. But wait, we're well into the 60s now and submarine designs have not stood still. In particular, nuclear power has come along. This was a complete game-changer; snort masts because obsolete overnight, and a nuke boat could travel at remarkable speed underwater (even early boats could do 30kts+), with range / endurance limited only by the food etc needs of the crew. Suddenly, a Victor (for example) can use its speed to work itself into position, attack from any direction and then run away deep. It might not even have to stick a mast up at all, relying purely on its own passive sonar to work out an attack solution (though that is far from easy). Worse yet, submarine torpedo ranges have grown hugely; no longer do they have to come within a couple of thousand yards to the target to get a decent chance of success. Plus things like wake-homing torpedos (another German late-war idea that happily didn't quite make it to full maturity in time) mean that they can (in theory at least) fire a weapon in the general direction of a ship from a fair distance away and rely on the weapon to do most of the work. The odds have swung hugely in the submarine's favour; the ASW screen of active sonars looking for submarines is no longer anything like enough. The answer came from noise. Any vessel travelling fast makes propellor noise - modern prop design (water jets, shrouded props etc etc) can reduce submarine prop noise a lot, but not eliminate it entirely, and especially not at anything other than very low speed because a phenomenon called cavitation comes into play - the propellor blade generates bubbles at high speed, and the collapsing bubbles make noise (it's more complex than that, but that's the gist!). Not only that, but even a completely stationary nuclear boat makes noise, because the one thing you really can't do with a reactor is to turn off the cooling pumps. So passive sonar became the cutting edge - ever-more complex and sophisticated sonobuoys and acoustic analysis (to the point where individual hulls could be identified by their noise signature - e.g. Victor III Hull Number 1234 generates noise at such-and-such frequencies, so we know it's definitely him). The Wessex would have been useless as passive ASW helicopter, because of its range / endurance. Passive ASW became a serious cat-and-mouse game through the 70s & 80s, with quieter and quieter boats on the one hand and more & more sophisticated buoys and processing (computers, etc) on the other. But even tracking a "noisy" (it was all relative) boat wasn't easy - even once you have detected the thing, it takes quite a lot of time to refine the position sufficiently to attack it; no good if you have to nip off to get fuel in the middle. And, since the standard NATO war scenario was still basically convoys reinforcing Europe from the USA, with the RN & USN protecting them, it also helps hugely if you can work well away from the convoy - because otherwise noisy surface ships drown out the targets. Enter the Seaking. Two really good, reliable engines. Better radar - especially from the HAS5 onwards. Better AFCS. Better sonar. MAD (some HAS5s, and all HAS6s). Genuinely all-weather, day and night. Best of all, an endurance of 4 hours+, even carrying 4 crew, a full outfit of sonobuoys and a weapon or two. Originally designed in the active ASW screen era, it was the first ASW helicopter that really could operate as an airborne frigate; either completely autonomously, or controlling other units using its radar. [The way ASW works, whoever is in contact with the submarine runs the fight - which means that it was very common for a first tour Sub/Lt Observer aged, say, 23, to be telling 4 or 5 grizzled NATO Captains where to put their vessels and/or 3 or 4 other aircraft what to do. You need to be well trained to get that right.] So the HAS 1 & 2 were a quantum leap over the Wessex as 60s ASW helicopters - and though it arrived just as Soviet nukes made active ASW semi-obsolete (though conventional boats are still around to this day, so not completely), the Seaking was powerful and adaptable enough to embrace passive ASW as well. That's why I sometimes allude to the fact that the RN stuffed more and more equipment into the back of the aircraft (giving us centre of gravity problems and a weird hover attitude) - it was all passive ASW gear, especially in the HAS 5. I flew a couple of Mk 2s in early training, but I only ever operated the HAS 5 or 6; I was from the era of full-on Cold War Passive ASW. Our bread & butter was the so-called "Ripple 3"; 3 aircraft airborne all the time (2 on task, with 1 in transit to / from the scene of action) 100+ miles away from the carrier / convoy, sometimes for weeks at a time. I joined 820 NAS / Ark in late-86, and the first thing we did was a major NATO exercise escorting a convoy from Norfolk VA to Harstad in Northern Norway - we had 3 aircraft on task for over 3 weeks, non-stop. I shudder to think how many sonobuoys we "spat" in a 3000+ mile line across the Atlantic. [100+ miles away, by the way, because by then the Soviets had developed long-range missiles that they could fire from e.g. a Charlie class SSN, thus attacking the convoy without having to get all that close - targeting info coming from Russian aircraft, which was one of the original reasons for procuring the Sea Harrier]. It was tiring, but possible to keep it up almost indefinitely - we had 14 crews, and 9 aircraft, so even if you had, say, 4 cabs broken at any time (not uncommon!), there were enough to keep the Ripple going. You got into a rhythm: wake up; eat; brief an hour before take off; fly for 4 hours; debrief [& file your records if you'd come across any real Soviet boats]; go to bed... 6 hours later repeat... and repeat... and repeat... But if it's an airborne frigate, why do you need 2 on task? Because it gives you much more flexibility; for instance, one of the Soviet tactics was so-called "sprint & drift" - if it thought it had been detected (and if you flew too low they would hear you), the SSN would wind up to 30kts and shoot off 50 miles or so, and then suddenly go completely silent; slow right down and use natural salinity / temperature layers in the water to interfere with sonar. If you only had one aircraft, he would have to be incredibly unlucky for you to keep up with that - effectively his boat simply disappeared. But with two, provided you were worked up and in good practice, one of you could track the boat while it was fast (& noisy) and direct the other to fly ahead... and then swap. If they didn't know you were there, then over time it was possible to get a really accurate picture of where the boat was (all passively) - so one of you would run the plot, and use the other cab as the weapon carrier. Or, if in doubt, direct the other cab into a hover ahead of the target... ping... contact... weapon in the water within seconds before he has time to react. At its worst, this was soul-crushingly boring. Stooging around for 4 hours at 6000'+ (nosebleed territory for helicopters) at maximum endurance speed (c.65 kts), in the dark so on instruments, spitting sonobuoys and finding... diddly squat. But when you were in contact - which was often with the real thing (e.g. on that 3 weeks crossing the Atlantic, we detected and tracked around 10 Russian SSNs [probably not 10 separate hulls, but 4 different types, so deffo not the same bloke 10 times!], since they were just as interested in watching us practice as vice versa) - it was 3-dimensional chess; it could be really exciting. Sometimes the SSN drivers would get bored, or decide to test their own tactics (we never knew), so they'd give up trying to be sneaky-beaky and stay silent, and instead try shaking us off with speed, big sudden changes in course, decoys etc. Tracking a fast nuke, in daylight, with 2 aircraft using both passive and active techniques - very, very demanding, but enormous fun. I hope it goes without saying that I am 100% delighted that we never had to do it for real. If Debs were still here, she could fill you in on the Nimrod perspective on all this - they were an integral part of this stuff, and the RN & RAF worked together extremely closely (my regular Observer at this time, for instance, later spent 3 years on exchange doing the same stuff in a Nimrod). And between us we were very very good at it. [Don't be fooled by the banter and inter-Service rivalry; in reality each service knows full well that the other is good at what it does, and gives due respect. The banter is just banter]. Then the Gulf War, Al Qaeda and Afghanistan etc came along, and ASW went completely out of fashion. The Merlin is a great deal more capable than the Seaking (and my knowledge is now over 20 years out of date, so things will have moved on again, no doubt), but the skills are perishable and we didn't practice them very much in the early Noughties (not a criticism; the RN cannot possibly keep current at everything). So the boys and girls are now having to re-learn all this stuff once again, I understand; rippling from tankers etc is commonplace once more. We have even (at long last, shamefully late in my opinion) ordered a really capable modern Nimrod replacement in the P8. So, in answer to your question, @corsaircorp; hunter-killer pairs pre-Seaking yes, but once the Seaking came long, no. More soon Crisp11 points
-
Thanks Scimitar. I may have to look into that. Hopefully it will be better than the 4+ book for photo's. Well, not really much done over the last week or so. Travelling plus looking for a new car plus spending several hours at Walmart today waiting for them to put new tires on the car. Then today I got some more work done for the train build which I am trying to pick up again before it languishes for too long. Anyhoos, remember this? Well, it worked.... a bit too well if you ask me. The floorboards have since received another little dampness and this time sat under a flat surface. It appears to have worked though I forgot to take a photo this afternoon. The only other real work I have done on this Wessi is drill a couple of holes for the seat backs. It looks a fairly straightforward job but when you consider that you have to get the distance from the port sidewall correct plus get the whole thing looking straight - it was a bit more difficult than I anticipated, but it's done now. But I did get some work done on another Wessex... I took a daft turn and decided to start a kitbash with Italeri's two dismal offerings in 1/72. The 1/72 is going to be as much OUT OF THE FLIPPIN' BOX as I can make it - resisting all temptation to go those places I've gone before in my 1/48 version and in this current build. The intent being that this will be a contrast (sharp!) to my two larger scale builds and show up what a mess Italeri made of the 1/72 version. The main question is... should I continue and pollute this thread with the 1/72 ? or create another thread for it by itself?11 points
-
Hello All, I bought the Revell Lufthansa Airbus A320 kit about nine years ago, at a time when I would eagerly pick up any new release that came out. I think I bought two kits that day for the first (and only) time. But to be honest I'd lost interest in it years ago. It sat in the stash until September 2017 when I started the kit partway through a ship build that was flagging. Could I try something different? I hit on the idea of modelling the plane on take-off, with retracting wheels. That meant cutting into the plastic a bit. If it went wrong then so be it, although the thought of messing up any model kit is an uncomfortable thought. Considered dropping the flaps slightly but that looked like a step too far for me. Typically straightforward build with good decals as usual. Revell paints with Humbrol varnish. Happy enough with it. A bit of fun this morning, thanks to some rare blue skies. Okay, proof it is mounted on a clear stand. And an indoor image of it on the shelf. Thanks for viewing, Graeme10 points
-
This is Monogram's 1/48 UH-1C kit. Its a pretty descent representation of the Charlie model with 2.75 inch rockets and 40 mm "chunker" on the nose. It even comes with the fat, 540 rotors and wide cord tail. One mistake I see on a lot of UH-1 models is that many builders paint the laminations at the blade root the same color as the rotor mast. These laminations were covered with an epoxy type coating, then painted the color of the blade. Vietnam birds main rotors were painted either OD or black. Many UH-1Cs were converted to the Mike model and soldiered on in the National Guard until the late 80s. Crews generally loved them because they carried two door gunners which could cover their break off a target, thus protecting their rear. Hope you like my Plain Jane UH-1C typical of attack helicopter platoons in Vietnam, around 1970. Monogram even got the window shapes correct as you can see from my bird in the last photo. Handsome devil! (Need more helicopter models on Britmodeller.)9 points
-
Bristol Bulldog TM, Central Flying School, RAF Wittering 1934. Not really happy with this, but thought I'd post anyway for your amusement9 points
-
I got this kit at the time mainly because it was cheap, but it didn't take long after I started building it to realize it was an extremely nice and detailed little kit for 1/72. So I decided to do something a little special with the winter camo pattern. image uploading site free screen capture software8 points
-
Hello Britmodellers, This is a conversion of the single seat Heller with canopy and spine from Italeri Mirage 2000 (heavily reworked) an partly scratch decals and handpainted details. I couldn't get a F1B for 10 years, so i did it myself in the year 2000.... Cheers, Thomas7 points
-
Next step was to fit the nose cowls. The fit of the side panels was impressive but the gun cover required a bit of attention in that it fouled the moulded cover for the back of the instruments significantly. I had to thin both the cowl and chew off some plastic on the instrument cover before I could bring the cowl into place properly. A quick check of the engine cowl fit reveal some very minor tweaking to be done but it all looks like it will come together well. Thanks again for following along and for the feedback.7 points
-
I thought I’d make this my first post on Britmodeller since the garage appears in the background of so many of my other model photos. I had no plan or intention to create a diorama like this - it just evolved over the years. In the first instance I just wanted a floor and back wall to photograph 1/6th scale bikes against, but then I found some diecast Snap-on tool cabinets on Ebay which fitted well. After that I obviously needed a bench, shelves etc, so they were duly made - and all the other clutter was added as and when I saw something suitable. One of the things I like about it is that I can put toys of just about any other scale or subject in there and it works. Here's a selection of photos taken over the last few years.6 points
-
Terry - if you get the FlightPath (www.djparkins.com) conversion set, then you can convert pretty much any Hasegawa 1/48 Seaking into an RN version. The set isn’t cheap, but it is worth every penny. I originally acquired mine with a view to converting Hasegawa’s AEW2a boxing, but they then came out with the so-called “HAR5 Ark Royal” version, so I immediately bought a couple of those since some of the work is already done for you (e.g. radar). But any Hasegawa boxing will do - all that varies is the amount of work (e.g. how many windows etc you need to adapt). David produces a conversion kit for an AEW 2, HC 4 & HAS 6. The Portland German SAR training op is run by a friend of mine. They have 2 ex-RN cabs, including XV666 (“Damien”), a serious veteran; first flew as an HAS1 in June 1970, converted to HAS2 in 1978, was the final aircraft ever to launch from HMS Eagle as she was towed to the breakers, converted to HAS5 in 1985... worked as an SAR cab with 771 from June 1988 until retirement from the RN in April 2016 (so presumably adapted to the HU5 specialist SAR configuration at some stage - removing the sonar etc). Goodness knows how many hours there are on that airframe by now! 48 years and still going strong... Still belongs to the Navy, apparently, and leased to HeliOps - that will be something to do with airworthiness certification needs.6 points
-
Funny how time flies so here is an update. Getting the cockpit/engine assembly together really tried my patients, but won in the end. With all Wingnut kits there really is no need to glue it to the fuselage the fit is that good. The beauty of this kit is that most of this will still be visible when finished😀6 points
-
Hi everybody; not much to report today, mainly because the main wings assembly required a lot of tidying up, and it's still not finished. OK, the lovely spring weather, BBQ, walk on the hills and lawn mowing didn't help too ... Anyway: port wing glued, and as anticipated, it required more "persuasion" compared to starboard one to get this: Which leave us with this gap: This ridge Starboard side, another good gap which not only is a gap, but also bears an alignment problem This is going to be interesting to deal with, too the opposite side is slightly better I also inserted the internal wing framing that is going to be visible posing the ailerons/airbrakes in the open position. Some detail work is needed here, bit I'll do that when I finish fixing all the other wing issues I also glued in the back part of the main wheel bays I had to use a blob of blue tack each to hold them in place, before applying Tamiya Green Cap; as you can see, there's going to be quite some work to do to fair them in properly ... I already fixed most of the gaps and ridges, pics will follow when the task is completed (hopefully later in the week) Comments welcome, as ever Ciao6 points
-
Just finished nostalgic build of Matchbox's Tempest. Built as a MkII, I built a few of these when I was young, but all finished silver and using the Indian decals from the kit. I decided to ring the changes with this one so used some Xtradecals to represent an RAF machine based in India during 1946.6 points
-
Getting there - this will eventually be Station 3 (starboard aft). I have provided the near-universal measure of scale, namely a Swann-Morton blade. Those of you who have followed my builds for a while will not be even a little surprised to see that I have answered my own question about whether I should add the EMRU on the underside. Of course I have. 9 pieces of styrene (per carrier) later... There is still one more piece to add, namely the battery port cover - which is the horizontal frame on the bottom of the springs (in the foreground here)... When there is a Stingray loaded, (top marks to the FAA Museum for loading a Stingray TVT [Training Variant Torpedo] for illustration!) this frame holds in place (in flight) and then retains (when the torpedo is dropped) a box-shape, which covers the a hole on top of the weapon. Stingrays are powered by a high power (but short life - it only needs to run for a few minutes at most!) sea-water battery; when the torpedo hits the water the sea gets into the hole and powers it up, and it takes over from the relatively low power battery which has retained the targeting info passed to it just before it left the aircraft. You do not, of course, want water (rain, spray etc) to get into this hole (& thus power up the weapon) while it's still on the side of the helicopter... hence the spring-loaded horizontal thingumajig. Note that this shows Station 2 (the port forward weapon carrier), and the brackets are a totally different shape. [Of course they are; you're not making this easy, Westlands!] You can also see the electrical plug through the aircraft skin (at the top of the photo). @corsaircorp, lots of people haven't noticed the weapon carriers; aircraft at displays tend not to have them fitted (not because they are secret or anything, but because airshow crowds will find a way of breaking almost anything, so if you don't need it you don't take it with you!). Modellers tend to build SAR aircraft on the whole (better known because those are the ones the public see, and more interesting colour schemes), or HC4s (more publicity in Bosnia, Gulf, Afghan etc) - you rarely see a model of a standard RN Anti-Submarine aircraft, despite the fact that well over ¾ of the airframes ever built were in some version of this configuration: it was what the aircraft was designed for. This aircraft was the backbone of the Royal Navy's anti-submarine effort for almost 50 years, until it was superseded by the Merlin (which itself has now been in service for close to 20 years). No-one has produced a 1/48 kit of either type at any point (yes, there's an Airfix 1/48 Merlin, but you need to perform some pretty drastic surgery to turn it from a Junglie cab to a Pinger.). I asked the Airfix guys at Telford whether they had even considered producing an ASW version (as with the Seaking, there are far more ASW Merlins than troop carriers) - "there wouldn't be the demand to justify it", apparently. [Though of course you can buy kits of numerous Luftwaffe machines that never got beyond the drawing board, were never built, and would almost certainly have been death-traps if they had... - not, to be fair, produced by Airfix!] I was lucky enough to fly Seakings in both ASW and SAR rôles, so have an excuse to build an SAR aircraft later. I already have the kit! But this represents the Royal Navy's real workhorse throughout the 70s, 80s & 90s. We worked them seriously hard for almost 50 years, and they just kept going. [Indeed, the AEW aircraft - some of which started their life as HAS 2s (possibly even HAS 1s) - are still in service, though not for much longer] More soon Crisp6 points
-
Hello, Here are a few pictures of my F-86D Sabre Dog in Yugoslav Air Force livery. I hope you like it I used the Revell kit and Cutting Edge decals kit to represent 14105 from the Yugoslav Air Force. I also used white metal landing gears together with wheels and PE from Eduard. The parachute housing is scratch built (yes I bought the wrong Revell kit - the one without the housing ). This kit builds like a dream, excellent fit and in my opinion nicely detailed from the box, including the pilot figure. The Cutting Edge decals and Montex masks where excellent to work with. The original North American F-86D Sabre Dog was based at the Yugoslav Air Force Academy, VNC (Vazduhoplovno nasdavni centar) in Sombor during the early 70’s. The Runway in Sombor was destroyed by NATO forces in 1999, but I actually think the base itself is still in use. There is a debate whether the color on the nose is blue, black or something in between and as far as I know there are only b/w pictures of the actual plane so there you go... I went for the blue option choosing the same blue as in the air force insignia. I used Aclad II Chrome as base and made some slight panel variations to an air frame I have chosen to be overall quite clean (it looks like it is very well maintained on the pictures I have seen). The rest of the colors used are Gunze and Ammo, weathered with Ammo products. Thanks’ for looking! /Fred5 points
-
AIRFIX first released this model in 1968. I received one for my tenth birthday. I remember that one of the fuselage halves was warped but I managed to build it and had fun flying it on long-range patrols around the playing field in front of our house. About twenty five years later I decided to have another go with an original 1960s one that I had in my collection. Unlike my first one this one was moulded perfectly in a silver grey plastic. I scratchbuilt the pilot and navigators' cockpits and added detail to the rear gunners position. I hacksawed the canopy so I could pose it open or closed. I enabled the gunner's access hatch to open and close by the use of small brass pins. I sprayed the finished model with Halfords Acrylic Grey Primer and then Halfords Acrylic Aluminium. Everything else was brush painted with Humbrol enamels. I cannot remember if I used the AIRFIX decals but the aircraft depicted is a Polish Air Force example from the 1950s/1960s. The original 1968 box like the one I built. Those wonderful educational 1960s instructions that explained what everything was and where it went. As you can see the interior was quite sparse. Quite basic colour schemes ........ but three to choose from. Scratchbuilt gound equipment. Figures adapted from AIRFIX German figures. I hope you have enjoyed looking at my AIRFIX Ilyushin IL-28. cheers, adey5 points
-
Ian, my apologies for appearing to ignore your previous comment (an oversight on my part), for which I thank you. Thanks Mr T, I will give that a try. I am looking for some suitable space in my 'cave' to locate a fridge - one that will also hold plenty of more palatable things than CA! Thanks Mr Crisp! Yes, looks only a mother could love! For reasons that I am sure would give a psychiatrist a job for life, I am drawn to unusual subjects; to be fair, they don't come much more unusual than this. Anyways, some more modest progress today. One of the big challenges I have had with fitting the PE, is in interpreting the somewhat interleaved order of fitting of the original parts and the PE parts. Nowhere is this more evident than in the fitting of the engine, the cowl covers and, ultimately, the prop. The gap between expectation and actuality, already quite wide, widens to almost a cosmic abyss at this point - the original engine parts just are not up to it. The sprue gates on the inlet valves are bigger than the actual part which, as if to add insult to injury, is also malformed in a couple of places. In short, it's a bust! At this moment, however, the good God of modellers has seen fit to smile upon me, and quietly whispered in my ear that I have a potential replacement engine left over from my machinations with the AZModel Morane Saulnier 'G' last year. In a stunning piece of good planning, they very kindly include a 9-cylinder engine block as well as a 7-cylinder one, just in case the option to build the type 'H' (the sports version!) is taken up. A quick dry-fit of said spare engine told me all I wanted to know - good enough! The one problem with it was that the spigot was not long enough to protrude to the point where the propeller was meant to be located. However, I decided that I would pull the same trick here as I did with the MS 'G' - I would make a rotating engine block using the same brass rod/brass tube combo as then. This would allow me to cut the shaft to exactly the length I wanted, and also as a bonus the prop would (hopefully) turn! I drilled out the moulded prop shaft on the bulkhead piece, and fitted my own brass version: The bulkhead was then glued in place: As you can see I also fitted the first of the side cheek pieces, which also incorporate the cabane struts and the undercarriage struts. I still need to overlay the PE piece over the top, hopefully the original plastic will be pretty much hidden once it's covered with the PE. I then drilled out the spigot from the AZModel engine block, and fitted the brass rod through it: Finally, I fitted the second cheek piece, and made sure there was sufficient clearance for the engine to rotate: Quite pleased with that, if I am honest! Thanks as ever for looking in, and for your comments5 points
-
Hi, A few months ago I built three models of this Polish tening aircraft. All come with Deluxe Set from Arma Hobby. This kit includes two models, photo etched and resin parts. TS-11 Iskra 1413 TS-11 Iskra 1918 TS-11 Iskra 1716 All together Thanks for watching5 points
-
Hey Guys, I have here IBG Models new Panzer III. It's not everyday you walk into WH Smiths and see them selling models so I thought why not I'll try something different. Construction was simple enough and with it being 1/72 and no running gear construction, apart from gluing it to the hull. Detail was utterly superb though, puts some 1/35 kits to shame... Painted with humbrol enamels and finished with a light weathering as well as drybrushing. Really enjoyable kit to be fair, and I've got their panzer II on the bench now! Thanks for looking guys! Sam5 points
-
Boeing 737-4K5 D-AHLL of Hapag-Lloyd Express circa 2003. Daco Skyline kit painted with Humbrol, Xtracolor and Halfords paints. Mixed BOA, Drawdecal and Brasil livery decals. Detail decals from kit sheet. Windows and landing lights by Authentic Airliners. Daco photo-etch detail parts.5 points
-
Been busy with this one but haven't posted in a while. Bit of fettling to get the intakes sorted but they're on. White from a rattle can and two brush coats of Light Gull Grey which I think could be bit lighter... Esci_AV8A_Harrier_Wip_2 by Dermot Moriarty, on Flickr Glossed up.. Esci_AV8A_Harrier_Wip_3 by Dermot Moriarty, on Flickr And then started on the decals. These are the originals from the kit and behaved very nicely! Esci_AV8A_Harrier_Wip_4 by Dermot Moriarty, on Flickr More soon, thanks for looking. D5 points
-
Finished off the cockpit by highlighting details: throttle handle yellow, T-levers silver, oxygen tubing blue and the trim and radiator cables in steel. The trim wheels have partial wood rims and were painted accordingly. The floor was scuffed up with a silver pencil but it's not easily seen in these pics. Stuck some paper in the map holder as well. The breaker panel is a PE part supplied with the kit as is the small placard behind the throttle. The seat was also painted and I decided to have a go at making a back cushion out of Milliput. This pic was taken when the slab was still wet and before tweaking he details. The Milliput seat cushion was painted and drybrushed to represent scuffed leather and the kit PE seatbelts were then installed. Straps for the cushion are fashioned of painted Tamiya tape. One needs to decide early whether to pose the aircraft with the cowl removed or closed as the number of bits to install on the gun deck and engine depend on that decision. I've decided to close the cowl so painting and detailing of the gun deck are not an issue. The instrument panel is PE and supplied with the kit. The dials are on a separate sheet and are sandwiched between the flat plastic backing and the outer PE panel with the bezels. Various PE levers and T pulls have also been added and the instrument faces got dabs of white glue to represent the glass but this is not really visible in the pics. The other side with the halves glued together: Thanks for looking in! Bye for now. Andy5 points
-
Let's go with another build... As the war started it quickly become clear that British 2 pdr (40mm) tank gun is an obsolete weapon against German opponents. An arm race started with quickly development of 6 pdr gun (75mm) and then its upgraded version QF 77mm (the same gun with bored off caliber). But all these guns still lacked the punch to effectively counteract against increasing armor of German tanks. In 1942 British finished development of the excellent 17 pdr (76.2mm) anti-tank gun with powerful charge making it a deadly weapon against Panthers and Tigers. The problem was that it was a huge gun with enormous recoil. It was quite common that in its towed version gunners needed to pull it back to the position as it was digging into soft ground with its trail spades. Obviously army wanted this gun mounted on the tanks ASAP, but the problem was at the time there was not suitable vehicle. Several vehicles were selected as a 17 pdr carriers and design works resulting in Challenger, Firefly and Achilles tanks. By the way, Firefly nickname was given due to insane muzzle flash when firing with 17 pdr. One of the vehicles selected was obsolete at the time Valentine tank. Slow, under armed but still big enough to carry this gun. Well... That depends on the point of view. This photo shows Valentine tank along with the gun build for Archer model. Looking at this photo, one thing coming to the mind is saying... But that wasn't the case. As the Valentine was way to small to install the gun in the turret, engineers designed a casemate with gun pointing backward. Sound strange, isn't it? But taking into account that British years later created Monty Python, not surprising a lot . As the result Archer was a weird shaped vehicle driving apparently backwards, with crew of four with a driver risking his life if seated when firing. Although it may looked obsolete, that design had a lot of positive points. First of all it was born ambush tank - after firing it was able to quickly relocate as it was moving forward when retreating. Normal action required driver to be out of tank when firing and acting as a observer, but I have found information that it was possible to stay in the position but with body leaned opposite way gun breech. Model is a new Tamiya issue, as expected with perfect fit and smart engineering. I'm adding some photoetches from Eduard, not every part is replaced as in some cases it is pointless. My build is not following the manual as I decided to make it in modules: complete gun with a cradle, open fighting compartment and bottom of the hull. The main reason was I wanted to install most of the equipment to fill up the gaps and make nice underside of the fenders - as it will well visible. The model will represent vehicle from 3rd (Tamiya gives a 2nd here, but I believe it is a typo) Anti-Tank Regiment, 3rd Canadian Infantry Division in North-West Europe in early 1945 - what means mud, dirt and mud again. As I started it some time back here are some construction photos. Some holes to be filled, grove visible is an moulding artifact - on the other side is a running gear mounting point point. Driver's post with some Eduard's parts attached. Note lack of the dashboard as it will be installed later, after painting. Gun. Primed with grey Surfacer 1500. Note that Tamiya depicted gun breech as open, but handle position (left from a breech) upwards indicates it shall be closed - what I did with a small modification of the parts. The whole module will be installed after interior painting. Tamiya's engineering makes it easy - just press and click. Lower interior. Nothing special with some PE parts and sanded out holes. Upper interior. On the wall visible half of the crew seats folded - ther half will be attached after painting. These seats when used were attached to the nooks visible on the fenders tops. And finally all modules dry-fitted. What is clear that interior was extremely tight for the crew of four. On the photos, some parts are still missing like a light machine gun and Sten guns and of course front wall. But this will come after painting the interior. At this point, I will attach complete running gear too. For painting, I will use custom-made mix of SCC15 (5xXF-61 Dark Green, 2xXF-62 Olive Drab, 3xXF-3 Yellow). See you soon, Damian4 points
-
Here I present my latest, a Hawker Hurricane IIc by Airfix and was a therapeutic 'test' build on a spare kit from the stash. From the start it was going to be a 'wheels up' subject as I plan to put the occasional aircraft on the ceiling of the future 'Man Cave (Mk II)' and being an Airfix kit, it came with pilot! The kit was built OOB and was very a good build with little or no problems, which surprised me some what. Cockpi was a little basic but was enough when you're stuffing a figure in the pit. Fuselage halves were joined and wings added, no filler in sight. Undercarriage and wheels fitted with no problems, nice and flush. I've never been happy with disks as dynamic props, so I ditched the blades and made a solid spinner, looks miles better to me. Everything was primed, and here comes the test, and painted using Colourcoat enamel paints. Paints were thinned 50/50, applied at 15psi and were lovely. Finished off using the kits decals for L8957, 34 Sqn, RAF SEAC, India, 1943/1944. The 'fluffy' stuff is some synthetic stuffing to simulate clouds. Stuart4 points
-
I wasn't intending to do a WIP on this fairly quick build. But there's a couple of processes I want to try out (for the first time), and I thought I would document it, success or not. Here's the kit... And pretty plain and simple it is, too. I suspect the mould is fairly old although the panel lines are engraved. It was originally a military version I think, and the cabin seats are the lengthways benches that paratroopers would sit on. I have no interest in unseen internal details anyway. What you do get in the Box is THIS... THAT'S RIGHT! 6 civilian livery options. Swissair, Air France, Lufthansa, Classic Air, Alitalia, KLM Now, I'm new to this Civilian airline business, but it is growing on me for sure. Because I do love a good natural metal finish on an airframe, and I do it with sticky back aluminium foil. So the plan is this.... Gloss white rattle can on top of the fuselage, buffed up Ali tape on the rest, and get some practice in with those long decorative stripes along the window line. I'm fancying the Air France option for now - love the overall appearance and that fabulous winged seahorse logo, although I have to say the Lufthansa option comes a very close second. I ought to point out that the KLM option has gone already. I was well along building a Beech Model 18 Expeditor, the military version C45 with either USAF or Royal Navy décor, when I got the DC3 home I should say the Beech is in 1/48 scale, and the overall size is quite similar to the DC3 in 1/72. So I came up with "De Vliegende Hollander" KLM option. And a great deal of enjoyment was had doing it! I'll post this, and gradually get up to date with the build so far.👍4 points
-
Hi, Some time ago I showed two 1/24 projects Scratch Built 1937 Mercedes-Benz L 10000 Heavy Truck http://www.britmodeller.com/forums/index.php?/topic/234955774-scratch-built-1937-mercedes-benz-l-10000-heavy-truck/ Scratch Built 1951 Büssing 12000 U13 6x4 Underfloor Engine Truck http://www.britmodeller.com/forums/index.php?/topic/235018898-scratch-built-1951-büssing-12000-u13-6x4-underfloor-engine-truck/ Maybe there will be also some interest in my latest scratch built 1/24 German vintage truck that I finished about two years ago. In 1958 the German Transportation Department reduced the maximum dimensions and weights of brand new trucks. The official motivation was accelerating road traffic but the inofficial motivation was providing a competitive advantage to the state-owned railway company Deutsche Bundesbahn. At any rate all German truck manufacturers had to re-design their heavy trucks. Mercedes-Benz decided to offer the first German twin steer truck called LP 333. While twin steer trucks were a common sight f. e. in Britain or Italy German coevals found that this new Mercedes design looked so odd (to say the least) that it was nicknamed "Tausendfüssler" (= millipede). Despite its odd appearance it became a sales success, and though originally designed only for the domestic market it was also sold in many other European countries. Today the Tausendfüssler is very likely the best-known and most popular of all Mercedes vintage trucks. To my knowledge only four LP 333 have survived. Two of them, an early model (blue) and a late model (green), are displayed at the Mercedes Museum in Stuttgart. The original 1958 LP 333 looked like this: When I started my model I was aware that building this cab would be laborious and very difficult, because almost every surface was curved into all directions. Moreover the deeply recessed, angular windscreens would not make things easier. Furthermore all known previous attempts of other modelers showed no convincing results and even most manufacturers of ready-made models in smaller scales had obviously trouble making realistic replicas of the LP 333. Nevertheless ultimately everything became even more laborious than foreseen. Approximately 1300 hours for the complete model was more than any other of my previous projects required.4 points
-
Hot on the heels of my Tamiya Raiden, is my 1/48 Tojo from Arii. A simple kit that provided the opportunity to do a natural metal finish and painted markings. The kit decals were unusable, so masks and and some home made decals were the order of the day. It was a fun build. I love the bulky engine, forward angled wings and tiny tail coupled with bright markings on shiny aluminium paint.4 points
-
Time for a small update wheels and engine nacelles fitted. And flaps fitted in the down position.4 points
-
Thank you Craig. I was quite pleased with the aluminium effect. I was looking at how the actual metal tubing looks in photos and it's kind of flat - so I thought - if I just paint it on it's going to look too bright and shiny. I thought dry-brushing it might get closer to the flat look. In the end not much of it is going to be seen because of the way I am going to display it. I agree - a Mk.II would be great and I'm sure there are a few of us that could help them decide where to put any ejector pins! Thank you very much for your interest James. Hi Col. Thank you for your comments. Yes Airfix are doing themselves no favours with this standard of plastic and some poor mould design. It's a shame really because the actual kit is very good but these little bits just stop them being top of the pile. I have managed to get a bit more done over the weekend but there's not as much to show for it. First job was making sure the motor for the prop would fit. I had to file off parts of the insides of the radiator mounting blocks on each side. It took a while but I eventually got the motor to sit centrally and level. Then I had to drill out the pin which Airfix provide for fixing the prop in place but allowing it to spin. Once drilled out I glued it onto the motor: I painted up more of the insides - thinned Revell Anthracite first followed by dry-brushing of those areas which need to be aluminium with Revell's metallic Aluminium - I still need to paint the upper mid sections of the cockpit sides with Humbrol 78: There was some test fitting of the seat unit and spars on the lower wing section: I don't think I'm going to use the decal on the instrument panel so I painted it first with thinned Revell's Anthracite and then did some very light dry-brushing with Light grey: I also took a few more pictures of the cockpit assembly - just to prove I had painted it - since it won't be seen once the pilot and canopy are in place: I did also trim the seams off the pilot figure and assemble him. However, I did do a test fitting first, before adding the arms, where I discovered - of course - that Airfix hadn't designed him to fit this cockpit! Poor chap had to have one of his legs broken off and then re-assembled in such a way that he can operate the pedals! I then sat his torso in the seat and only then glued his arms in place - to make sure he could use the joy-stick and other controls! Unfortunately I forgot to take a photo. More next weekend. Comments and suggestions welcome. Kind regards, Stix4 points
-
Why is it the closer to the end you get, the more frustrating the build becomes? In the past 48 hours I think I have spent more time on repairing than building. The resin tail wheel snapped so after valiant attempts to use the resin, I went with a re shaped staple. I spent about an hour preparing, attaching, re attaching and when it finally looked the goods, I dropped the build as I was turning it over in the jig. Now I had the tail wheel, one of the main wheels, wheel cover, antenna mast to repair. Took a deep breath and start again. Once that was done peeled off the canopy masks and found a tide mark so out with the Pledge (Future) and a micro brush. Anyway here she sits: No antenna wire as although the profile shows one, the period photos of this and other unit aircraft do not so one less task. I left the aircraft in it’s gloss finish and flat coated the anti glare panel, prop and spinner, M10 launchers, wheels, drop tanks and inner gear doors just to add some variance. I am not sure if I should have made it all uniform but it is now getting to the point where I just want it finished. Regards,4 points
-
Have made some solid progress on this one. Wings complete along with some deepening of the vents and the addition of a couple of others to suit this time frame in it's RAAF career. Remaining tidy up done including a couple of coats of undercoat to identify any gap issues. I did have one where the clear part joins the fuselage which required some further sanding and profiling. The after market masks for these make short work of the canopy. Given the geography and elements these operated in I pre-shaded this one and then covered and infilled with an Intermediate Blue base coat followed by a mix of Intermediate Blue and EDSG to simulate the oxidized blueish hue these took on. Unfortunately the camera I use is not much chop and the actual color is much more grey than appears. Hope to get to the green later this week, weekend. Cheers, AGW..4 points
-
Lots of time and effort expended, building a new cockpit. I added a vestige of a throttle unit, plus an oxygen regulator and switch panel into the sides. The control stick is a bent pin, and the central unit is a piece of plastic tube. This will get some silver to represent the little window the pilot used to check the nose wheel had deployed properly. I've added the coaming in the cockpit to cover the instrument panel: the kit version stops at the slot which is far too far forward. The instrument panel itself is plastic card with stretched sprue bezels. This will get slipped under the coaming before adding the seat. And speaking of the seat, I scratched this up. He He 162 was one of the first service aircraft fitted with an ejector seat, to allow safe escape past the engine air intake. Apparently it was effective, but a number of pilots lost their lives because the seat functioned but the canopy release failed. The seat is plastic card, with cushions made from cardboard (soft edges!), coffee jar foil belts and handguards/footrests from steel rod. I'll cram this lot into the hole then it's onto the undercarriage bay!4 points
-
Self explanatory update! It is not a missing piece of decal at the bottom trailing edge of the fin, there is actually a little triangular white flash there.4 points
-
So Dears ! The beast is now closed... And the cosmodog has received some painting... Now wings and wheels ! And paints !! Sincerely. CC4 points
-
My second entry in this group build will be the Micro Mir 1/144 Argosy. I have the Spitfire Vb, Super Etendard and Mi-10 to finish so this will take a back seat at first, but should get properly into it soon. Not yet decided which markings I'll use but the front runner is a 115 Sqn Argosy E.1. Box shot: I've made a start. It looks like a nice little kit, but it's short run, there's a bit of flash, and the sprue remind me a lot of Amodel kits - are Micro Mir and Amodel related? You get fine surface detail, an interior, vinyl masks, a PE fret and a decal sheet with 5 marking options (don't have it in front of me but from memory they include C.1's in the light stone/dark earth and light aircraft grey/white schemes, a T.2 in the LAG/red/white scheme, the A&AEE Argosy, and an E.1). Started with the windows. Another feature that reminds me of an Amodel kit - individual window pieces (the carpet monster's evil eyes light up at the mere mention of these tiny individual window pieces) which are too big for the apertures they go in. So each hole has to be opened up a bit to get the window in. I've done 6 so far, 13 to go!3 points
-
Thanks for looking. Mark [uDSCN3053 (2) by mwsfly9, on Flickr rl=https://flic.kr/p/FRZEZk]DSCN3045 (2)[/url] by mwsfly9, on Flickr https://farm1.staticflickr.com/815/40992796822_a7bdf6a87b_b.jpg]DSCN3054 (2) by mwsfly9, on Flickr jpg[/img][/url]DSCN3046 (2) by mwsfly9, on Flickr DSCN3047 (2) by mwsfly9, on Flickr https://farm1.staticflickr.com/800/41034382271_017c03d829_b.jpg]DSCN3052 (2) by mwsfly9, on Flickr 04_44fcf2fd63_b.jpg[/img][/url]DSCN3048 (2) by mwsfly9, on Flickr https://farm1.staticflickr.com/817/40992758202_007ef15367_b.jpg]DSCN3051 (2) by mwsfly9, on Flickr mg][/url]DSCN3049 (2) by DSCN3055 (2) by mwsfly9, on Flickr com/photos/90631911@N03/]mwsfly9[/url], on Flickr DSCN3050 (2) by mwsfly9, on Flickr3 points
-
Finally got round to finishing and photographing the beautiful Airfix 1/72 Stuka. The first in my intended ‘Battle of Britain’ mini collection Thanks for looking in... Guy ps Me109E next, and a Spitfire Mk1 on the bench...3 points


.thumb.jpg.eca0c14e328767d0864cd6db01ca9ccf.jpg)


.thumb.jpg.0bac681e0da8e4ed7557610e98fda908.jpg)


This leaderboard is set to London/GMT+01:00